Wavy hair has a natural texture that works beautifully for half-up styles — it holds shape without needing tons of product or tools, and the loose waves create movement and depth that make even a simple hairstyle look intentional and polished. But if you’ve got shoulder-length or medium-length waves, you know that finding hairstyles that actually work with your texture (instead of fighting against it) is the real challenge. Half-up styles are your secret weapon because they combine the best of both worlds: they pull hair back from your face and look put-together, while the waves flowing down the back keep that relaxed, undone vibe that makes wavy hair so effortlessly beautiful.
The thing about medium wavy hair is that it sits in a sweet spot for half-ups. Your hair has enough length to work with for styling, enough weight to hold a style without constant touch-ups, and enough texture that you don’t need to rely on tight braids or sleek finishes to look polished. Whether you’re looking for something you can do in five minutes on a weekday morning or a styled look for a special occasion, these 13 medium half-up styles will give you the exact inspiration and technique you need to make your waves work harder for you.
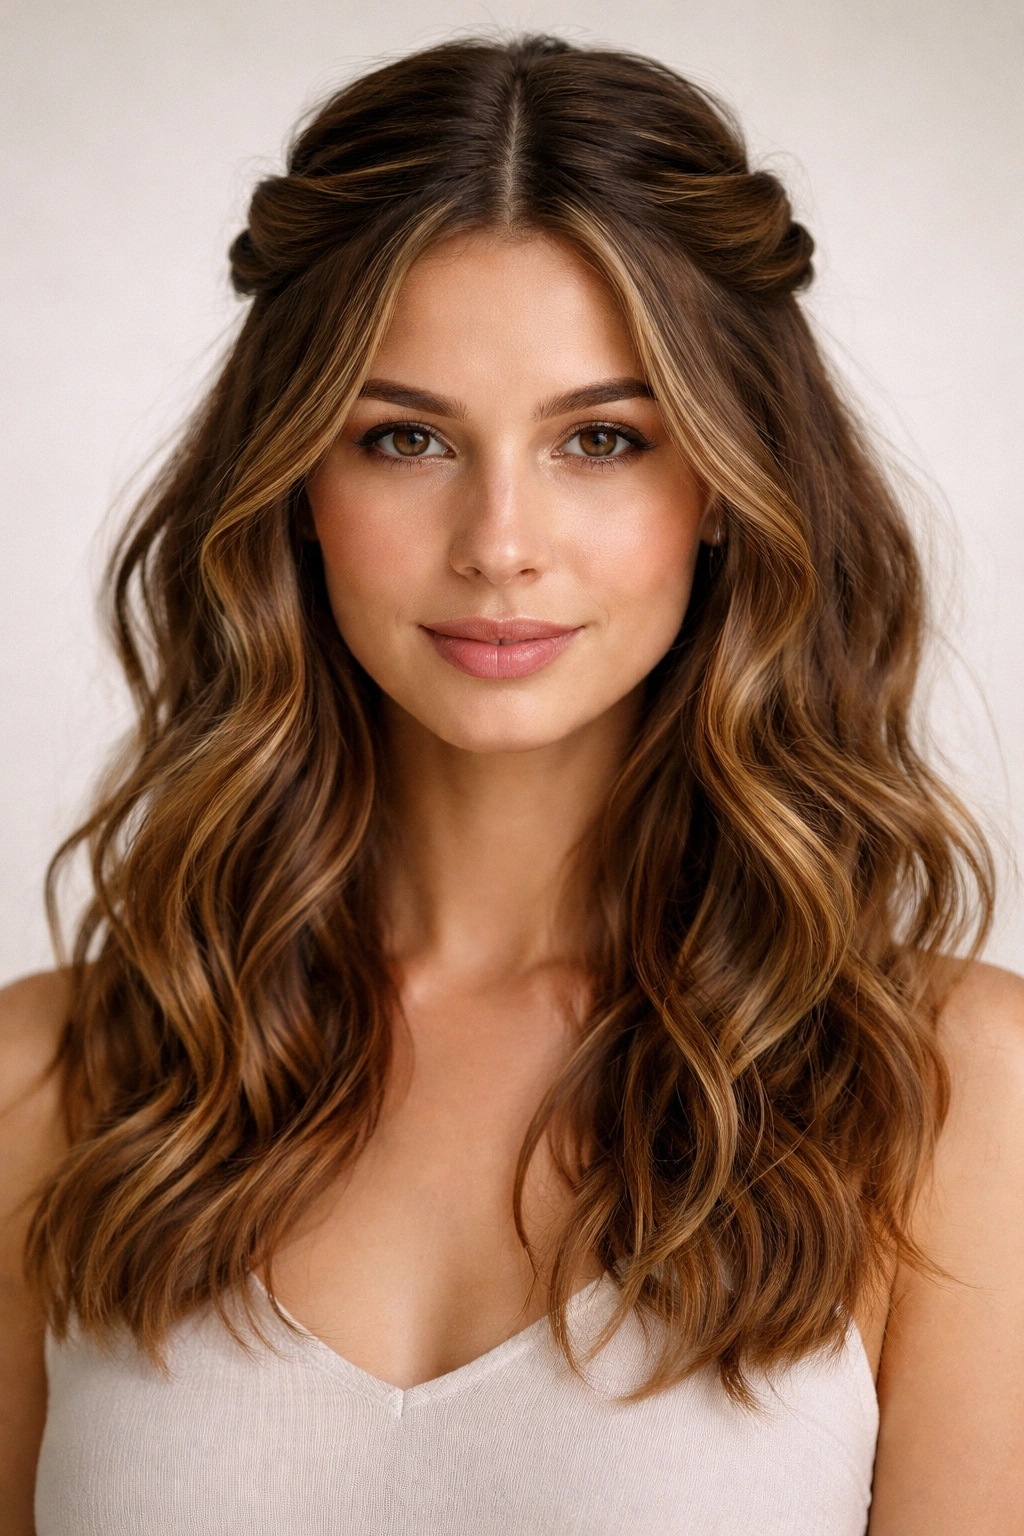
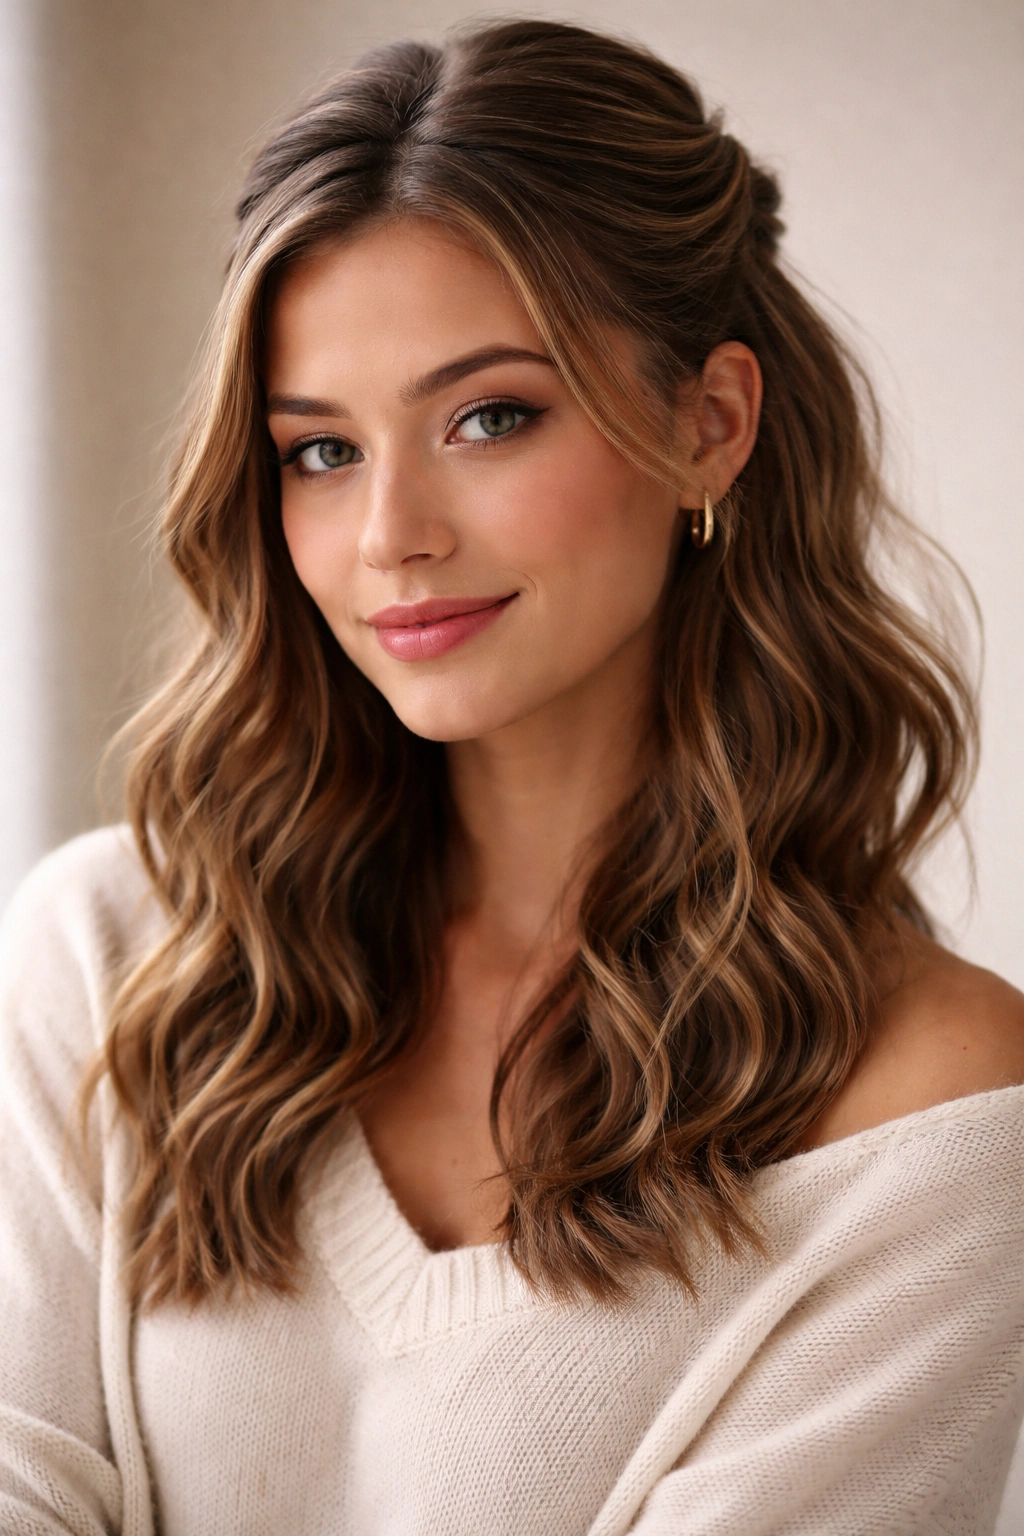
1. The Twisted Crown Half-Up
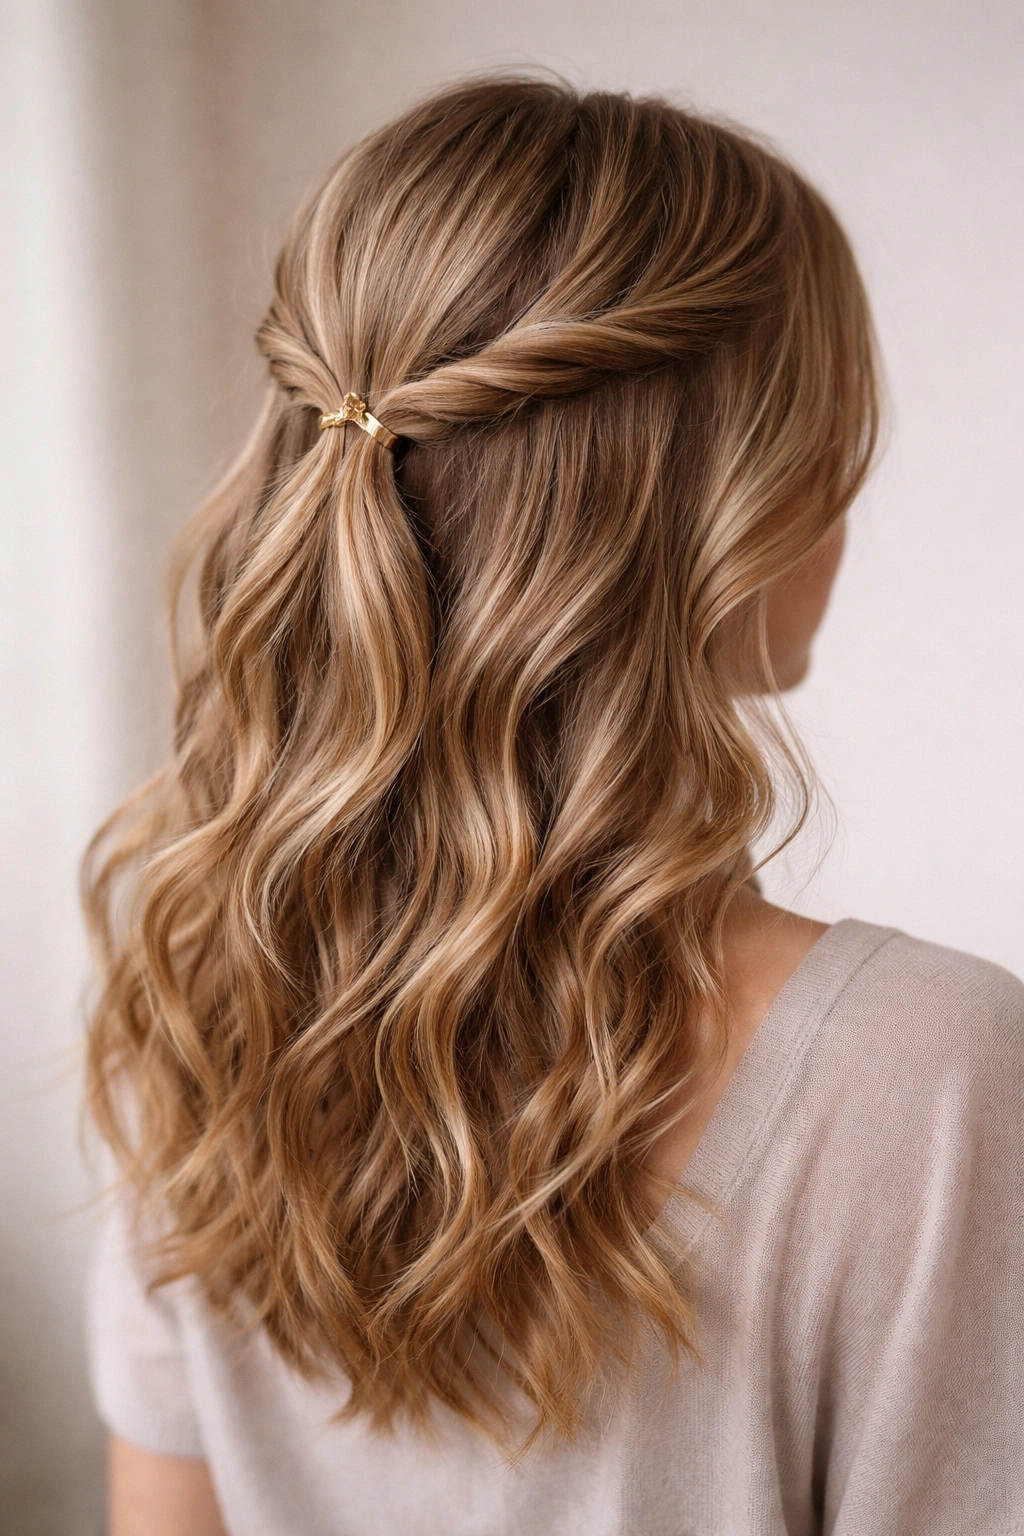
This is the half-up that feels elegant without trying too hard — two simple twists that wrap around the back of your head and meet at a clip, leaving your wavy ends loose and flowing. What makes this style work so well for wavy hair is that the twists actually showcase the natural texture of your waves instead of fighting against it. The definition in each twist creates visual interest, while the loose waves underneath keep the whole look soft and approachable.
How to Perfect the Twisted Crown
Start with hair that’s been air-dried or lightly wave-sprayed. Take a section from one side of your head at about ear level — you want it thick enough to create a noticeable twist but not so thick that it overwhelms the style. Twist that section loosely backward and slightly upward, letting the twist sit at about the back of your crown. Do the same from the opposite side, twisting in the same direction so both twists are traveling the same way around your head. Where the twists meet at the back, use a small clear or metallic clip to hold them together — this keeps the focus on your waves rather than the hardware.
Pro Details to Keep in Mind
- Looseness is key — a tight twist can look severe and won’t flatter the natural softness of wavy texture
- You can gently pull at the twisted sections after clipping to create a slightly fuller, more textured look
- If your waves are fresh and slippery, a light mist of dry shampoo on the roots before twisting will give the twist better grip
- This style works best when you have some natural texture or waves already present — it’s not something you need to curl, blow-dry, or heavily style to work
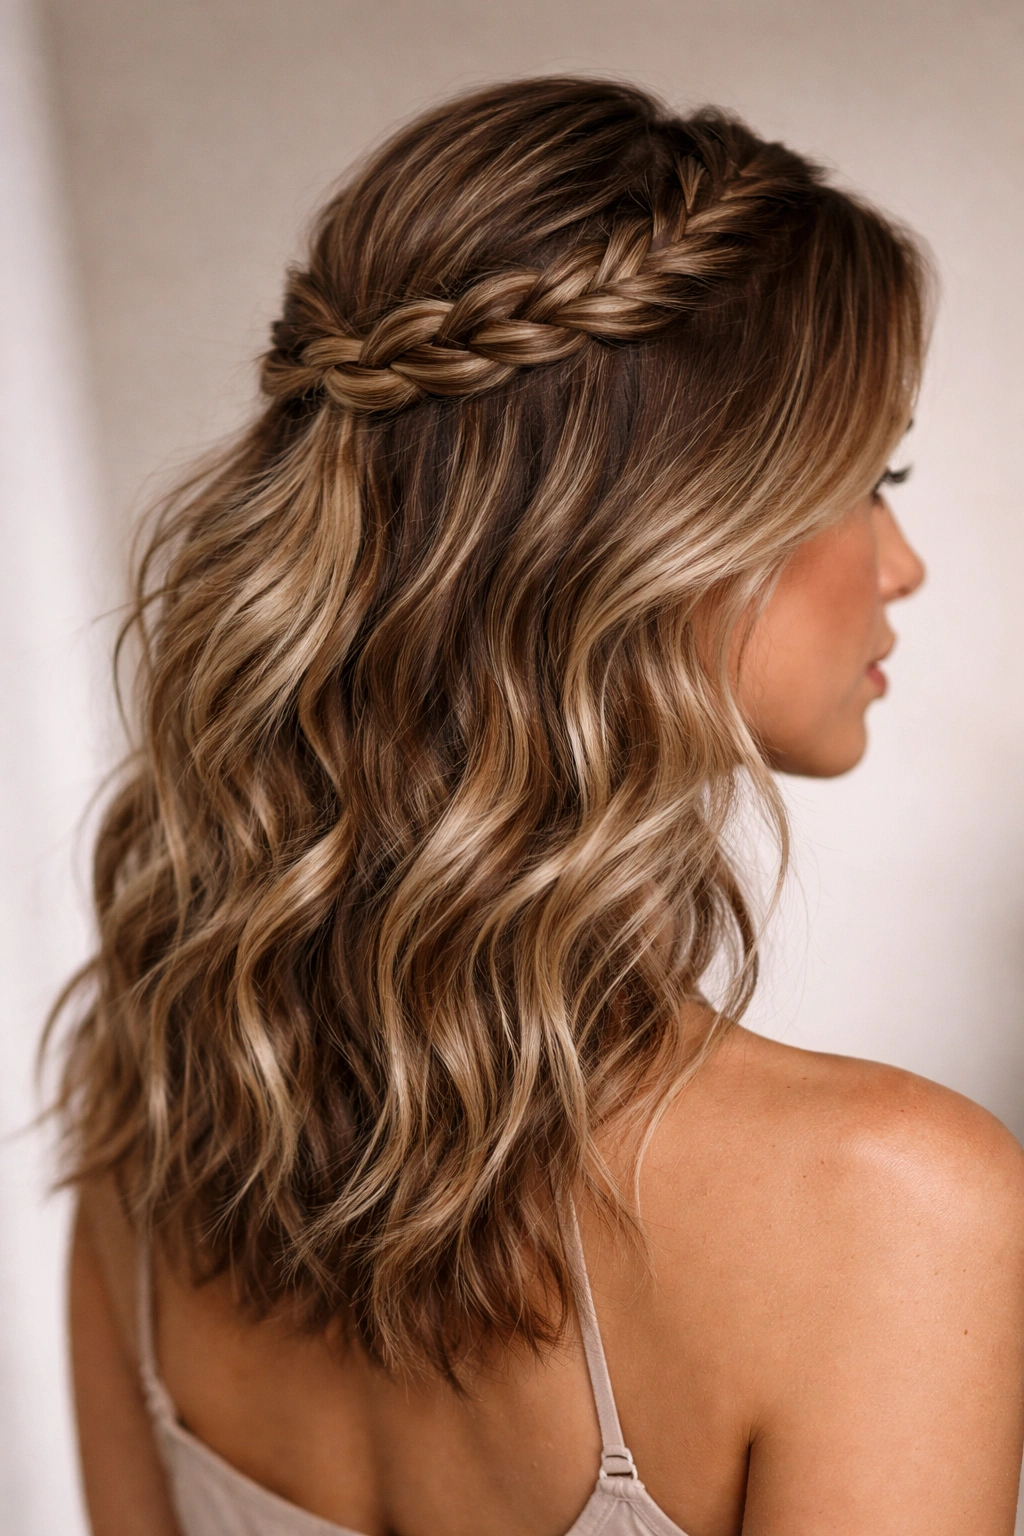
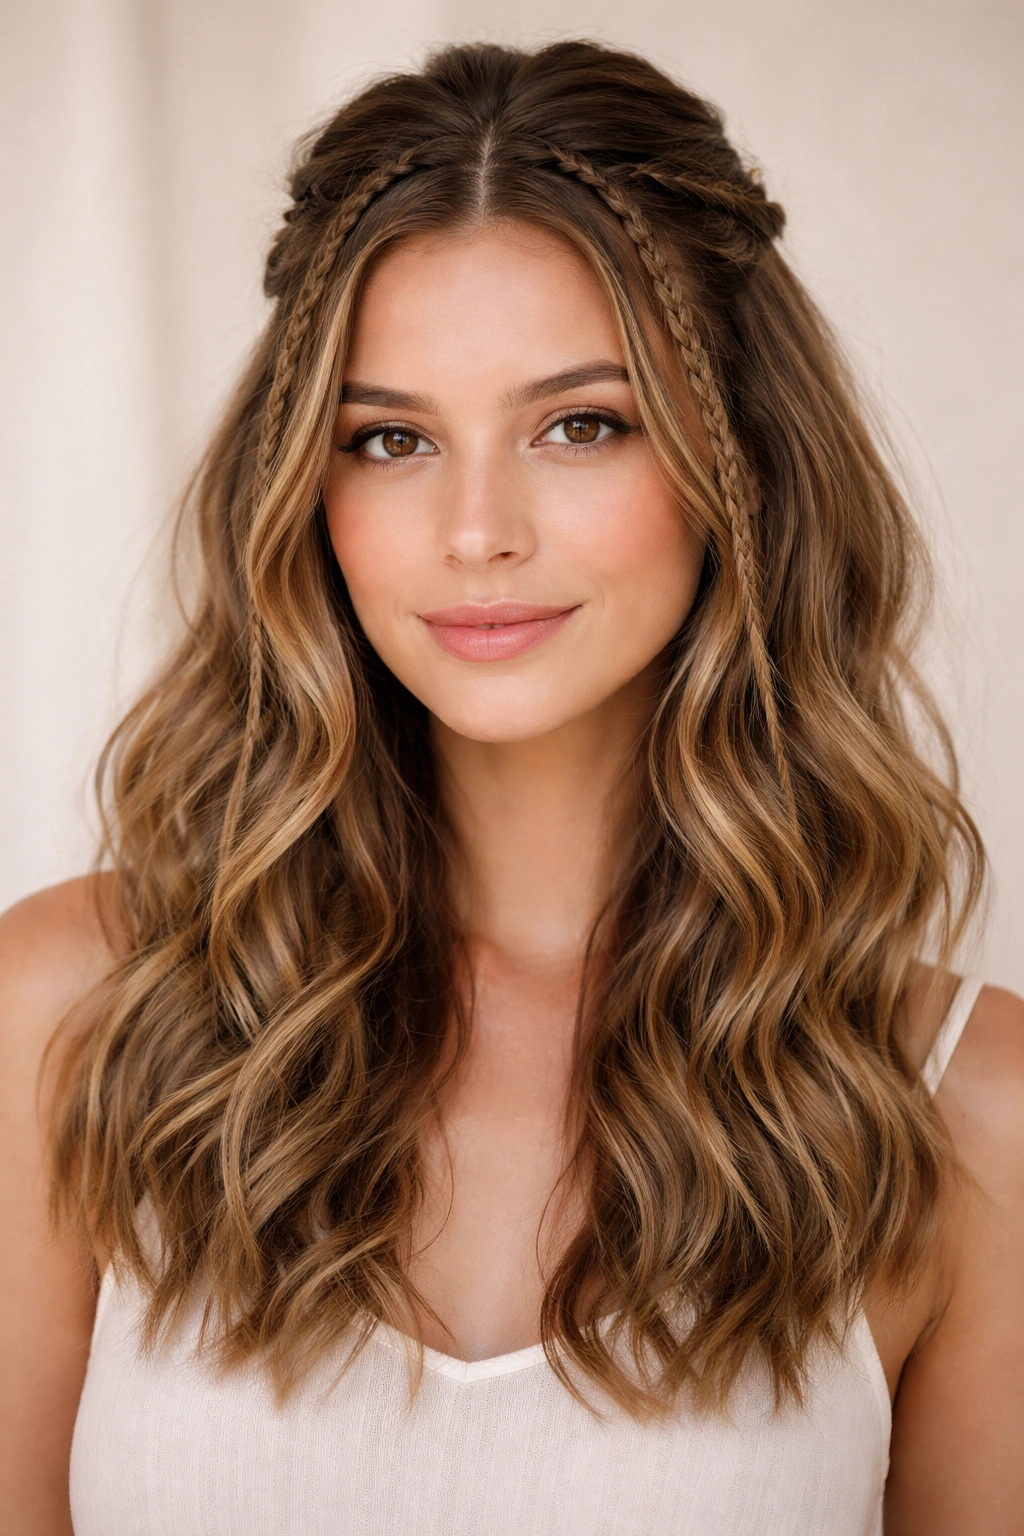
2. The Textured Braid Half-Up with Face-Framing Pieces
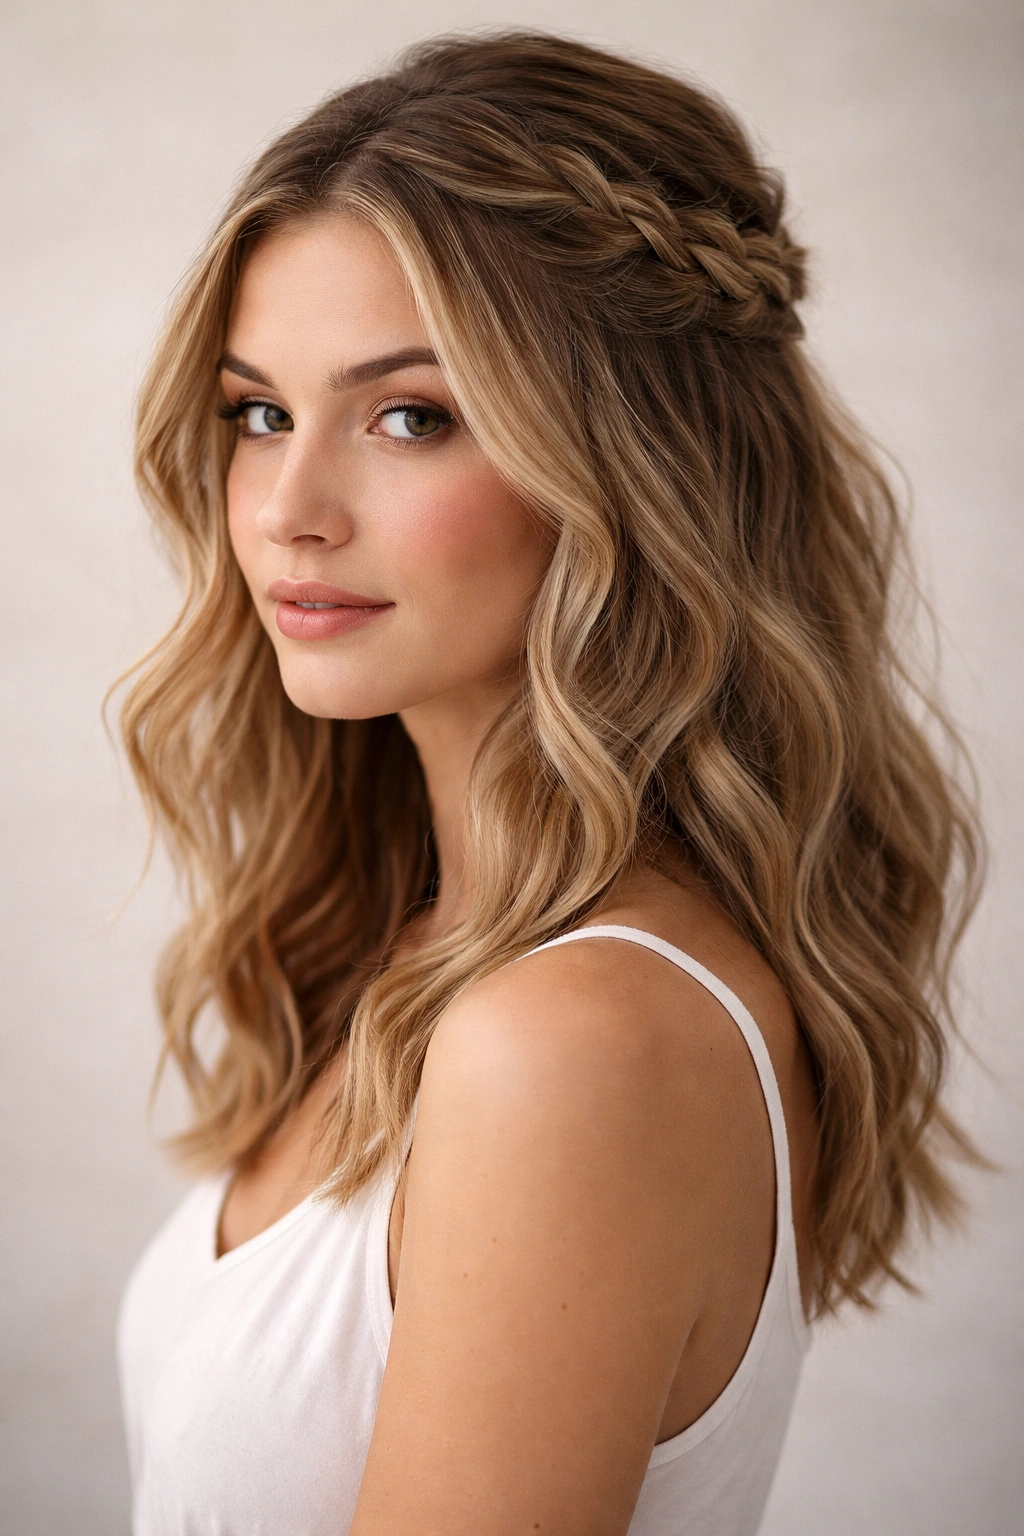
Braids and wavy hair are a naturally beautiful pairing because the waves create dimension and interest within the braid itself, making it look intentionally textured rather than perfectly polished. A single textured braid pulled to the back of your head with a few face-framing waves left loose is classic half-up dressing that reads as either casual or dressy depending on what you’re wearing.
Building the Textured Braid
Part your hair down the middle or slightly off-center, and use a fine-tooth comb to gently smooth the top section that you’ll be braiding — not so smooth that you eliminate your waves, but smooth enough that the braid has a clear defined shape. Pull this section back into a three-strand braid starting from the crown, and as you braid, you’ll naturally incorporate some of your natural wave texture into each strand. The braid won’t be geometric and perfect, and that’s exactly what you want — the imperfection is what makes it look sophisticated on wavy hair. Pin the bottom of the braid in the back with bobby pins that match your hair color, and then gently pull at the edges of the braid to loosen it slightly and create more volume and texture.
Styling Notes for Maximum Impact
- Leave at least 2-3 inches of face-framing waves on each side — these pieces soften the braid and keep the look from feeling too pulled-back
- A light hair oil or smoothing serum on the face-framing pieces makes them look intentional and not like flyaways
- Braid while your hair is still slightly damp or has been freshly wave-sprayed — this gives the braid more grip and definition as it dries
- This style can go from weekend-casual (messy braid, tousled waves) to event-ready (slightly sleeker braid, defined waves) depending on how much texture you encourage
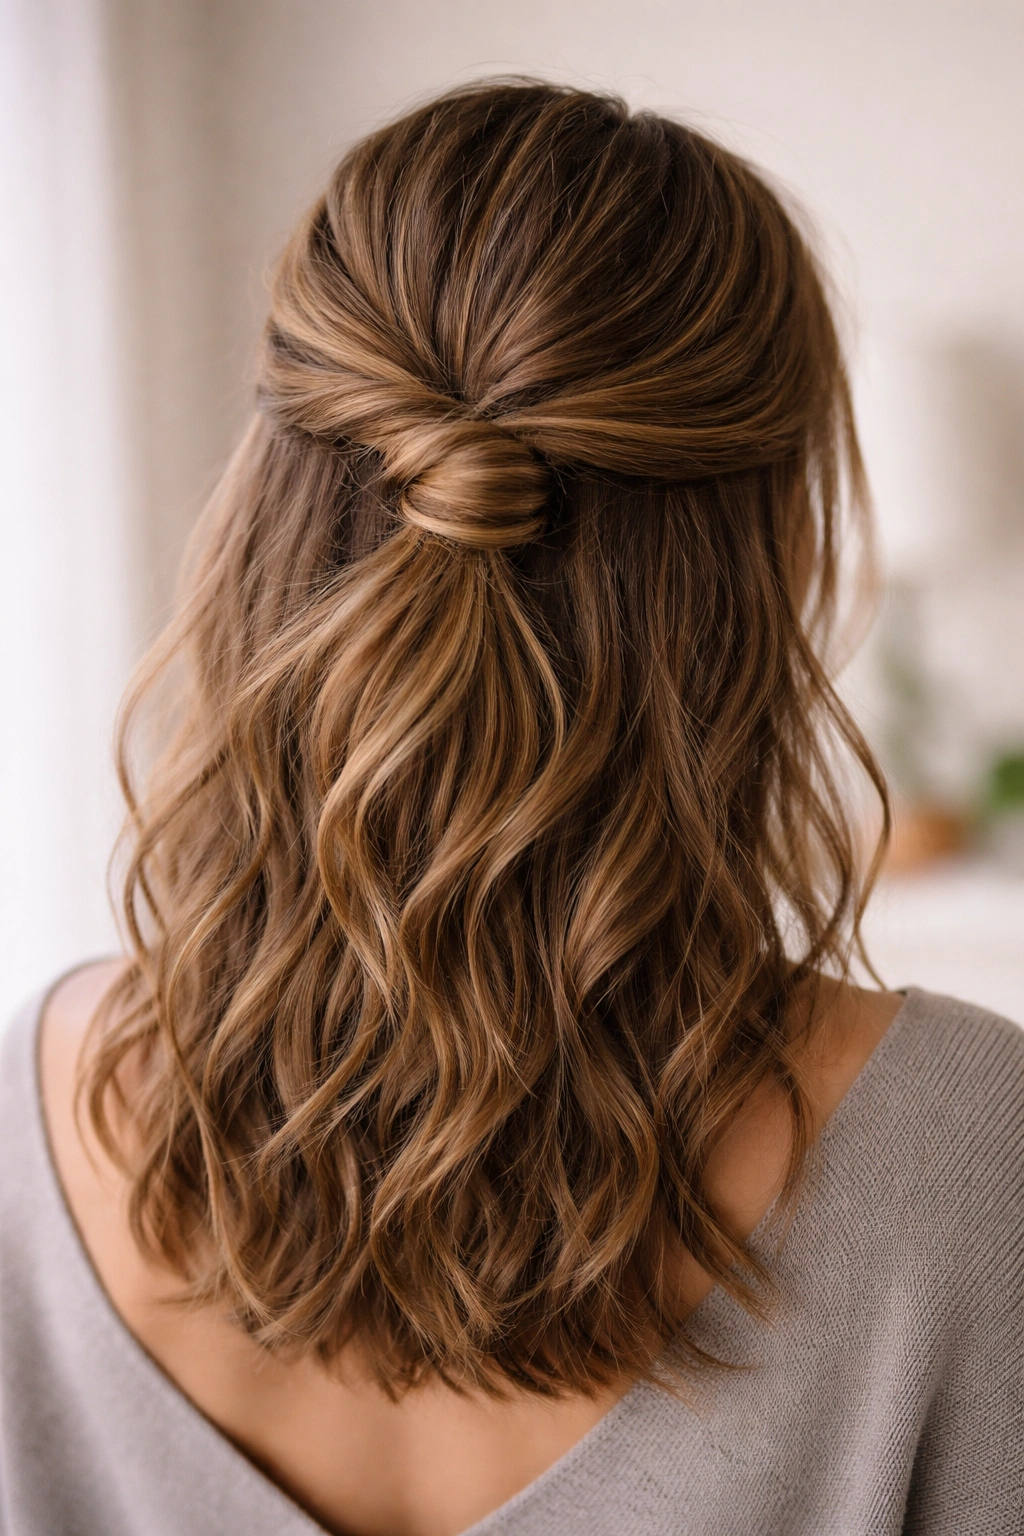
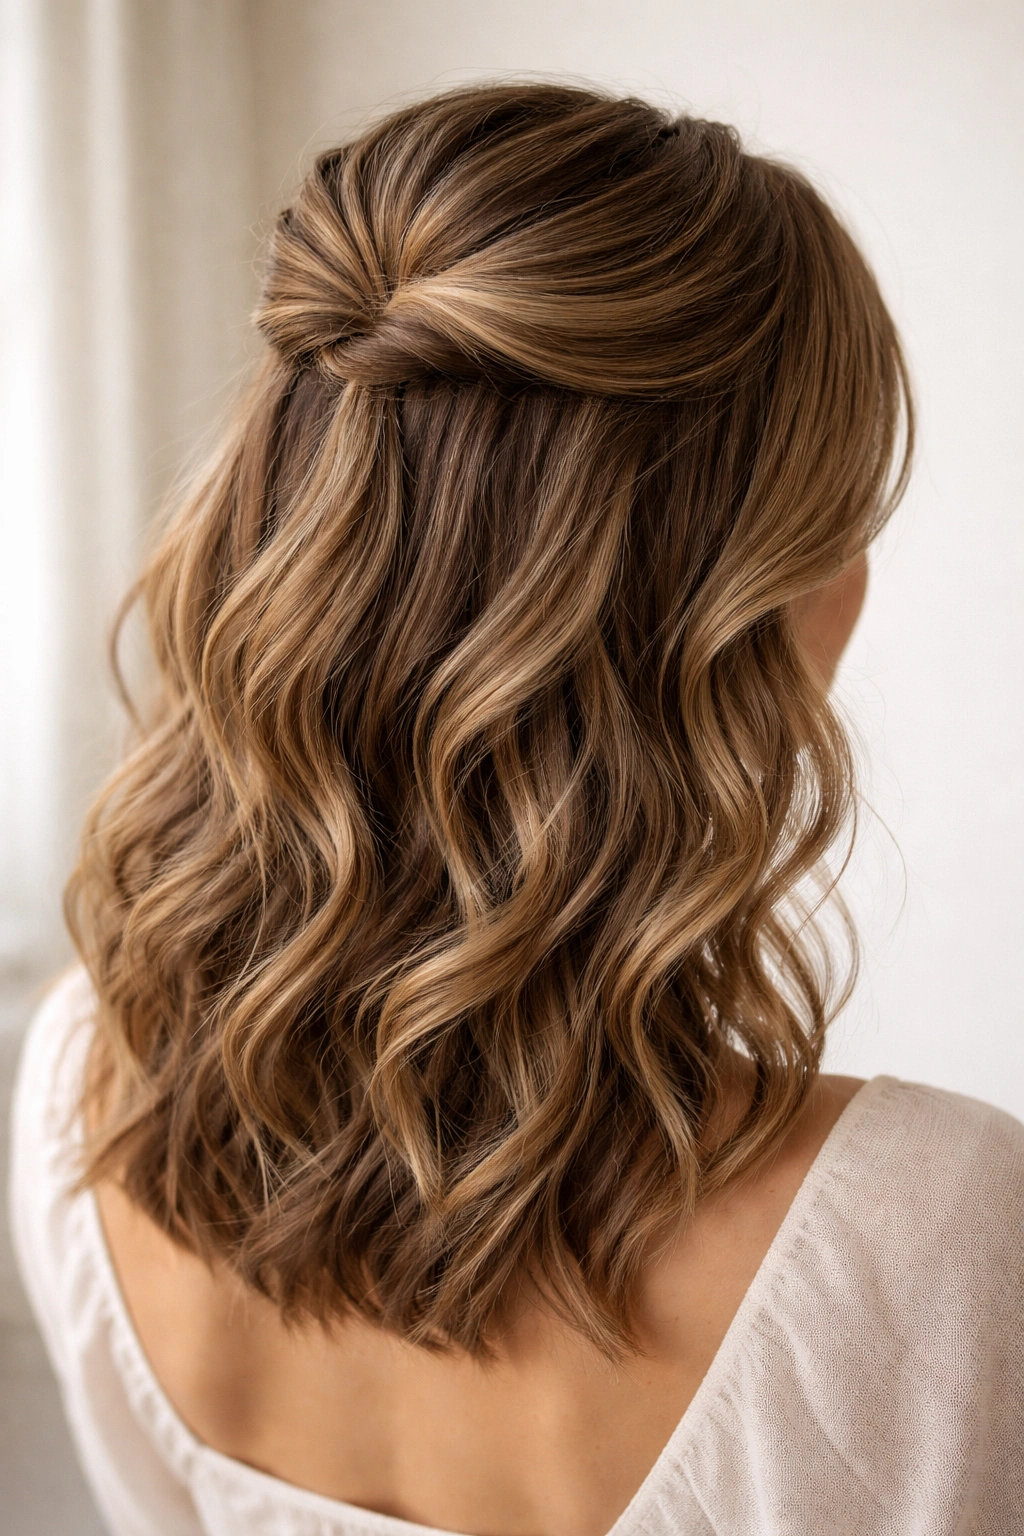
3. The Half-Up Knot with Loose Waves
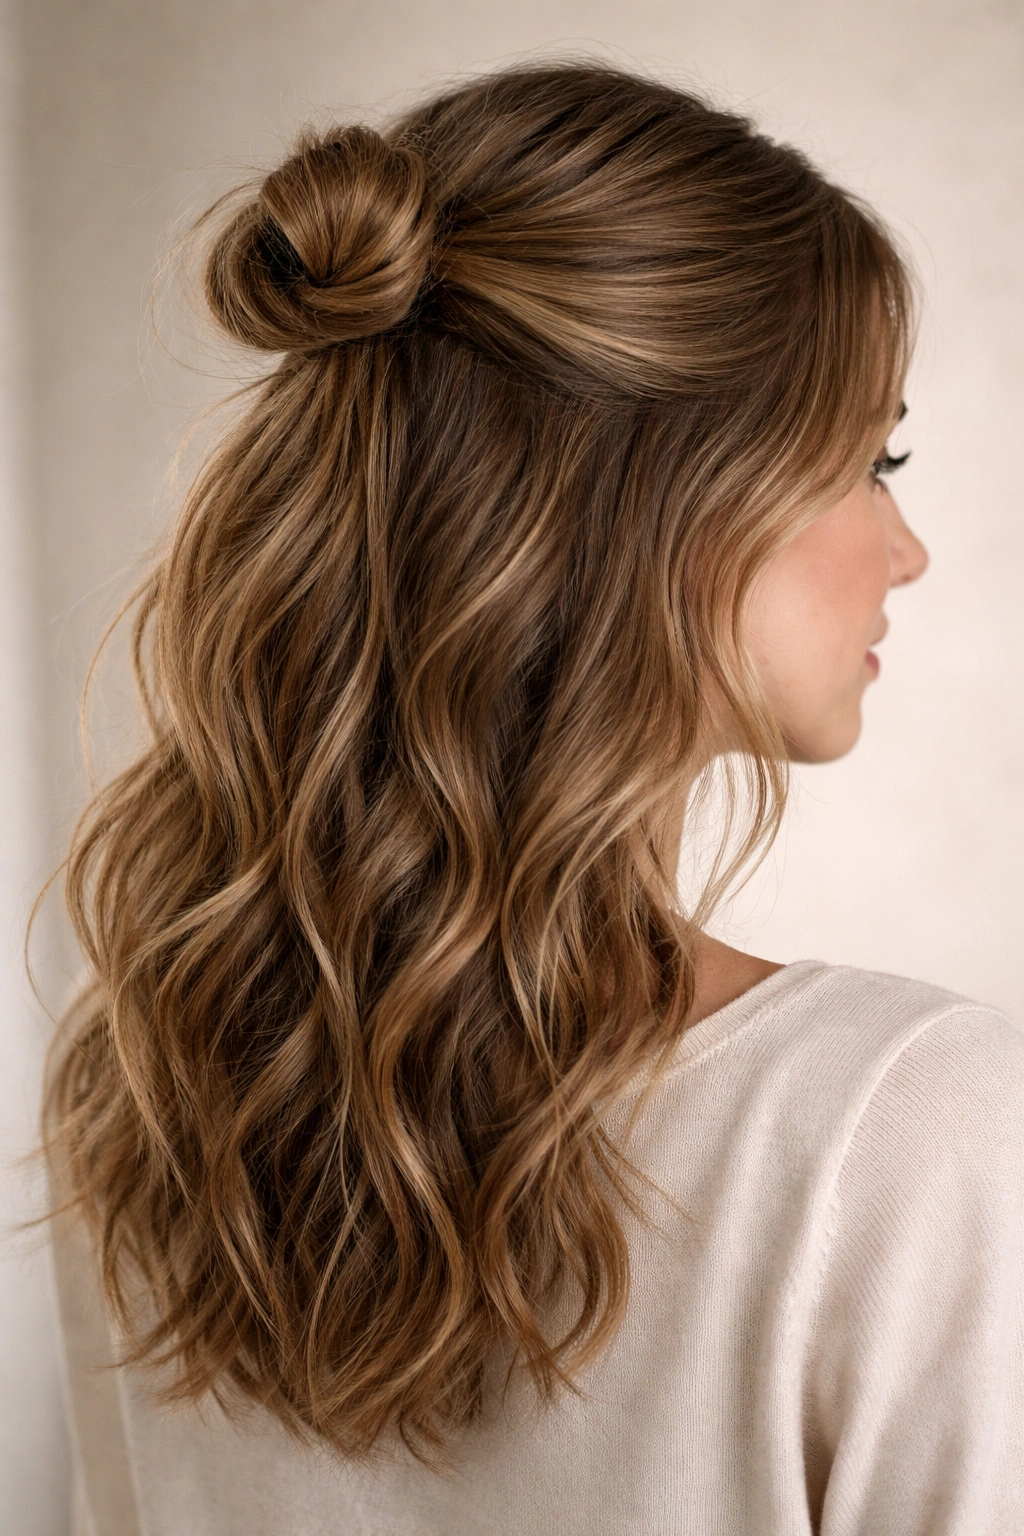
Instead of a traditional clip or band, this style uses a simple knot — literally tying the top section of your hair into a loose knot that sits at the crown, then securing it with bobby pins. It’s architectural and modern while still feeling effortless, especially with the contrast of loose, relaxed waves flowing underneath.
Creating the Half-Up Knot
Take the top section of your hair from about ear level up to the crown, divide it into two sections, and tie them into a single simple knot at the crown. This isn’t a tight knot — you want it loose and soft so it looks more organic with your wave texture. After you tie the knot, use two or three bobby pins angled horizontally through the knot to secure it in place. Gently pull and adjust the knot so it sits just right and has a relaxed, intentional look rather than a perfectly neat appearance.
Why Wavy Hair Works Best Here
- The natural texture of your waves creates softness around the knot so it never looks harsh
- The knot itself becomes a design element that showcases your hair texture instead of hiding it
- This style works on second-day hair beautifully — in fact, slightly older waves often create more definition and hold the knot better
- You can make this look minimal and everyday or slightly dressier by adjusting how tightly you tie the knot and how much texture you encourage in your loose waves
4. The Sleek Half-Up with Soft Wave Contrast
For days when you want that put-together, polished feeling but you’re not ready to fully abandon your waves, this is the style. The top half is smoothed back into a sleek, controlled half-up (usually using a pomade or smoothing cream), while the bottom half stays completely wavy and textured. The contrast between the two textures is what makes this so visually striking.
Getting the Sleek-to-Textured Transition Right
Start by applying a smoothing pomade or cream to damp hair. Using a fine-tooth comb, smooth the top section of your hair — from the crown down to about ear level — back and into a low ponytail or clip positioned just slightly above your natural ponytail point. The key is to smooth this section enough that it looks intentional and polished, but not so much that you eliminate all texture (even sleek sections should have a little dimension). Secure with a clip, and let the bottom half of your hair dry completely wavy and textured, with zero smoothing product applied to it.
Making the Contrast Pop
- The sleek section should occupy roughly the top third of your head, with waves taking up the remaining two-thirds
- Use a lightweight smoothing product on the top section only — anything too heavy will weigh down the waves below
- This style is perfect for thicker hair or hair with particularly active waves, because the sleek top gives your head shape while the waves below add volume
- You can wear this with a crisp shirt or blazer for a professional look, or with a casual tee for something more relaxed
5. The Soft Wrap Half-Up Bun
This is a half-up that transforms into something between a half-up and a low bun — the top section wraps partially around your head and then the ends are curled into a small, soft bun or knot just at the nape of your neck. It’s romantic and intentional without requiring any particular skill or heat styling.
Constructing the Wrap Bun
Take a substantial section of hair from one side of your head at about ear level. Instead of twisting or braiding it, you’re going to wrap it diagonally across the back of your head toward the opposite side. Secure this wrap with bobby pins as you go, creating a subtle spiral effect. Once you’ve wrapped it across, take the remaining wavy section from that side and twist or lightly braid it into the wrap, creating a soft shape that becomes a small bun at the nape of your neck. Secure with bobby pins and hair spray.
Styling Considerations for Wavy Hair
- This works best when your waves have some natural texture and hold already — you don’t need to crimp or aggressively curl anything
- The wrap should look soft and organic, not tight or geometric — pull gently at the sections as you go to create a fuller, more relaxed appearance
- The bun at the base doesn’t need to be perfectly round or neat; soft and slightly undone is more flattering with your wave texture
- This is a great style for second or third-day hair when your waves have naturally settled into a softer, less defined pattern
6. The Butterfly Half-Up Clip
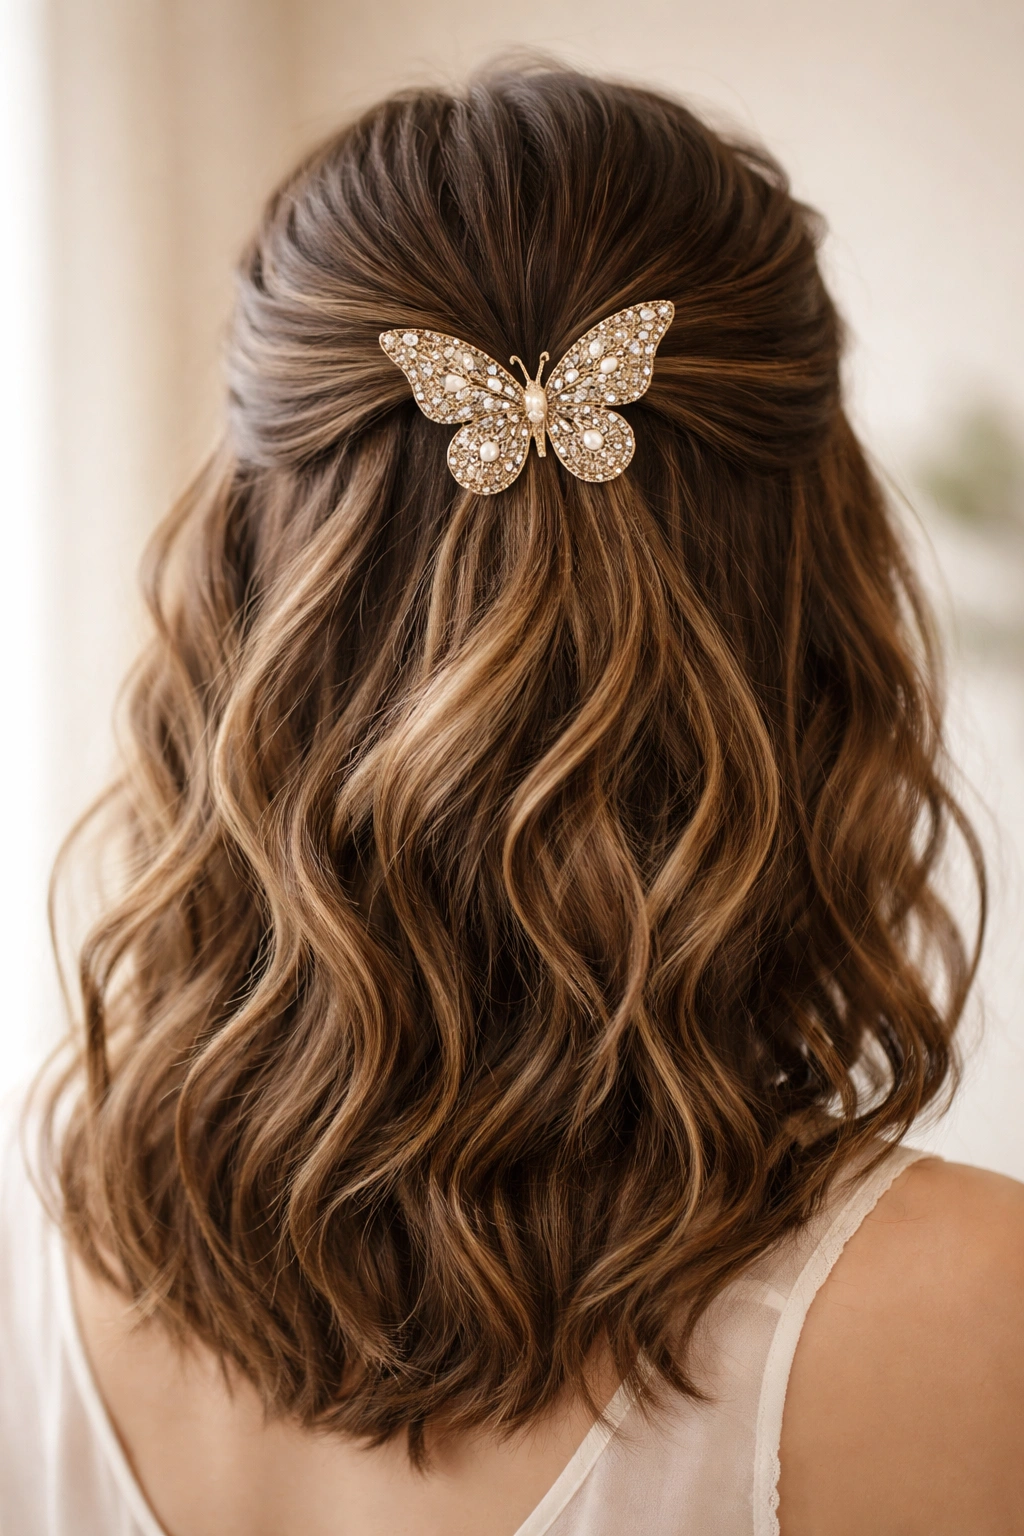
Using a decorative clip (butterfly, arc, vintage-style, or any design that appeals to you) to hold back the top section is one of the simplest half-up options, but it’s also one of the most visually striking when you have wavy hair. The clip becomes a jewelry piece for your hair, and your waves create a beautiful frame around it.
Keeping the Clip Secure on Wavy Texture
The challenge with clips on wavy hair is that waves can sometimes be slippery and the clip might slip throughout the day. The solution is to use a bit of dry shampoo or texturizing spray on the roots of the section you’re clipping. This creates micro-texture that the clip can grip, keeping it secure without any visible product. Take the top section from about ear level, smooth it gently (but don’t over-smooth — keep the wave texture), and clip it at the crown.
Choosing the Right Clip for Your Hair
- Wider clips with more gripping surface tend to hold better on wavy hair than tiny delicate clips
- Position the clip so it sits horizontally at the crown, which distributes your hair weight more evenly
- You can clip just the very top section for a minimal look, or clip a thicker section for something more dramatic
- The weight of your hair and the thickness of the section you’re clipping will determine whether a clip stays put all day, so adjust based on what you find works best
7. The Braided Half-Up with Texture Spray
This style uses a single or double braid pulled back from your face, but the secret to making it look special with wavy hair is using a texture spray to amp up the natural texture of your waves before braiding. The result is a braid that looks fuller, more interesting, and deliberately textured rather than sleek and uniform.
Layering Texture for Maximum Impact
Spray your waves liberally with a texture or sea salt spray while your hair is dry or nearly dry. Let it sit for a minute so the spray can absorb and create grip. Then take your section and braid — the spray will make the braid thicker, chunkier, and more visually interesting. As you braid, you’ll feel more texture in each strand, and the finished braid will have an almost braided-rope effect rather than a smooth three-strand look.
Making This Style Last All Day
- Texture spray is your friend for half-ups on wavy hair — it keeps everything in place without feeling sticky or heavy
- You can do a single center braid, two Dutch braids from each side, or even a braid that loops around the crown — the texture spray works with all of these
- After braiding, gently pull the edges to loosen the braid and create more volume — the texture spray will have given it enough grip that it won’t unravel
- This style works beautifully on day-two or day-three hair, when your waves have naturally relaxed and softened
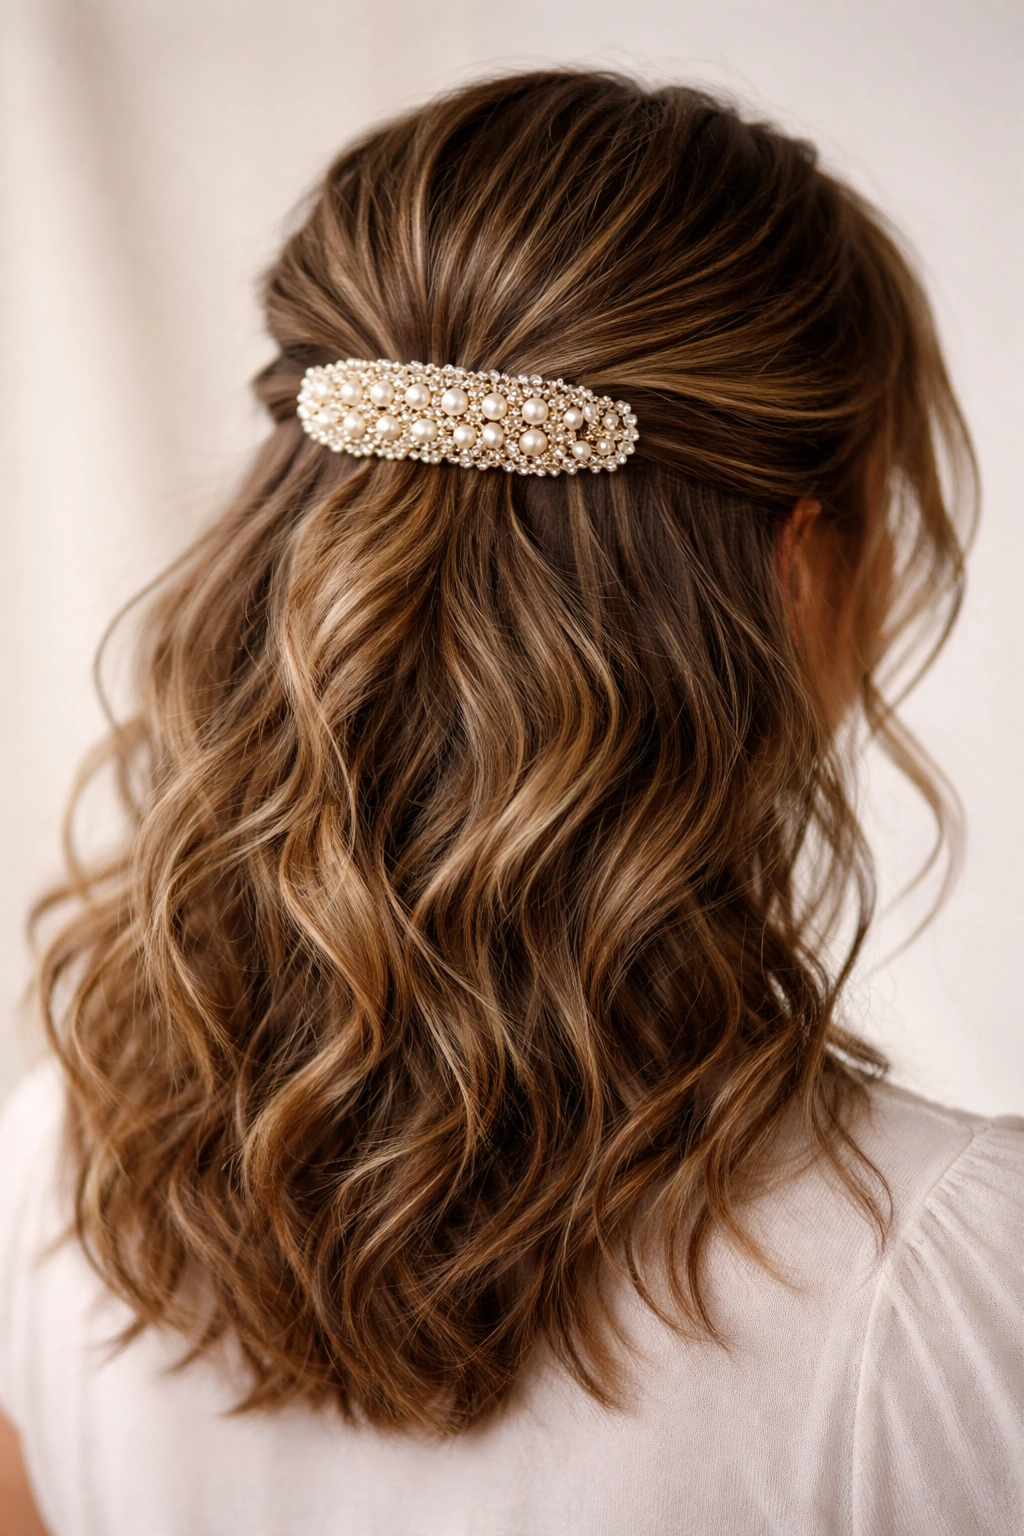
8. The Half-Up with Pearl or Metal Pins
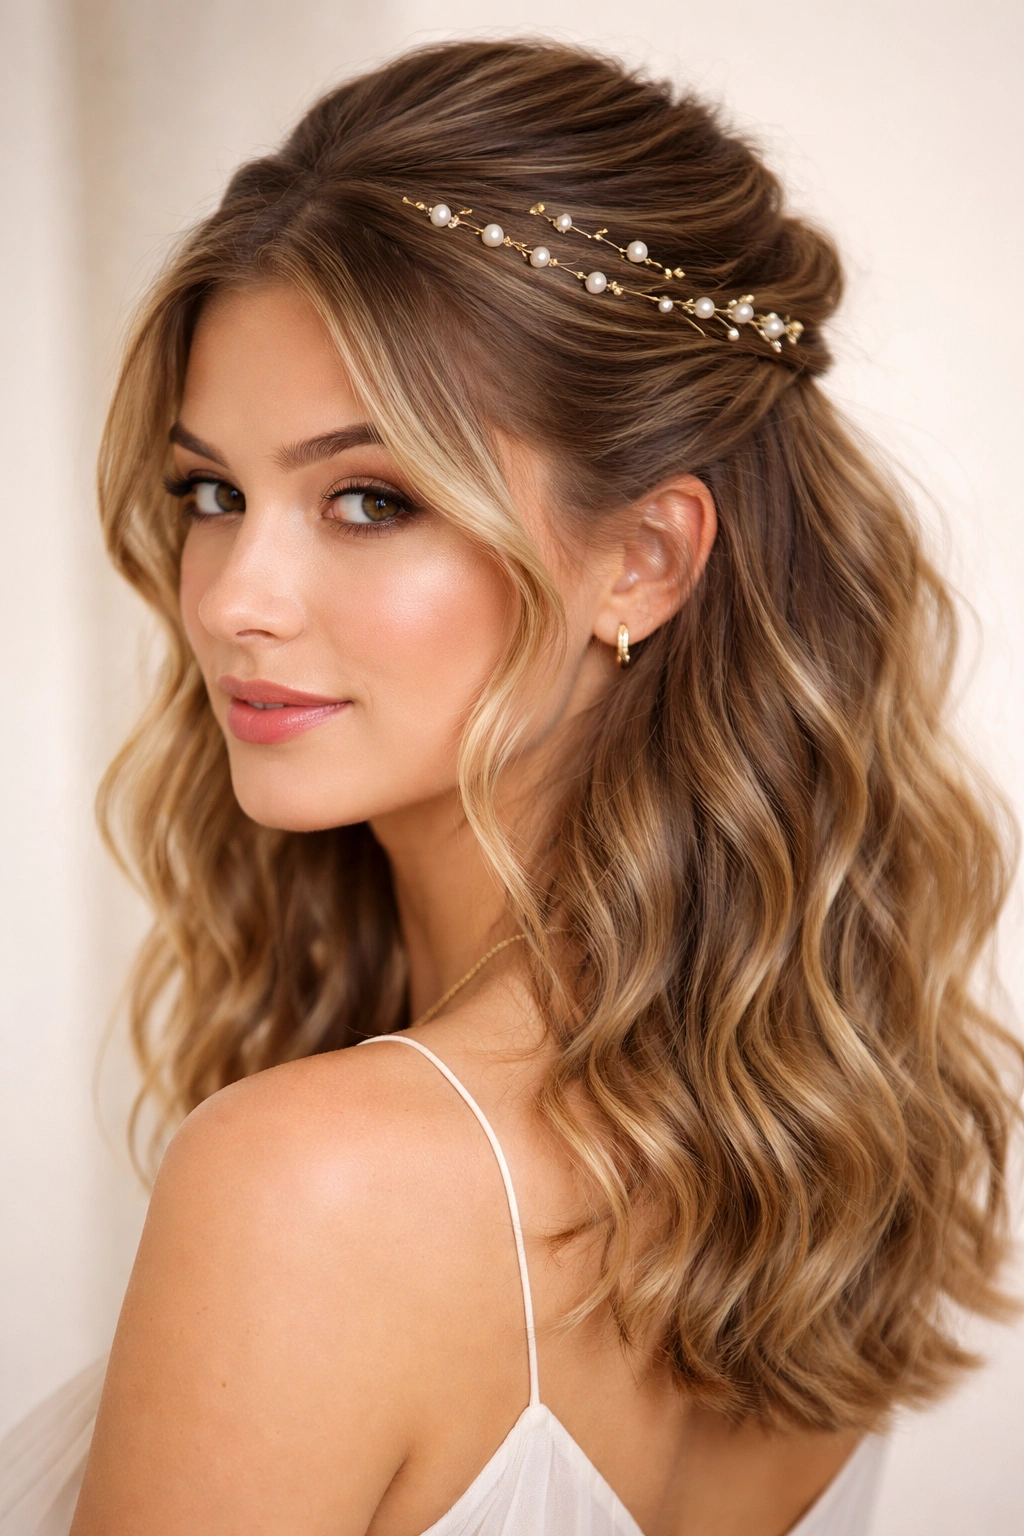
Instead of using a single clip or traditional bobby pins, this style uses multiple small decorative pins (pearl pins, metal bars, or vintage-style bobby pins) scattered along where your half-up section meets your down section. It’s more of a design statement than a traditional half-up, and it works especially well with wavy hair because the pins create visual points of interest against your textured waves.
Positioning Pins for Visual Balance
Take a slightly thicker section than usual for a half-up, and instead of clipping it to hold it back, position 3-4 decorative pins horizontally across the crown where the up and down sections meet. Space them out so they’re visible and create a deliberate design — they shouldn’t look random or accidental. The pins should be angled so they catch light and draw the eye, making them part of the overall aesthetic rather than just a practical fastener.
Styling Notes for This Look
- This works best with hair that already has defined waves or texture — smooth, sleek hair can look sparse with this style
- You can coordinate the pin color to your hair color (for subtlety) or choose a contrasting metal (gold, silver, or copper) to make them statement pieces
- Make sure the section you’re holding back is substantial enough that the pins have hair to grip — too-thin sections will slip
- This is more of a “occasion” style than an everyday one, but it’s simple enough that you can absolutely wear it on any day when you want to feel put-together
9. The Loose Braid Half-Up with Curled Ends

This style is a half-up braid where the ends of the braid are loosely curled or waved into the rest of your wavy hair, so the transition between the braid and the loose waves is seamless. It creates the effect of a half-up style that’s also been curled throughout, even though you’ve only styled the top section.
Blending the Braid with Your Natural Waves
Start with air-dried or minimally styled waves. Take your top section and braid it loosely (three-strand or Dutch braid, your choice), braiding to about mid-length or slightly lower. Instead of securing the end of the braid with a tiny elastic, you’re going to let the braid dissolve into the loose waves below. Gently unravel the last few inches of the braid so it blends into your wave texture, then clip the main braid section in place at the crown. The result looks like everything is one continuous wave pattern.
Why This Works So Well on Wavy Hair
- Your natural waves do most of the work — you’re not trying to curl or style everything, just the top section
- The loose braid creates definition at the crown while the waves below create softness and movement
- This style works on second-day hair beautifully because slightly older waves blend seamlessly with the braid
- You can achieve this look in about five minutes if your hair already has waves; no heat tools required
10. The Half-Up with Face-Framing Braids
Instead of a single central braid or twist, this style creates two smaller braids starting from the front corners of your hairline, braiding backward and slightly upward, then meeting at a clip at the crown. The effect is architectural and intentional while still showcasing your wave texture.
Creating the Symmetrical Braid Frame
Part your hair in the center. Starting at the hairline on one side, take a small section and braid it backward toward the crown. Do the same from the opposite side. Both braids should travel at roughly the same angle and speed, so they meet neatly at or near the crown. Secure both braids at the crown with a single clip or a few bobby pins. The rest of your hair — the thicker, middle section and all the waves below — flows down freely.
Styling for Wavy Hair Beauty
- These face-framing braids work best when they’re loose and slightly messy, not tight and perfectly uniform
- Your waves will naturally create texture within the braids, which is exactly what you want — don’t try to smooth them out
- This style is romantic and intentional, perfect for dates, events, or any day when you want to feel special but not overdone
- The two braids frame your face beautifully and keep hair back without feeling severe because of your natural wave texture softening the effect
11. The Half-Up with Rolled-Back Section
This style uses heat or styling products to create a subtle rolled or curved section at the crown that flows into your loose waves. The roll creates a polished, vintage-inspired look while your waves maintain that relaxed, effortless feel.
Creating the Crown Roll
Take your top section and blow-dry it with a round brush, rolling it under and back as you dry. Once it’s dry, the roll will hold beautifully even without product. Then let the middle and lower sections of your hair air-dry into their natural waves, or spritz with a wave spray. The result is a soft roll at the crown that transitions seamlessly into loose waves below.
Alternative if You Skip Heat
If you don’t want to blow-dry, you can achieve a similar effect by applying a light styling cream or gel to the top section while damp, smoothing it back into a rolled shape, clipping it in place while it dries, and then releasing the clip once it’s set. It won’t be as perfectly rolled, but it will have that subtle curved effect that makes the style look intentional.
Why This Works for Medium Wavy Hair
- The roll creates height and shape at the crown without requiring you to curl your entire head
- Your waves do the work of creating movement and texture below, so you only need to style the top
- This is a great style when you want to look polished but still feel like yourself
- It works on first-day, second-day, and even third-day hair, because the roll holds better than a braid or twist might
12. The Double Twist Half-Up with Center Parting
This style takes the twisted crown concept and adds a twist: you part your hair in the center, and each side is twisted individually before meeting at a clip at the back. The center part creates a strong, face-flattering line, and the double twists create a thicker, more substantial half-up than a single twist would.
Building the Double Twist Structure
Part your hair down the center from forehead to the nape of your neck. On one side, take a section from ear level and twist it loosely upward and backward. Do the same on the other side. Where the two twists meet at the back of your head (roughly where the two sides converge at the nape), clip them together. The rest of your center-parted hair flows down in loose waves.
Adjusting Based on Your Face Shape
- If you have a rounder face, this center-parted style with the twists pulling back actually flatters you by creating angles and definition
- If you prefer an off-center look, you can adjust the part to be slightly asymmetrical and the overall effect still works beautifully
- Gently pull at the twisted sections to loosen them and create more volume — this keeps the style from looking too neat or severe
- This is a style that works equally well for casual days and more dressed-up occasions
13. The Half-Up with Decorative Hair Comb
A decorative hair comb (vintage-style, pearl-embedded, or simple metal) becomes the statement piece in this half-up style. Instead of a clip that disappears into your hair, the comb sits visibly at the crown, functioning as both a practical fastener and a jewelry piece for your hair.
Positioning the Comb for Maximum Effect
Take your top section and smooth it gently back (not slick-smooth, but smooth enough that it has a polished appearance). Position the comb horizontally at the crown where the up and down sections meet, pushing it through far enough that it grips securely but sitting it prominently so it’s visible and intentional. The comb should look like an intentional accessory, not like you’re using it as a hidden fastener.
Choosing Your Comb
- Wider combs with more teeth tend to grip wavy hair better than delicate narrow combs
- Metal combs are more visible and statement-making than tortoiseshell or plastic, though the material is entirely your choice
- Consider the scale of the comb relative to your hair thickness — a delicate comb works on thinner hair, while thicker hair can carry a larger, chunkier comb
- This style is especially pretty when you have visible waves below the comb, because the waves create a beautiful textured contrast to the sleek comb design
Final Thoughts
Medium wavy hair gives you so much flexibility when it comes to half-up styling, because your natural texture does the heavy lifting while you focus on the creative part — the actual style and shape. The common thread through all of these styles is that they work with your waves rather than against them, meaning you’re not fighting to smooth everything down or create artificial texture where there isn’t any. Most of these can be done in under ten minutes, many of them work beautifully on second or third-day hair, and all of them look intentional and polished without feeling overdone.
The best half-up for you will depend on what you’re doing that day, what your hair texture is doing, and honestly, what you feel like wearing. Some days you want the elegance of a braid, some days you want the simplicity of a twist or a clip, and some days you want to make a statement with a decorative comb or pins. Your wavy hair is adaptable enough to pull off any of these looks, which means you’ve got genuinely useful styling options that go way beyond the same old ponytail. Start with one or two styles that appeal to you most, master those, and then build from there — your medium wavy hair is ready for all of it.