Your wedding day deserves a hairstyle that’s both beautiful and practical — one that won’t fall apart during the ceremony, keeps you cool during cocktail hour, and photographs flawlessly from every angle. That’s exactly why a sleek ponytail has become a go-to choice for brides and bridesmaids alike. Ponytails offer the best of both worlds: they’re polished and elegant enough for the most formal events, yet they’re low-maintenance enough that you’re not constantly checking your reflection or worrying about flyaways throughout the day. Whether you’re walking down the aisle, standing beside your best friend, or celebrating as a guest, a well-executed ponytail can feel as romantic and sophisticated as any traditional updo — sometimes even more so.
The key to pulling off a sleek wedding ponytail isn’t just about pulling your hair back; it’s about the intentional details. The right styling products, strategic placement, and thoughtful embellishments transform a simple ponytail into something truly wedding-worthy. Some styles emphasize clean, architectural lines that complement a modern dress. Others soften the look with strategically placed waves or face-framing pieces that feel romantic and timeless. And then there are the styles that incorporate braids, twists, wraps, and accessories that add layers of visual interest without ever looking overdone.
The beauty of these styles is their flexibility. You can adapt almost any of them to work with your dress’s neckline, your face shape, the venue’s formality level, and your personal style preferences. They work for every hair type and length, from thick and textured to fine and straight. Whether you’re planning a large formal wedding or an intimate garden celebration, whether you’re the bride or a bridesmaid or a guest, you’ll find something in this collection that feels authentically you while keeping your hair elegant and secure from sunrise to the last dance.
1. The Classic High Ponytail with Face-Framing Layers
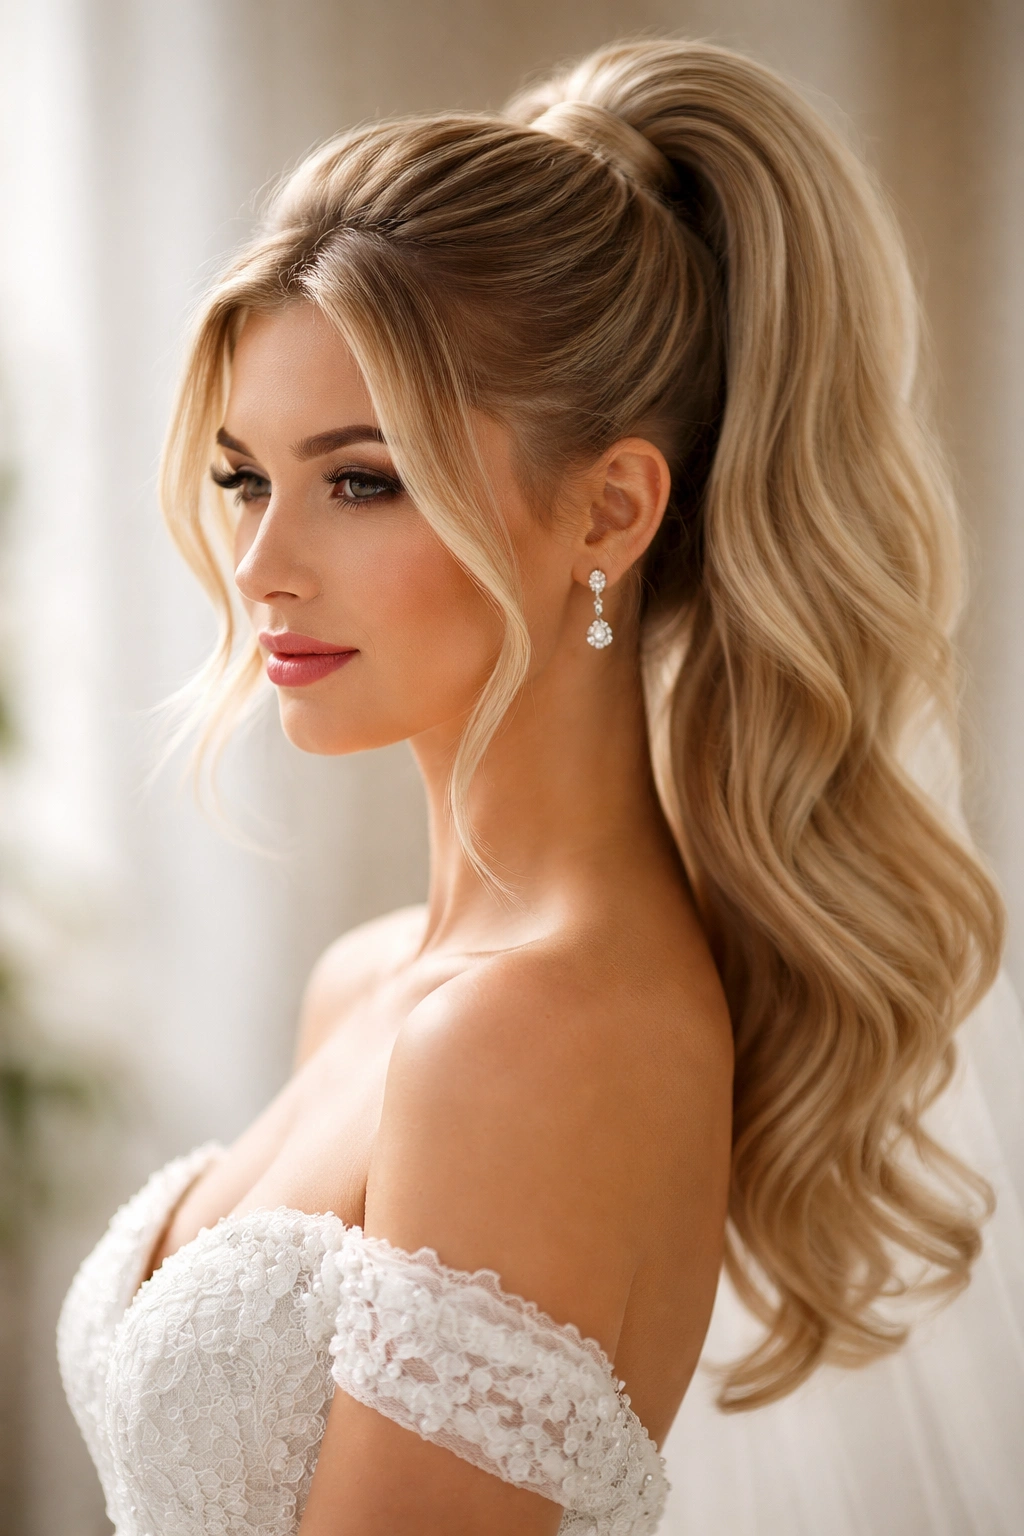
This is the timeless choice that never loses its appeal — sleek, polished, and undeniably elegant. The foundation is a high ponytail positioned just at your crown, which instantly lifts the face and creates a naturally flattering silhouette. What makes this version wedding-ready is the strategic face-framing layers that are left out before securing the ponytail. These soft pieces fall naturally around your cheekbones and temples, softening what could otherwise feel too severe and adding a romantic dimension that photographs beautifully.
Why It Stands Out
This style works because it balances structure with softness. The high placement is bold and confident — it says you’re the star of the show — while the face-framing layers keep the overall look approachable and romantic rather than severe. The visible forehead and cheekbones actually complement most face shapes, and the style is particularly stunning if you’re wearing a strapless or sweetheart neckline dress that you want to showcase. Hair stays off your shoulders and neck, keeping you comfortable, yet the face-framing pieces prevent the style from feeling like your hair is aggressively pulled away.
How to Get the Look Right
Start with blow-dried hair that has volume at the roots. Section out two small pieces in front (from your temples toward your ears), then gather the remaining hair into a high ponytail at your crown. Secure it very tightly with a elastic band — you want zero slippage throughout the event. Take the face-framing sections and curl them loosely with a 1.25-inch curling iron, then soften the curls with your fingers. Use a fine-tooth comb to smooth the ponytail base and tease gently at the crown for extra height. Finish with a light hairspray that won’t make hair feel stiff or sticky.
Pro tip: Use a clear elastic band underneath and a decorative band or clip on top — this gives you a secure foundation while looking intentional and finished from every angle.
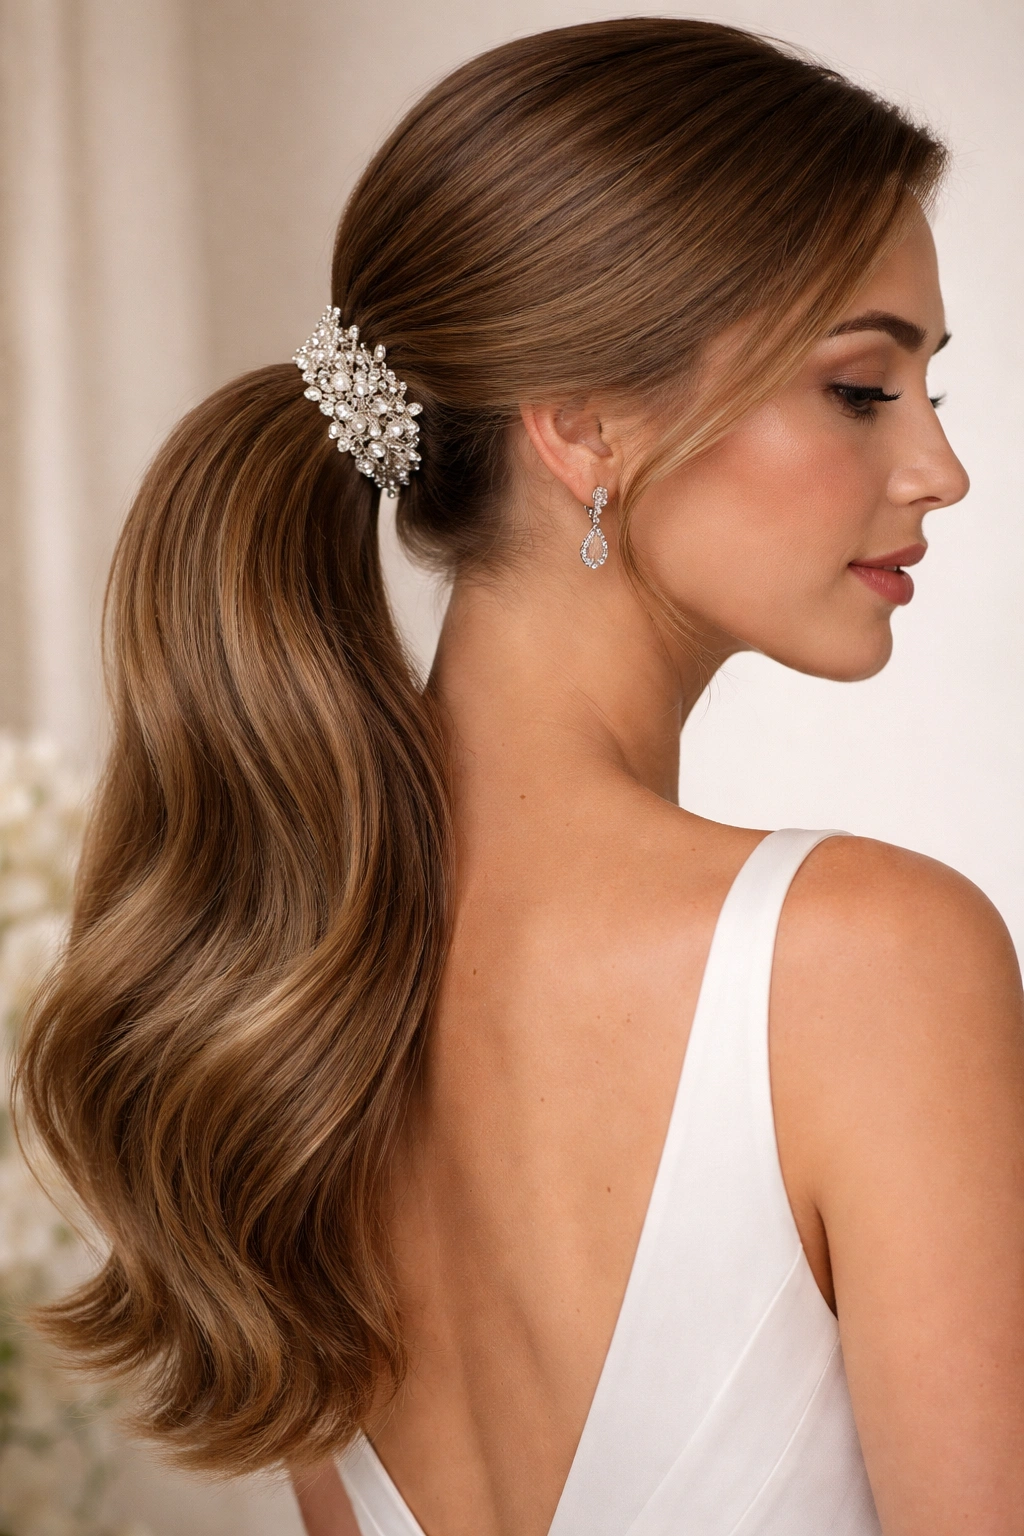
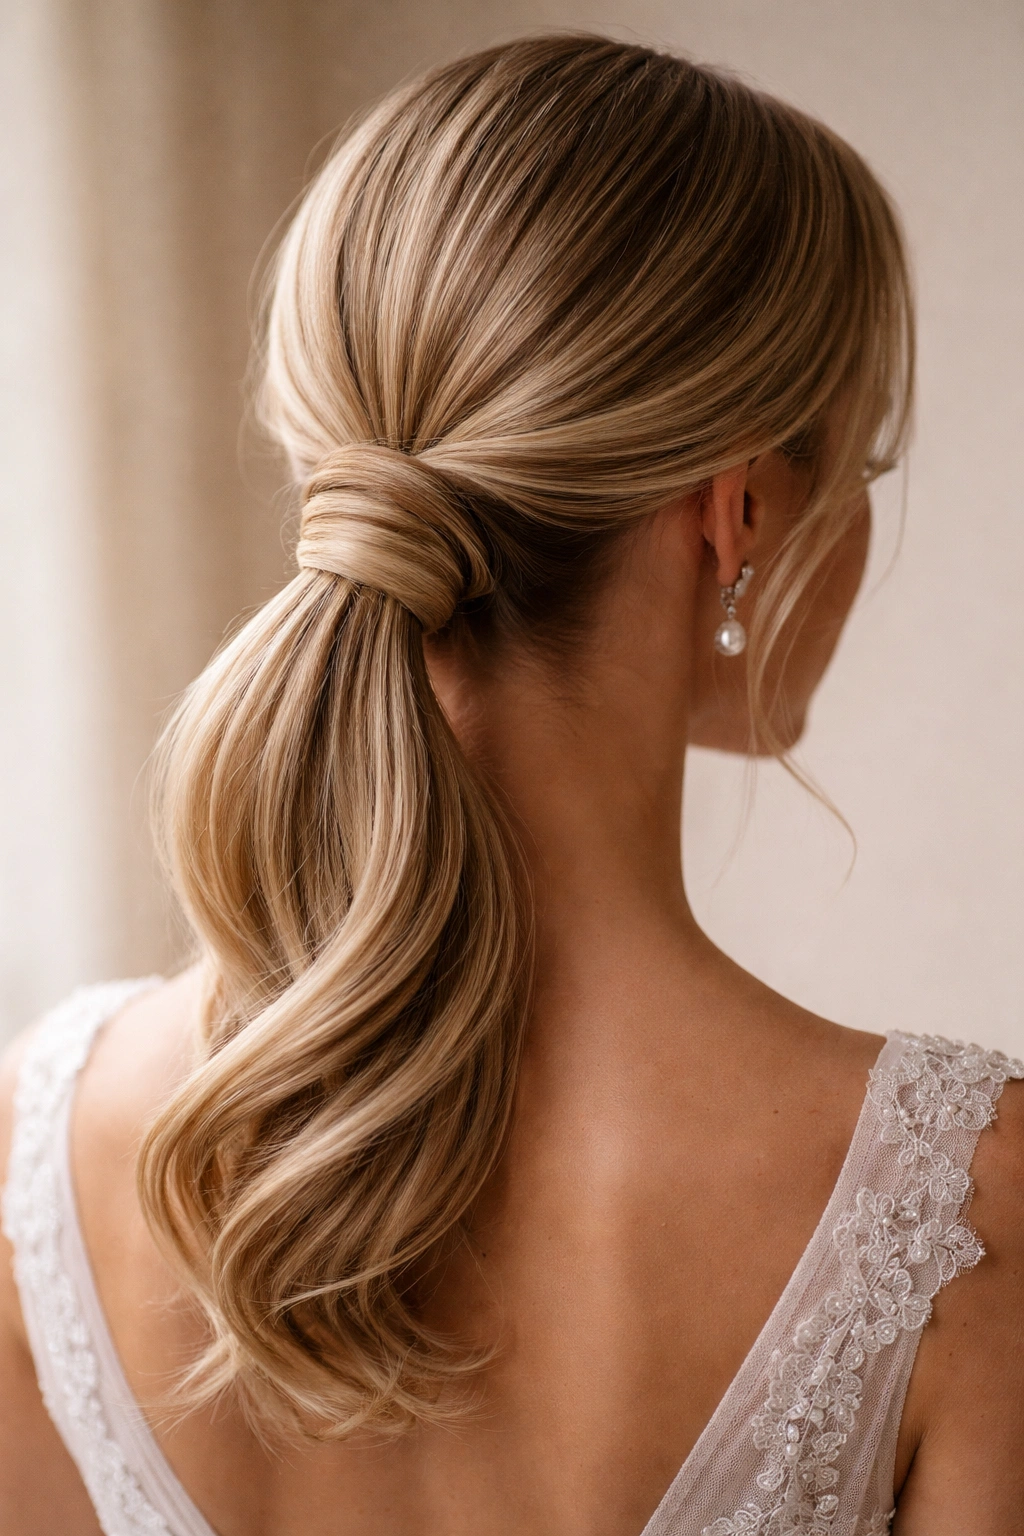
2. The Sleek Low Ponytail with Pearl Accents
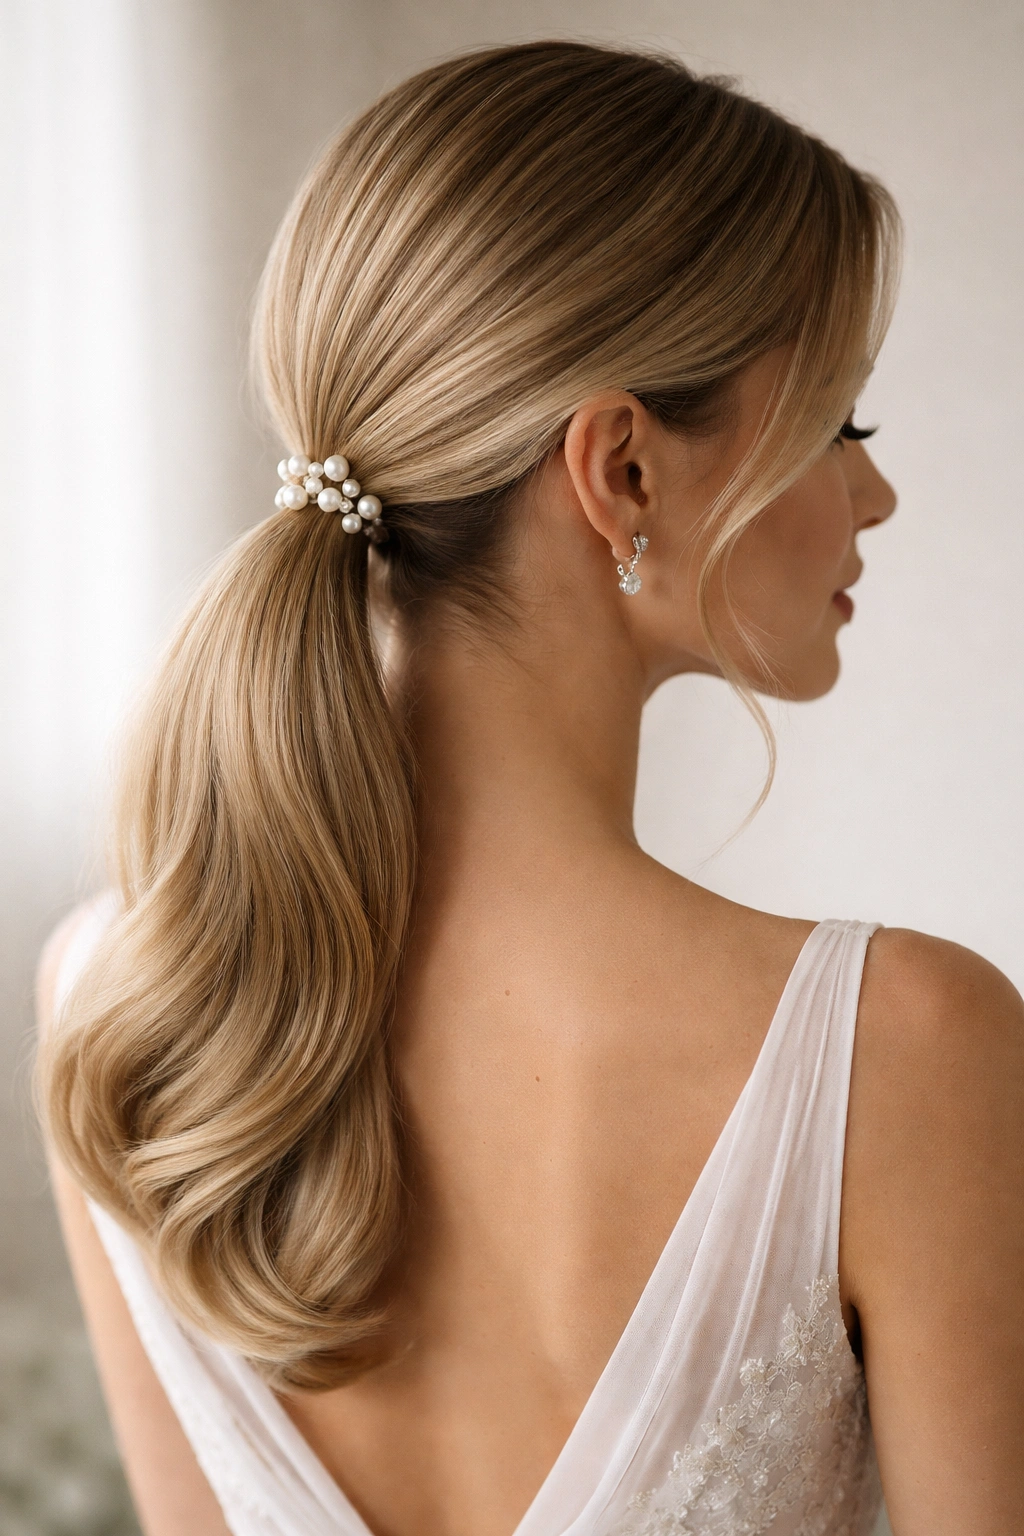
Elegance in its quietest form, this style is the choice for brides and bridesmaids who prefer understated sophistication over dramatic volume. The ponytail sits low at the nape of your neck, giving a refined, almost minimalist feel that pairs beautifully with a traditional wedding dress or a modern, architectural gown. The sleekness comes from careful smoothing and often a light smoothing cream or gel that eliminates any texture or texture the hair might naturally have, creating an almost liquid-silk appearance.
Why This Style Is Wedding-Perfect
There’s something inherently sophisticated about a low ponytail — it feels mature, intentional, and timeless in a way that transcends trends. This placement is particularly flattering if you have delicate shoulders or want to showcase the details of your dress’s back or neckline. Pearl hair clips, vintage pins, or a decorative comb nestled into the ponytail base adds jewelry-level detail without requiring a separate necklace or earring commitment. The low placement also keeps hair off the face completely, which is ideal if you’re wearing an elaborate veil, a crown, or statement earrings.
Styling Tips for Maximum Sleekness
Blow-dry your hair completely straight and smooth — any texture underneath will show through and ruin the sleek effect. Apply a lightweight smoothing cream or anti-frizz serum to damp hair before blow-drying. Gather your hair low at the nape (roughly where your hands naturally fall behind your neck) and secure with an elastic. Use a fine-tooth comb to smooth any flyaways, then wrap a small section of hair around the elastic to hide it completely. Secure pearl clips or a vintage comb over the wrapped elastic for an extra-polished finish.
Worth knowing: If you have frizz-prone hair, apply a tiny amount of pomade or edge control around your hairline and smooth with a small brush for a glass-like appearance. This takes the style from pretty to professional-wedding-level.
3. The Braided Wrap Ponytail
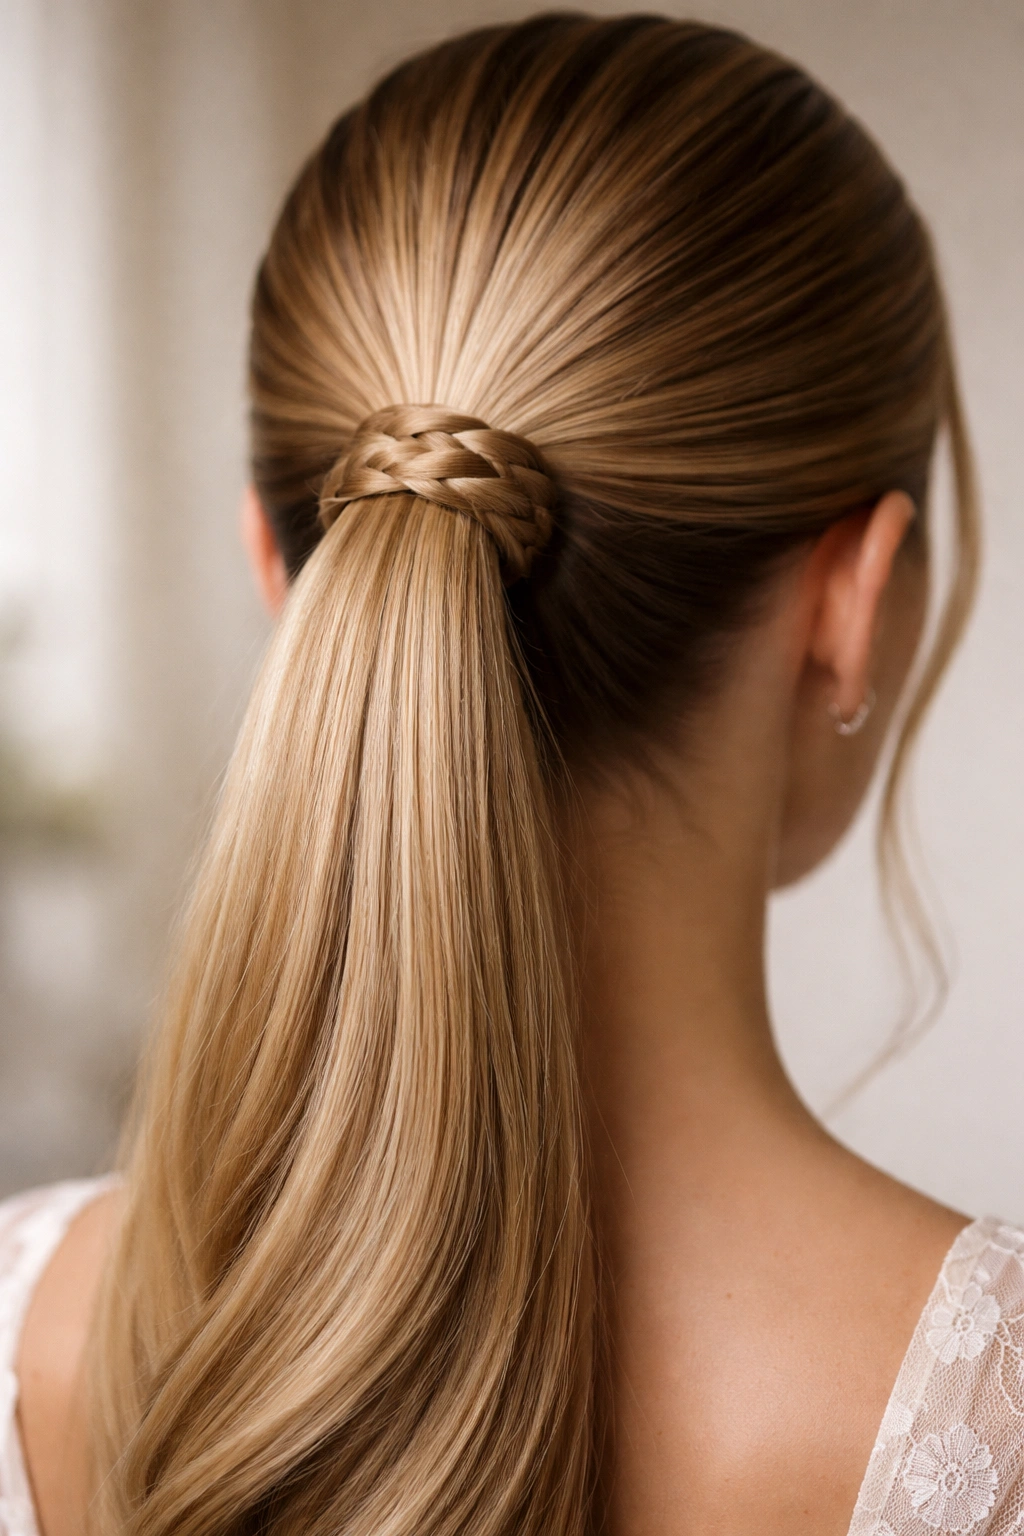
This style merges texture with refinement — a clever combination that makes it feel more interesting and less severe than a purely sleek ponytail. A sleek ponytail sits at your crown or mid-back, and then a two-strand braid or rope braid wraps around the base, looping back to hide the elastic. This wrapped braid catches light beautifully and adds a handcrafted, intentional element that reads as elevated without feeling like costume or overdone.
What Makes It Stand Out
The braided wrap serves multiple purposes: it’s visually interesting, it hides the elastic band (which immediately makes the style look more polished), and it gives you something to look at beyond just straight hair hanging. The texture of the braid adds dimension and movement without requiring waves or curls throughout the entire ponytail. This style also works across all hair types — fine hair benefits from the visual interest the braid creates, while thick hair appreciates that the braid adds a deliberate textural element rather than just being a mass of straight strands.
How to Execute This Cleanly
Create a sleek high or middle ponytail first, securing it tightly. Take a small section of the ponytail hair (about 1 inch) and divide it into two strands to create a two-strand twist or rope braid. Wrap this braid around the ponytail base at least twice, securing the end with a bobby pin underneath where it won’t be visible. Use a fine-tooth comb to smooth the base and make sure the wrapped braid looks intentional. If you have any loose ends, pin them down individually. A light hairspray keeps everything locked in place.
Pro tip: Practice wrapping your braid at least twice before your wedding day — it’s easier than it sounds once you understand the motion, but it takes one or two tries to get the tension right so the wrap sits flat and snug rather than loose and wobbly.
4. The Twisted Crown Ponytail
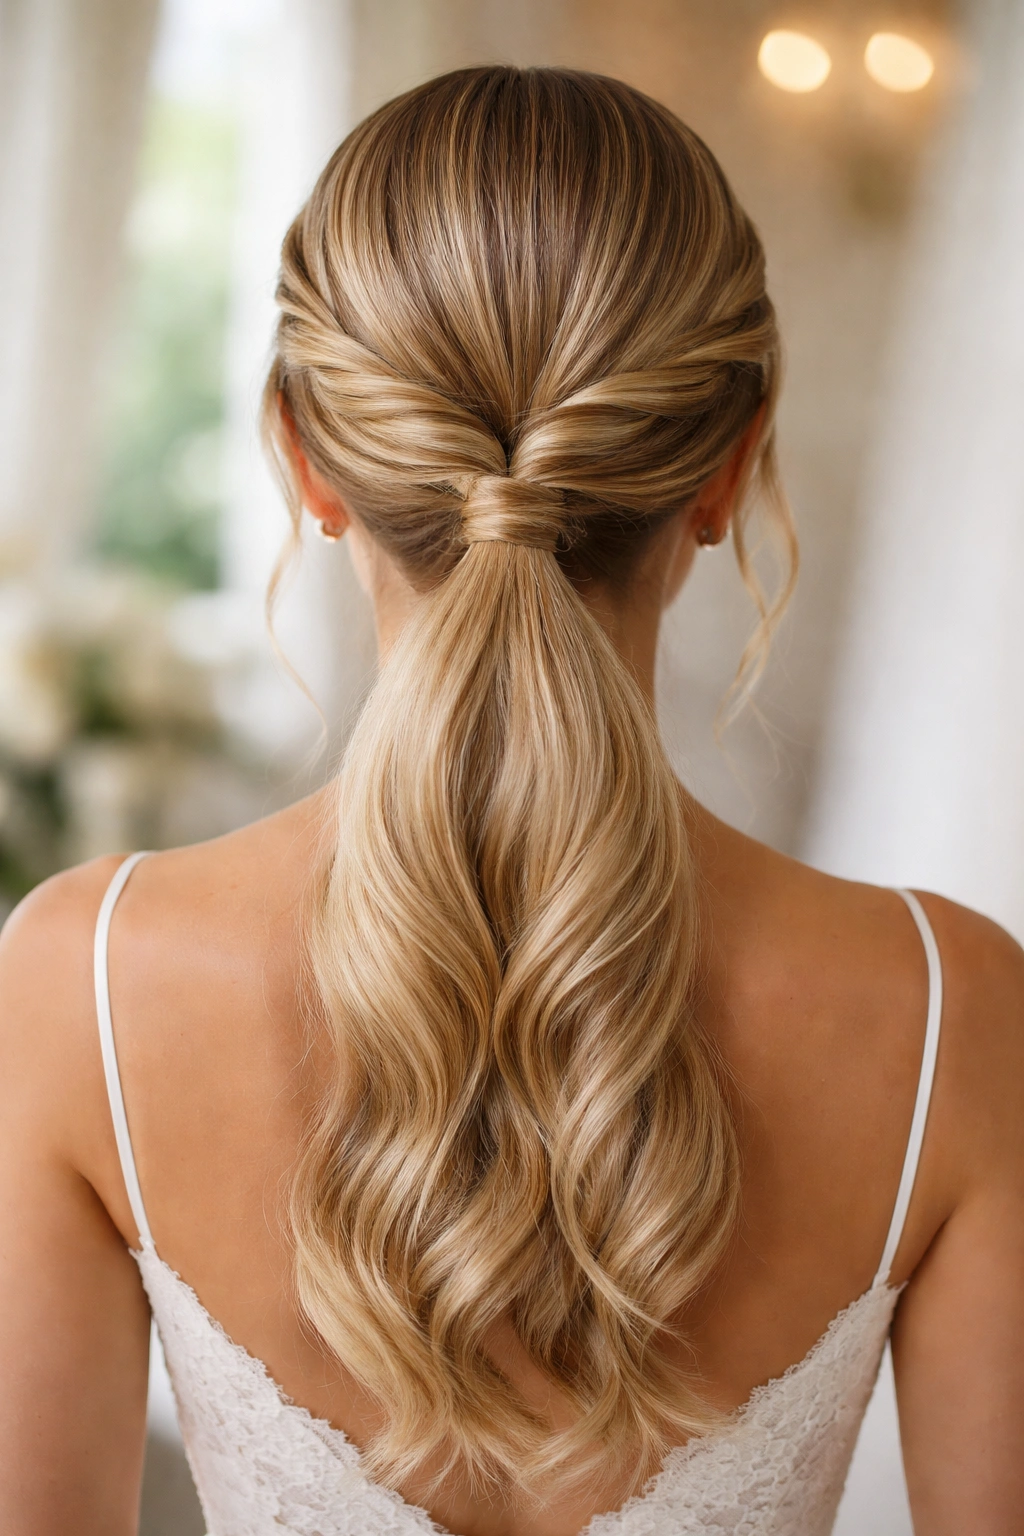
Two soft twists spiral around your head like a crown before meeting at a ponytail at the back — creating a style that feels both romantic and pulled-together. Each twist starts near your temples and travels backward toward the crown, where the remaining hair is gathered into a low or medium ponytail. The twists secure the overall style while adding a layer of visual interest that makes the ponytail feel more special than standard.
Why This Works for Weddings
The twisted crown creates the optical illusion of an elaborate updo while actually being much simpler and faster to execute. It’s romantic without being fussy, and it works beautifully in photographs because the twists create natural contour lines that add dimension to the back of your head. The style frames the face softly without requiring face-framing layers, making it ideal if you want a cohesive, polished appearance. It’s also excellent if you’re planning to wear a veil, crown, or statement earrings — the twisted sections secure those accessories beautifully.
Step-by-Step Execution
Start with wavy or textured hair (curl before twisting if you have naturally straight hair). Section out a small piece of hair at one temple, twist it loosely toward the back of your head, and secure it with a bobby pin near the crown. Repeat on the other side with a twist starting from the other temple. The two twists should meet roughly at the crown. Gather all your hair (including the twist ends) into a low or middle ponytail. Gently pull the twists slightly to loosen them and create a softer, fuller appearance. Secure everything with a tight elastic, then wrap a section of ponytail hair around the base.
Worth knowing: The looser your twists, the more romantic the overall effect. Don’t twist too tightly or the style reads as pinned-back rather than woven-through. You want movement and softness, not a structured architectural look.
5. The Bubble Ponytail with Soft Waves
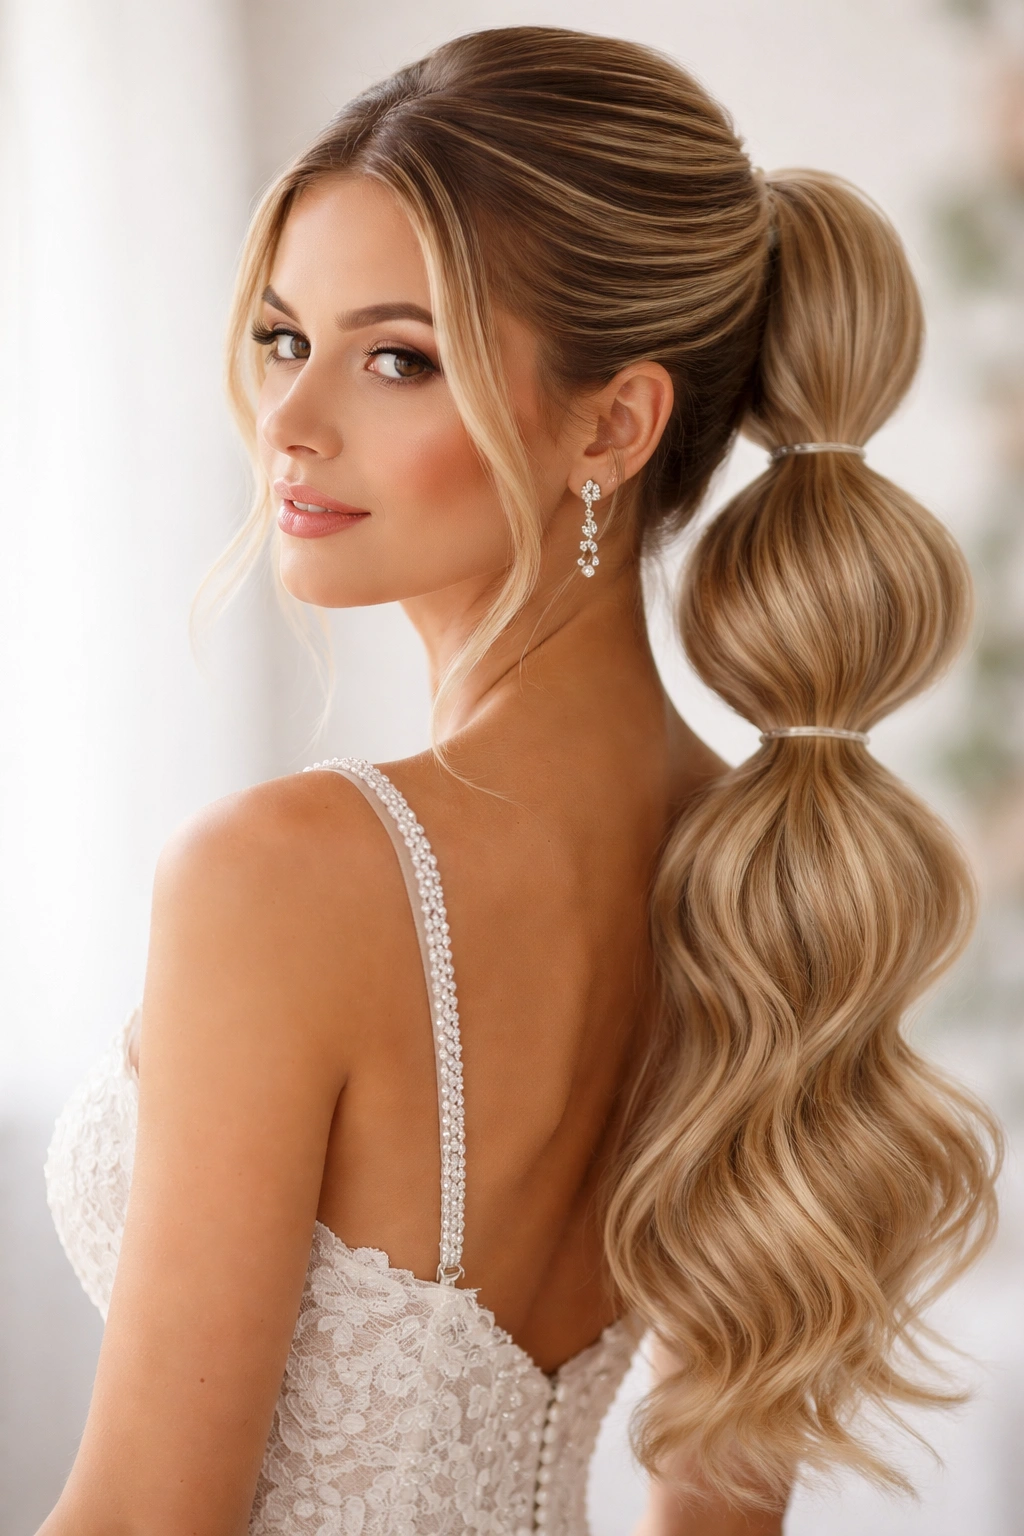
A ponytail divided into 2-3 distinct sections with elastics, each section fluffed outward slightly to create a bubbled or tiered effect — imagine stacked clouds of hair traveling down the length of your ponytail. Between each bubble, the hair is gathered tight to create definition. The waves throughout the ponytail add movement and catch light, making the style feel romantic and textured rather than simply straight.
What Makes It Wedding-Appropriate
This style sits in an interesting space: it’s playful and modern enough to feel current and fun, yet romantic and intentional enough for a formal wedding. The bubbled sections and waves create visual movement that flatters most face shapes, and the style photographs beautifully because light catches the waves and texture throughout. It’s less severe than a sleek ponytail but more structured than loose waves, striking a balance that appeals to brides who want polish without formality.
How to Create Defined Bubbles
Start with wavy hair (curl before creating the ponytail if your hair is straight). Create a high or middle ponytail and secure tightly. About 2-3 inches down from the elastic, wrap another elastic around just the ponytail hair (not pulling from the base). Gently pull the section of hair above this second elastic upward and outward to create the first bubble. Repeat this process 2-3 more times down the length of your ponytail, spacing the bubbles about 2-3 inches apart. Each section should be fluffed outward slightly. Use your fingers (not a brush, which will disrupt the waves) to gently tousle and separate the waves throughout.
Pro tip: Don’t make the bubbles too loose or the style loses its definition — you want clear, intentional bubbles with visible elastic separation, not a shaggy ponytail that looks accidental.
6. The Half-Up Ponytail with Volume
This style takes the best of both worlds — the polish of a ponytail combined with the romance of hair down. Roughly the top half of your hair is gathered into a ponytail at the crown, while the bottom half remains down, curled into soft waves that flow past your shoulders. The result is dramatic, voluminous, and undeniably romantic while maintaining the polished edges of a ponytail structure.
Why Half-Up Is Perfect for Weddings
A half-up style instantly reads as “occasion hair” without requiring the commitment of a full updo. It showcases the length and thickness of your hair while keeping hair back from your face, giving you the best visual effect. This style works beautifully with a veil, tiara, or crown because the upper ponytail provides a secure base for accessories while the waves down frame them. It’s also incredibly flattering for almost every face shape, and the waves can be adjusted in tightness and texture to match your dress’s formality level.
Styling Steps for Picture-Perfect Half-Ups
Blow-dry your hair with volume at the roots — texture throughout is your friend here. Curl the bottom half of your hair with a 1.5-inch curling iron, working in sections and curling away from your face for a flattering shape. Once all the waves are set, gently work through them with your fingers to create soft, loose texture rather than tight ringlets. Take the top half of your hair and gather it into a ponytail at your crown, securing tightly. Use a fine-tooth comb to smooth the ponytail base. Wrap a small section of hair around the elastic to hide it. Mist everything with light hairspray to set the waves without making them look stiff.
Pro tip: The transition between the up section and the down waves should be invisible — make sure the gathered hair sits right where the waves naturally begin so there’s no awkward gap or disconnection.
7. The Sleek Side Ponytail with Jeweled Comb
A ponytail gathered to the side of your head (rather than directly at the back or crown) creates an asymmetrical, modern silhouette that’s both unexpected and elegant. The sleekness comes from smooth styling and strategic placement of a jeweled comb, vintage pin, or statement clip that sits right where the ponytail begins, adding jewelry-level detail.
Why Side Ponytails Read as Wedding-Sophisticated
There’s something inherently elegant about breaking symmetry — it feels intentional and fashion-forward without sacrificing romance. A side ponytail allows you to showcase one side of your face while creating dimension on the other, which photographs beautifully and flatters most face shapes. The jeweled comb serves as both functional (it helps secure the ponytail and hide the elastic) and decorative, eliminating the need for a separate hair accessory in most cases.
How to Position and Secure a Side Ponytail
Blow-dry your hair smooth and sleek. Take your hair and gather it to one side of your head — roughly 3-4 inches to the side of center, at about ear height. Secure tightly with an elastic. You want the gathering point to be visible and intentional, not hidden behind your ear. Smooth the sides with a fine-tooth comb, then place a jeweled comb over the elastic, positioned vertically so it’s visible and glamorous. If your hair is slippery or fine, use a small velvet elastic underneath and hide it completely with the jeweled comb on top.
Worth knowing: The side you choose matters — generally, gathering the ponytail to whichever side is your “better side” or the side that photographs best is the smart choice. You’ll be turning that way for most of the day’s photos, so lead with your strength.
8. The Dutch Braid into Ponytail
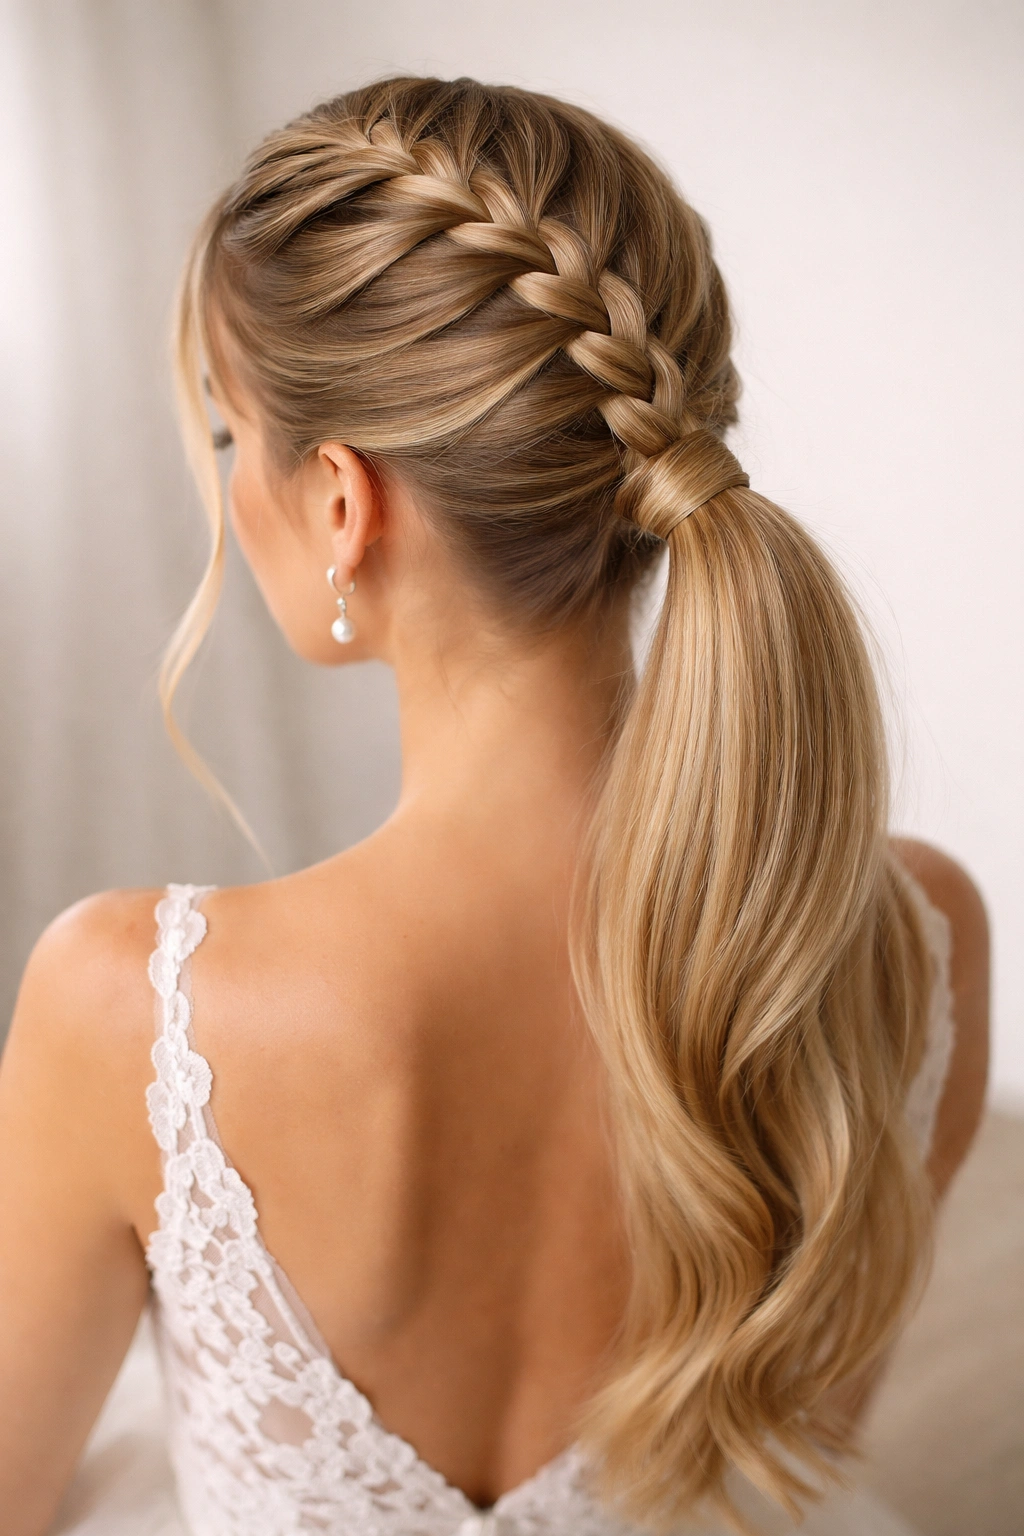
A Dutch braid (an inside-out braid that creates a 3D, textured appearance) begins at the crown and travels down the back of your head, then transitions smoothly into a ponytail that extends the braided line. The result is a unified style that feels intricate and handcrafted while actually being more secure and longer-lasting than a ponytail alone.
What Makes This Style Stand Out
The Dutch braid adds texture and visual interest in a way that feels artistic and intentional. Because the braid sits on top of the head (rather than blending into it like a French braid would), it’s visible and becomes a design element itself. The transition from braid to ponytail is natural and elegant, and the style actually holds better throughout a long event than a ponytail alone because the braid secures the upper portion of hair more effectively.
Braiding and Blending the Transition
Begin with wavy or textured hair (curl first if needed). Start a Dutch braid at your crown, dividing your hair into three sections and braiding underneath rather than over, creating a raised, textured appearance. Braid down about 5-6 inches, stopping roughly at the nape of your neck. At this point, release the three sections of the braid and gather all your hair (including the braid ends) into a ponytail. Secure tightly. The braid should disappear seamlessly into the ponytail, with the three braid strands becoming part of the overall ponytail. Gently pull the braid strands slightly to loosen and soften the appearance.
Pro tip: Don’t make your Dutch braid too intricate or detailed — you want it visible enough to be interesting, but not so complex that the transition to ponytail looks choppy or disconnected.
9. The Wrapped Chignon-Style Ponytail
This style hovers in an elegant space between a ponytail and a full updo. Hair is gathered into a low ponytail, then the ponytail is loosely twisted or curled into a compact shape at the base of your neck, and the entire bundle is wrapped with a smaller section of hair and secured with pins. From the front, it looks polished and upswept; from behind, it’s clearly a ponytail that’s been elegantly wrapped and finished.
Why It’s Perfect for Bride-Level Formality
This style offers maximum polish while remaining practical and low-maintenance. It keeps all your hair off your face and neck, making you comfortable throughout the day, yet it looks as intentional and formal as a French twist or sleek updo. The wrapped chignon-style ponytail photographs beautifully from all angles, and it’s less likely to loosen or shift than a standard ponytail because the wrapping and pinning add security. It works with most face shapes and is particularly flattering if you want to showcase your shoulders or the back details of your dress.
Step-by-Step Wrapping Technique
Gather your hair into a low, tight ponytail at the nape of your neck. Take the ponytail and twist it loosely, then wrap the twisted section around the base of the ponytail to create a compact, coiled shape (think of it like wrapping rope around a pole). Secure this coil with bobby pins inserted from underneath so they’re invisible. Take a small section of loose hair from the base of the ponytail (before you gathered it) and wrap it around the coil to hide all the pins and elastic. Secure this wrapping section with additional bobby pins underneath. Smooth everything with a fine-tooth comb and finish with light hairspray.
Pro tip: The tighter your initial ponytail, the easier this wrapping process becomes. A loose base ponytail will be slippery and difficult to work with, so secure it very firmly before you begin twisting.
10. The Slicked-Back High Pony with Statement Pins
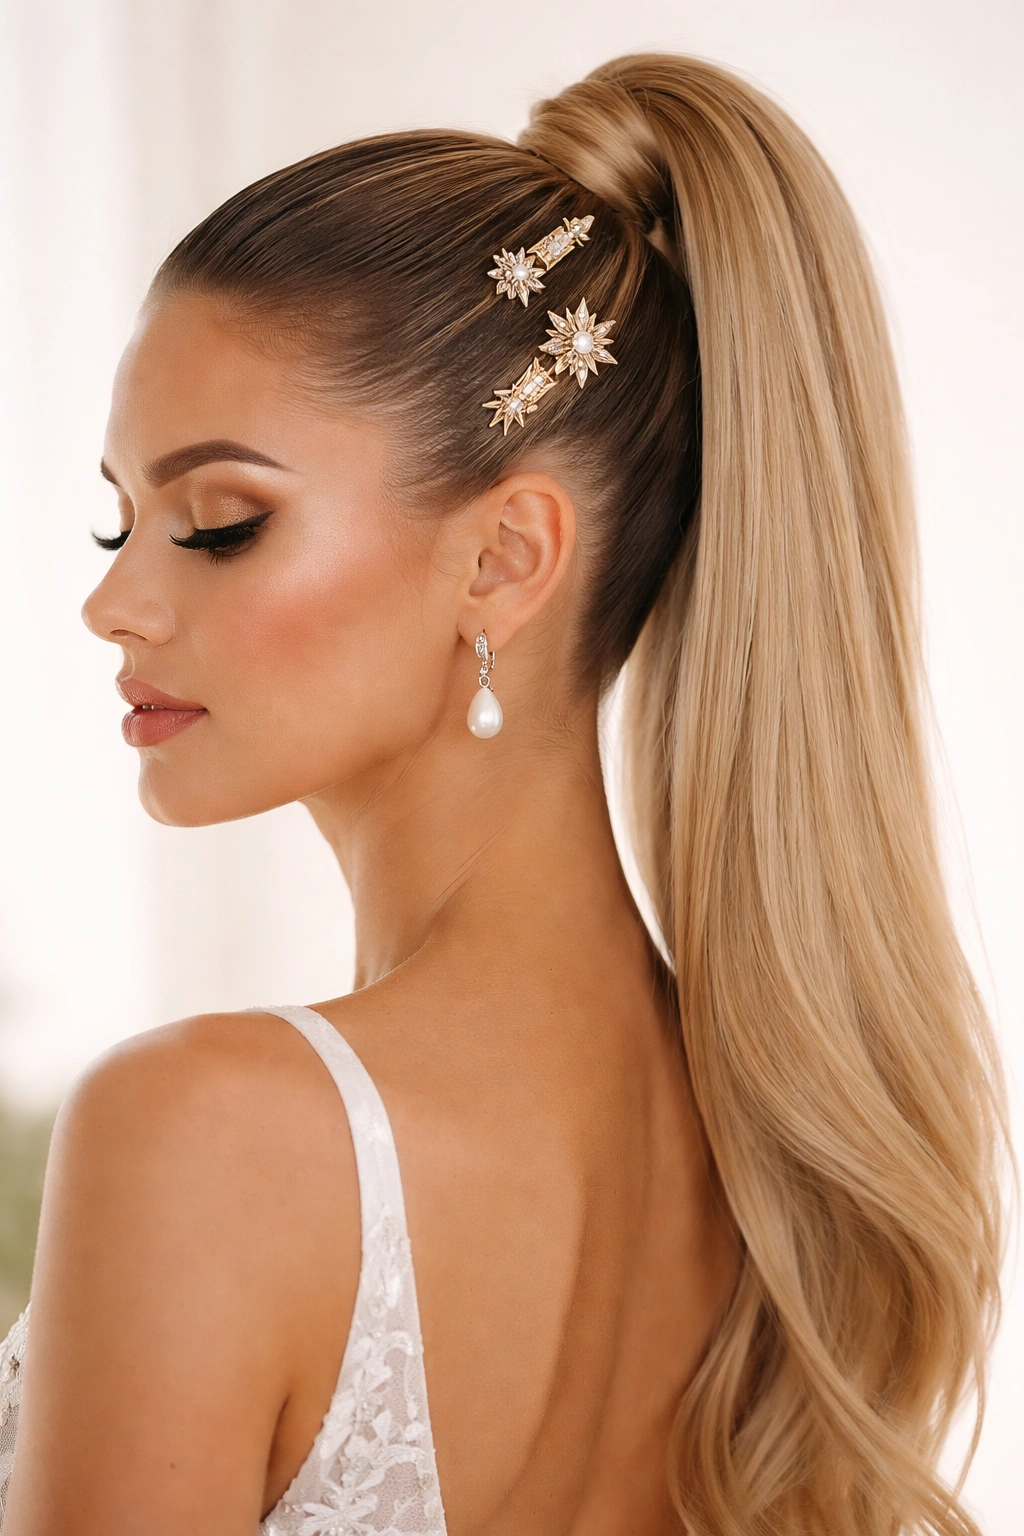
This is the choice for brides who want serious polish and a modern, almost architectural aesthetic. Hair is smoothed completely away from the face using a smoothing cream or gel, pulled into a very high, very tight ponytail at the crown, and finished with strategically placed statement pins (think geometric gold pins, crystal clips, or vintage hair sticks) that become intentional design elements rather than functional necessities.
Why This Style Commands Attention
The slicked-back look is unapologetically bold — it showcases your face completely, highlights your bone structure, and reads as high-fashion and confident. The statement pins add glamour and personality without requiring a separate tiara or elaborate headpiece. This style photographs beautifully because there are no flyaways or texture to manage — the sleekness creates clean lines that are flattering and modern. It’s ideal for brides with strong cheekbones, a defined jawline, or beautiful ears that they want to showcase.
Creating Absolute Sleekness
Apply a smoothing cream or gel to damp hair, working it through from roots to ends. Blow-dry completely smooth using a paddle brush and tension. Use a fine-tooth comb to smooth the front hairline and create a sleek base. Gather your hair into a very high ponytail at your crown and secure tightly — you want zero looseness. Apply a tiny bit of edge control or pomade around your hairline and smooth with a small brush for a polished finish. Strategically place your statement pins around the ponytail base or inserted vertically into the ponytail itself.
Worth knowing: The sleeker your base, the more dramatic the pins become. Any texture or flyaways will distract from your statement pins, so invest in good smoothing products and take time with the blow-dry.
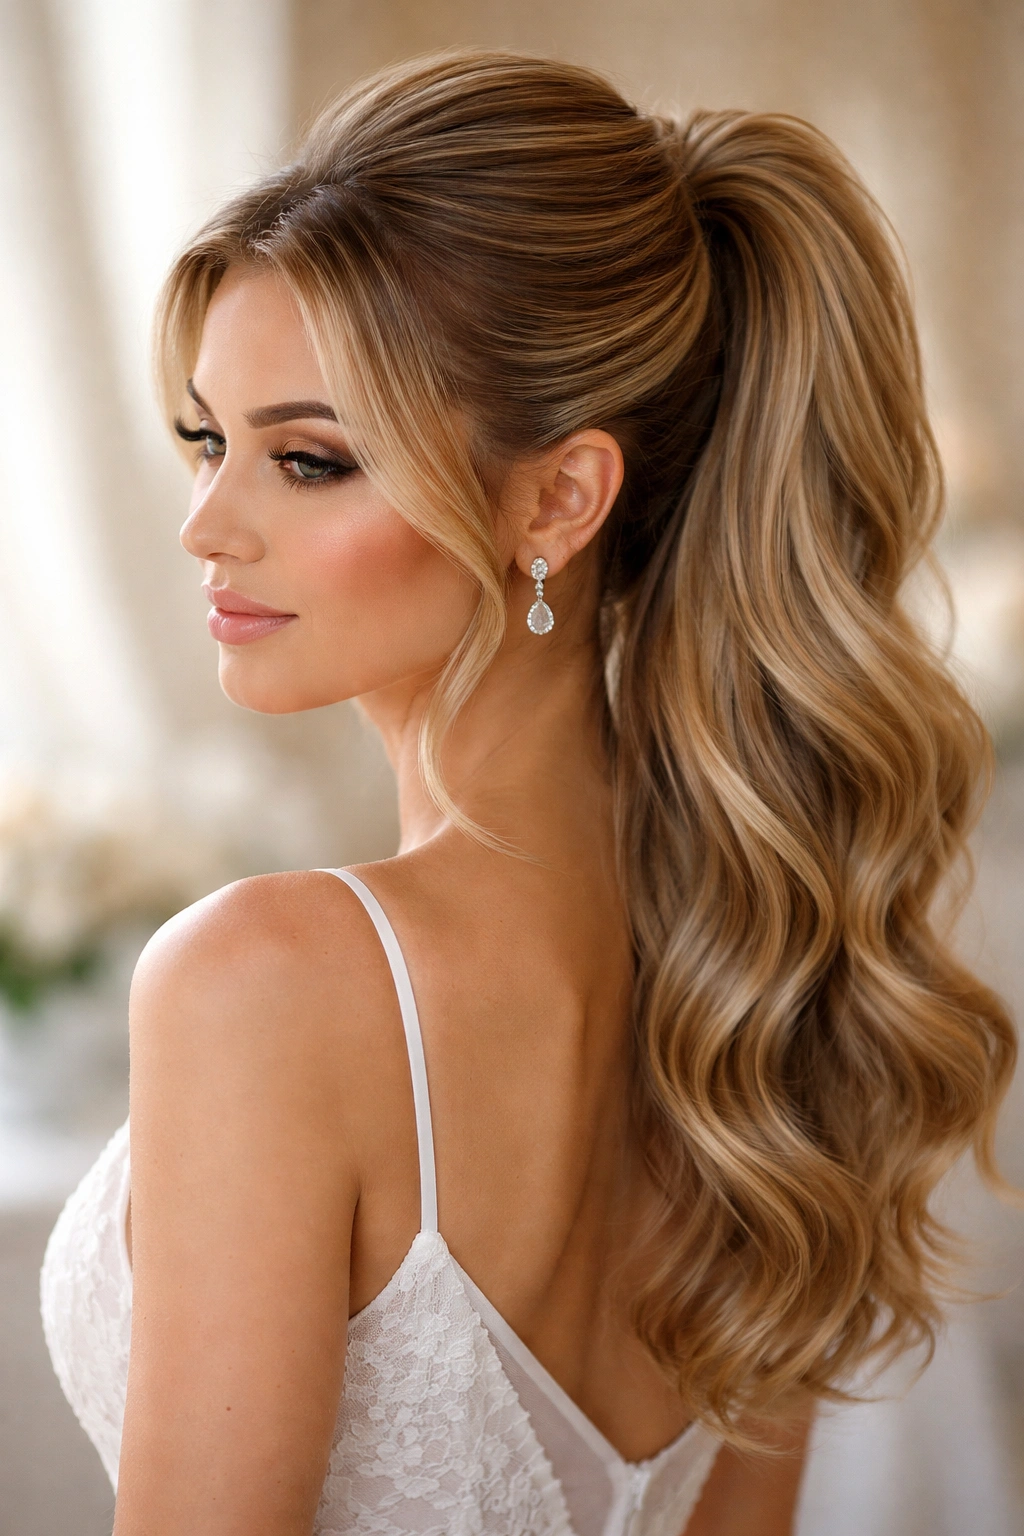
11. The Romantic Loose Wave Ponytail
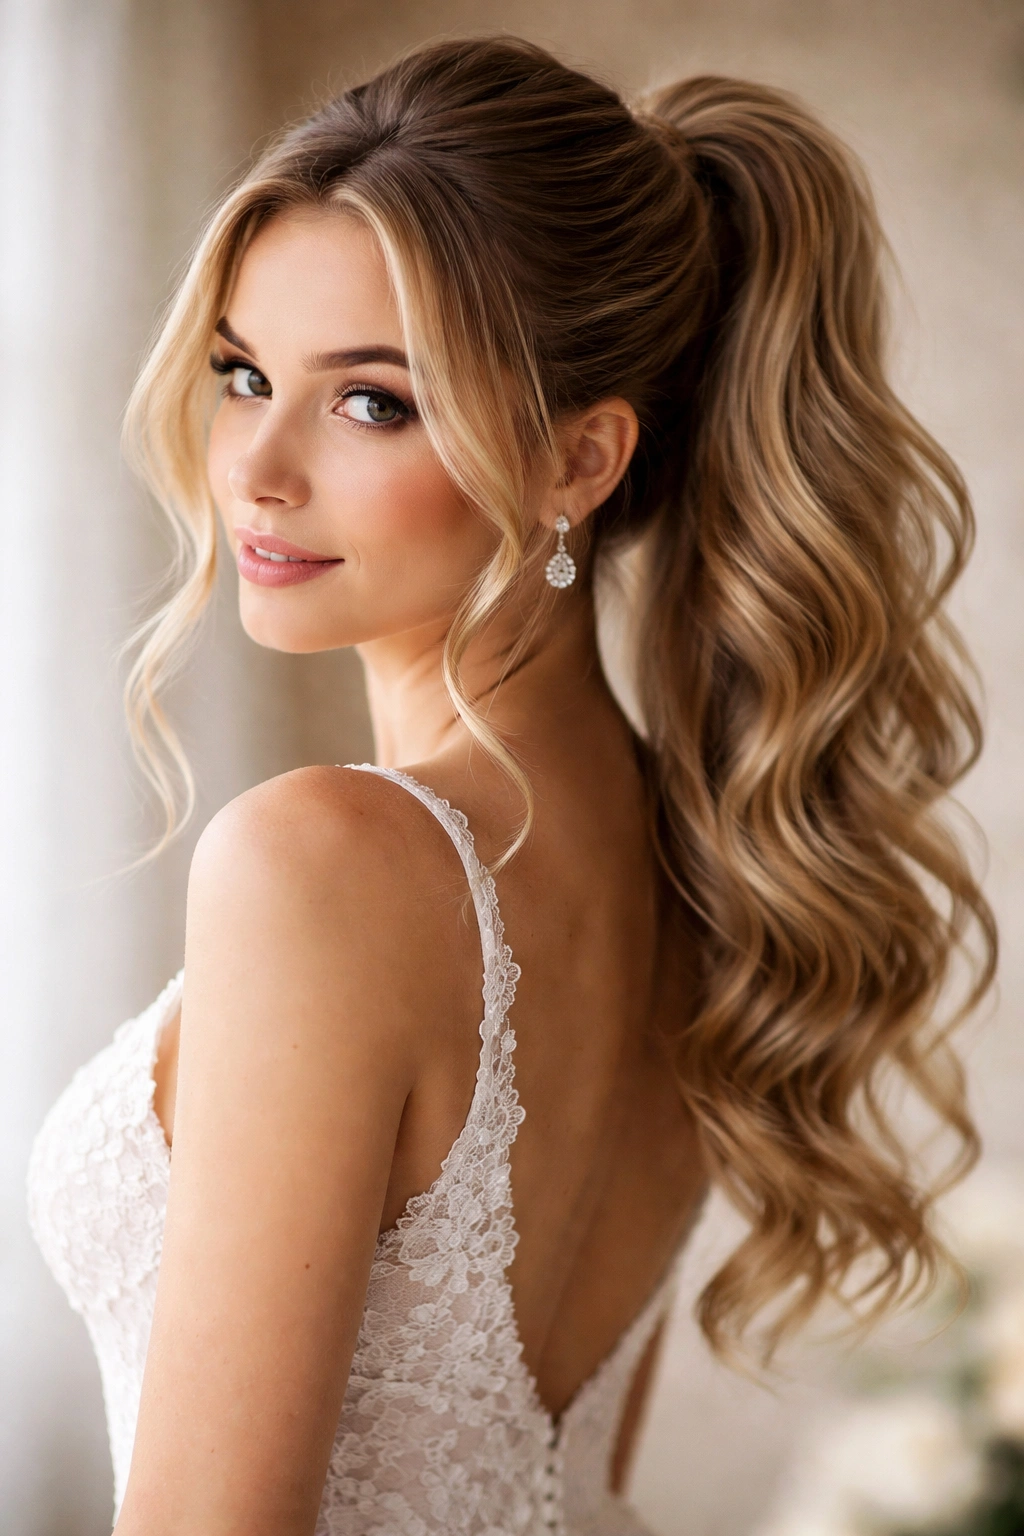
This style is for brides who want their hair to look like it naturally fell into place — polished yet effortless, romantic yet practical. Hair is gathered into a ponytail at the crown, but the ponytail itself is loosely waved rather than straight, and intentional pieces are left out in front to frame the face with gentle, undone-looking texture.
What Makes This Feel Effortlessly Elegant
There’s a specific charm to a ponytail that looks like it happened naturally rather than being constructed — it reads as confident and unbothered. The loose waves throughout the ponytail add movement and romance, and the face-framing layers prevent the style from feeling severe or pulled-back. This style works beautifully with vintage, bohemian, or romantic dress styles, and it photographs as timeless rather than trendy. It also works with most face shapes and hair types because the looseness and texture are forgiving.
Styling for That Undone Effect
Start with textured, wavy hair (curling is key here — this style doesn’t work with naturally straight hair that you just pin back). Create a high ponytail, but don’t make it too tight. Take the face-framing pieces and curl them loosely with a 1.5-inch curling iron. Curl the entire ponytail loosely with the same iron, working in sections. Gently work through all the waves with your fingers (not a brush) to soften and separate them, creating loose, romantic texture rather than tight ringlets. Mist lightly with hairspray, but use a light hand — you want the waves to maintain movement, not feel stiff.
Pro tip: This style actually improves as the day goes on — the waves will relax and soften throughout the event, creating an even more romantic, undone appearance by evening.
12. The Low Twisted Ponytail with Tulle or Ribbon
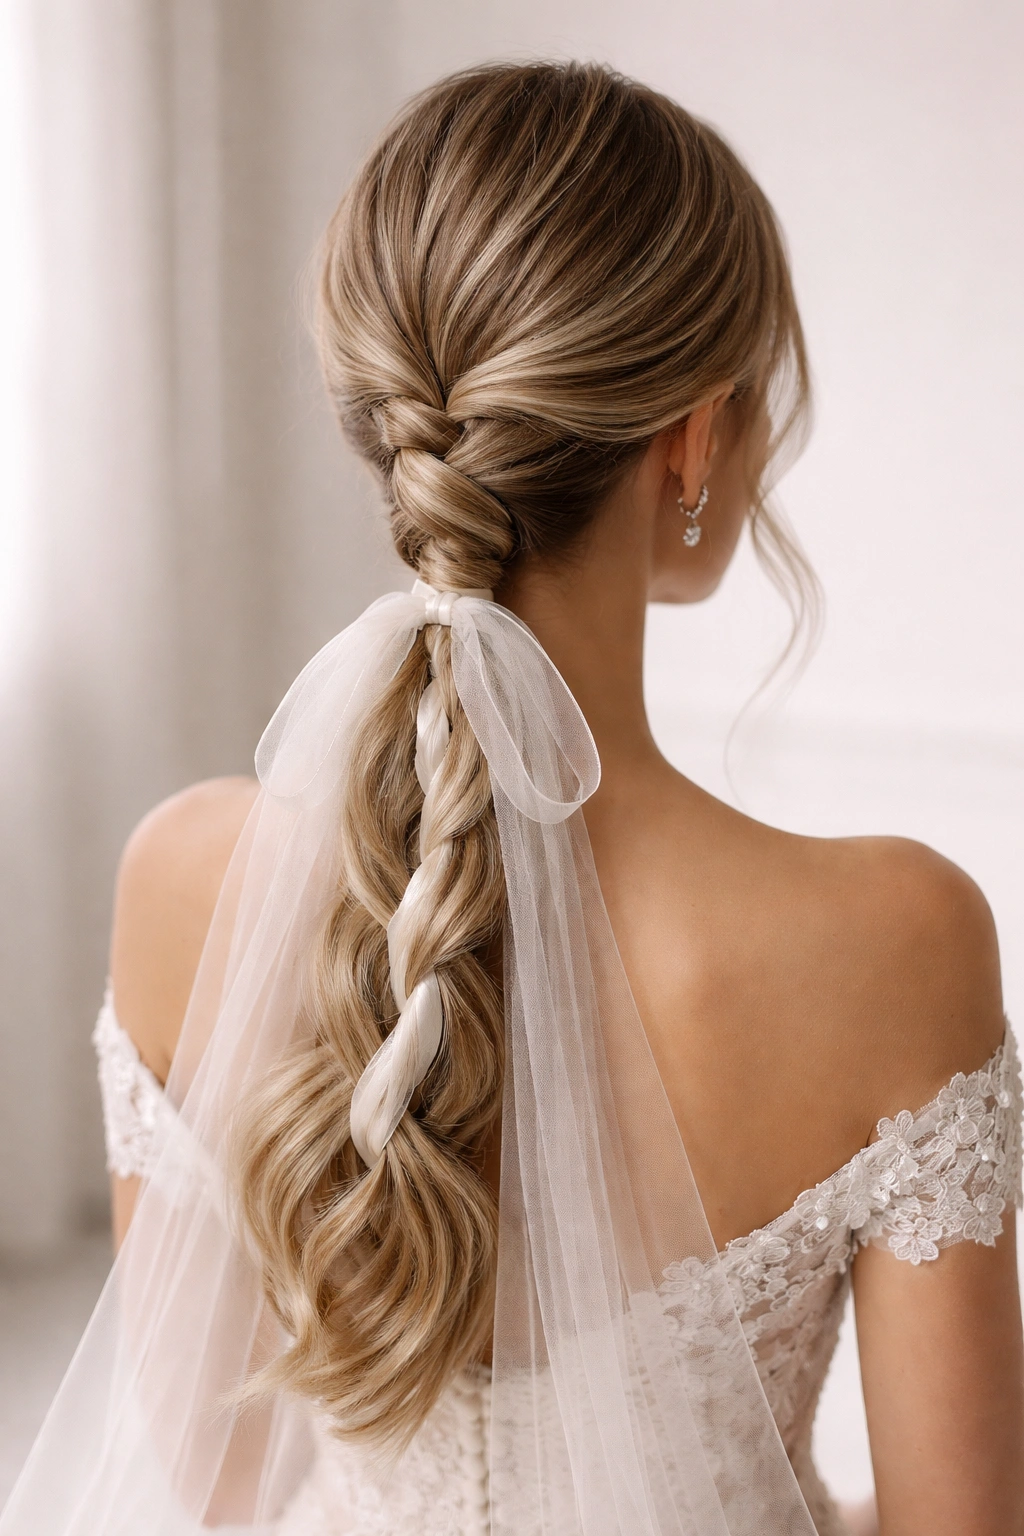
A low ponytail at the nape of your neck is elevated with the addition of tulle, satin ribbon, or even soft lace woven through the ponytail, creating a whimsical, romantic finish that feels distinctly bridal without being overdone. Two-strand twists replace traditional braids for a softer, more fluid appearance, and the decorative element is secured throughout the ponytail for both function and visual effect.
Why Tulle and Ribbon Add Magic
There’s something about adding a soft, feminine element like tulle or ribbon that instantly elevates a ponytail from “nice” to “wedding-ready.” The tulle or ribbon catches light and adds movement and dimension, making the style feel more formal and intentional. It’s also incredibly flexible — you can choose a tulle or ribbon that matches your dress, your flowers, or your wedding color palette, making the style uniquely yours. This is an excellent choice if your dress is whimsical, romantic, or vintage-inspired.
Incorporating Tulle or Ribbon Seamlessly
Gather your hair into a low, tight ponytail. Cut a piece of tulle or ribbon roughly 18-24 inches long. Fold it in half and loop it around your ponytail just above the elastic. Take two strands of your ponytail hair and create a two-strand twist around the tulle or ribbon, wrapping the twist around the ponytail as you work downward. Secure the bottom with bobby pins underneath, where they won’t be visible. The tulle or ribbon should be woven throughout the twist, visible and intentional. You can let the tulle fall loosely at the end of the ponytail for added romance, or tuck the ends under and pin them to keep the look more controlled.
Worth knowing: Silk ribbon works better than satin for this technique because it’s less slippery and easier to weave through twists. If you’re using tulle, choose a quality that’s soft and flowy rather than stiff or scratchy.
Final Thoughts

Choosing the right ponytail for your wedding day is about balancing what makes you feel confident and beautiful with what works practically for the event itself. Whether you’re drawn to sleek, architectural styles that showcase your bone structure or romantic, textured options that soften and frame your face, each of these styles can be customized to match your dress, your venue, and your personal aesthetic.
The secret to a wedding-ready ponytail isn’t complexity — it’s precision in the details. A truly polished ponytail comes from a tightly secured base, smooth styling from root to end, and intentional finishing touches like wraps, twists, or accessories that make the style feel purposeful rather than hastily thrown together. Take time with your blow-dry, invest in quality smoothing and styling products, and practice your chosen style at least twice before the actual day so you know exactly how long it takes and which products work best.
Remember that your ponytail should feel comfortable enough to forget about throughout the day — you shouldn’t be constantly checking it in mirrors or worrying about flyaways. The best wedding hairstyle is the one that looks beautiful in photos, feels secure when you’re dancing or celebrating, and lets you be fully present rather than preoccupied with your hair. Any of these styles, executed with care and the right products, will absolutely accomplish that.