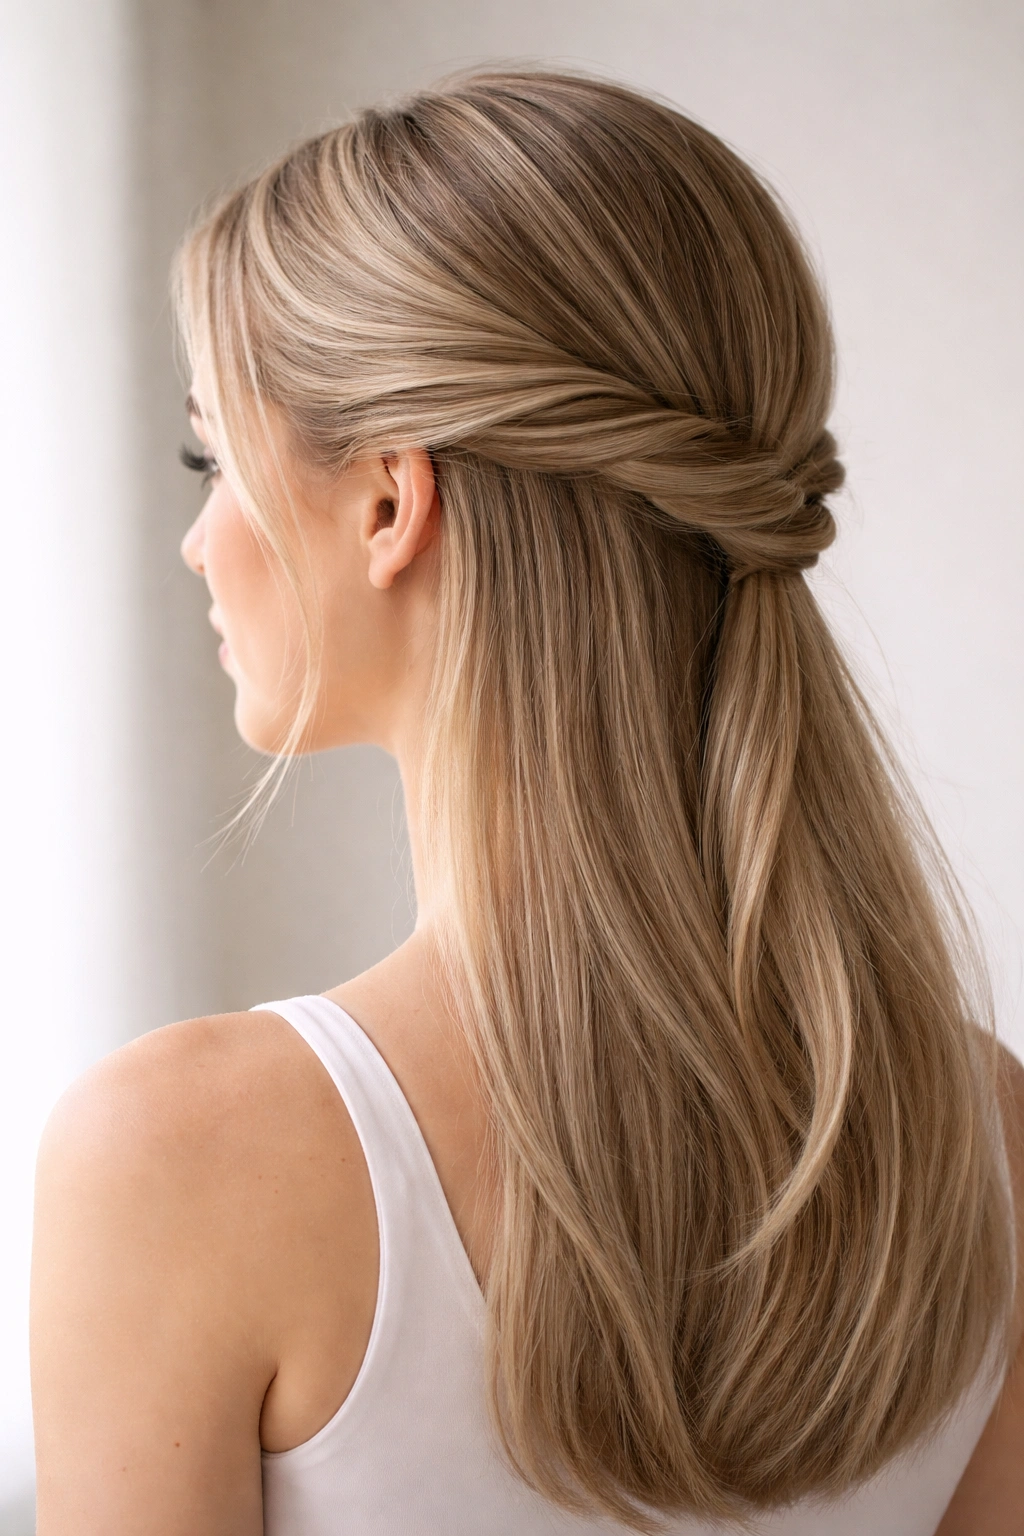
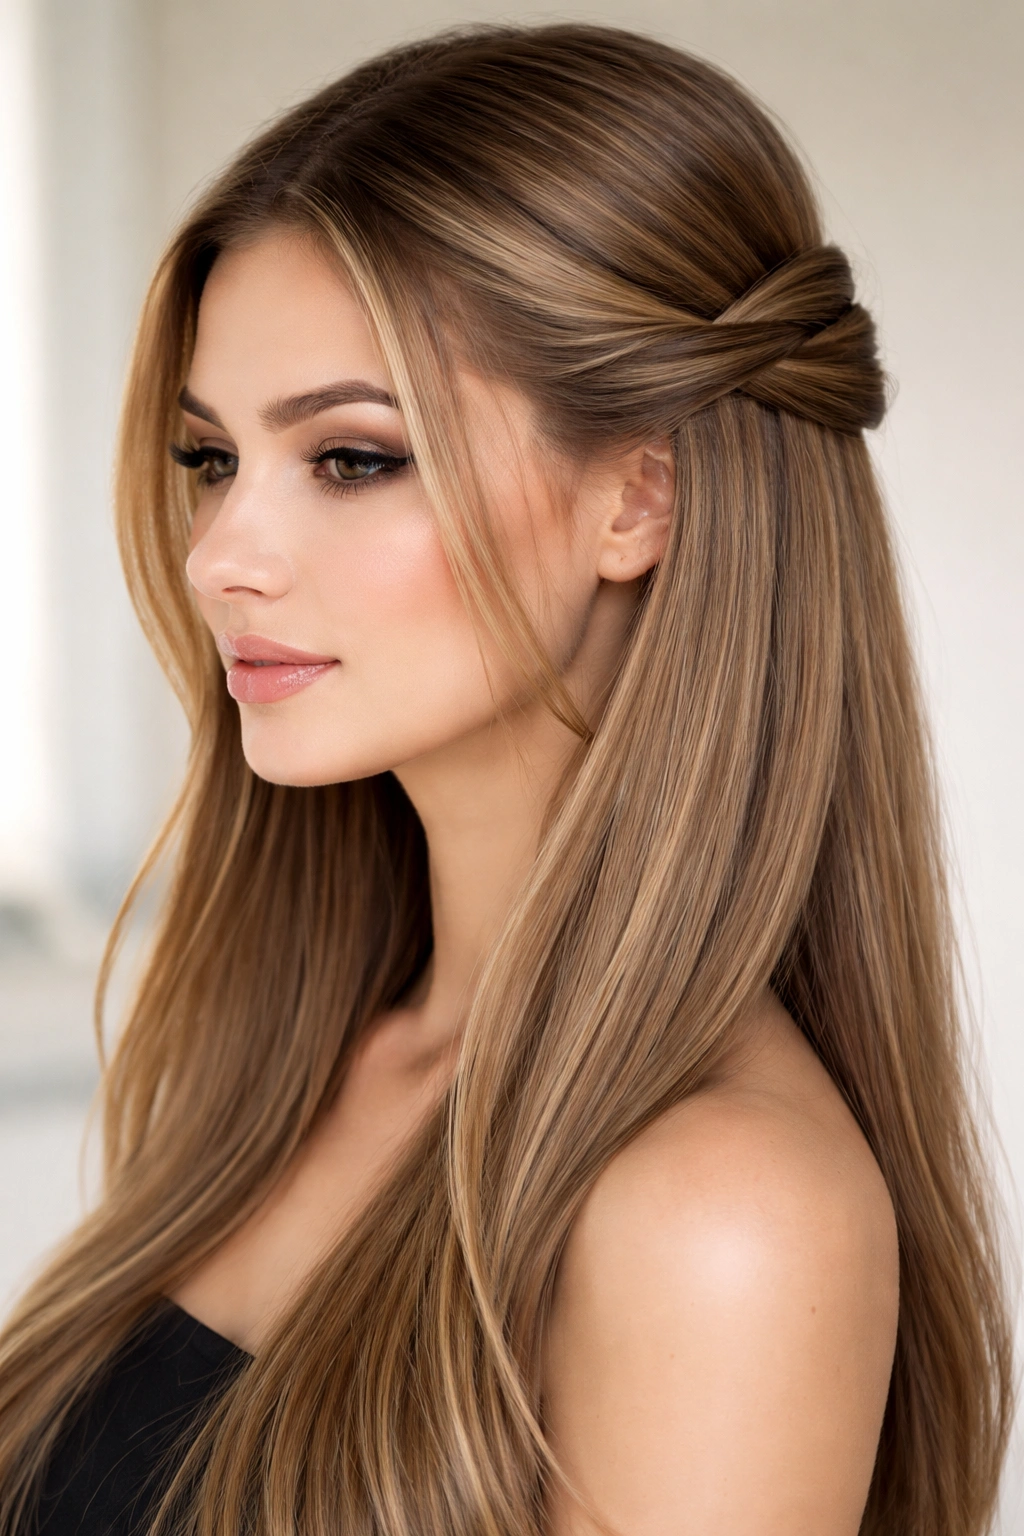
Straight hair might seem limited when you’re looking for versatile styling options, but the half-up half-down silhouette opens up a world of possibilities. This hybrid approach gives you the best of both worlds—volume and polish at the crown while keeping the length flowing freely. Whether you’re dressing up for an event or looking for a polished everyday style, half-up half-down twists offer the perfect balance between effortless and elegant.
The beauty of twisting your half-up section lies in the texture it creates against straight hair. While straight strands naturally lie flat, a twisted crown adds dimension, visual interest, and a refined quality that feels intentional without requiring a heat tool or complicated technique. For anyone with straight hair who wants to add movement and style without committing to a full updo, these twists are game-changers. They work equally well for professional settings, casual outings, or special occasions—you just adjust the tightness, the number of twists, and the finishing details to match the vibe you’re going for.
The best part? Most of these styles take under ten minutes once you understand the basic technique. Straight hair holds twists beautifully, and you won’t struggle with flyaways or frizz the way curlier textures sometimes do. All you need is a brush, a few bobby pins, and maybe some texturizing spray or dry shampoo to give your strands a bit of grip so the twists stay put throughout the day.
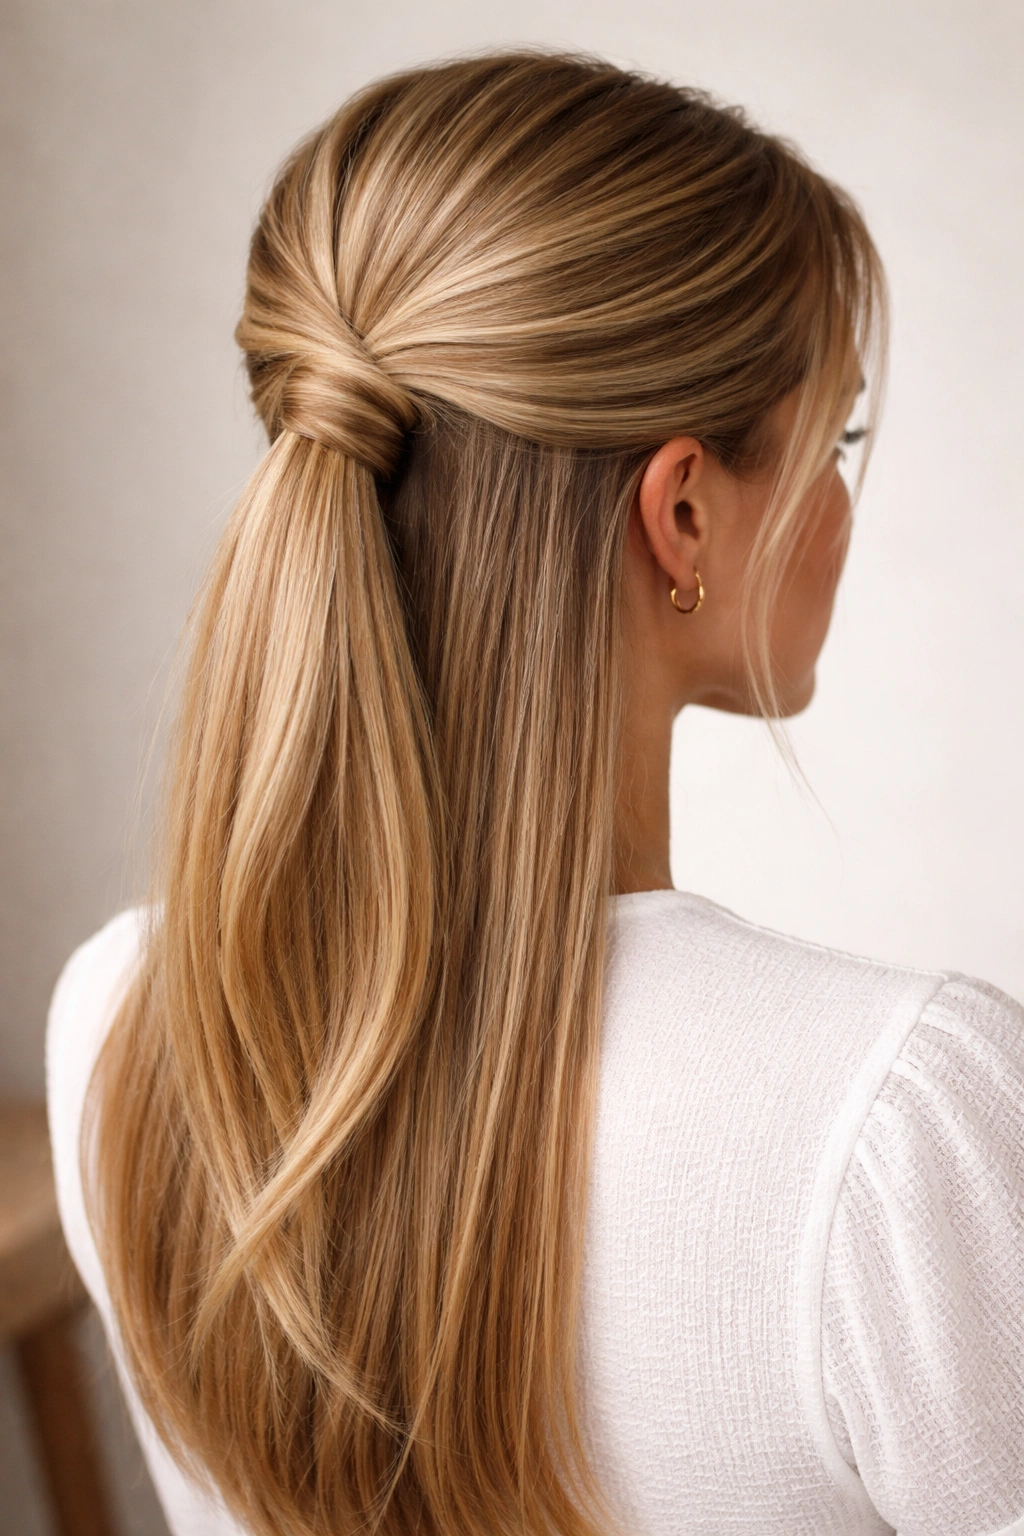
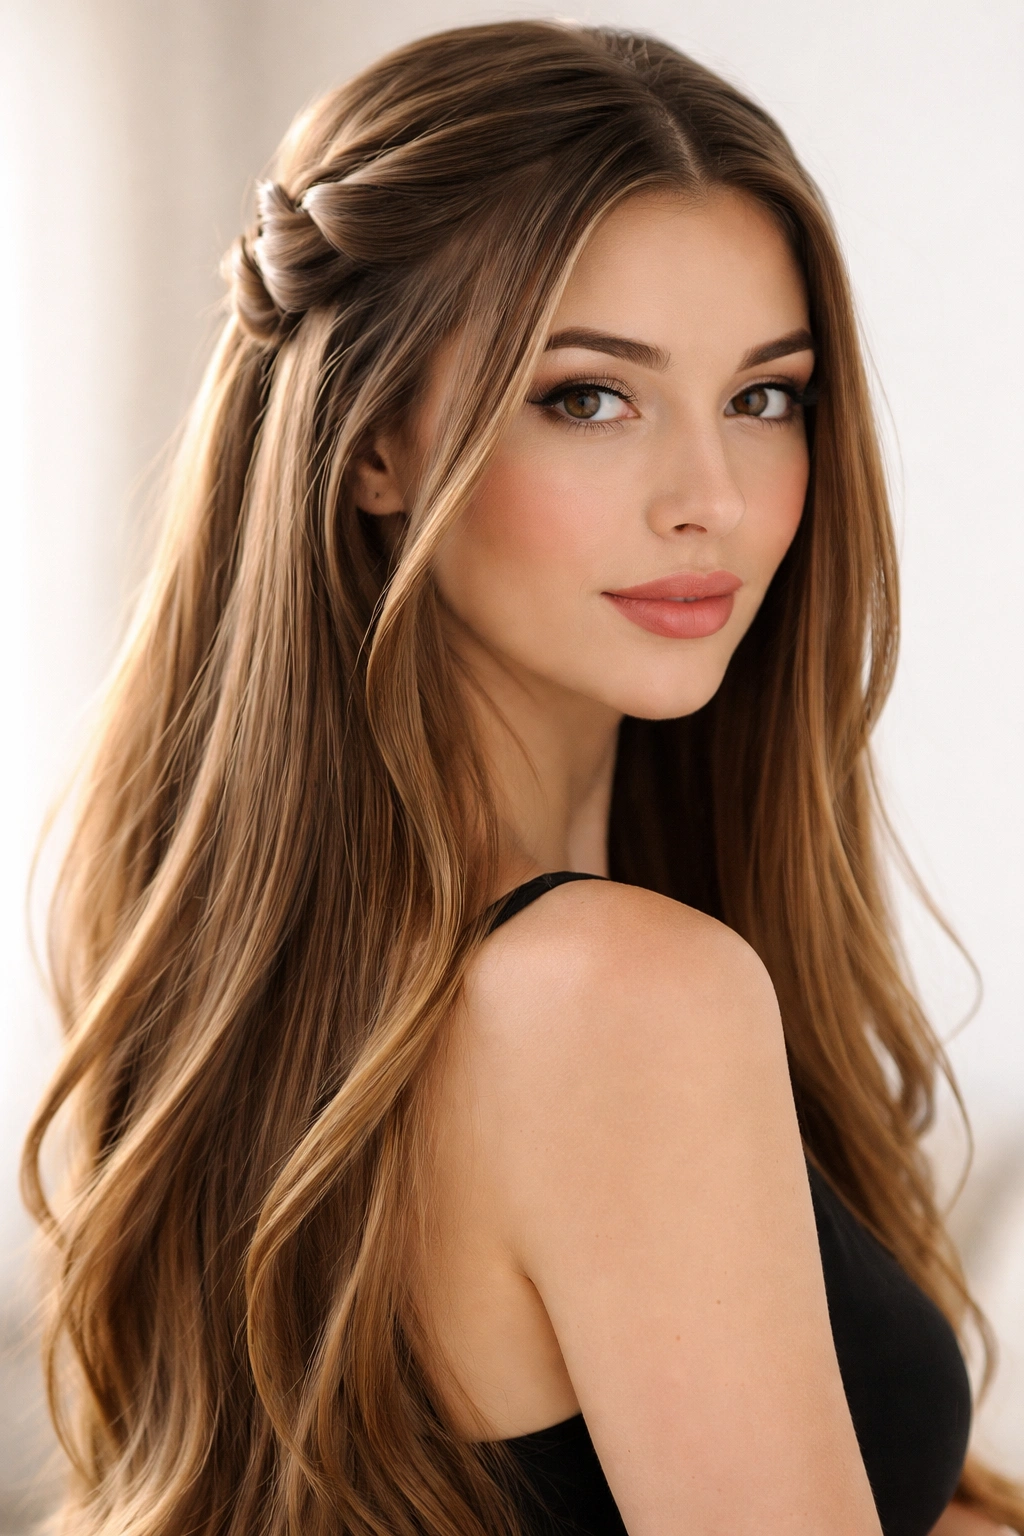
1. The Classic Twisted Crown
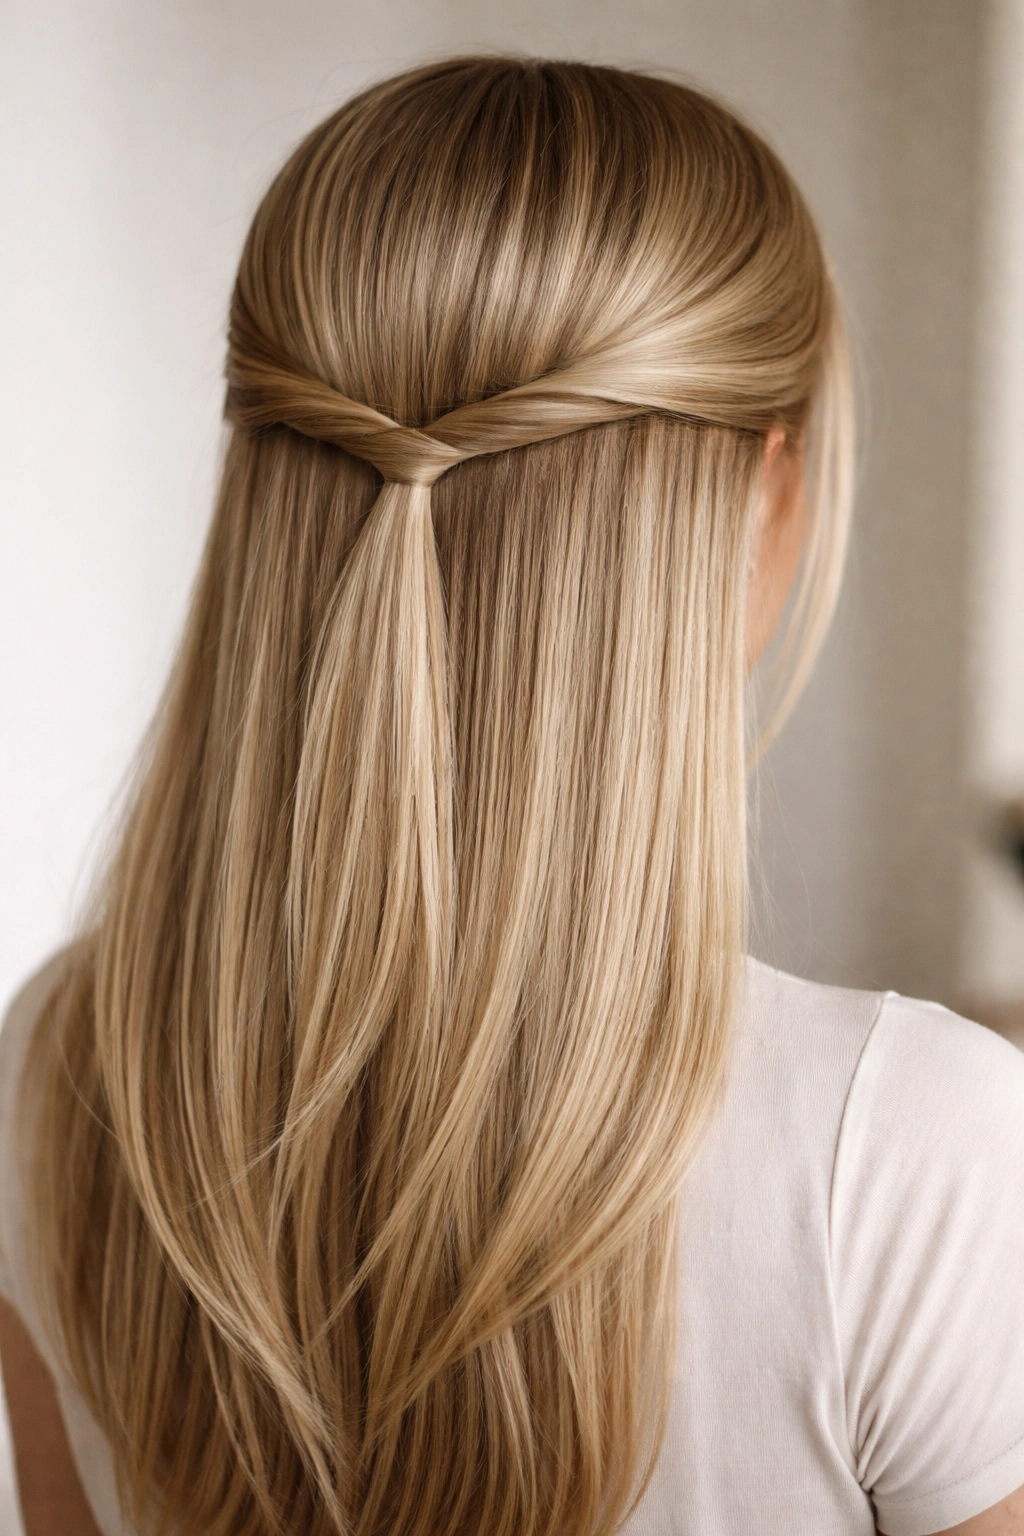
The most timeless half-up half-down variation, the classic twisted crown works for literally any occasion. You’re creating a single twist (or sometimes two for extra fullness) that runs horizontally across the back of your head, gathering hair from both sides and securing it with pins. What makes this style feel elevated is its simplicity—there’s nowhere to hide, so clean sectioning and even tension are everything.
How to Perfect the Classic Twisted Crown
Start by creating a clean deep side part. Take a section of hair from your temple on the fuller side of the part, twist it back toward the crown, and then grab a similar section from the opposite side. Twist both sections together as if you’re making a double helix, and secure the finished twist at the back with bobby pins tucked underneath for invisibility. The tightness matters here—not so loose that it falls out within an hour, but not so tight that it looks strained or feels uncomfortable.
Why It Works for Straight Hair
- Creates an instant polished silhouette that reads as intentional styling
- The smooth texture of straight hair makes the twist visually clean and defined
- Works beautifully with blunt bangs, curtain bangs, or a full face-framing section left down
- Pairs perfectly with minimal makeup or a sleek low ponytail underneath if you’re going for extra drama
- Takes genuinely five minutes once you’ve done it a few times
Pro tip: Use a texturizing spray or light dry shampoo on clean or second-day hair—slick, freshly washed strands will twist smoothly but might slip out of your pins. A tiny bit of grit gives the twist something to grip.
2. The Double Twist with Center Parting
For a more graphic, intentional look, create two symmetrical twists that meet in the middle. This style feels modern and architectural, especially with a ruler-straight center part. You’re essentially creating a mirror image on both sides, which gives the style a formal quality that works beautifully for events or polished everyday styling.
The Symmetrical Approach
Part your hair down the middle from your forehead to the nape of your neck. Take a section from the front hairline on one side, twist it toward the back of your head, and secure it just past the center line with bobby pins. Repeat exactly the same on the other side, making sure your twists are similarly tight and positioned at the same height. The symmetry is what makes this work—asymmetry here reads as accidental rather than intentional.
Technical Details and Styling Tips
- Start each twist slightly higher than you think you need to—gravity will pull it down as you work
- For maximum impact, twist all the way to the ends and then wrap them around the secured base for a fuller crown
- Leave a face-framing section on both sides if you want softness—it prevents the style from feeling too severe
- Add a delicate hair clip, pearl bobby pins, or a small metallic claw at the center point where the twists meet for an extra detail
Worth knowing: This style shows every hair, so it’s best attempted on freshly brushed or blow-dried hair with no visible bumps or tangles. Straight hair’s natural sleekness actually works in your favor here.
3. The Spiral Twist with a Low Gather
Instead of twisting straight back, create a spiral motion by twisting one section all the way around your head like you’re following your hairline. This creates a halo effect that’s softer and more romantic than a straight-back twist. You’ll end up gathering everything at a low point rather than at the crown, which works beautifully if you have a longer face or prefer a less severe look.
Creating the Spiral Effect
Begin at your temple with a small section of hair. Twist it as you work backward and around your head, continuously adding small sections from your hairline as you go. The motion should feel like you’re drawing a spiral from front to back to side. By the time you reach the opposite temple, you should have incorporated hair all the way around. Secure everything with pins at the low point you’ve chosen—at the nape, just behind one ear, or wherever feels balanced on your face shape.
Why Spiral Twists Flatter Straight Hair
- The continuous motion creates movement without needing any actual curl or wave
- Straight hair holds the twist shape perfectly, making the spiral visually clear
- This style works on all face shapes because you control exactly where the gathering point falls
- It’s forgiving if your sections aren’t perfectly even—the spiral motion disguises minor inconsistencies
- The lower gathering point works beautifully with longer lengths or if you want less hair pulled away from your face
Insider note: If you have very thick hair, break the spiral into two thinner twists that interlock as they spiral around. You’ll get the same effect without needing an army of bobby pins.
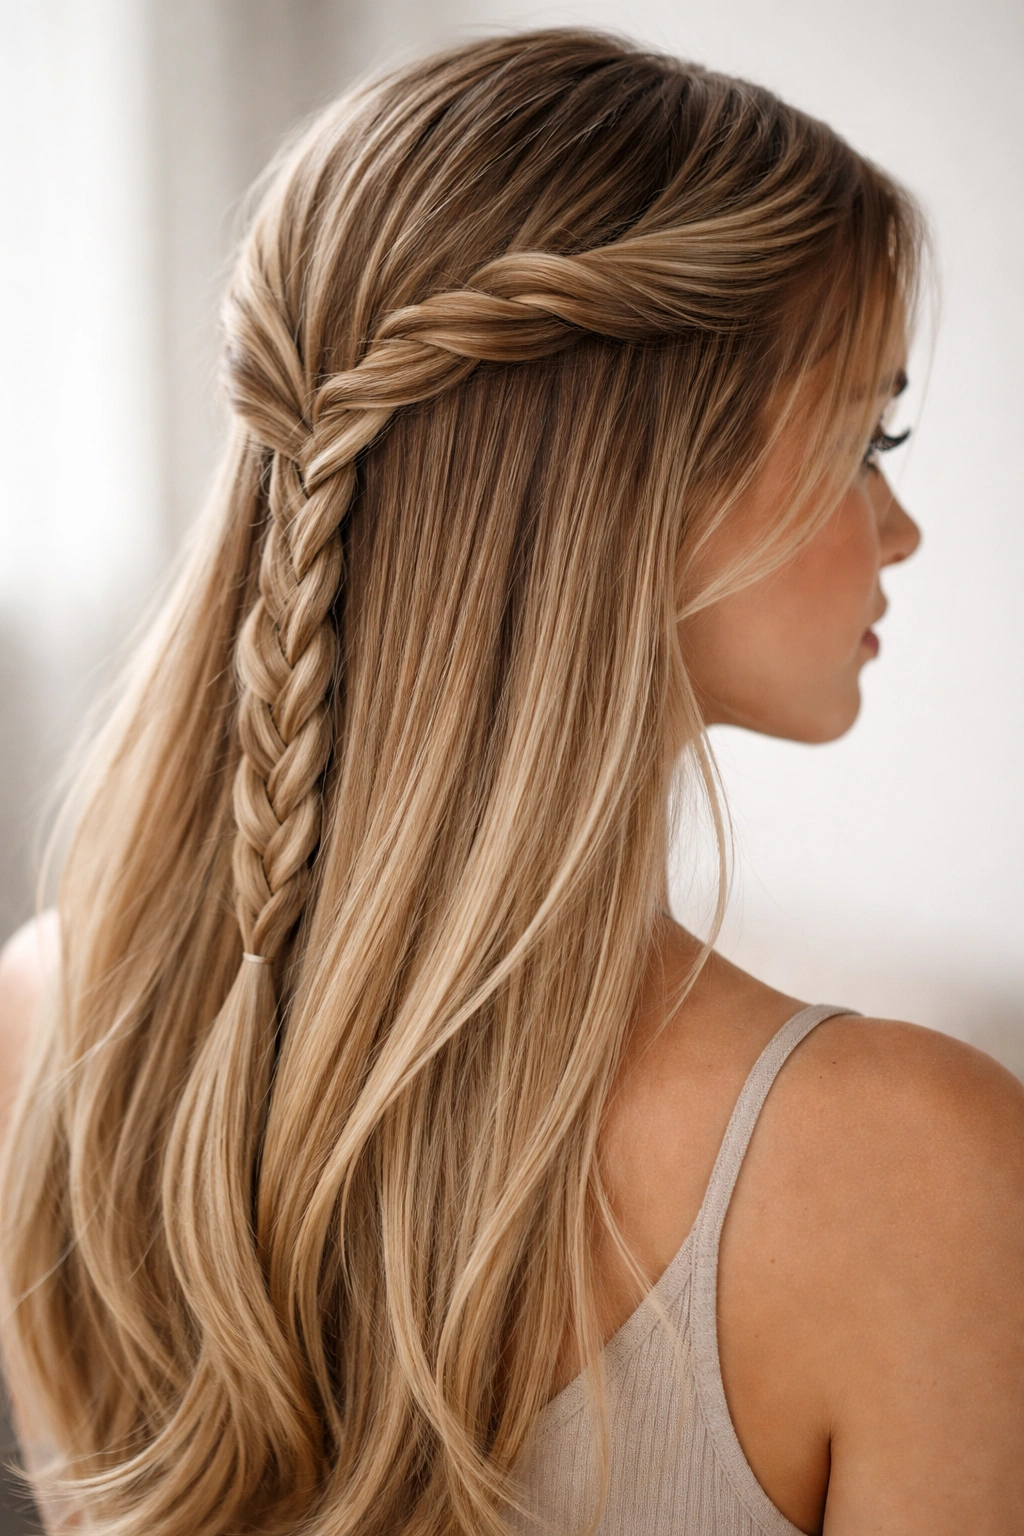
4. The Rope Twist with Braided Accent
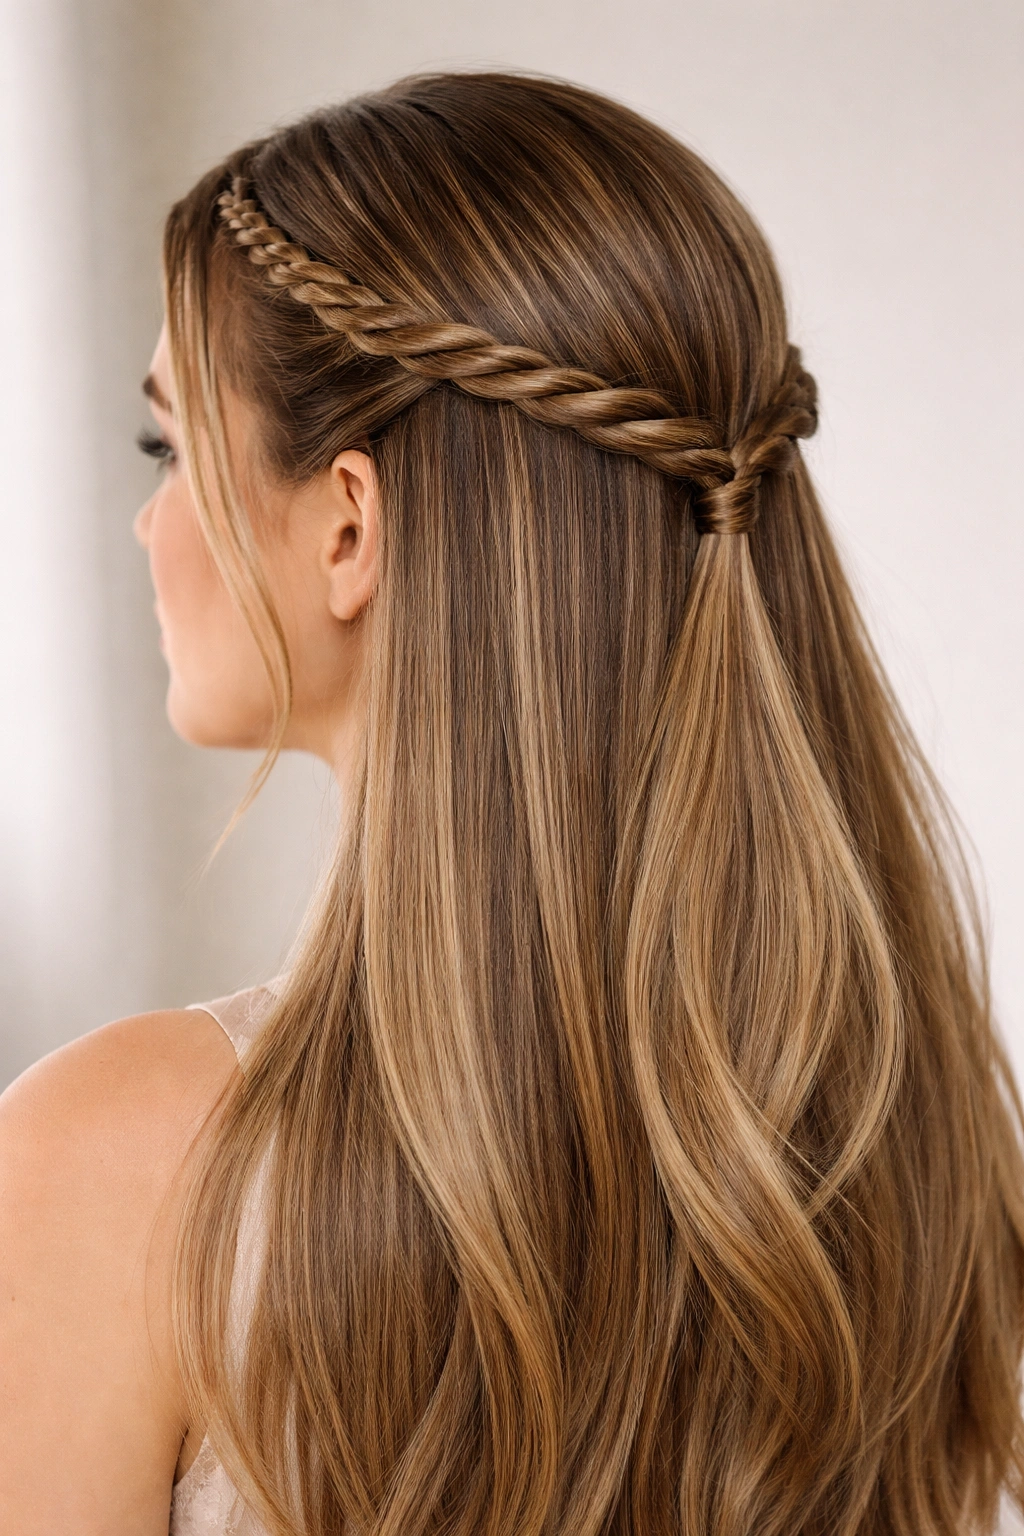
A rope twist is created by twisting two strands around each other (rather than wrapping a single strand around itself), which creates a different visual texture than a standard twist. To elevate it further, add a thin three-strand braid along one side of your face before beginning the rope twist. This creates visual interest and a more intricate style while still maintaining the half-up silhouette.
The Rope Twist Technique
Divide your half-up section into two equal pieces. Hold them taut and twist each strand individually so both pieces spiral clockwise (or both counterclockwise—consistency matters). Then wrap one twisted strand around the other to create the rope effect. The result is a thicker, more textured twist that feels more interesting than a single twisted strand.
Building in the Braid Detail
Before you create the rope twist, take a thin section from your front hairline and braid it loosely all the way back. This braid becomes part of your half-up section and gets incorporated into the rope twist as you secure everything. The combination of braid and rope creates visual complexity that looks like you spent thirty minutes on your hair when you actually spent eight.
Pro tip: Rope twists look best when they’re slightly loose and relaxed—if you pull them too tight, they flatten and lose dimension. Aim for a gentle tension that you could comfortably run a finger through.
5. The Twisted Ponytail Base
Instead of a standard elastic hair tie creating your half-up point, create the gathering with a twisted section. You’ll twist hair from both sides toward a center point, then use that twisted section as the anchoring point for a secondary ponytail or bun. This feels elevated because the elastic is hidden beneath the twist, making it look like the twist itself is somehow defying gravity and holding everything in place.
Two-Step Secure Method
First, create a standard half-up section by twisting sections from both sides toward the back. Secure this twisted crown with bobby pins. Then, take the full half-up section (including the twisted part plus any additional hair you want to include), and gather it into a ponytail using an elastic. The twist you created with the bobby pins now sits above the elastic, creating a layered effect that’s much more interesting than a plain half-up do.
Why This Method Works
- The twist draws visual focus to the crown while the ponytail keeps everything secure
- You can adjust the height and position of the ponytail to create different vibes—higher for sporty, lower for romantic
- Straight hair shows off this layering beautifully because there’s no frizz to hide the transition
- Works with loose ponytails, tight ponytails, braided ponytails, or even a small bun
- The combination of twist and ponytail reads as more intentional than either element alone
Worth noting: If your ponytail sits too low, the twist can look like a separate element rather than part of the whole. The key is positioning the elastic close enough to the twisted section that they feel connected.
6. The Crossover Twist
Create two twists that begin at opposite sides of your face and cross over each other in the middle before securing at the back. The crisscross pattern adds visual drama and works beautifully for occasions when you want your hair to be the focal point of your look. This style works especially well if you have longer straight hair because the crossed pattern is more visually striking with length.
Step-by-Step Crossover Execution
Begin at your left temple with a section of hair that’s about two inches wide. Twist it smoothly toward the back of your head, but instead of securing it immediately, keep it in place with one hand. Start a second twist at your right temple, twisting it toward the back at a slightly lower angle so it will cross over the first twist. When both twists meet, arrange them so they visibly cross each other, then secure both together at the back with bobby pins.
Styling Variations
- Tighten both twists for a graphic, geometric look
- Keep them slightly loose for a softer, more romantic version
- Wrap the ends around the base to create a fuller crown at the gathering point
- Leave a longer face-framing section on both sides for balance
- Add a delicate clip or hair stick through the crossing point for an extra detail
Pro tip: The crossing point becomes the visual focus of the style, so position it somewhere that feels balanced on your head. If you cross too high, it can look accidental; if too low, it feels overdone.
7. The Twisted Half-Up with Ribbon or Fabric Accent
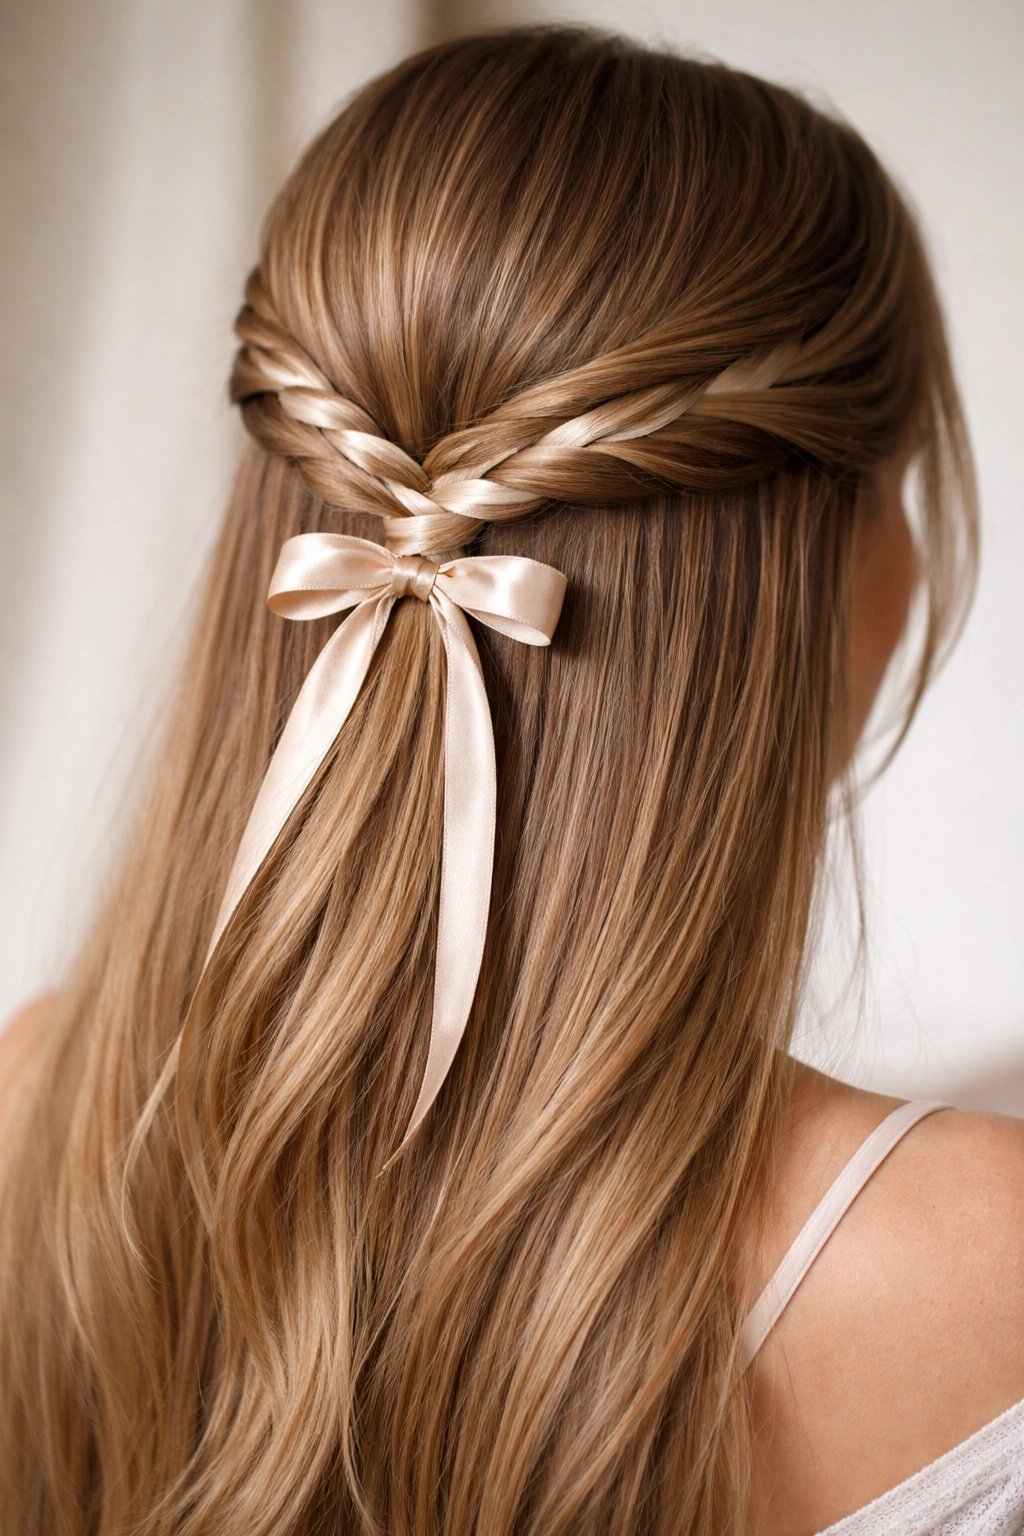
Take a standard half-up twist and weave a ribbon, silk thread, or strip of fabric through it as you’re securing it. The ribbon adds color, texture, and visual interest without requiring any additional hairstyling skill—you’re just incorporating a ribbon into a technique you already know. This style feels feminine and intentional, and the fabric helps hold the twist in place while adding a polished finish.
Ribbon Weaving Technique
As you’re creating your twist, position the ribbon so it runs parallel to your twisted hair. Weave it over and under the twist as you work backward, or simply let it wrap around the twist. Once you’ve secured the twist with bobby pins, wrap the ribbon ends around the base and tie them off or tuck them under a small bow. The ribbon should feel like an integral part of the style, not an afterthought.
Material Choices That Work Best
- Silk ribbons create an elegant, refined look
- Grosgrain ribbons add a preppy, put-together quality
- Metallic threads add glamour and catch the light
- Leather strips or cord create an edgier, modern vibe
- Lace ribbon works beautifully for romantic occasions
Insider note: Thinner ribbons (about ½ inch wide) weave more smoothly through the twist, while thicker ribbons sit on top more visually. Choose based on whether you want the ribbon integrated or showcased.
8. The Thick Twisted Crown with Wraparound Ends
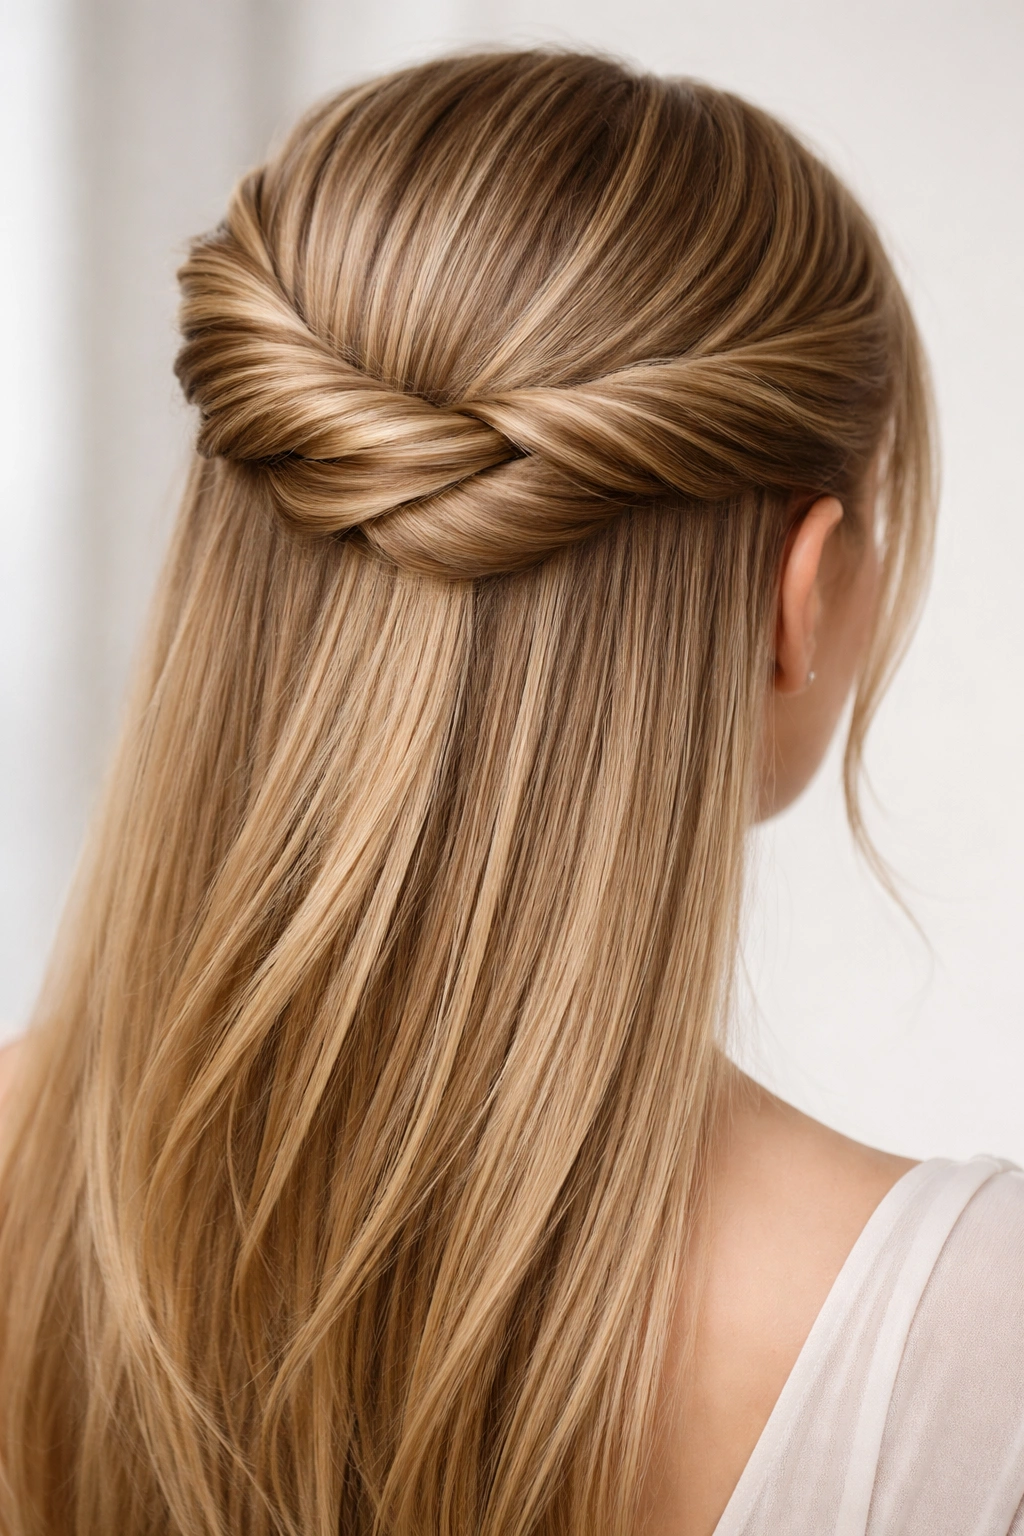
Instead of just twisting sections from both sides, gather a much thicker section of hair and divide it into two large pieces that you twist individually, then wrap around each other. This creates a substantial, very visible twisted crown that feels luxe and intentional. The thickness gives straight hair actual body and dimension, which is harder to achieve with thinner twists.
Building Thickness Into Your Twist
Begin at the temples and work backward, but gather larger sections than you normally would. You want your half-up section to be roughly one-third to one-half of your total hair volume. Divide this section into two pieces, twist each one fully, then wrap them around each other. The resulting crown will feel substantial and visible from all angles.
Taking It Further with Wraparound Details
Once you’ve created the thick twisted crown, don’t just secure it at one point. Take the twisted ends and wrap them around the base of the crown, anchoring them with bobby pins so they create a fuller, almost bun-like shape. This gives the illusion of much more volume than you actually have and looks especially striking from the back.
Pro tip: This style looks best on straight hair because the sleekness of straight strands shows off the clean twist lines. Curly or wavy hair would diffuse the visual impact.
9. The Asymmetrical Twisted Side Sweep

Instead of creating symmetrical twists or a centered crown, pull all your half-up hair toward one side of your head and create a thick, relaxed twist that sits above your ear. This asymmetrical approach feels modern and flattering, especially if you have a longer face or want to draw attention to one side. The side-swept version also works beautifully with slightly wavy or textured straight hair because the movement adds to the asymmetrical vibe.
Creating the Side-Swept Asymmetry
Use a deep side part to your preference. Take a much larger section of hair from the fuller side of your part and gather it toward the opposite side of your head, creating a twisted section as you work. Secure the twist above your ear on the opposite side, leaving your face-framing pieces loose and flowing toward the twisted side. The result is a style that elegantly frames your face while maintaining the half-up silhouette.
Why Asymmetry Works
- Creates visual interest and feels more modern than symmetrical styles
- Flatters many face shapes by directing attention strategically
- Works with multiple texture and length variations
- Easy to adjust the degree of asymmetry to match your preference
- Feels effortless even though it’s intentional
Worth knowing: The side-swept twist looks best when you leave at least one face-framing piece loose. This softens the style and prevents it from feeling too severe or pulled.
10. The Double Twisted Spiral
Create two separate spiraling twists that curve around opposite sides of your head and meet at the back. Instead of one spiral that goes all the way around, each side gets its own spiral twist that creates a frame around your face. When both spirals meet at the nape or low point, you have a gathered half-up style with significant visual impact and movement.
The Dual Spiral Approach
Begin at your left temple with a section of hair. Twist as you spiral backward and slightly downward toward the nape. Add sections as you go, continuously twisting. Do the same on the right side, spiraling at the same angle and speed. When both spirals reach the back, secure them together. The shape created is almost like two flowing ribbons that frame your face and meet at the gathering point.
Design Considerations
- Make sure both spirals follow a similar path and tightness—asymmetry here should be intentional, not accidental
- This style works beautifully with longer hair because the spirals have more distance to travel
- You can tighten the spirals for a formal look or keep them loose for something more casual
- Leave face-framing pieces loose if you want softness, or wrap everything back for a cleaner look
Pro tip: Mark where you want your gathering point before you start. It’s easier to work toward a specific destination than to figure out where to secure everything once you’ve finished the spirals.
11. The Twisted Braid Hybrid
Combine a twist and a braid in a single half-up style by creating a twisted section from one side and a braided section from the other side, then twining them together as you gather them at the back. This hybrid approach gives you texture variation and looks significantly more complex than it actually is. The twist and braid sections interact visually in interesting ways, especially on straight hair where the textures are distinct and visible.
Building the Hybrid Section
Take a section from your left temple and twist it toward the center-back. Simultaneously, take a section from your right temple and create a three-strand braid working toward the center-back. As both sections reach your gathering point, weave the twisted section and braided section together, then secure both with bobby pins. The contrast between the smooth twist and the textured braid creates visual complexity that elevates a simple half-up.
Visual Impact and Benefits
- The combination of twist and braid reads as intentional and intricate
- Straight hair makes both textures visually distinct and clear
- This style disguises imperfect sections or uneven thickness because the variations become part of the design
- Works beautifully for formal events or polished casual styling
- Holds incredibly well because you’re using two different anchoring techniques
Worth noting: The twist and braid need to travel at roughly the same speed and follow roughly the same path, or they’ll look like separate elements rather than parts of a cohesive style.
12. The Relaxed Twisted Knot
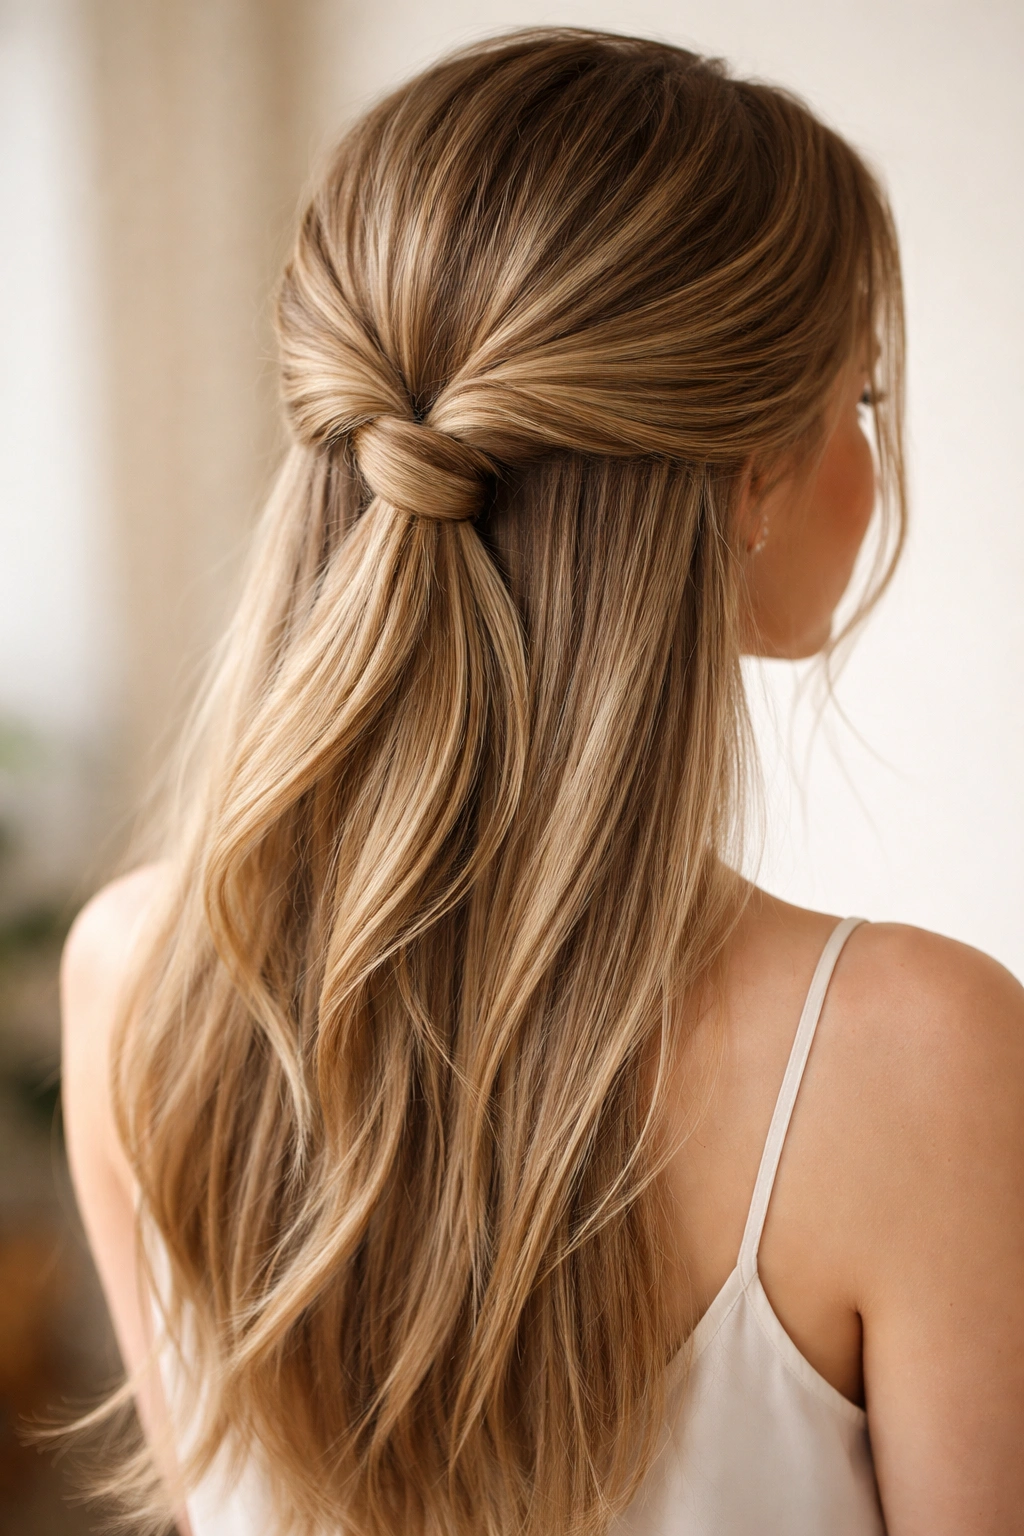
Instead of securing your twisted sections with bobby pins, wrap them around each other at the back of your head and tie them off like you’re creating a knot. The knot becomes a visual element itself rather than a hidden gathering point. This works best with thicker, longer hair and creates an effortlessly romantic look that feels intentional without appearing fussy.
Creating the Twisted Knot Base
Create two thick twisted sections from both sides of your head, working them toward a center point at the back. Once both twisted sections meet, take one twisted section and wrap it around the other, creating a loose knot shape. Secure the knot with bobby pins tucked underneath, making sure the knot itself stays visible from the back and sides.
Why Knots Work on Straight Hair
- The smooth texture of straight hair makes the knot shape visually clear and defined
- You don’t need the grip or texture that curly hair provides—straight hair holds knots beautifully
- The knot creates actual volume and dimension at the crown, which is harder to achieve with just pins
- This style works with either a loose, romantic knot or a tighter, more structured one
- Leaving pieces loose around the knot softens the overall effect
Insider note: If your hair is very slippery, add a texturizing product or use second-day hair that’s had time to accumulate natural oils. Freshly washed, slick straight hair might slip out of the knot throughout the day.
Final Thoughts
The half-up half-down twist is your secret weapon for looking styled without investing serious time or effort. Straight hair is actually ideal for twisted styles because the sleek texture makes every twist visually defined and clean, and the strands hold the shape throughout your day without frizz or flyaway complications. Whether you’re going for a classic twisted crown, something more elaborate like a crossover twist, or a romantic spiral variation, you’ve got endless options.
The best approach is to practice a couple of these styles until they become automatic, then branch out to others once you’re comfortable with the basic twisting technique. Start with the ones that match your current hair length and face shape, but don’t be afraid to experiment. What feels awkward the first time becomes second nature after you’ve done it a handful of times.
The real magic of these styles is that they bridge the gap between “my hair is down” and “I’ve done something with my hair.” You get the freedom and movement of wearing your hair down while still achieving that polished, intentional feeling that comes with styling. That balance is why half-up half-down twists work for every season, every occasion, and every mood.