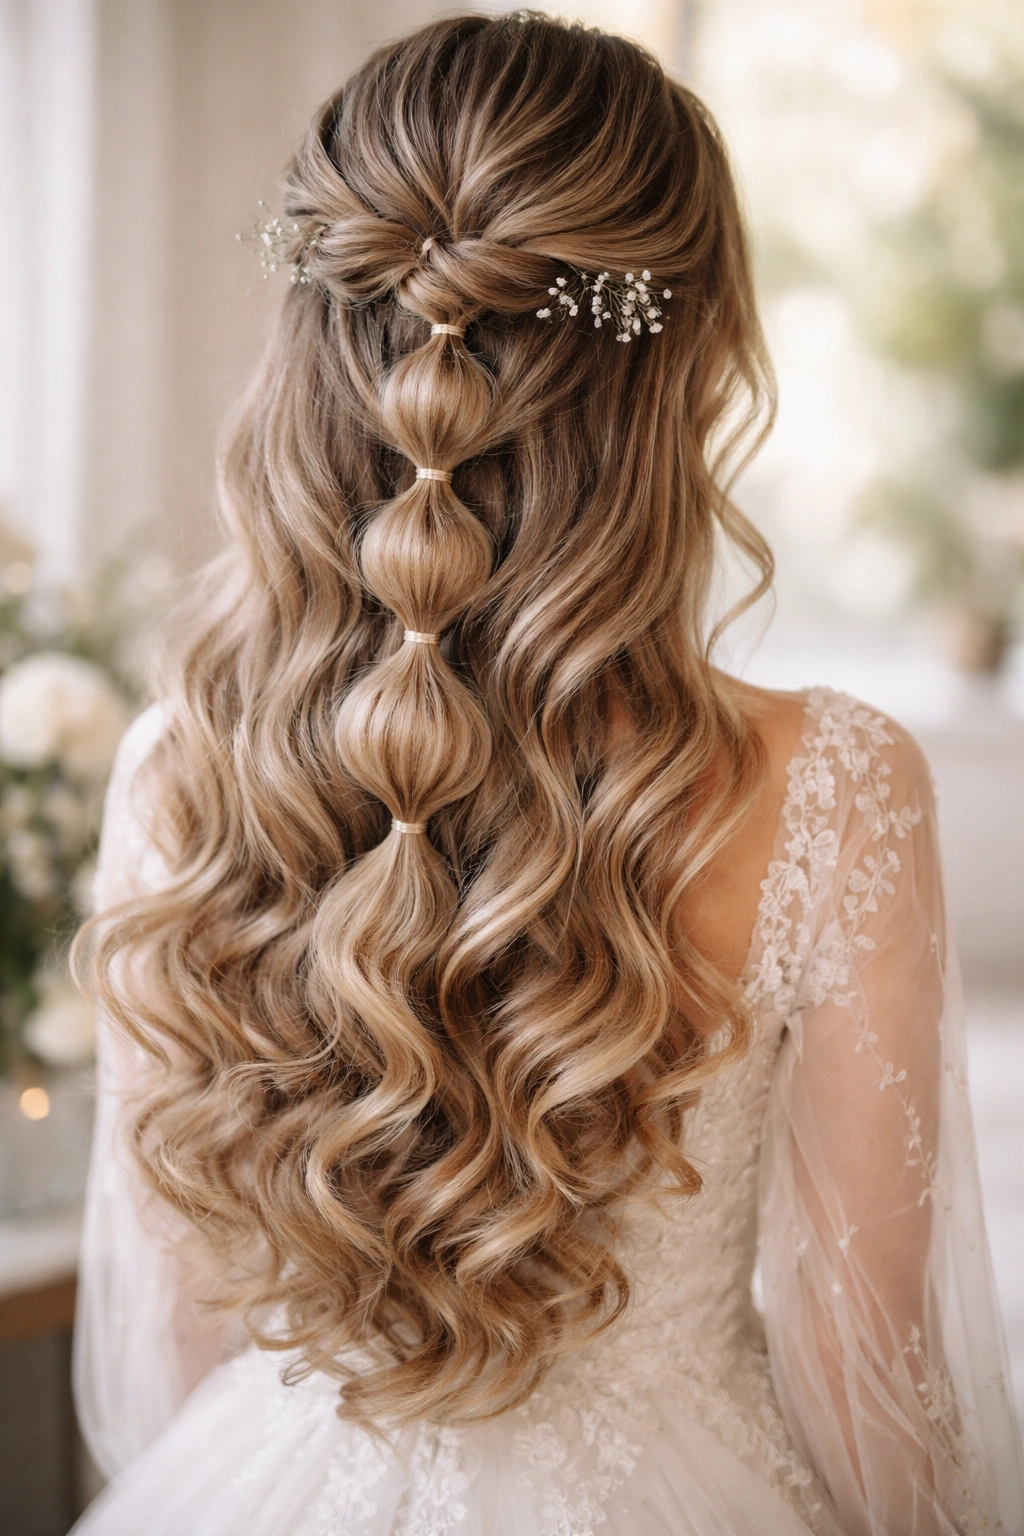
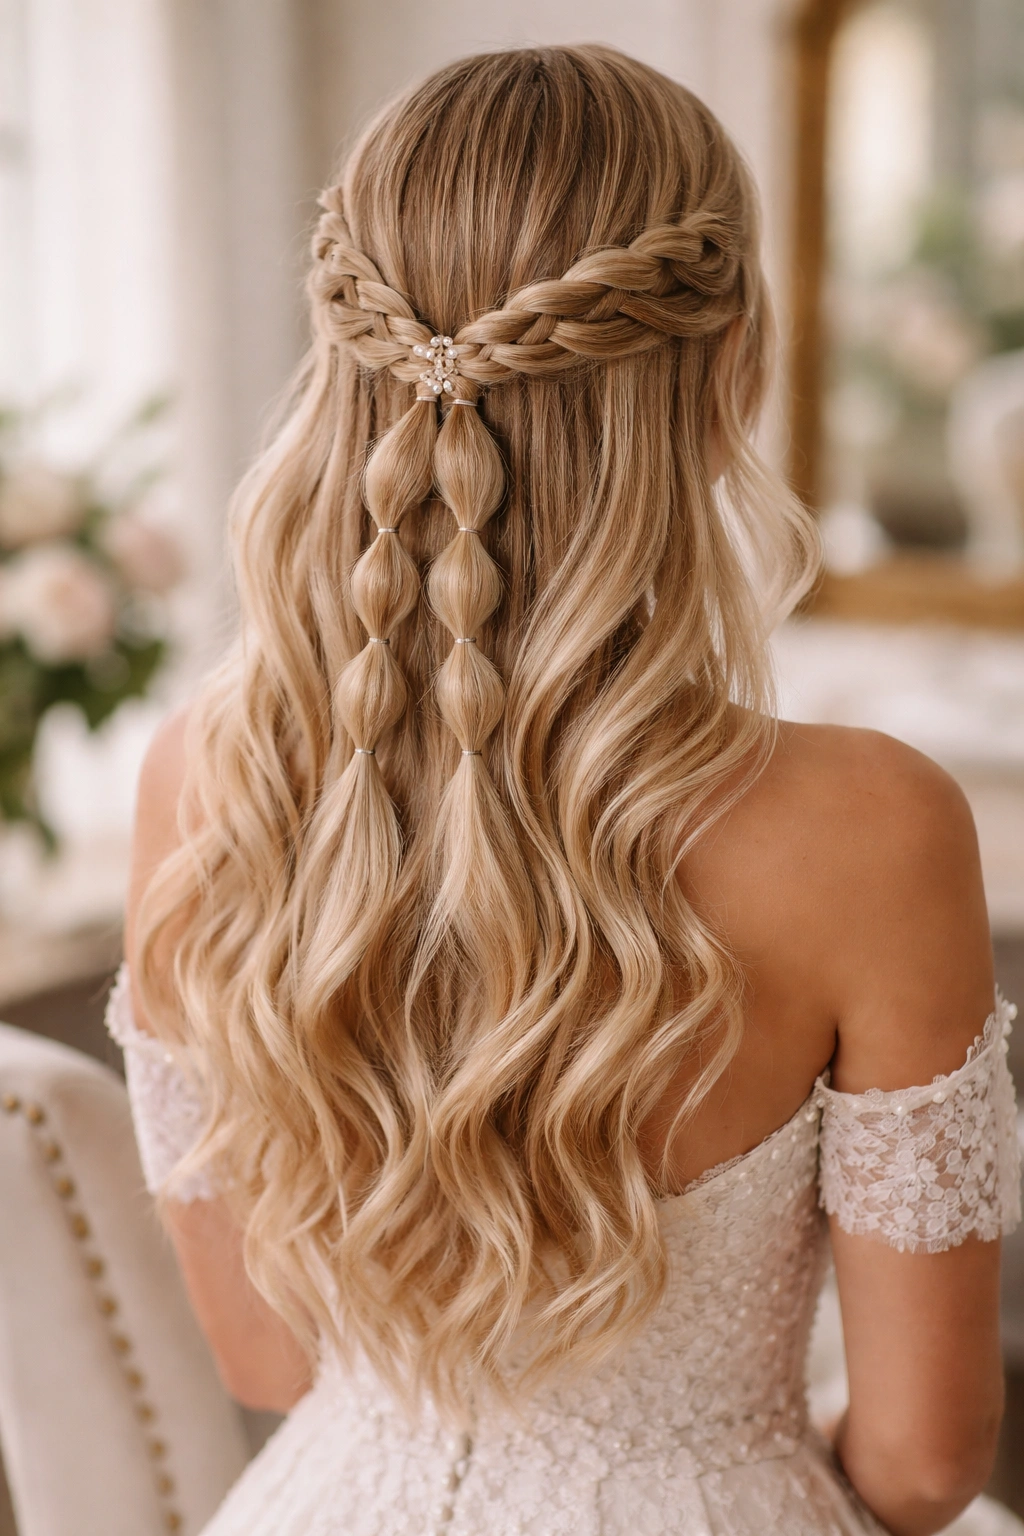
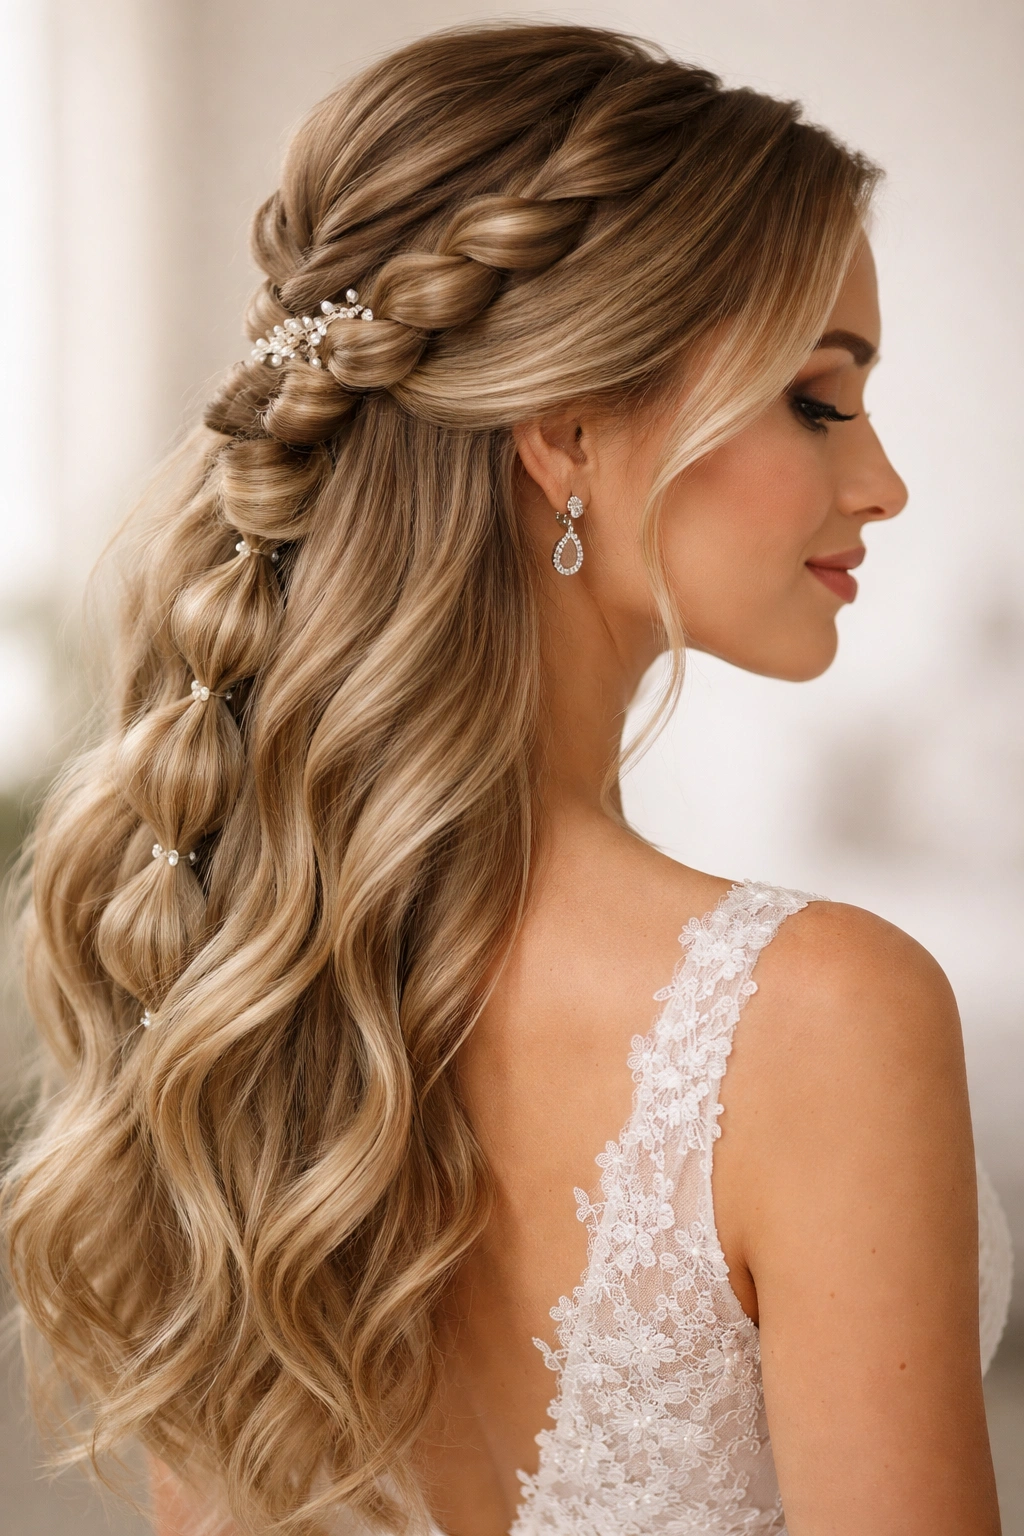
There’s something undeniably romantic about a hairstyle that walks the line between fully up and fully down — and bubble braids have become the go-to choice for brides and bridesmaids who want to look polished without sacrificing movement and softness. A bubble braid works by creating a series of small ponytails stacked vertically, then gently pulling out the hair between each tie to create those signature “bubbles” that catch light beautifully in photographs and look utterly effortless in person (even though they absolutely aren’t).
The beauty of wearing a bubble braid in a half-up, half-down configuration for a wedding is that it gives you the best of both worlds. The secured upper portion keeps hair off your face and neck — crucial if you’re wearing a detailed gown neckline, statement earrings, or a veil — while the flowing bottom section maintains the romantic, goddess-like quality that wedding hair should deliver. Whether you’re going minimal and modern or maximalist and embellished, there’s a bubble braid half-up style that matches your wedding aesthetic perfectly.
These aren’t your everyday hairstyles either. These are the kinds of braids that look stunning in candid shots, photograph beautifully from every angle, and hold up genuinely well through a ceremony, reception, and potentially late-night dancing. The key is understanding which variation suits your hair texture, face shape, dress style, and personal vision — and knowing exactly how to execute it so it doesn’t unravel mid-vow or look limp by the time you hit the dance floor.
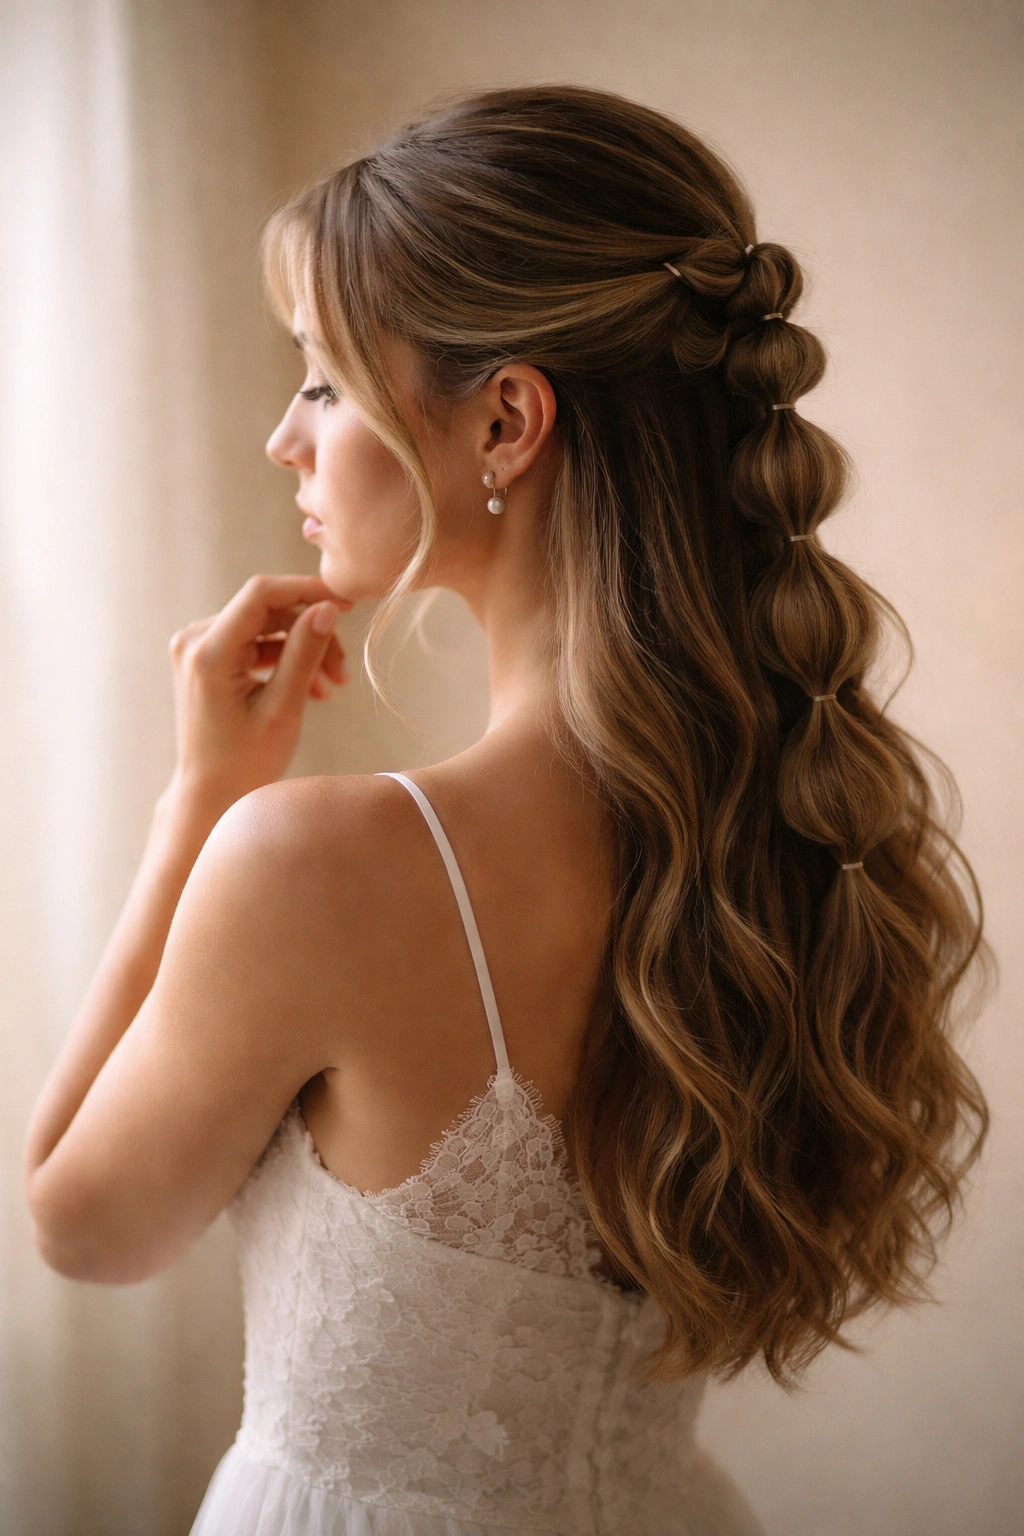
1. Classic Three-Strand Bubble Braid Half Up
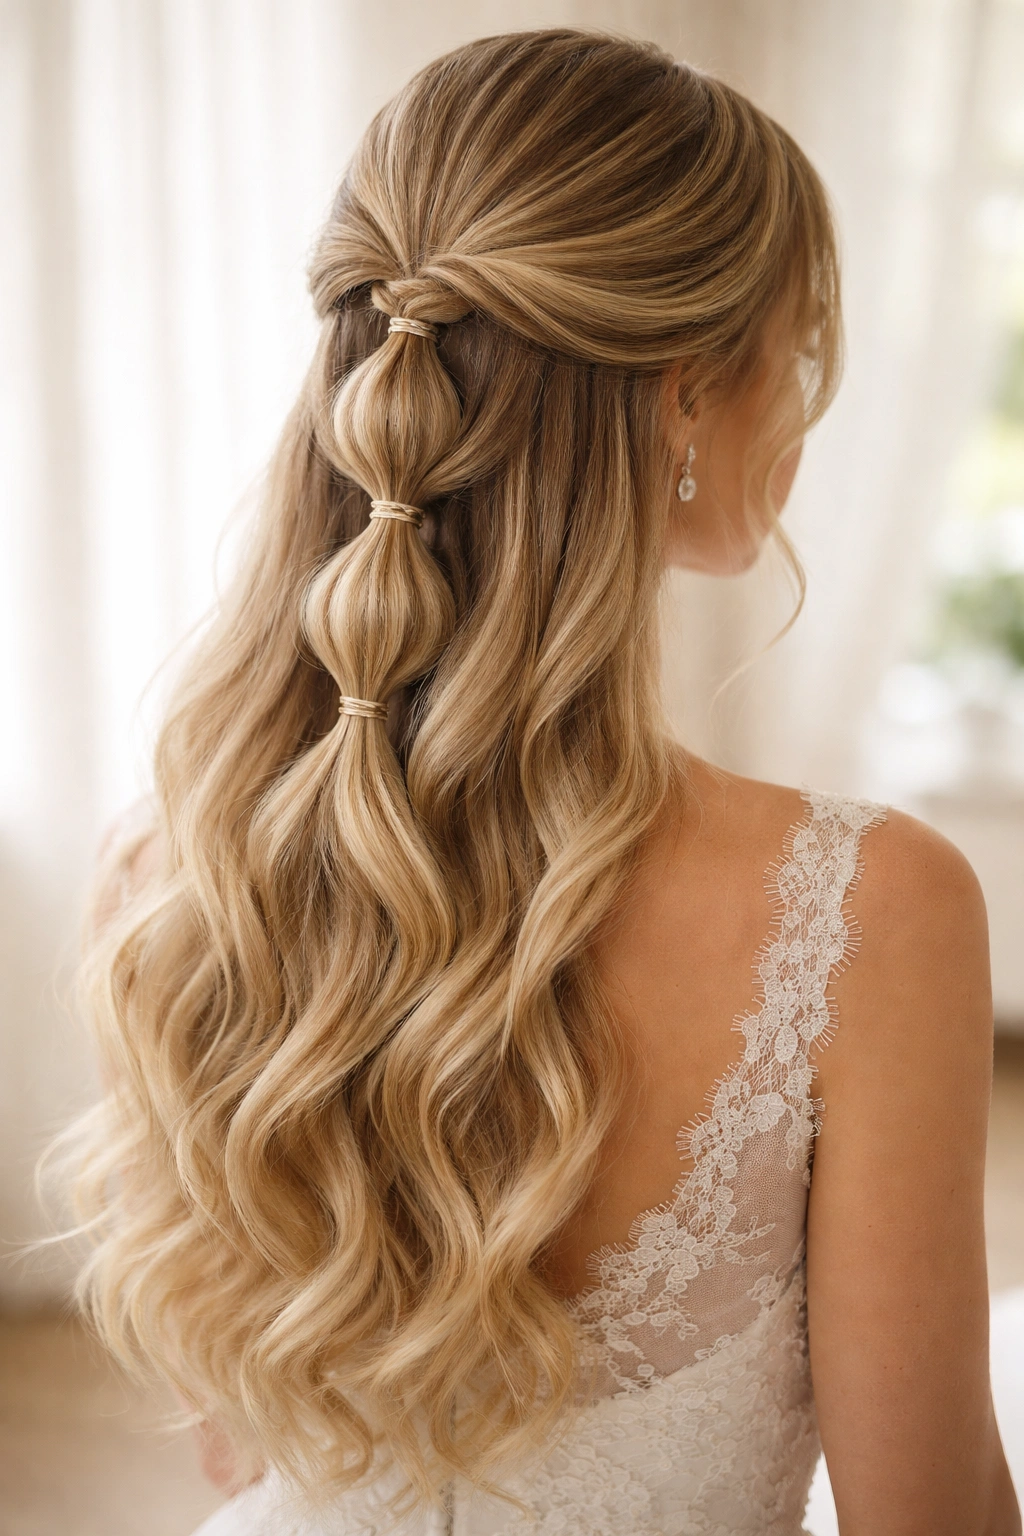
This is the foundational style that works as a jumping-off point for nearly every other bubble braid variation, and it’s deceptively simple in its elegance. You’re essentially creating three neatly stacked ponytails from the crown down to the base of the braid, with each section gently teased and pulled out to create that signature bubble effect. The full bottom half remains down, flowing in whatever texture you’ve chosen — loose waves, beach curls, or even completely straight.
Why This Works for Weddings
The classic version feels refined without being overdone, which means it photographs beautifully and suits both intimate ceremonies and elaborate celebrations. It’s forgiving enough that minor imperfections actually add to the romantic quality, while still looking intentional and polished. If you have fine or thin hair, this style is your friend because the bubbles create the illusion of much more volume than you actually have.
How to Perfect It
Start with hair that has texture — a beachy wave, loose curls, or even just damp hair brushed through and air-dried. Blow-dry your roots for extra lift. Create your first small ponytail about two inches below the crown, securing it with a clear elastic. Gently pull the hair in the bubble above the elastic outward and upward, creating that bubble shape. Repeat this process two more times, spacing each ponytail about 1.5 to 2 inches apart. Tease each bubble slightly before pulling it out — this makes the shape hold much better throughout the day.
Pro tip: Use bobby pins to anchor each bubble from behind if they’re loosening up during the event — the pins won’t show but will keep everything locked in place.
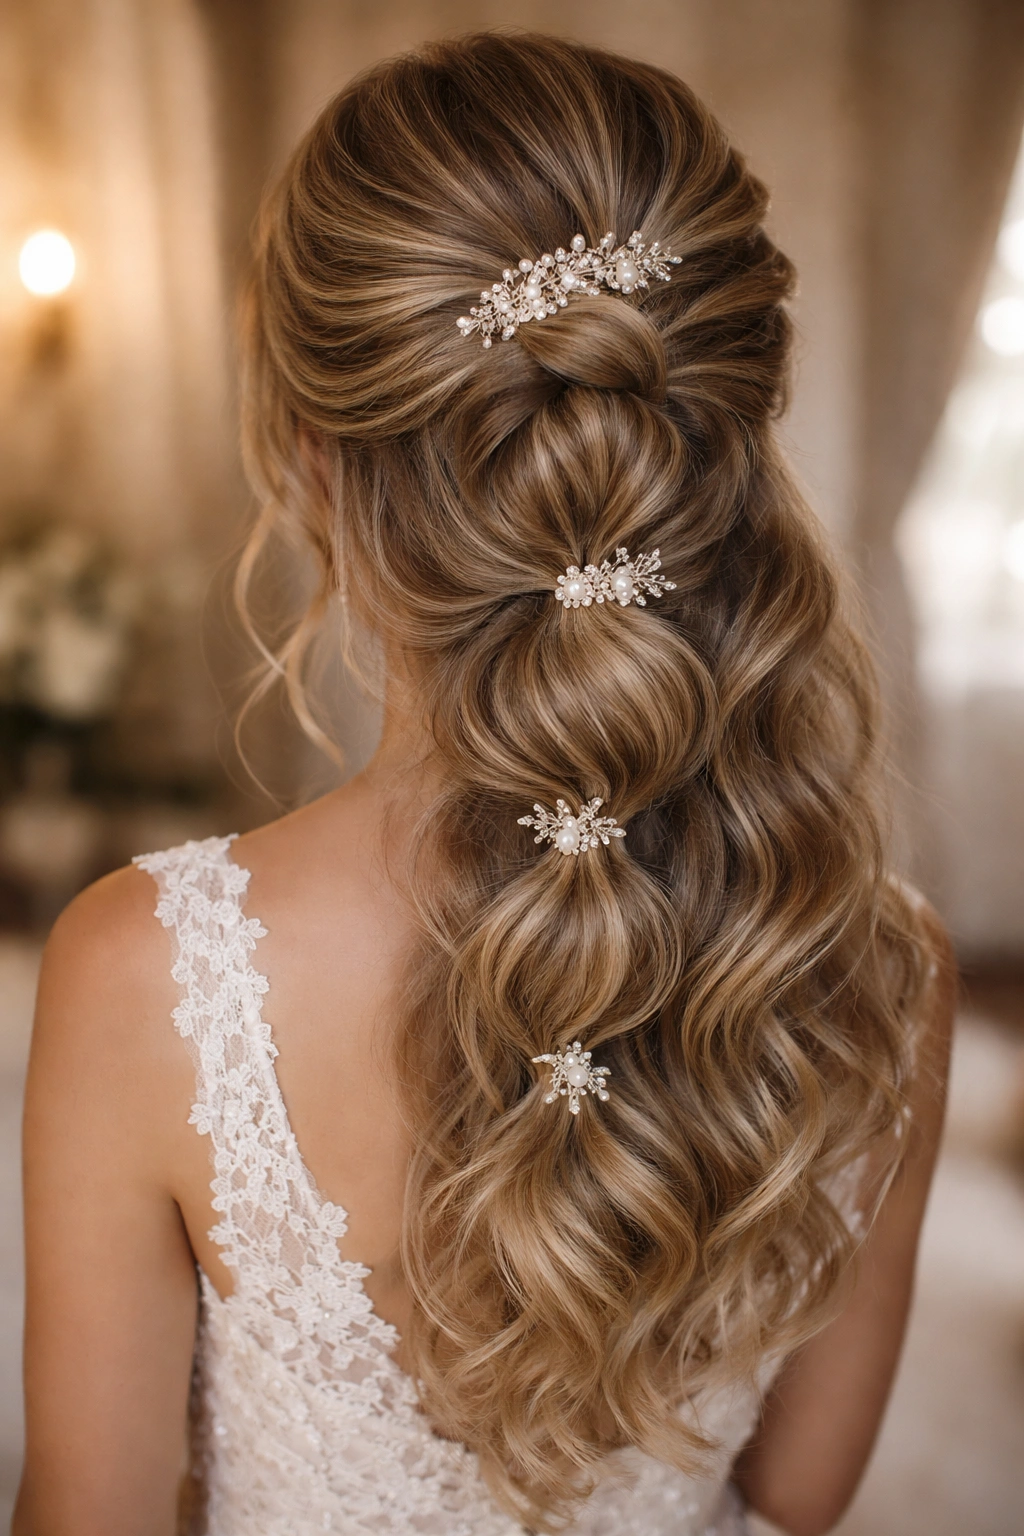
2. Twisted Bubble Braid with Pearl Accessories
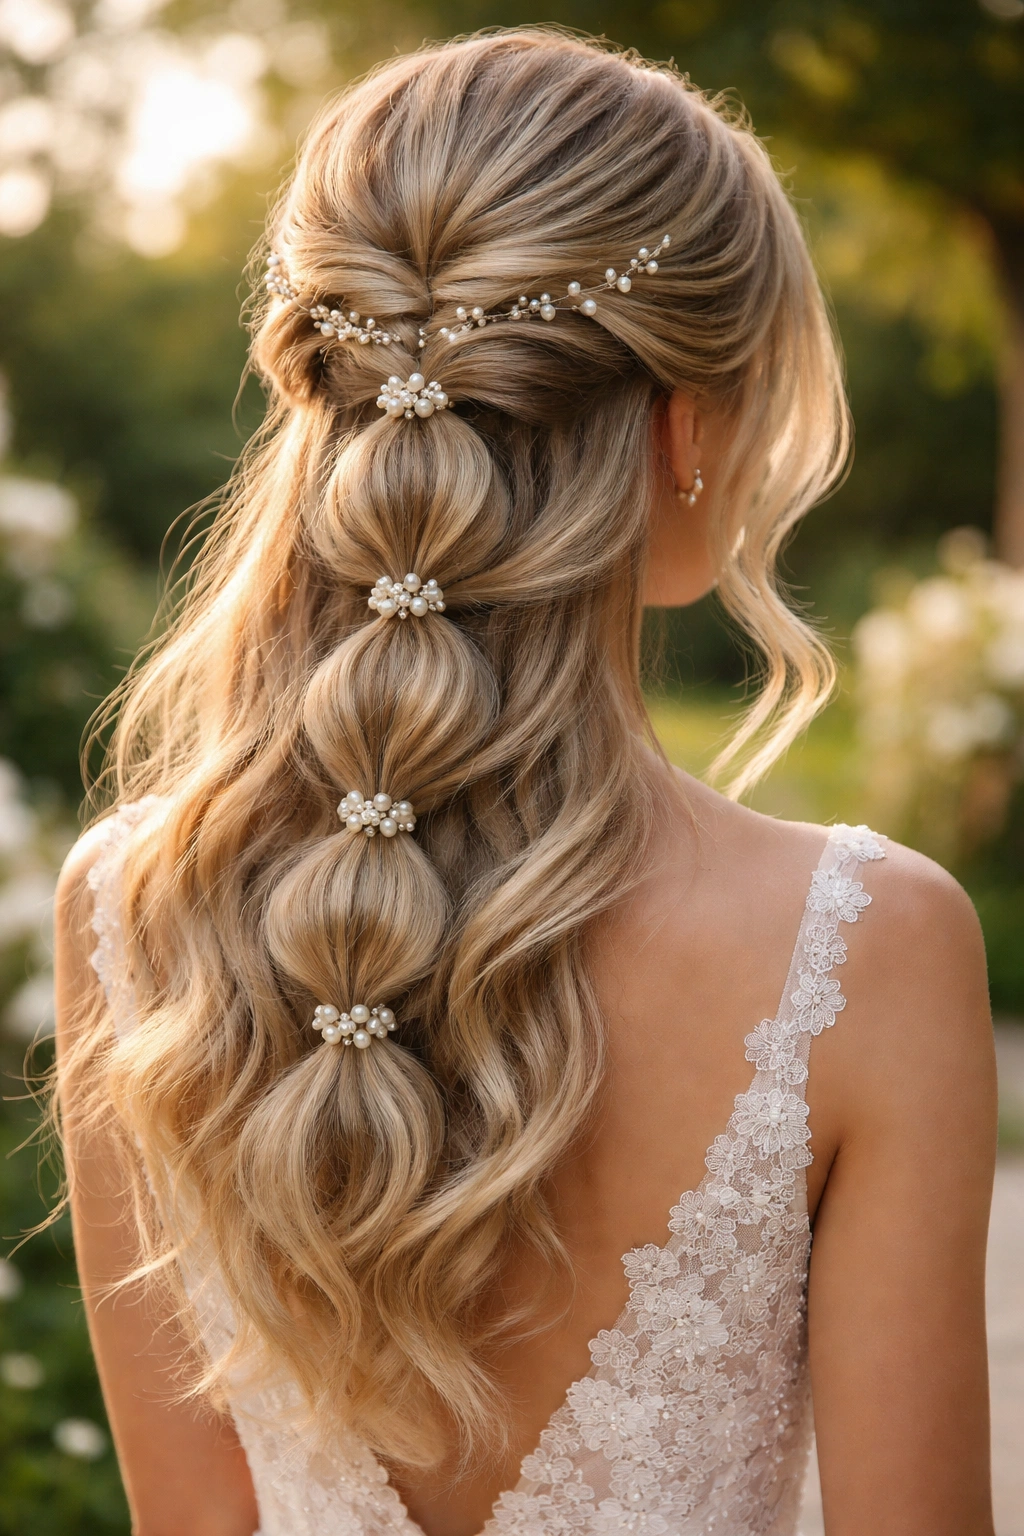
Rather than using a traditional three-strand braid inside your bubbles, this style incorporates gentle twists between each ponytail section, giving it a slightly more intricate, upscale appearance that reads as bridal without looking costume-y. The twists catch light differently than braids, creating gorgeous dimension in photographs, and they feel slightly more formal than a standard bubble braid.
The Visual Impact
Twists have a naturally flattering quality that works well with most face shapes, and they’re genuinely easier to execute than you might think if you’ve never done them before. The twist sits right between casual and formal, making it perfect for an outdoor garden ceremony or a more relaxed reception vibe where you still want to look bridal.
Adding Pearl Details
Wrap delicate pearl wire or tiny pearl hairpins around the base of each bubble, or use pearl-topped bobby pins to secure the twisted sections. You can also weave thin pearl-beaded hair wire directly into the twists themselves — just wrap it loosely around each twist and pin the end underneath so it’s invisible. This adds genuine sparkle without feeling heavy or overdone, and pearl details photograph beautifully in any lighting.
Worth knowing: If you’re using product in your hair (which you should for hold), use something with a satin finish rather than a shiny one — matte products look more elegant in photos while still keeping hair locked in place.
3. Soft Romantic Bubble Braid with Loose Waves
This version prioritizes softness and femininity above all else. You’re creating the bubble braid structure, but pulling out each bubble generously so it’s much fuller and rounder than a sleek bubble braid would be. The result should look almost cloud-like — soft, pillowy sections that flow into long, languid waves for the bottom half.
Achieving That Effortless-But-Intentional Look
The secret is that this style actually requires deliberate planning to look genuinely effortless. You need to start with waves that are set in place but still moving slightly, not crisp curls. Create waves using a large barrel curling iron (1.5 inches or larger) or a straightener curled at the ends. Let those waves cool and set completely before you even touch a brush or tie. When you create the bubbles, pull them out much more generously than you would on a tighter version.
The Hair Texture Matters
This style works best on shoulder-length hair or longer — if your hair is shorter than shoulder-length, the loose waves don’t have enough length to create that flowing, romantic effect. Your hair should have natural movement and body; if you have very straight hair, this will require actual wave-setting and product to maintain throughout the event.
Quick facts:
- Use a texturizing spray or sea salt spray before creating bubbles for easier manipulation
- Leave the bubble braid slightly loose as you’re creating it rather than pulling it super tight
- Pin tiny baby’s breath flowers throughout the bubbles and waves for a garden-wedding feel
- This style tends to loosen naturally as you move and dance, which actually adds to the romantic effect
4. Sleek Metallic Bubble Braid Half Up Style
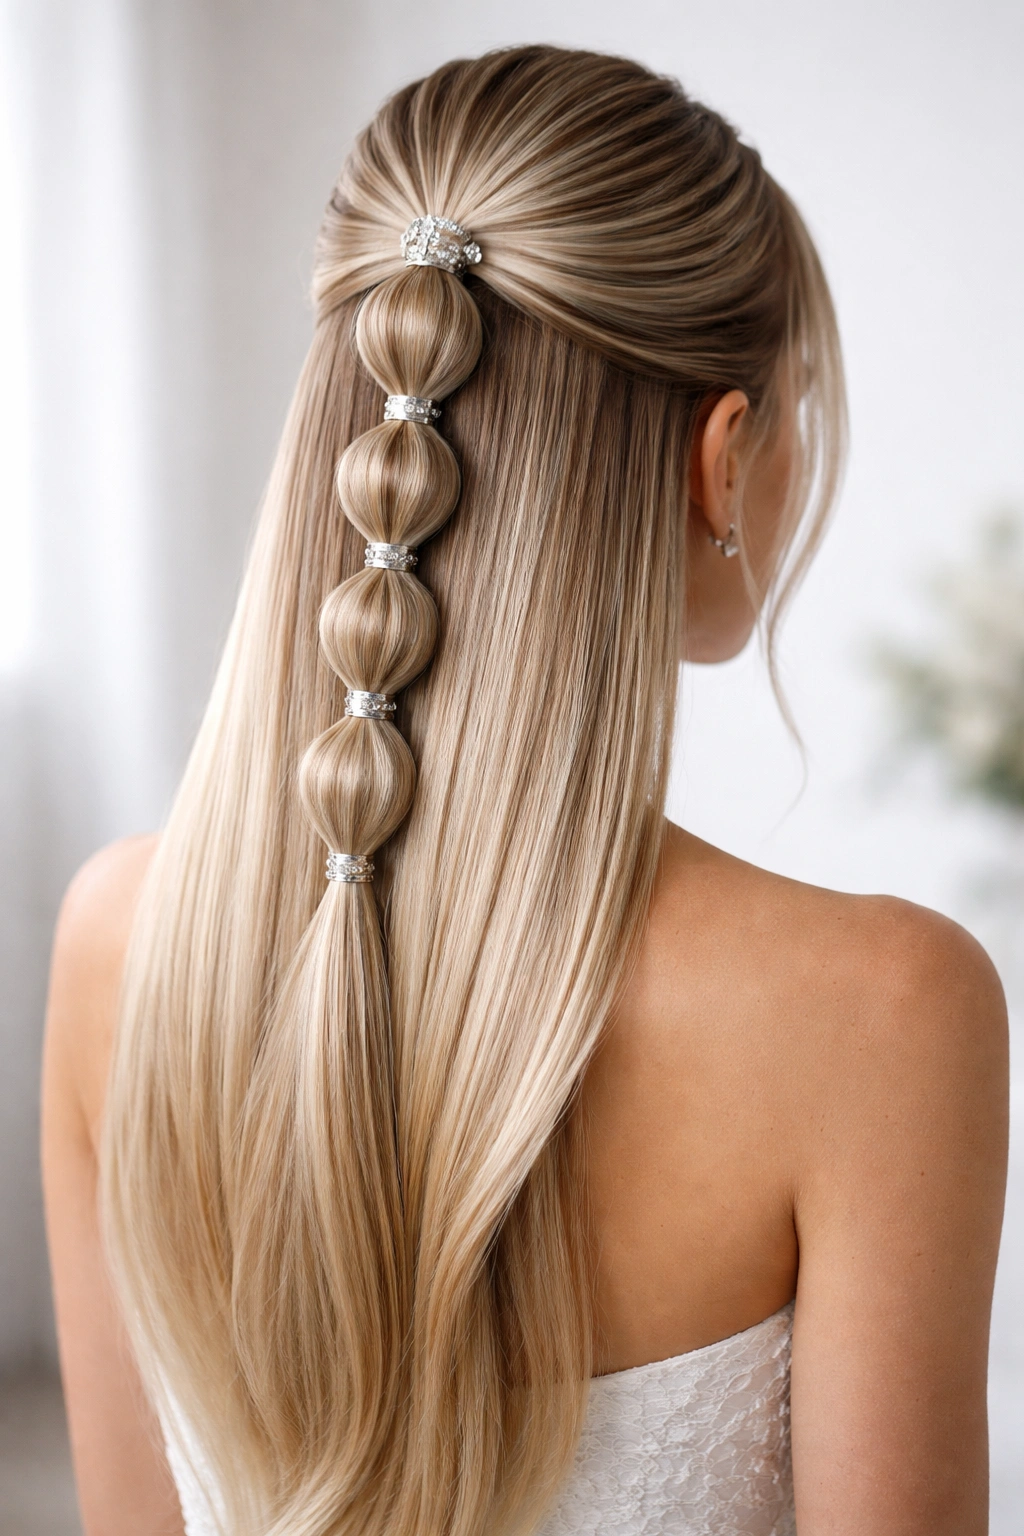
If your wedding aesthetic leans modern, minimalist, or has a touch of glamour, this is your hairstyle. This version keeps the bubble braid itself very neat and tight (almost sculptural in precision), then incorporates metallic threading, beads, or jeweled hair cuffs around specific bubbles for geometric, architectural interest. The lower half remains completely sleek and straight — no waves, no texture.
Why Sleek Works
Straight hair in the bottom section creates a beautiful visual contrast with the structured bubbles at the top, and it photographs with clean lines and professional polish. This style suits modern dress designs, particularly sheath gowns, minimalist silhouettes, or anything with interesting architectural details that you don’t want competing with your hair.
The Metallic Accents
Rather than delicate or romantic details, you’re using bold but refined elements. Wrap thin gold or silver wire around the elastic bands, or insert small metallic hair cuffs that sit right at the base of each bubble. You can also weave metallic cord or ribbon directly through the braid sections themselves. These details should feel intentional and sculptural, not randomly placed.
Pro tip: If you’re using metallic elements, keep your jewelry minimal and in the same metal tone — too many shiny things competing will feel costume-like rather than bridal.
5. Cascading Bubble Braid with Curls
This version extends the bubble braid longer down the back of the head than the classic version does — you’re creating four or even five bubbles instead of three — and then transitions into beautiful curls rather than loose waves. The bubbles cascade down and then release into springy, defined curls that frame the lower back and shoulders.
The Transition Point
The magic happens where the last bubble releases into the curl section. Make sure this transition is seamless — the bubbles should flow naturally into the curls rather than feeling like two separate hairstyles stitched together. Your last bubble should sit right at the point where your curls naturally begin.
Curl Patterns That Work
This style looks exceptional with ringlet curls, vintage Hollywood waves that are tighter and more defined than romantic waves, or even loose spiral curls. The tighter and more defined your curls, the more intentional and bridal the overall look becomes. You can create curls using a curling iron before starting the bubble braid, or you can curl them after braiding if your hair holds better that way.
Quick facts:
- Set curls with a light hairspray before braiding so they hold shape through the event
- Create curls in sections (left side, right side, center back) so the pattern looks intentional
- For tighter ringlets, use a smaller barrel curling iron and twist each section
- This style works particularly well for black-tie or formal evening weddings
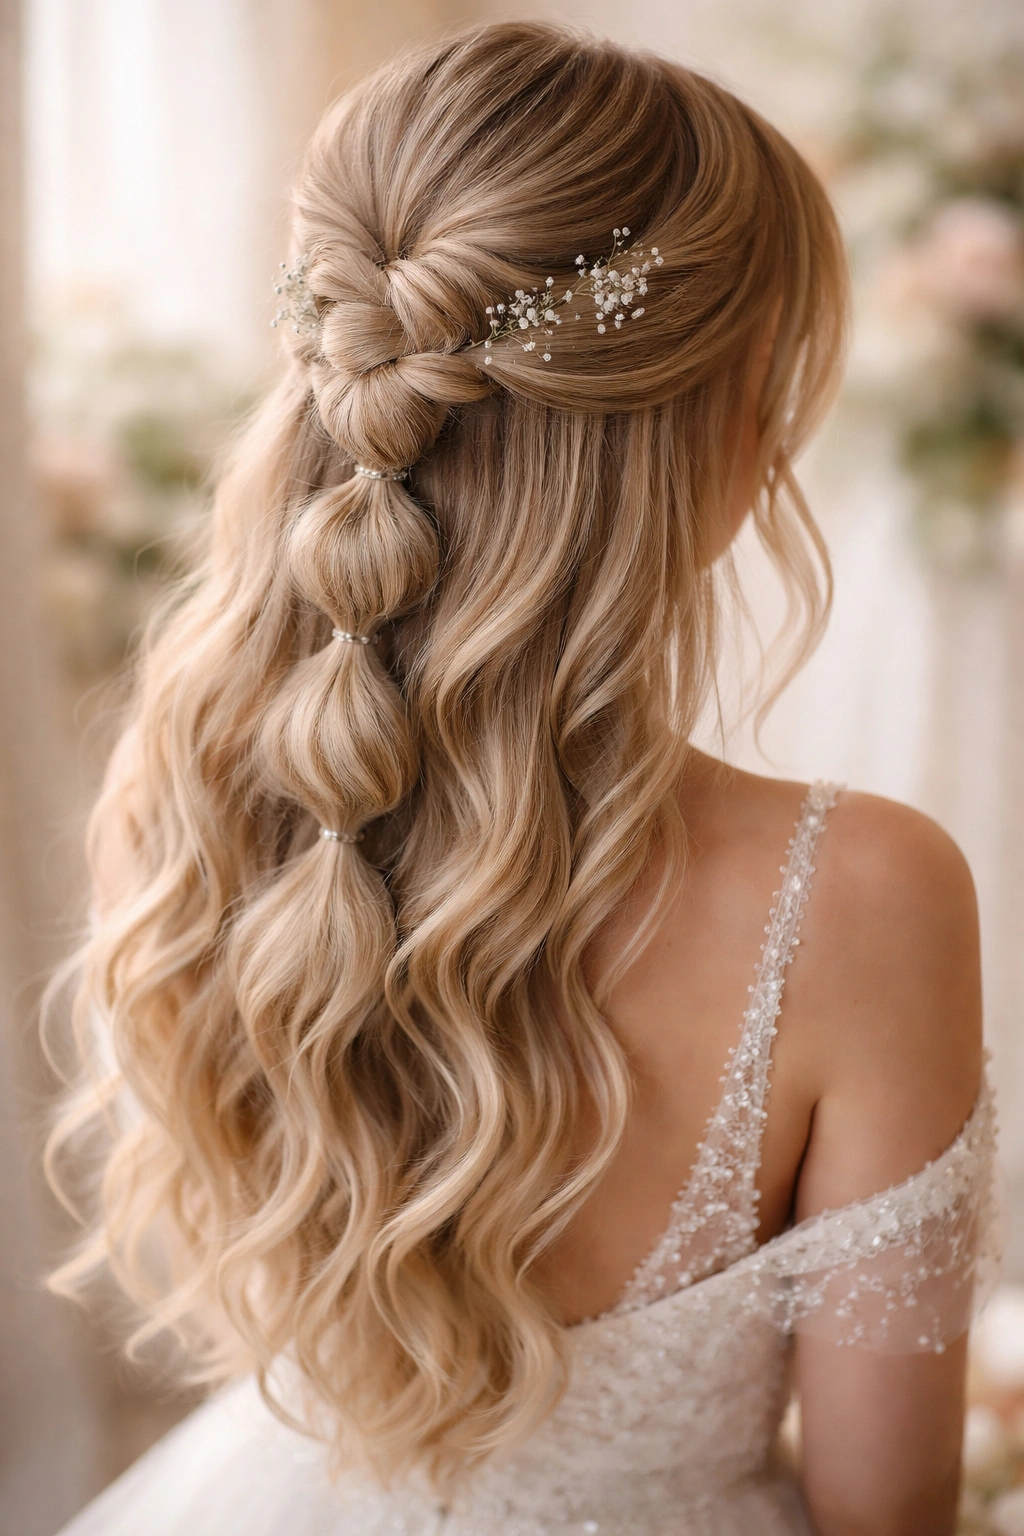
6. Boho Bubble Braid with Wildflowers
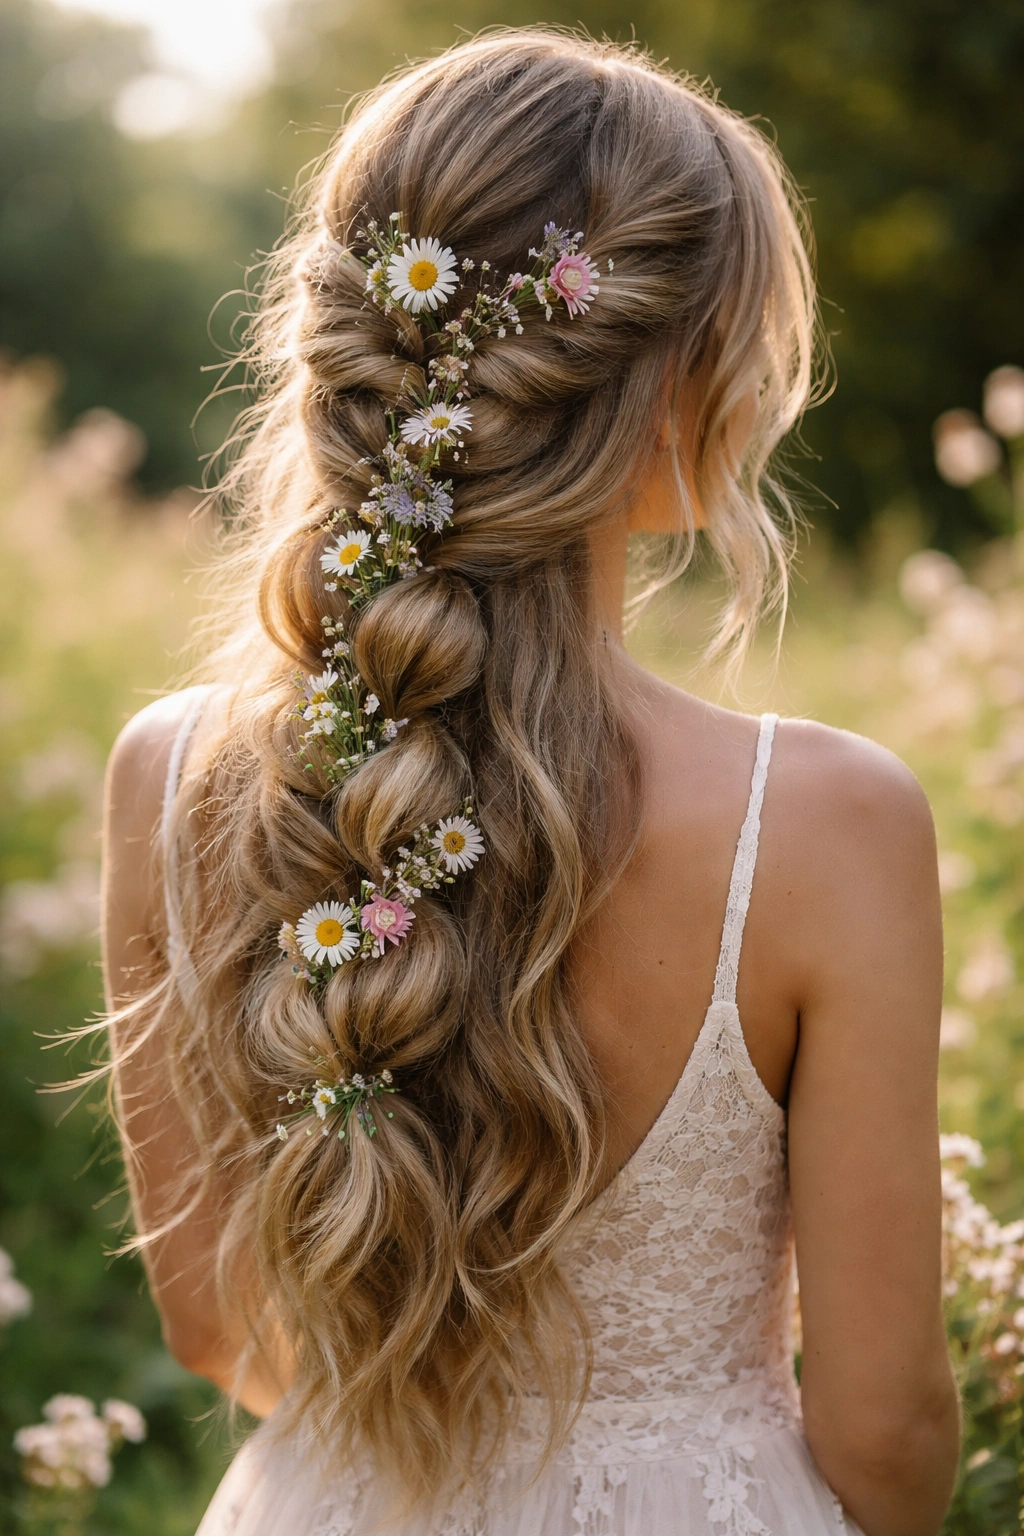
There’s an undeniable romance to incorporating fresh flowers into bubble braids, and this style leans fully into that bohemian, garden-inspired aesthetic. You’re creating a soft, slightly undone-looking bubble braid, then weaving fresh flowers through the bubbles and down the length of the lower waves. The flowers should look naturally placed, as if they’ve been tucked in organically rather than arranged formally.
Choosing Your Flowers
Work with your florist to select flowers that will stay fresh throughout your event and won’t wilt under the stress of being woven into hair. Hypericum berries, baby’s breath, waxflower, and certain varieties of roses, ranunculus, and sweet pea hold up exceptionally well. Larger statement flowers like garden roses or peonies work if you use them more sparingly, in key spots rather than throughout. Avoid flowers that are heavy or have thick stems — they’re difficult to anchor and will weigh your braid down.
Securing Flowers Without Damaging Hair
Use floral wire and a few strategically placed bobby pins rather than trying to weave stems directly into the braid. Wrap the floral wire around the base of the flower stem, then coil the other end of the wire around your bobby pin, and anchor that pin into the braid or waves. This keeps the flower secure while protecting your hair from being crushed by thick stems.
Worth knowing: Have your hair and flowers done very last, immediately before the ceremony, since fresh flowers do genuinely wilt over time — even hardy varieties start looking tired after 4-5 hours.
7. Braided Bubble Braid with Ribbons
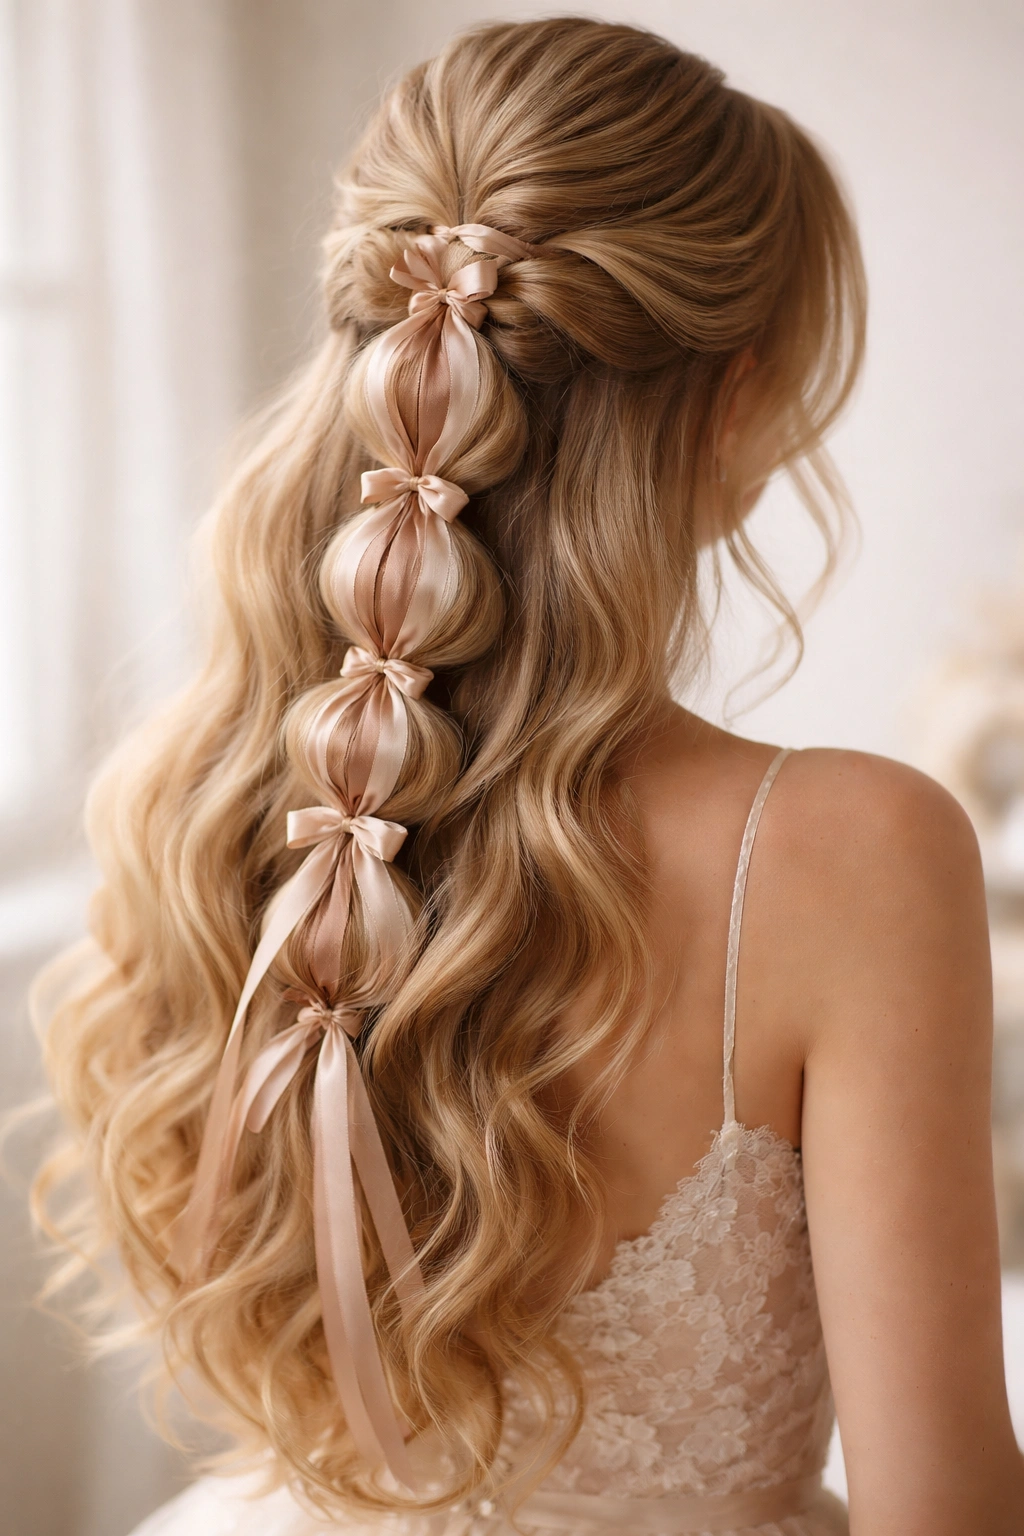
This style takes the bubble concept and weaves actual ribbon through the length of the braid, creating a feature-level detail that completely changes the aesthetic. The ribbons run through the center of each bubble, creating lines of color or metallics that catch light beautifully in photos. This works for romantic, vintage, or any wedding where you want an obvious decorative element that’s still sophisticated.
Ribbon Choices
Choose ribbons that complement your color palette but don’t necessarily match exactly — a slightly-off shade or mixed metallics (gold and silver together, or blush and champagne) actually feel more bridal and intentional than perfect color matching. Silk ribbons look more elegant than satin, and narrower ribbons (¾ inch to 1 inch wide) photograph better than wider ones, which can look overwhelming in the hair.
The Threading Technique
The easiest approach is to create your entire bubble braid first, then thread the ribbon through after using a bobby pin as a needle. This gives you much more control than trying to thread ribbon while simultaneously creating the braid. Weave the ribbon through each bubble vertically, not horizontally, so the ribbon creates lines of color running down your back.
Quick facts:
- Use 2-3 colors of ribbon together for more visual interest than a single ribbon
- Secure ribbon ends underneath the lowest bubble with bobby pins so they don’t trail loose
- This style works beautifully with veil integration — the ribbons coordinate with the veil attachment
- Ribbon adds little to no weight, so this works well for fine hair that needs to stay anchored
8. Double Bubble Braid Half Up Half Down
Instead of creating one braid down the center back, this style creates two identical bubble braids, one on each side of the head, both starting from behind the ears and meeting at the center back. The effect is significantly more intricate and dimensional than a single braid, and it photographs beautifully because of the visual interest from multiple angles.
The Complexity Factor
This style genuinely requires either professional execution or serious practice beforehand. You need to section your hair precisely into two equal halves, create matching bubbles on both sides simultaneously (or at least with matching bubble sizes), and make sure the two braids meet and blend seamlessly at the center back where they join.
Making It Look Intentional
The two braids should appear mirror-images of each other in terms of bubble size and spacing. Uneven bubbles on the two sides will read as a mistake rather than a design choice. Practice creating this style at least 2-3 times before your wedding day if you’re attempting it yourself, and consider having a hair trial with a professional to see how they execute it — different stylists create different variations.
Pro tip: Create each braid very slightly off-center rather than dead-center, angling them to meet at the nape of the neck rather than the very back of the head — this creates a more flattering frame for the face and photographs better.
9. Textured Bubble Braid with Hair Accessories
This version prioritizes visual interest through deliberately textured bubbles rather than smooth, sleek ones. You’re creating each bubble with intentional volume and dimension — some pulled out very full, others left slightly tighter, some slightly twisted, others loosely braided — so the overall effect is layered, dimensional, and utterly polished despite looking effortlessly pieced together.
Creating Intentional Texture
Start with hair that has genuine texture — waves, curls, or at minimum, damp hair that’s been blow-dried with texture spray. Create each bubble with slightly different techniques: one pulled out smoothly, the next one teased slightly before pulling, the third one gently twisted before securing. This variation is what makes the style feel refined rather than repetitive.
Accessorizing Strategically
Use pearl comb clips, vintage hair slides, delicate lace hair scarves, or ornate bobby pins placed visibly throughout the braided sections. These aren’t hidden — they’re intentional design elements that add visual interest and sophistication. Limit yourself to 3-5 distinct accessories rather than overloading the braid with too many details.
Quick facts:
- Textured bubbles hide imperfections better than perfectly sleek ones
- This style works on all hair types and textures
- The accessories should coordinate with your jewelry and dress details
- This is the best choice if you’re not naturally great at achieving perfect braid symmetry
10. Side-Swept Bubble Braid Half Up
Rather than creating the bubble braid down the center back of your head, this version starts at one side (typically behind one ear) and sweeps diagonally across the back of your head before releasing into waves or curls on the opposite side. The effect is dramatically different from a center-part bubble braid — it’s softer, more romantic, and incredibly flattering for most face shapes because of the asymmetry.
The Flattering Asymmetry
Side-swept styles elongate the face and create a naturally softer frame than center-parted styles. This is particularly flattering if you have a round face, as the diagonal line creates the illusion of length. The side-swept bubble braid also works beautifully with certain veil placements — particularly chapel-length veils attached to the opposite side from where the braid sweeps.
Getting the Angle Right
Start your bubble braid behind one ear (let’s say the right ear), creating your first small ponytail at that point. Build your bubbles going diagonally back and slightly to the left, so by the time you’ve created 3-4 bubbles, the braid has swept across the back of your head. The final bubble should sit somewhere center-to-left, where it then releases into the bottom waves.
Worth knowing: This style benefits from a slight tousle and deliberate undone-ness — it shouldn’t look artificially perfect. A few pieces of hair loose around the face and a few flyaways actually enhance the romantic quality rather than detract from it.
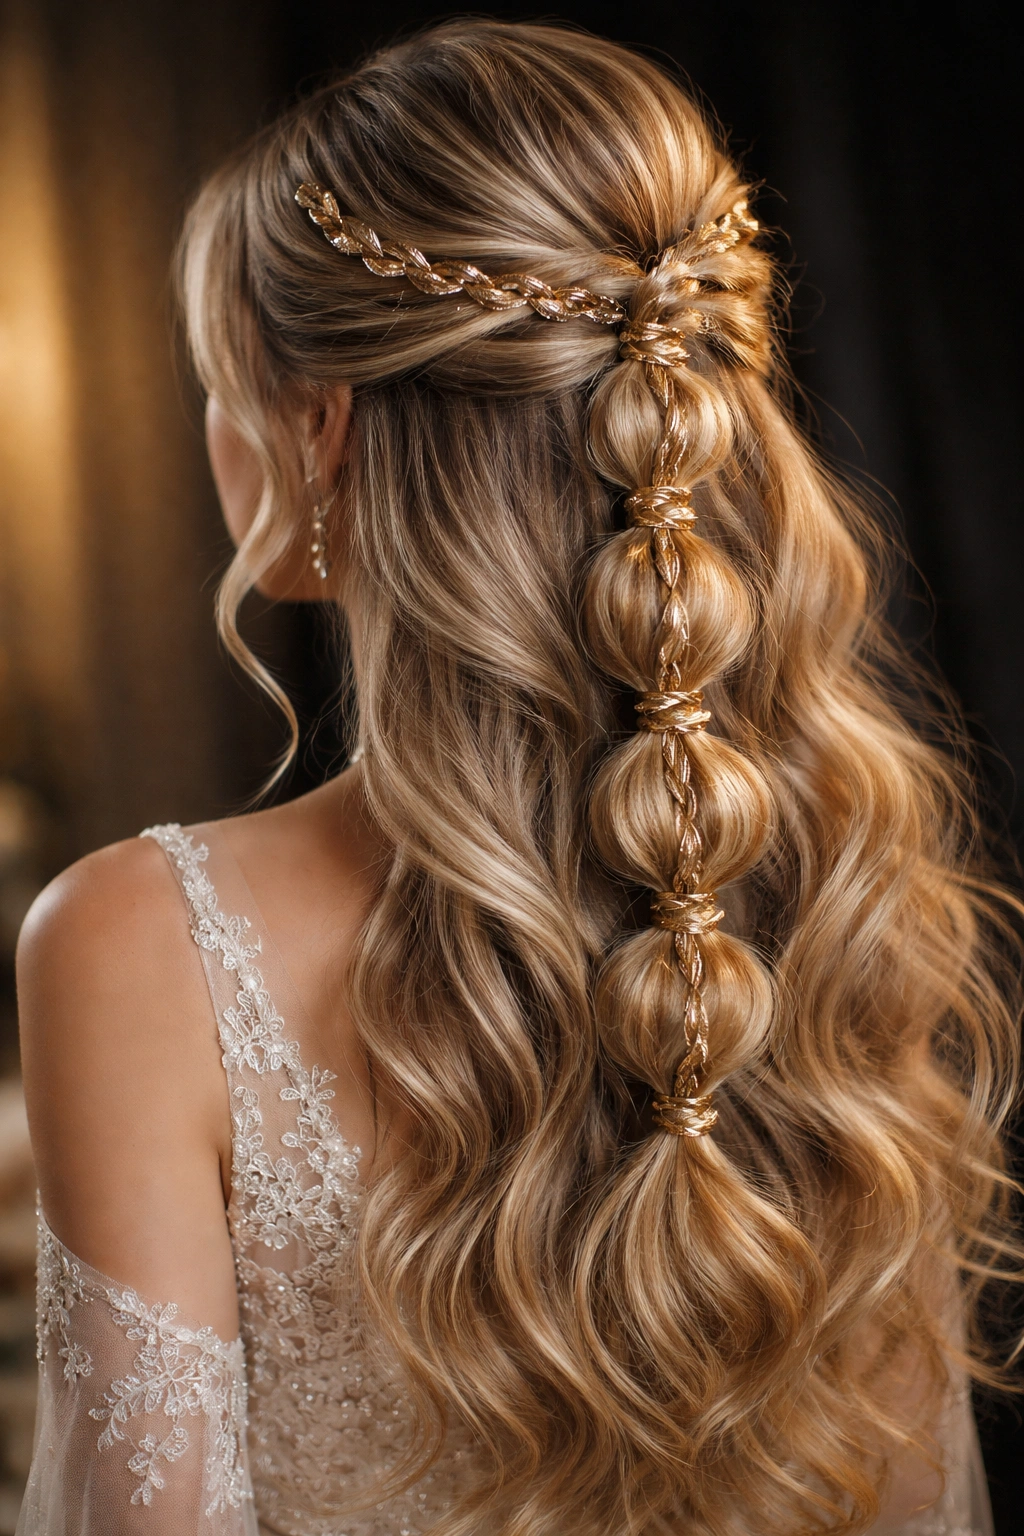
11. Glamorous Bubble Braid with Metallic Twists
This style is a step up from the basic twisted bubble braid — you’re incorporating actual metallic threading or beading directly into the twisted sections themselves, creating a shimmering, high-impact look that reads as genuinely glamorous rather than just pretty. This is the choice if you’re wearing a statement gown, having a formal evening reception, or want your hair to be a genuine showstopper element.
The Metallic Details
Rather than adding metallic accessories after the fact, you’re weaving metallic cord, beaded thread, or even thin metallic ribbon directly into each twisted section as you create it. Gold works with nearly any skin tone and dress color, but rose gold has become increasingly popular for weddings because it feels more contemporary while still reading as luxury.
The Technique
As you create each twisted section, lay down your metallic thread or cord alongside the hair sections before you begin twisting. Twist the hair, thread, and all together, creating one cohesive twisted section with the metallic element visible throughout. Pin each twisted section at the base with the metallic thread tucked underneath so it’s secure but hidden. The metallic will shimmer throughout the twisted portions and catch light beautifully in photographs.
Quick facts:
- This style requires steady hands and genuine skill — consider professional execution
- Metallic elements are heavy, so make sure your hair is thick enough to support the weight
- This works best on sleek, polished hair rather than textured waves
- This style absolutely requires quality bobby pins and good hairspray — no shortcuts
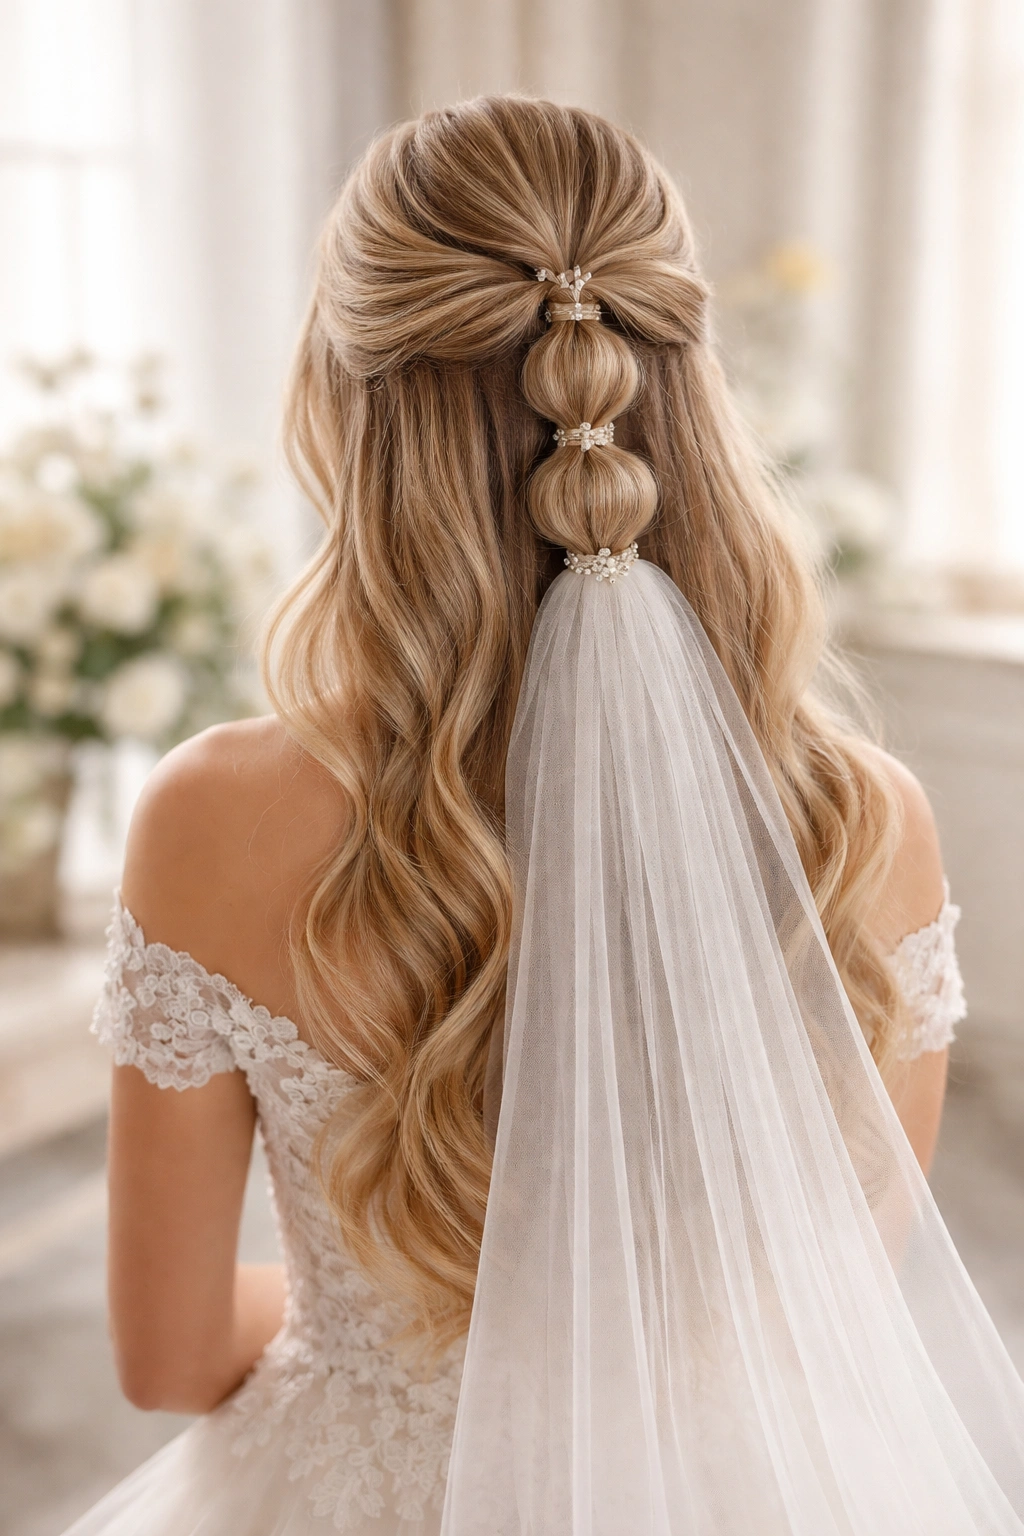
12. Ethereal Bubble Braid with Veil Integration
This final style is specifically designed to integrate seamlessly with a bridal veil, so the bubble braid and veil function as one cohesive hairpiece rather than feeling like separate elements. The bubble braid sits at the crown where it naturally anchors a veil, and the veil’s attachment point becomes an integral part of the overall design rather than an afterthought.
Creating the Integration
The bubble braid in this style typically starts slightly higher on the crown than standard bubble braids, giving you more real estate for the veil comb to anchor into. Build your bubbles slightly larger and more voluminous than you might otherwise, creating enough body at the crown that the veil sits with good support and doesn’t slip or shift during the ceremony. The veil should attach right at the final bubble or between the bubbles, creating a seamless transition.
Veil-Appropriate Bubble Sizes
Larger bubbles (achieved by pulling out more hair between elastics) work better with veils because they create a fuller crown that supports the veil’s weight more effectively. If your bubbles are too sleek and small, a veil will sit too prominently and separate from the hair rather than looking integrated.
The Overall Effect
When executed well, the bubble braid and veil should look like one complete, intentional hairpiece. The veil drapes from the bubbles rather than from a separate comb that happens to be in the hair. This requires careful planning in your hair trial — bring your actual veil to your trial appointment so your stylist can see exactly how the weight and volume of your specific veil interacts with the bubble braid.
Pro tip: Have your stylist tease the area just above where the veil will attach, creating a slightly sticky foundation that helps anchor the veil comb even more securely — this prevents the dreaded veil shift that can happen during a ceremony.
Final Thoughts
Choosing a bubble braid half-up style for your wedding should feel like choosing a partner in the most important photographs of your life. It’s not just about how the style looks in the mirror on your wedding morning — it’s about how it photographs, how it holds up during ceremony and celebration, and whether it genuinely aligns with your personal aesthetic and comfort level.
The variations here range from soft and romantic to modern and minimalist, which means there’s legitimately something for every bride and every wedding aesthetic. The wisest move is committing to a professional hair trial 4-6 weeks before your wedding, bringing reference photos of the specific bubble braid style you’re envisioning, wearing a similar neckline dress to your actual wedding dress if possible, and having your stylist execute the style completely. Walk around, tilt your head, look at yourself from every angle, take photos in different lighting. This trial is where you discover what actually works for your hair texture and face shape, rather than finding out something doesn’t work on the morning of your wedding.
The technical skills required for bubble braids range from beginner-friendly (the classic three-strand version) to genuinely complex (the double braid side-sweep with metallic details), so be honest about your skill level before deciding to DIY. Even experienced people who braid hair regularly sometimes find executing an elaborate bubble braid on their own hair incredibly frustrating, simply because of the angles and the difficulty of seeing the back of your head. A professional stylist isn’t a luxury in this case — it’s insurance against a major styling stress on an already-emotional day. Whatever you choose, choose something that makes you feel like the most beautiful version of yourself.