Fishtail braids bring an undeniable elegance to bridesmaid hairstyles, and when you take that romantic, intricate braid and sweep it into a half-up style, you’ve got something that photographs beautifully from every angle. The half-up, half-down approach strikes the perfect balance—you’re keeping hair off the face and shoulders while still showing off length and movement. It’s wedding-appropriate without feeling overly formal, works for various hair textures, and complements any dress style from bohemian to classic.
The real beauty of a fishtail half-up style is its versatility. You can dress it down with loose waves for a relaxed garden wedding, tighten the braid for a modern polished look, or add embellishments like pearls, ribbons, or fresh flowers to match your wedding’s aesthetic. Bridesmaids don’t have to look identical when wearing this style—slight variations in texture, tightness, and accessories allow each person to feel like themselves while maintaining cohesion in the bridal party.
Whether you’re the bride planning your bridesmaids’ looks or a bridesmaid searching for the perfect style, these twelve fishtail variations offer something for every hair type, dress code, and personal style. Each can be adapted based on hair texture, length, and the overall vibe of your wedding day.
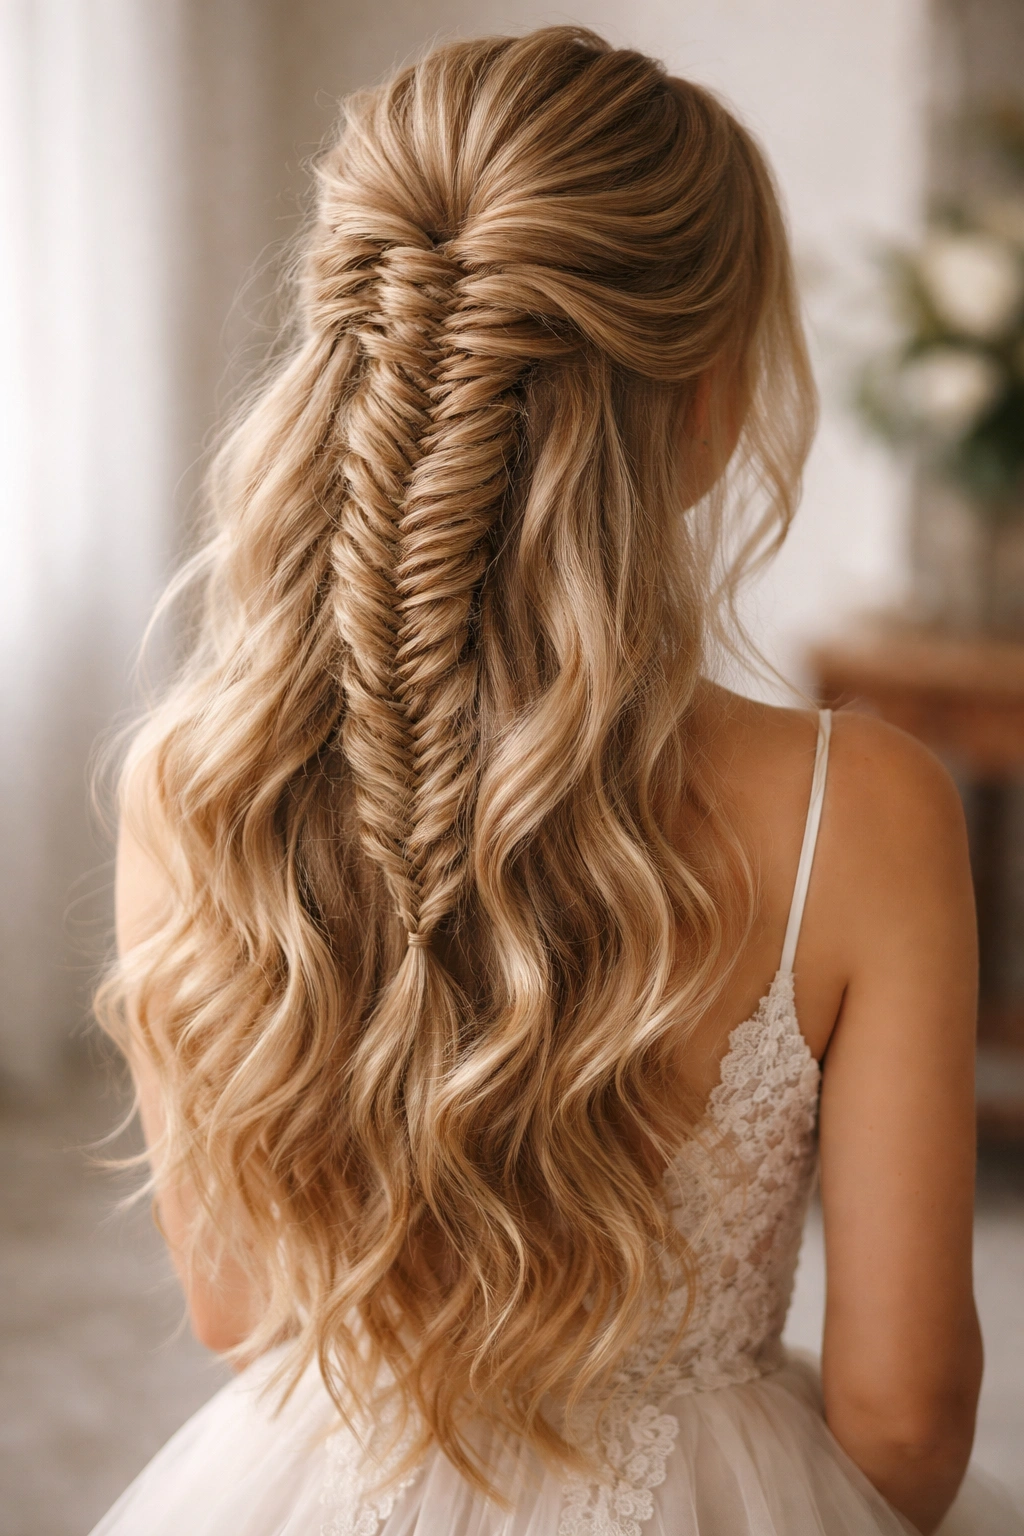
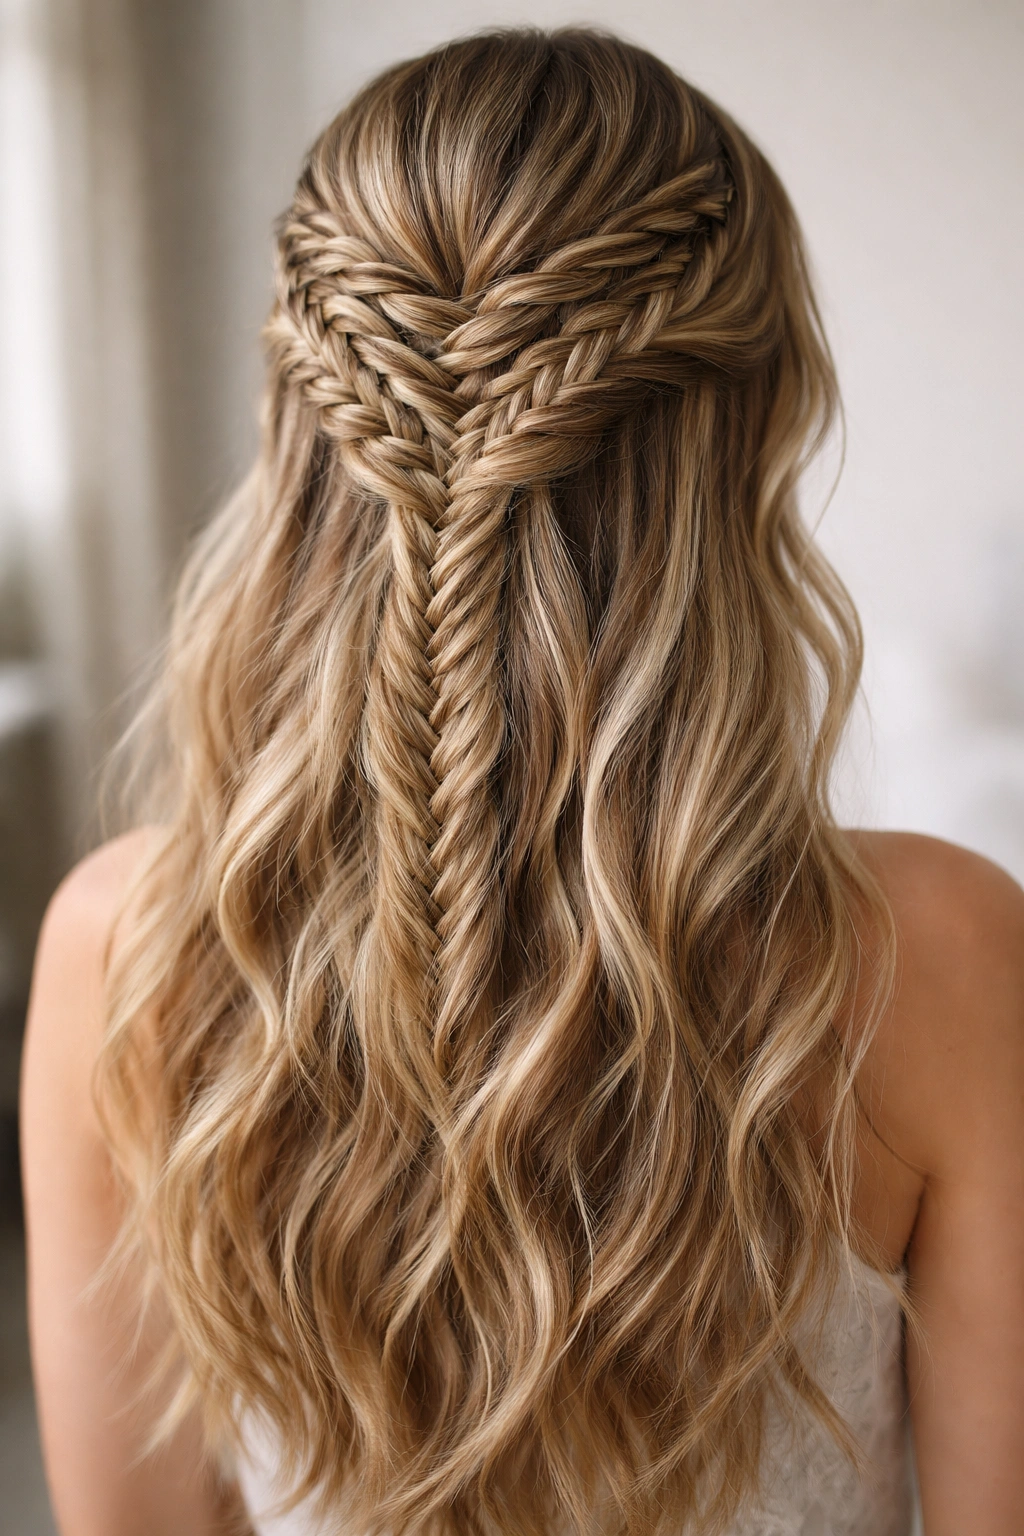
1. Classic Fishtail with Loose Curls
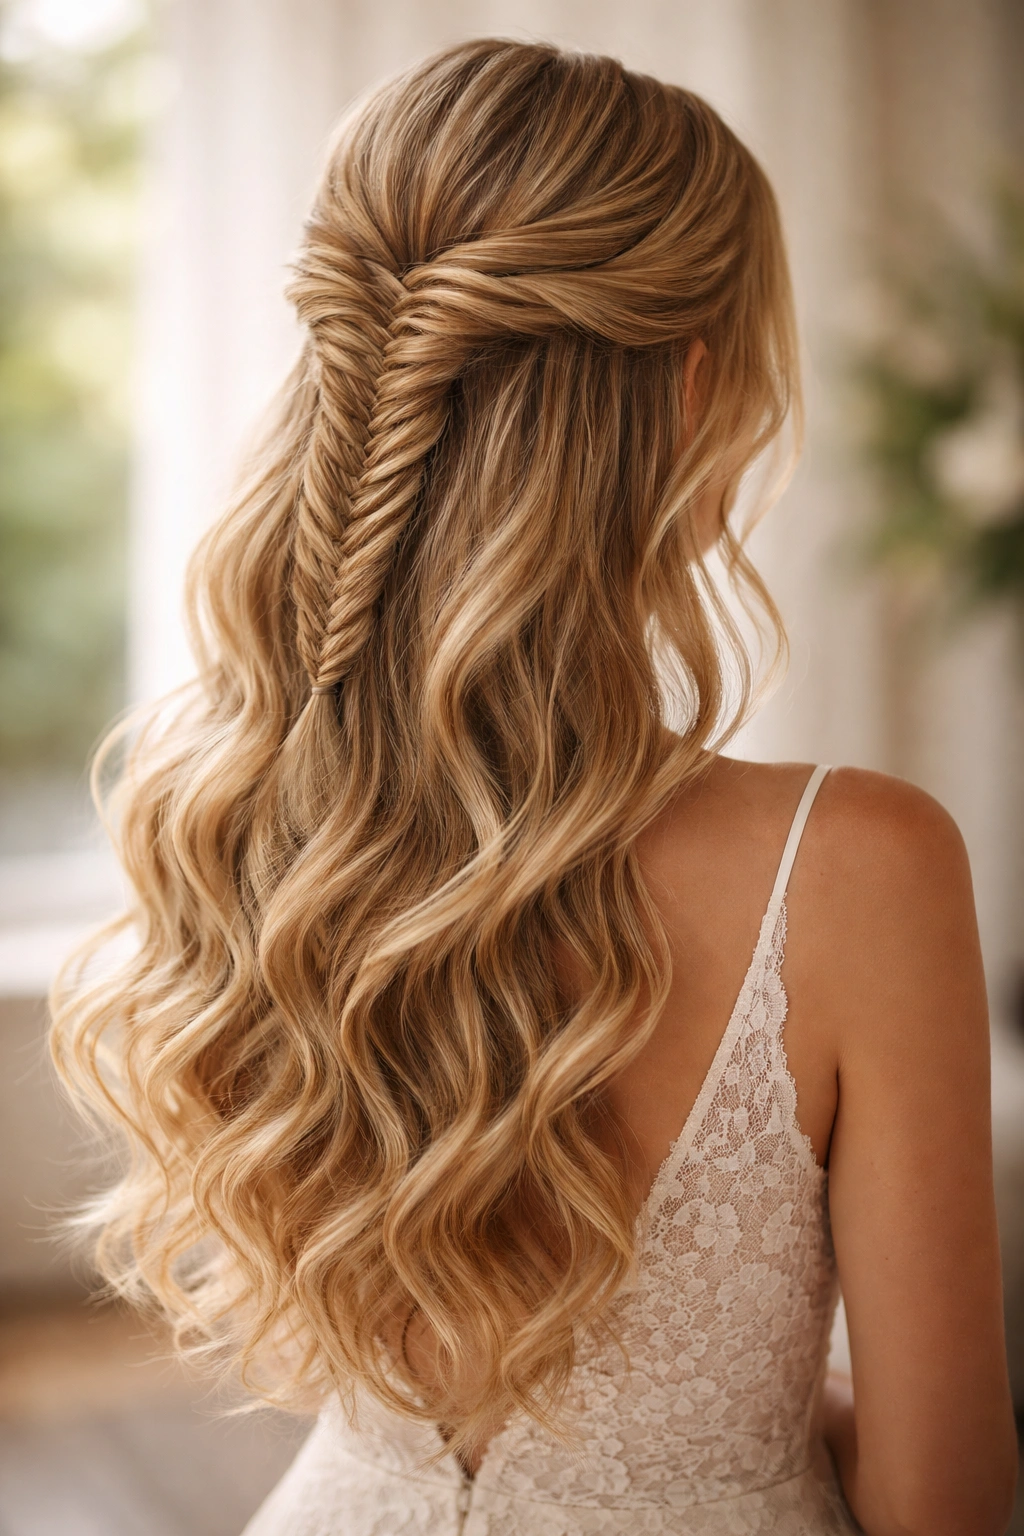
This is the go-to style that works for virtually any bridesmaid—timeless, romantic, and flattering to all face shapes. The fishtail begins at the crown and is pulled back into a secured half-up style, while the remaining hair flows in soft, romantic waves down the back. The juxtaposition of the intricate braid detail against the relaxed curls below creates visual interest without appearing overdone.
Why It’s Perfect for Bridesmaids
The classic fishtail half-up works because it keeps hair neatly arranged from the front while preserving the drama of length in the back. This style photographs exceptionally well from all angles, which matters when you’re going to be in dozens of photos. The braid draws the eye to the face, making it an excellent choice if your bridesmaids want their features and makeup to be the focus. Unlike fully up styles, loose waves won’t feel heavy or restrict movement—essential when bridesmaids are standing through ceremonies, dancing, and mingling for hours.
How to Style and Secure It
- Start by curling all hair in loose waves using a 1.5-inch curling iron, curling away from the face for a flattering frame
- Section out the top half of the hair from ear to ear, and clip the bottom section away
- Begin the fishtail braid at one temple, taking thin sections alternately from left to right to create that signature interlocking pattern
- Braid back toward the crown, keeping the tension consistent so the braid reads clearly in photos
- Secure the braid at the back with a small elastic, then pull out the back section of curled hair
- Gently tease the braid between your fingers to create softness and dimension—fishtails look best when they’re not perfectly tight
- Finish with a light hairspray to hold everything in place without creating a stiff, helmet-like appearance
Pro tip: If you’re styling multiple bridesmaids the morning of the wedding, curl all hair first while chatting and calming pre-wedding nerves—the curls will have time to cool and set while you work on braiding, which means longer-lasting waves throughout the day.
2. Romantic Fishtail with Flower Crown
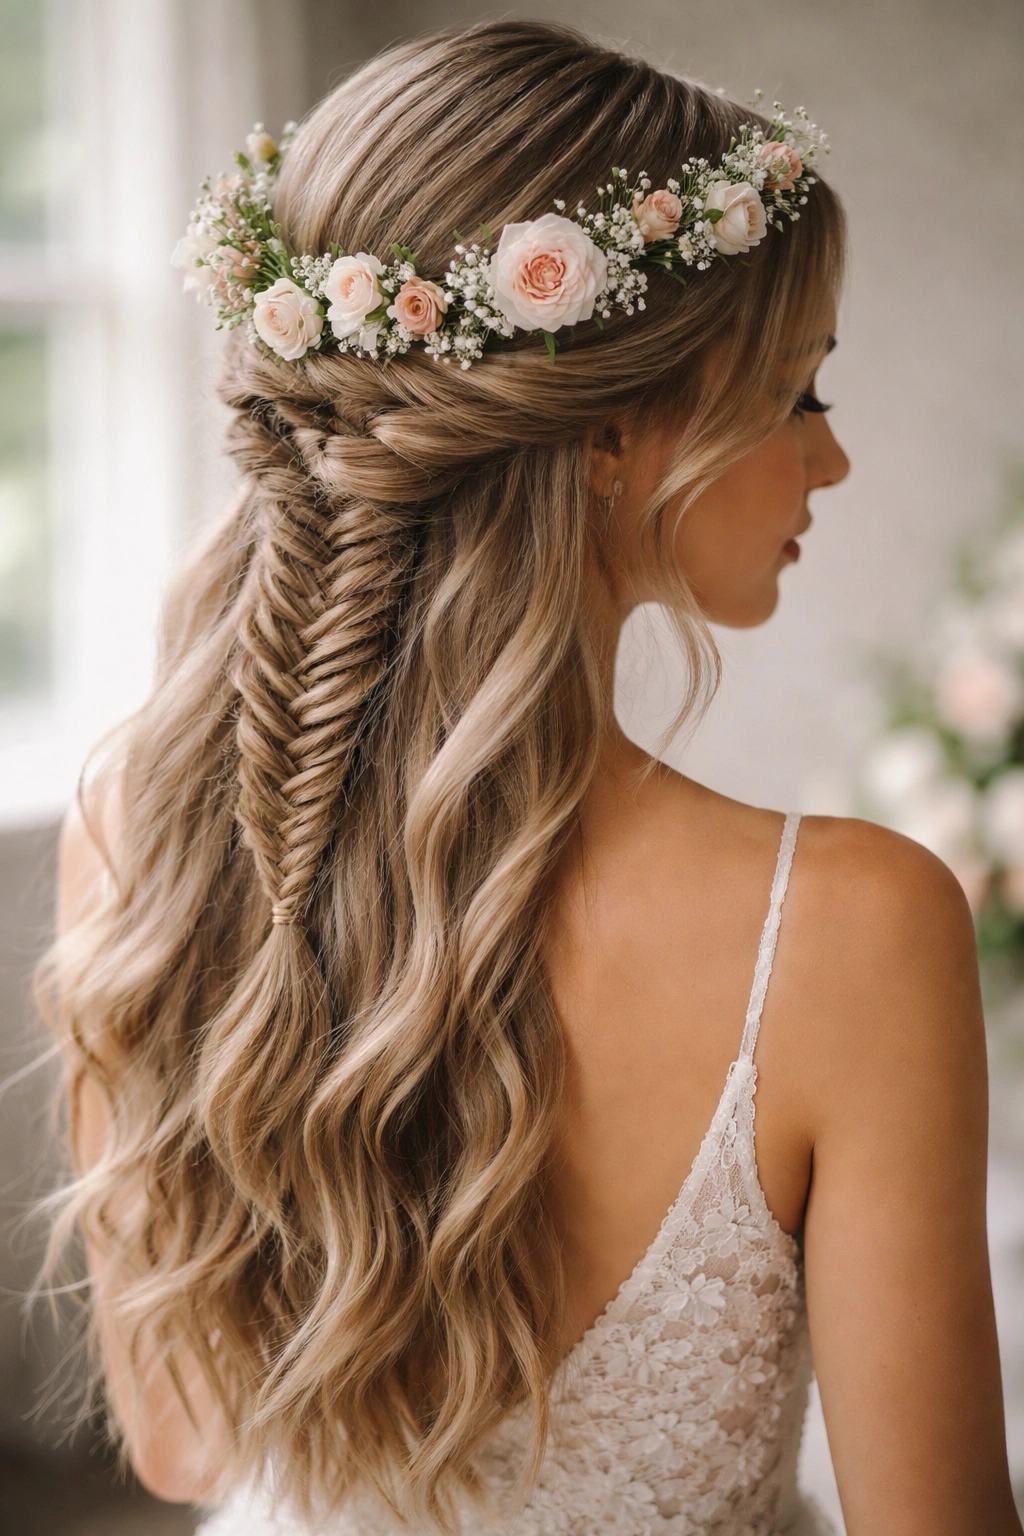
Elevate the fishtail by pairing it with a delicate flower crown, and you’ve instantly transformed it into a style that screams “romantic wedding.” The flowers can be woven directly into the braid, attached above it, or positioned as a separate crown that sits at the back where the braid is secured. This style works beautifully for garden weddings, outdoor ceremonies, or any wedding with a bohemian or romantic aesthetic.
The Magic of Flowers and Braids Together
Flowers in bridal hair aren’t just decorative—they create a focal point that draws the eye and adds dimension. When paired with a fishtail braid, the natural texture of both elements complement each other. Real flowers (roses, eucalyptus, baby’s breath, waxflower) add a subtle, sophisticated touch that looks expensive in photos. The organic shapes of blooms soften the geometric precision of the braid, creating a balanced, effortlessly elegant look. This combination is particularly stunning for outdoor ceremonies where the flowers are part of the natural environment.
Creating a Flower Crown That Lasts
- Choose flowers that will hold up throughout the day—avoid peonies or other delicate blooms unless your wedding is early in the day
- If using fresh flowers, have your florist create small individual stems bound with floral tape that can be inserted into hair as needed
- Alternatively, attach flowers to a wire or elastic base before the styling day so bridesmaids can simply slip it on after the fishtail braid is complete
- Place heavier blooms lower in the arrangement so they don’t weigh down the braid or pull uncomfortably
- Use floral spray or hairspray to secure any loose petals and add shine to greenery
- Test the arrangement the day before to ensure it feels secure and balanced on each bridesmaid’s head
Pro tip: Schedule a hair and flower trial with each bridesmaid if possible—flower crown weights and flower choices vary, and what works on one head of hair might need adjustment on another.
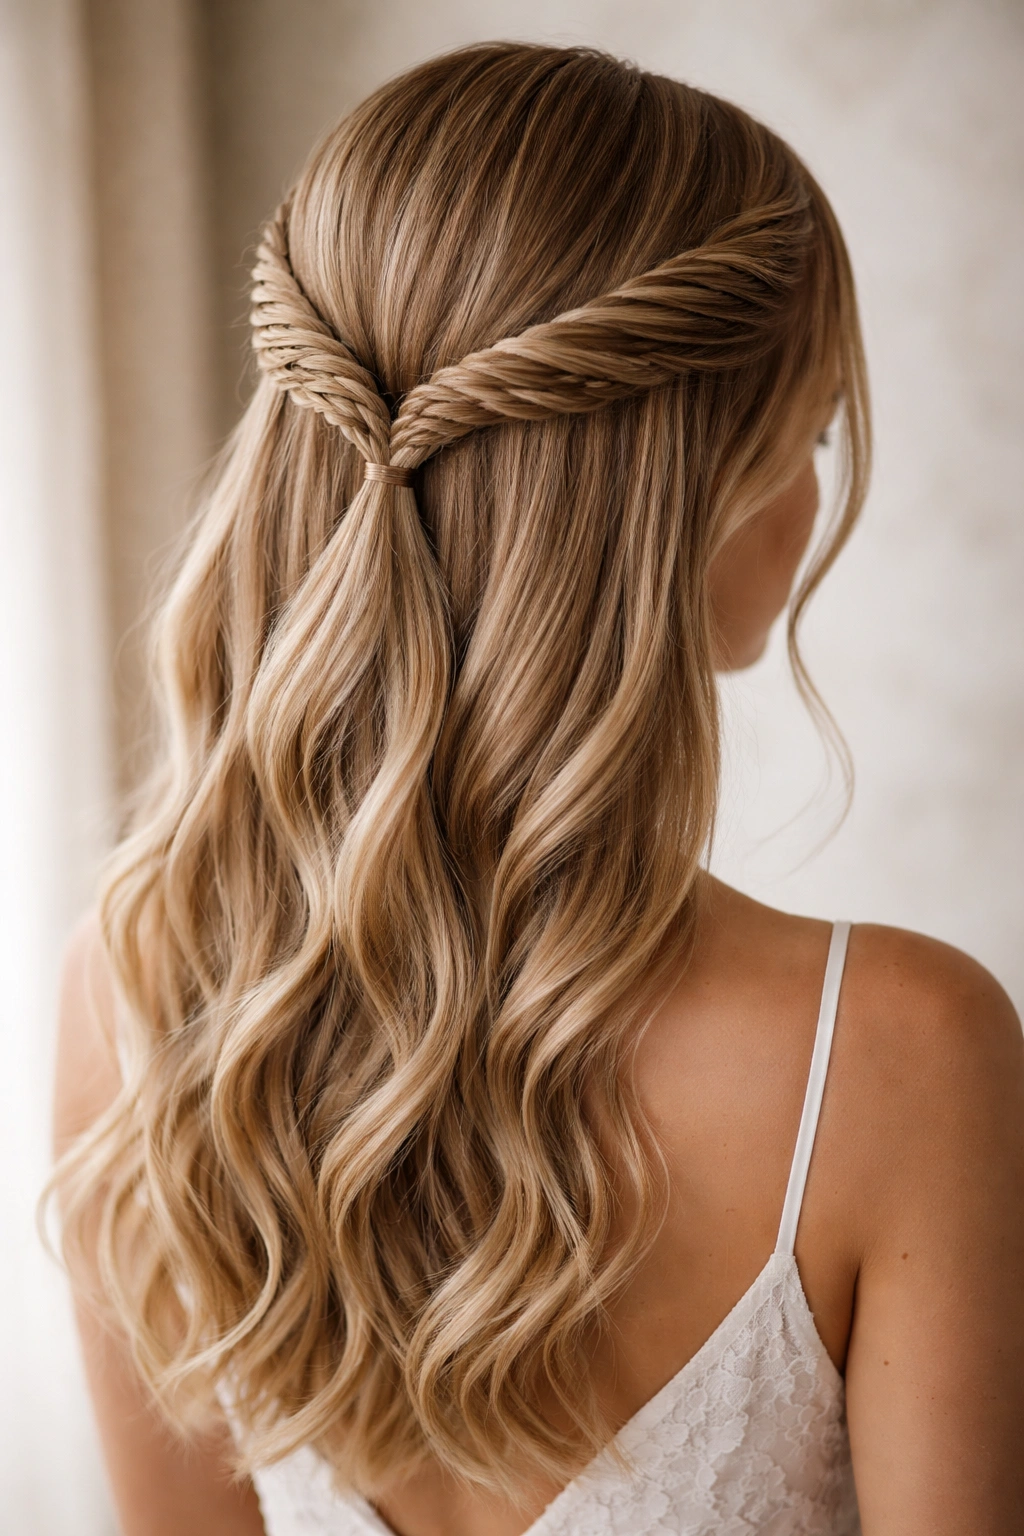
3. Modern Twisted Fishtail
For bridesmaids who want something contemporary rather than traditionally romantic, a twisted fishtail offers clean lines and a more structured appearance. Instead of a standard three-strand fishtail, this style incorporates twists that create a bolder, more geometric pattern. The twist-meets-fishtail combination reads as modern while still maintaining the softness bridesmaids expect from a half-up style.
The Technique Behind Twisted Details
A twisted fishtail is technically more complex than a classic fishtail, but the effort pays off in visual impact. You’re essentially combining two braiding techniques—the twist and the fishtail—to create a hybrid that’s visually distinctive. The twist component creates thicker, bolder sections, while the fishtail elements add intricacy. This style works particularly well on bridesmaids with thicker hair or those who want their style to make a subtle fashion statement. The tighter, more defined nature of twists also means this style holds beautifully throughout a long day without needing frequent touch-ups.
Step-by-Step Execution
- Start with smooth, wave-free hair for the cleanest look
- Section off the top half of hair and begin a two-strand twist at one temple
- After twisting for about two inches, transition into a fishtail pattern by taking thin strands from the outside of each twist section
- Continue alternating between twisted sections and fishtail sections as you move back toward the crown
- Secure at the back of the head with a small, clear elastic
- Gently tease the braid slightly to add softness and prevent it from looking too rigid
- Finish with strong-hold hairspray to keep the pattern defined throughout the day
Pro tip: This style is more forgiving on second-day hair than you’d think—slightly textured or wavy hair actually helps the twist-fishtail pattern read more clearly because the sections have natural grip.
4. Sleek Double Fishtail Half-Up
Two fishtails are better than one, and a double fishtail half-up style creates symmetry and drama without requiring excessive hair volume. Start a fishtail on each side of the head at the temples, braid them back toward the crown, and secure them together at the back. This style creates a frame around the face while maintaining the romantic fishtail element bridesmaids love.
Why Double Braids Make an Impact
A single braid down the center is lovely, but two matching braids flanking the face create natural symmetry that’s inherently photogenic. Your face appears more balanced, and the side braids draw the eye upward, which is flattering for most face shapes. From a practical standpoint, two thinner braids are easier to manage than one thick, heavy braid—especially if a bridesmaid has fine or medium hair that doesn’t braid thickly. The double-braid approach also allows for more creativity in how you combine them at the back: you can twist them around each other, leave them separate within the half-up section, or even incorporate them into a low bun.
Creating Balanced Double Fishtails
- Part hair down the center from forehead to crown for a clean starting point
- Begin a fishtail braid on the left side starting at the temple, taking thin sections and keeping tension moderate so the braid sits flat against the head
- Mirror the exact same braid on the right side—same starting point, same width, same tightness
- Braid both sides back to the crown, securing each with a small clear elastic
- Bring both braids to the center back of the head and secure them together with a larger elastic
- Leave the bottom section of hair loose in waves, or incorporate it into a low bun if you prefer a more polished look
- Soften the braids by gently pulling the outer edges to create a fuller, less structured appearance
Pro tip: Color-matched elastics are your secret weapon—they virtually disappear in photos, making the braids and hair flow appear seamless.
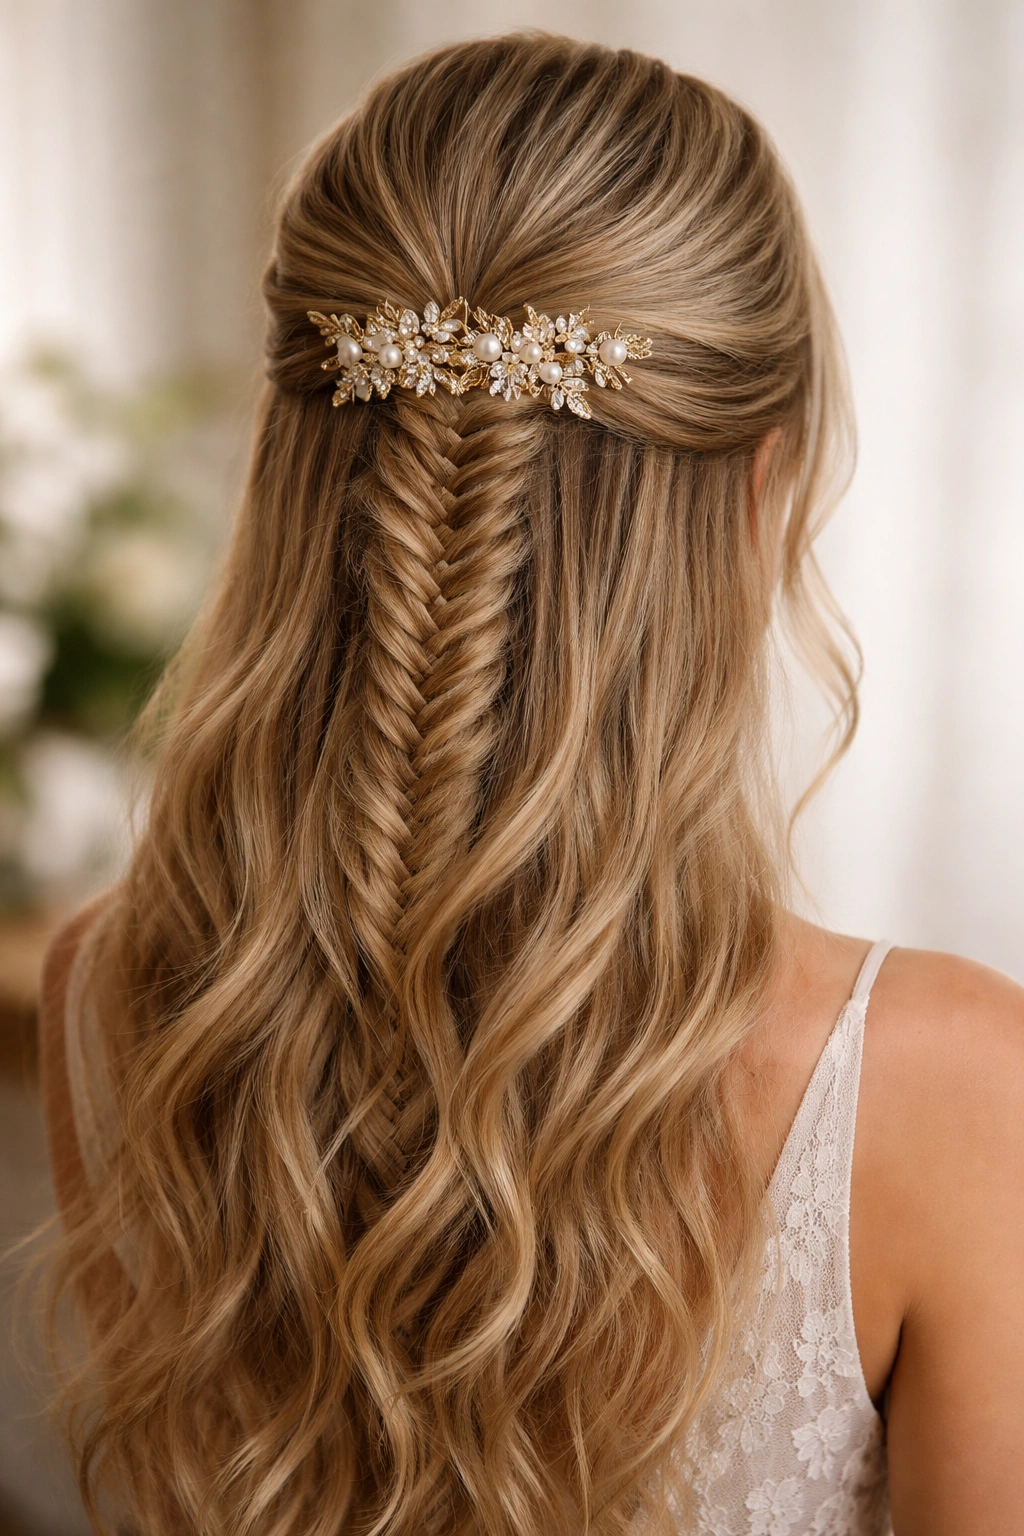
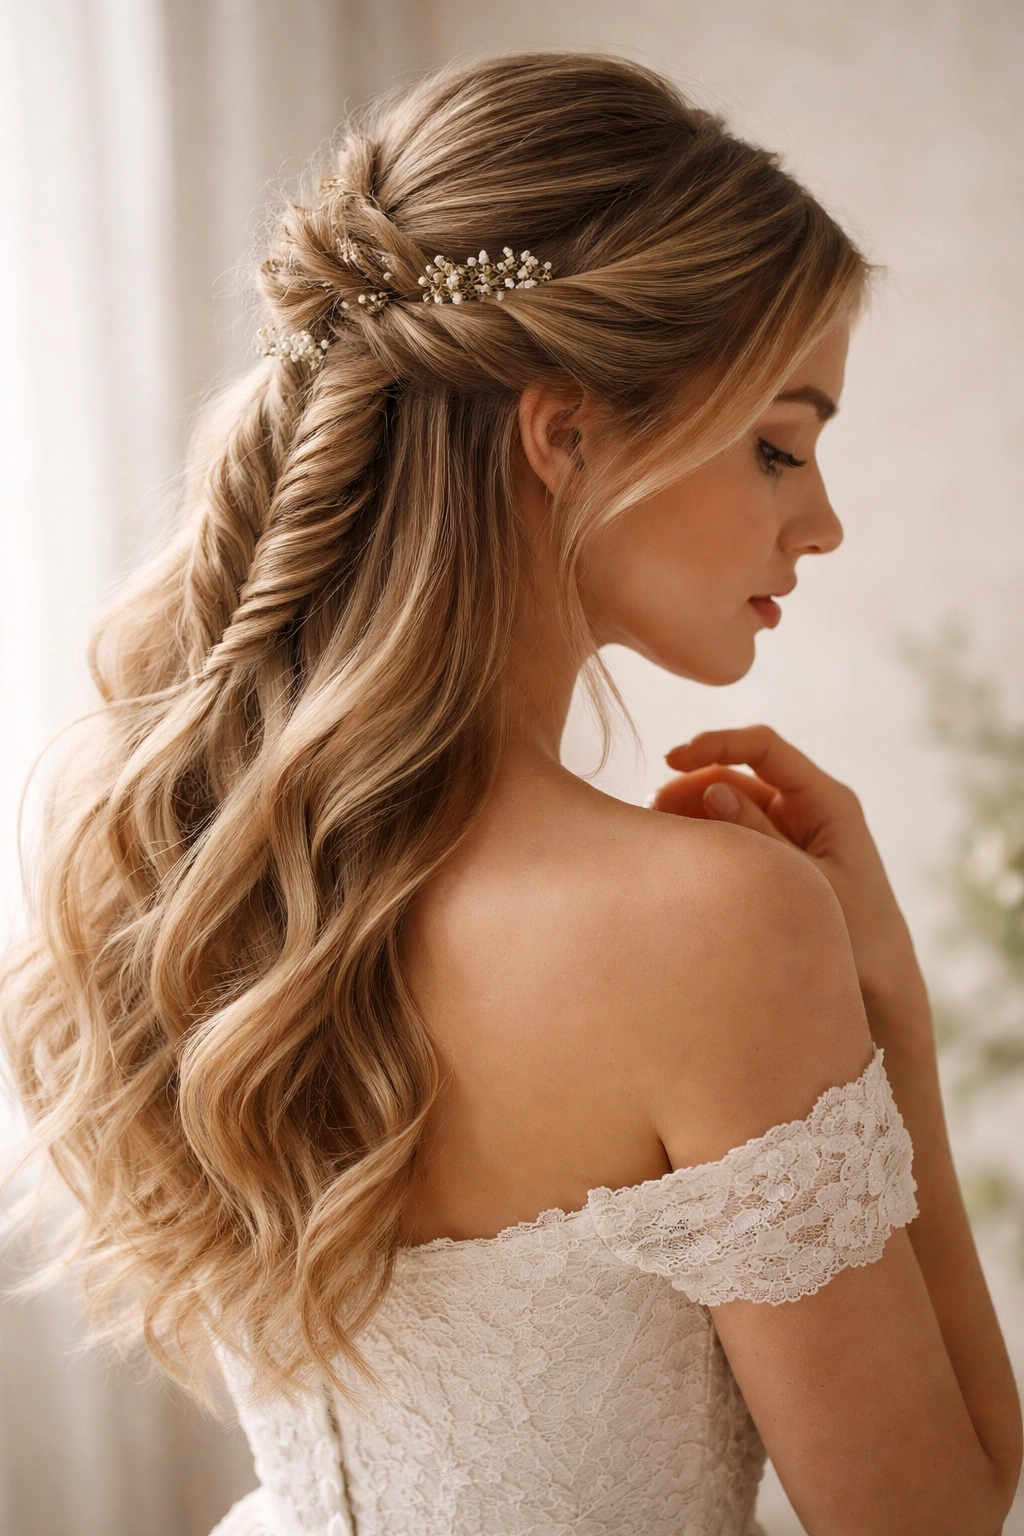
5. Fishtail with Delicate Pins and Pearls
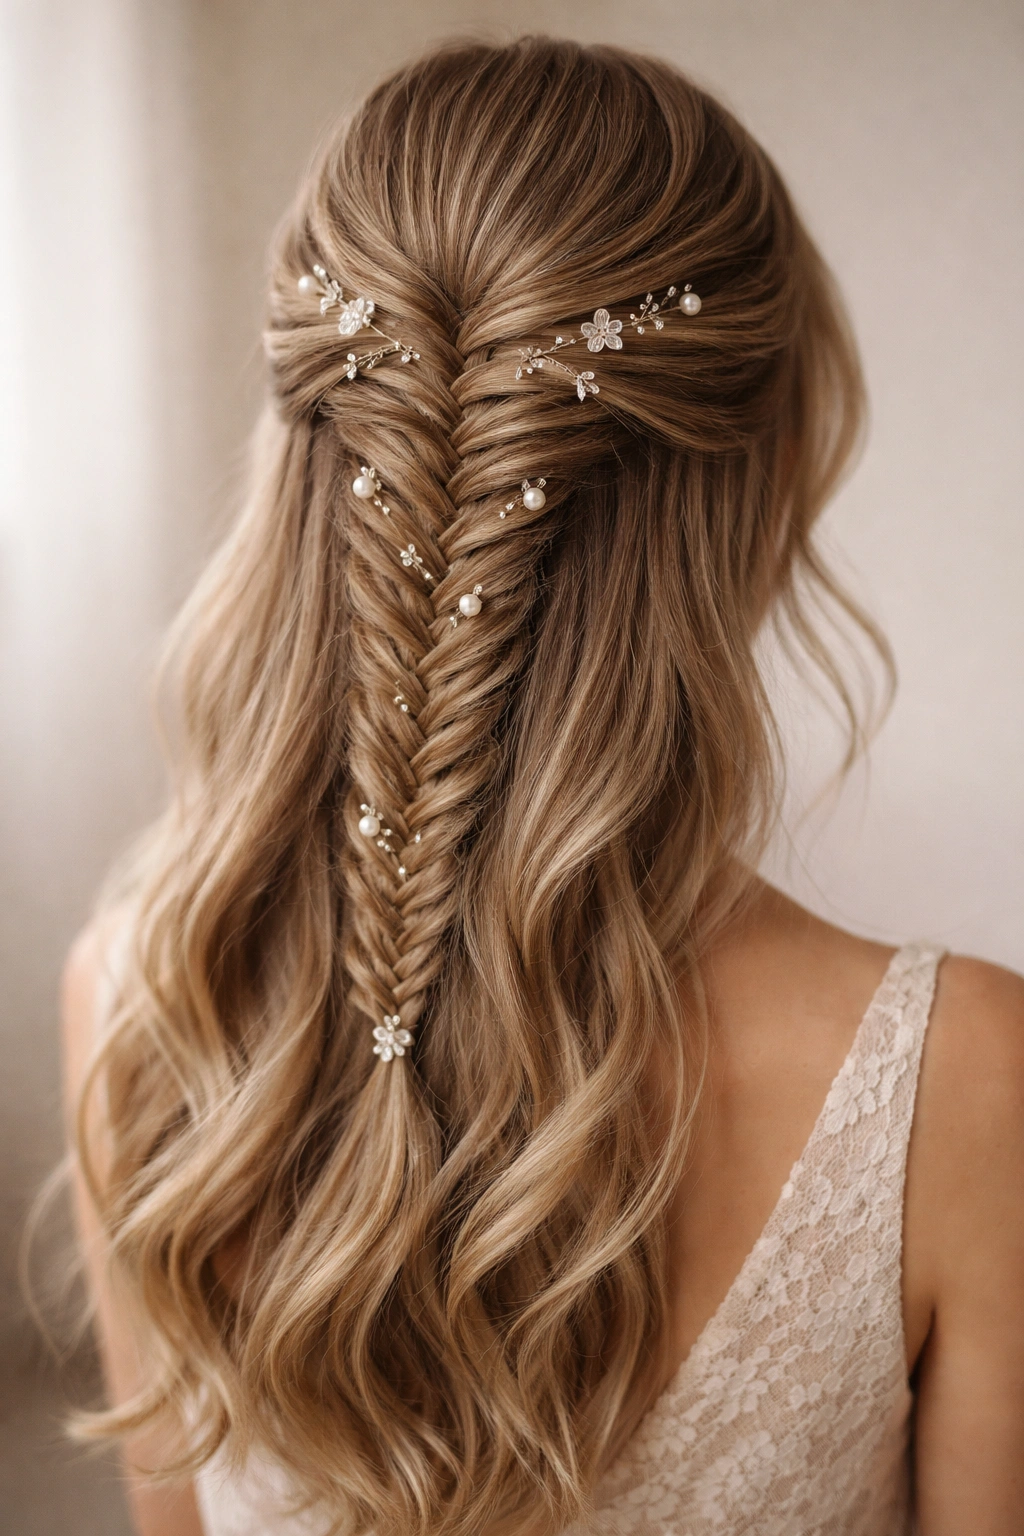
For a wedding that calls for understated elegance, a fishtail adorned with pearl bobby pins and delicate hair accessories offers sophisticated detail without overwhelming the look. Rather than adding a separate crown or flower arrangement, small accessories are pinned throughout the braid itself, catching light and adding visual interest when the camera flashes.
Accessorizing with Restraint and Purpose
The key to this style is choosing quality over quantity. A handful of pearl-topped bobby pins, a few delicate crystal hair clips, or thin wire hairpieces woven through the braid create a polished, intentional look that feels special without appearing costume-like. This approach works beautifully for modern, minimalist, or classic weddings where the focus should remain on the bride. The subtle sparkle of pearls or crystals in the braid adds dimension in photos and catches light as bridesmaids move, creating an animated, luxurious effect.
Selecting and Placing Accessories
- Choose bobby pins and clips in colors that match the hair—try to avoid stark metal tones that read as overly visible against the hair
- Pearl-topped pins, rhinestone clips, or delicate gold hairpieces all offer elegant options
- Plan placement before the wedding day so you have a consistent design across all bridesmaids
- Pin accessories at strategic points: where the braid begins, at the midpoint, and where it’s secured at the back
- Space pins evenly rather than clustering them so the look feels balanced
- Use hair-safe adhesive or bobby pins specifically designed for hair accessories to ensure nothing slips
- Less is more—three to five well-placed accessories create more impact than ten scattered throughout
Pro tip: Buy a few extra pins of each type in case of last-minute drops or if a bridesmaid wants her style adjusted slightly during the day.
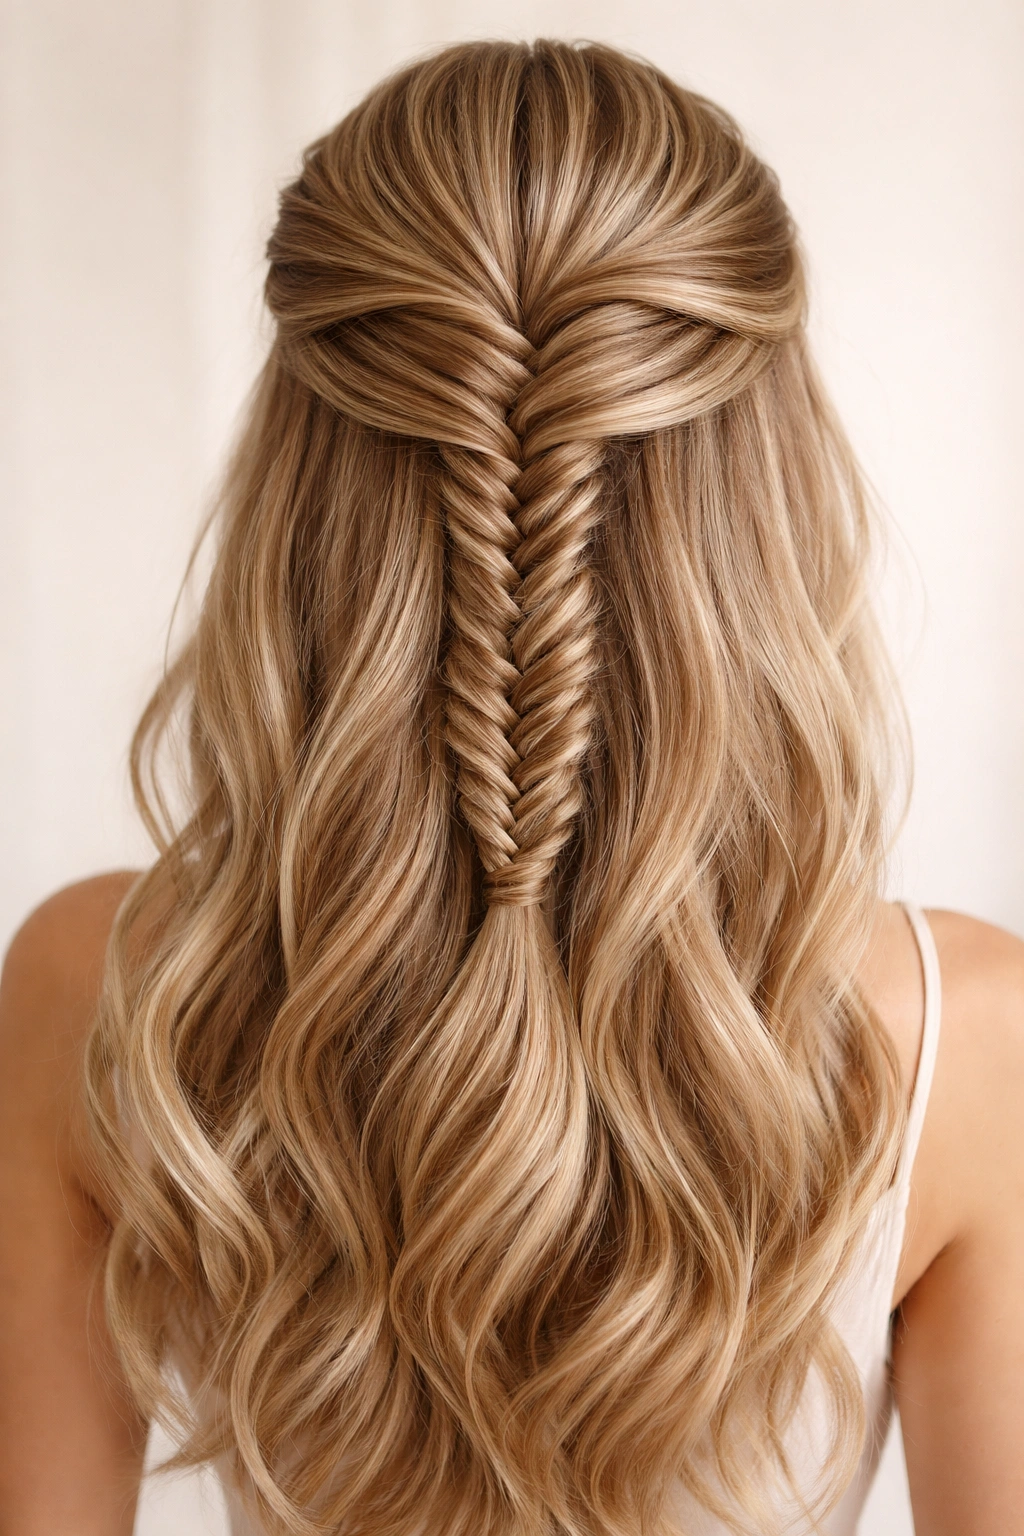
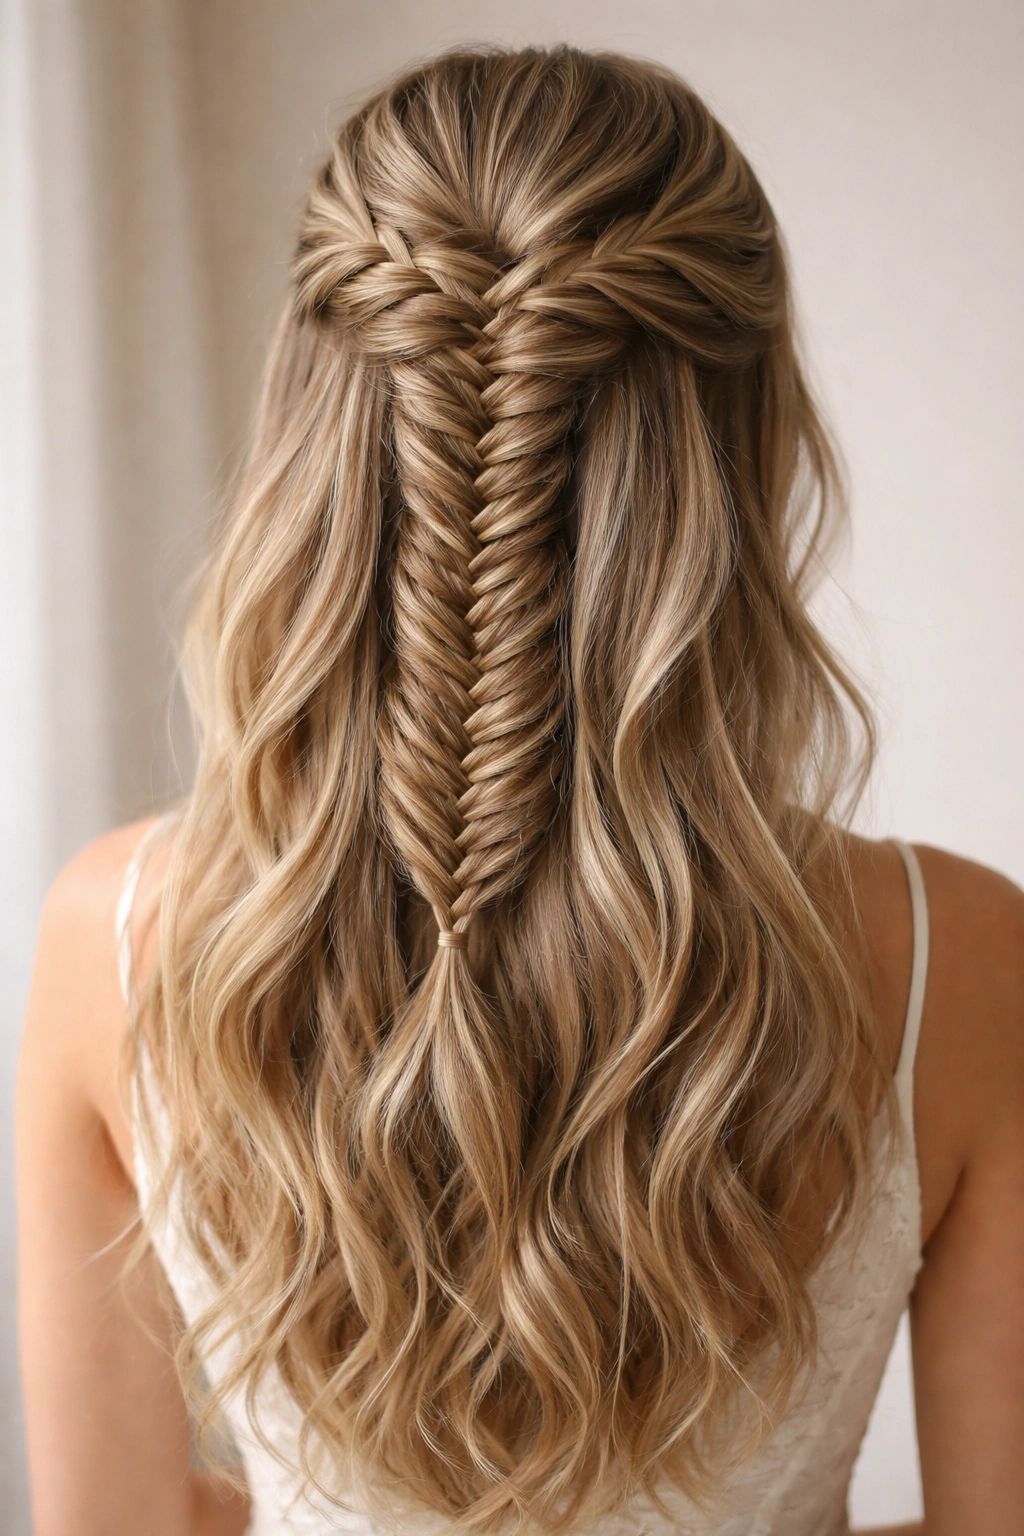
6. Voluminous Braided Fishtail
If you want maximum impact and drama, a voluminous fishtail creates an impressively full, textured braid that commands attention. Start with teased, textured hair at the crown, create a fishtail that’s intentionally loose and puffy rather than tight and defined, and you’ll achieve a style that photographs beautifully and feels romantic and substantial.
Building Volume From the Start
Volume begins before you pick up a comb for braiding—it starts with how you prep the hair. Curling, teasing at the roots, and using texturizing spray all create the foundation for a braid that reads thick and luxurious. A voluminous fishtail requires taking slightly thicker sections than a standard fishtail, and the finished braid should feel full enough that you can see generous spacing between the interlocking strands. This style is ideal for bridesmaids with longer hair or those who want to maximize the visual impact of their length.
Achieving the Voluminous Effect
- Apply texturizing spray or dry shampoo to damp hair to create grip and texture
- Blow dry hair with a texturizing product in place, using a medium round brush
- Once dry, tease gently at the crown and brush the surface smooth while keeping volume underneath
- Create the fishtail with slightly thicker sections than normal, taking about half-inch pieces rather than quarter-inch pieces
- After completing the braid, gently pull and tease the outer edges of each fishtail loop to expand the braid
- Work section by section down the length of the braid, creating a graduated effect where the braid gets progressively fuller toward the end
- Finish with a strong-hold hairspray to set the teased sections and prevent the braid from deflating
Pro tip: Voluminous braids benefit from being done as close to photos as possible—if you’re braiding hours before the ceremony, the texture might settle and look less full by picture time.
7. Side-Swept Fishtail Half-Up
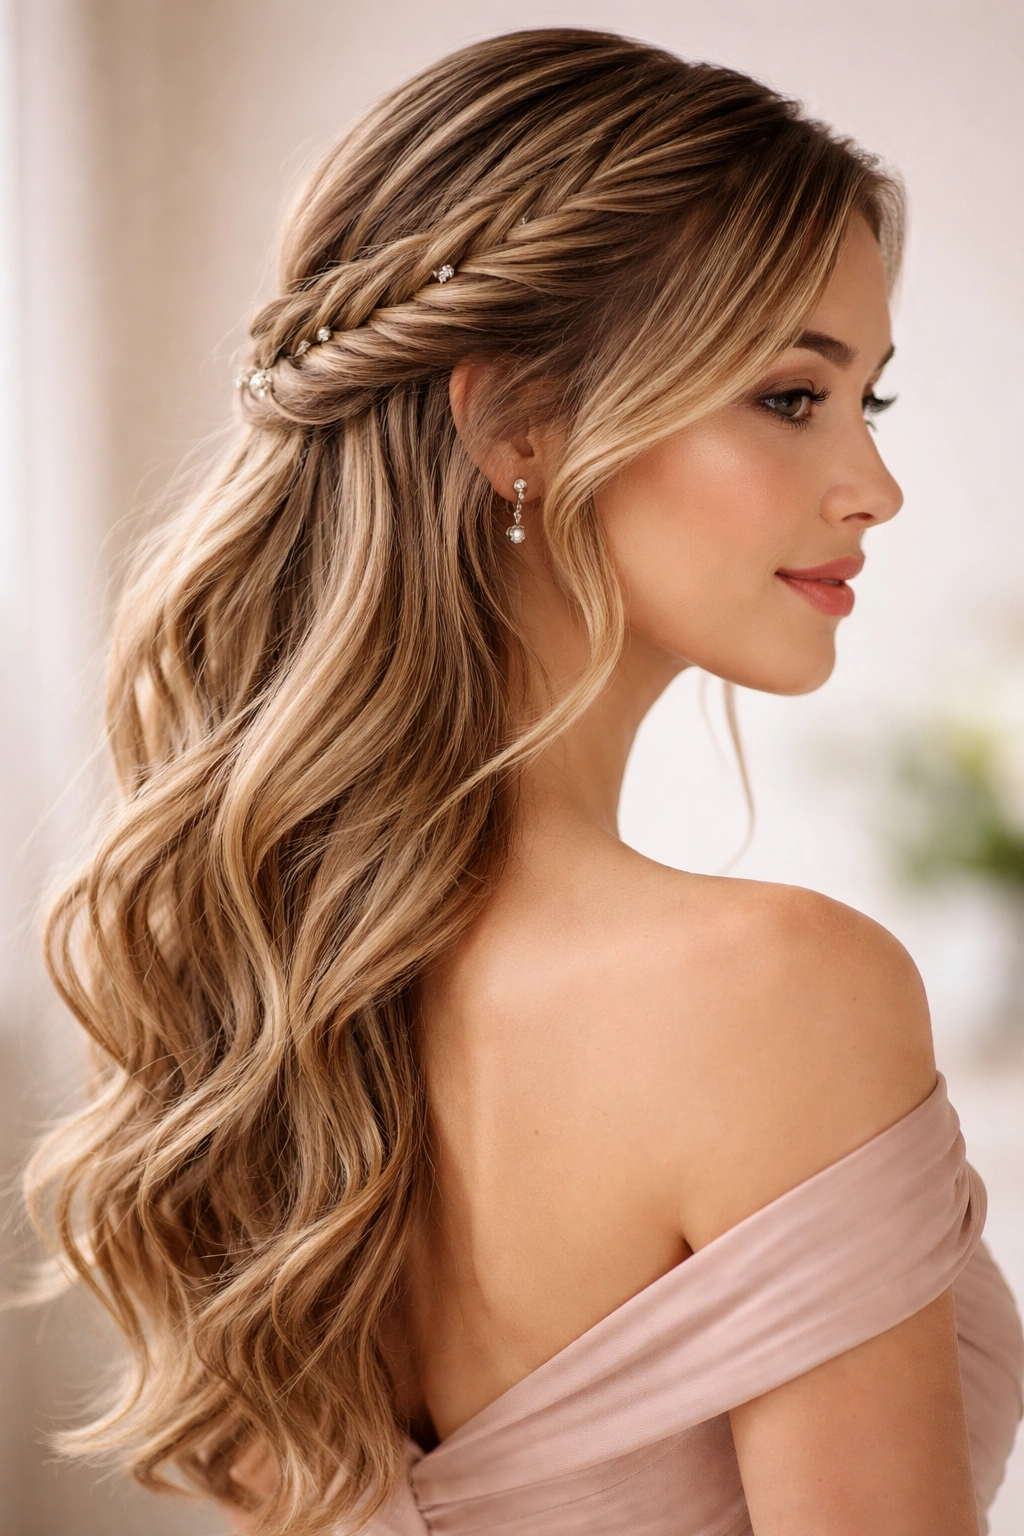
Moving away from the centered approach, a side-swept fishtail half-up creates asymmetry and a more fashion-forward silhouette. The fishtail begins on one side, sweeps across the back of the head, and is secured on the opposite side, leaving more hair down on one side of the face than the other. This style is particularly flattering for square-shaped faces or bridesmaids who prefer an asymmetrical look.
The Flattering Geometry of Side-Sweep Styles
An asymmetrical style naturally creates visual interest because it breaks the expected symmetry of centered styles. This works beautifully in photos and can actually be more flattering to certain face shapes—a side-swept braid can minimize a broad jawline or draw attention upward if that’s desired. The side-sweep approach also allows for more creative styling of the remaining loose hair: you can create more dramatic waves on one side, leave it straighter, or add additional texture to create contrast.
Creating a Polished Side Sweep
- Begin the fishtail on one side at the temple, starting the braid closer to that ear than you normally would
- Braid at an angle toward the back of the head rather than directly back, following the natural curve of the skull
- As you reach the back, angle the braid slightly downward so it sits lower on the back of the head
- Secure the braid on the opposite side of where you started, positioning the elastic lower and slightly forward
- Leave the hair on the starting side fuller and more voluminous, creating visual weight on that side
- Style the loose hair in waves, with more prominent waves on the side with less braid coverage
- Pin the secured braid gently to the head using bobby pins that match hair color to keep it in place and prevent slipping
Pro tip: Side-swept styles work beautifully for bridesmaids with side-part preferences or those who style their hair off to one side daily—it’ll feel more natural to them than a centered style.
8. Fishtail with Ribbon or Lace Detail
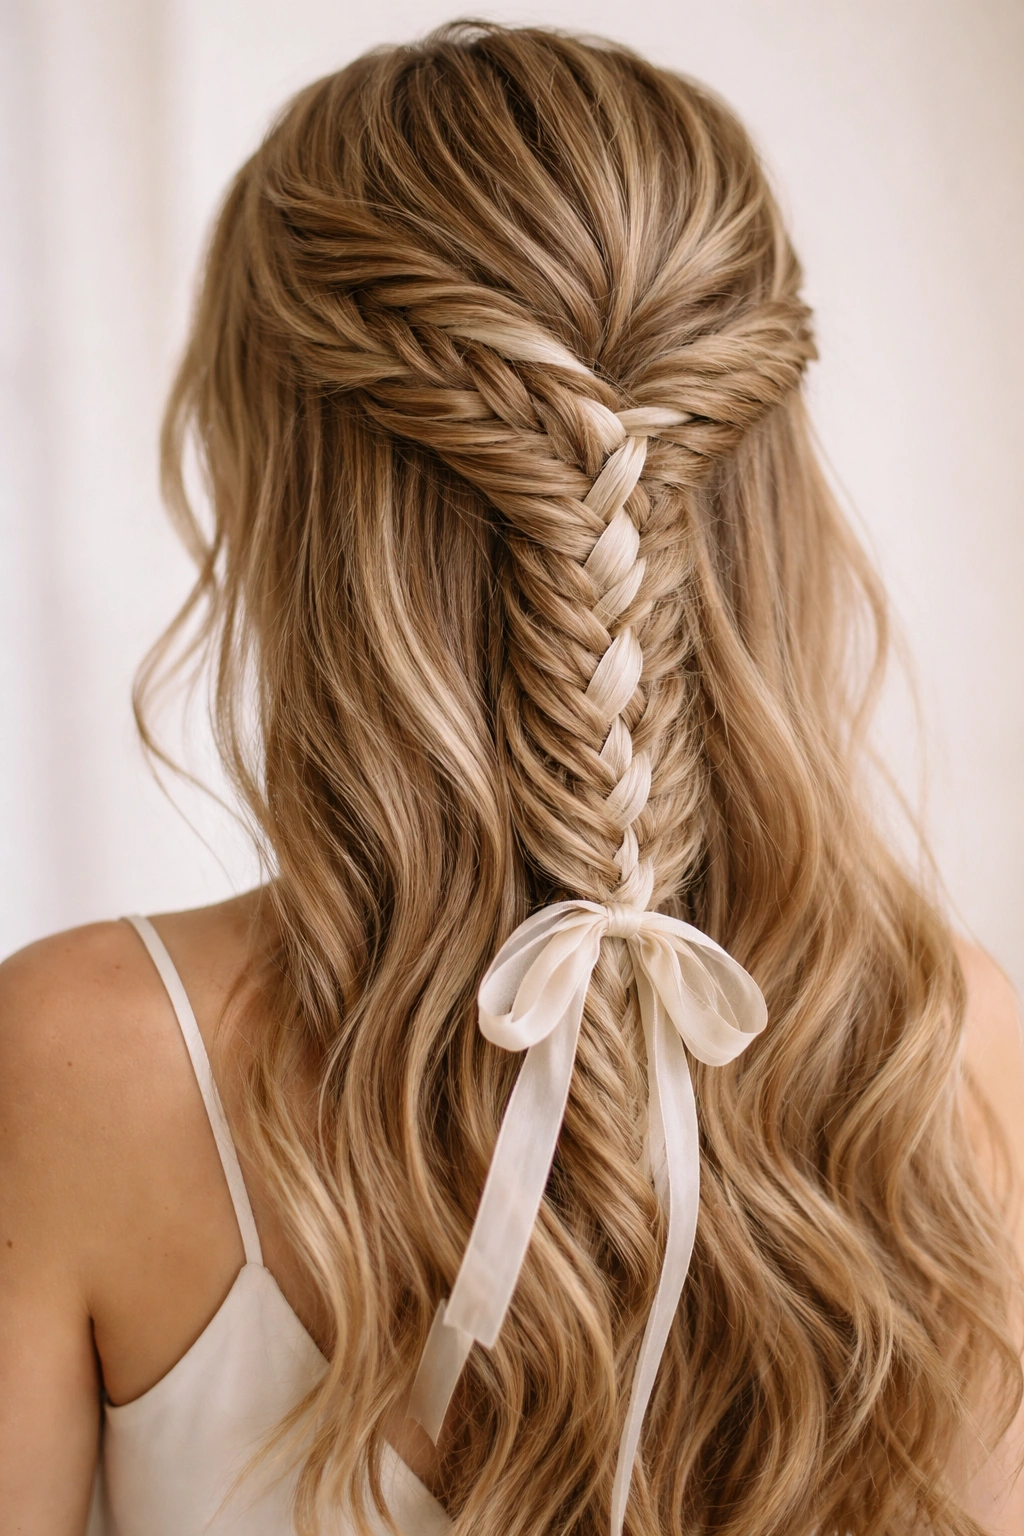
Weave a delicate ribbon, silk strip, or lace through the fishtail braid for added texture, color, and romantic detail. This technique transforms a basic braid into something that feels custom and intentional, and the ribbon or lace can coordinate with the bridesmaid dresses, wedding colors, or other design elements from the ceremony.
Ribbon and Lace as Functional Design
Ribbons and lace serve double duty—they’re decorative and functional. A ribbon woven through the braid helps hold the braid structure together, which is especially useful if a bridesmaid has fine or slippery hair. The ribbon also adds visual dimension and can introduce color or metallics that wouldn’t naturally be present in hair. Lace creates a softer, more delicate aesthetic, while satin or silk ribbons offer a shinier, more luxe appearance. This is an excellent way to tie the hairstyle directly to the overall wedding design without requiring custom accessories.
Technique for Weaving Ribbon or Lace
- Choose a ribbon or lace that’s approximately half an inch to one inch wide for optimal weaving
- Secure the ribbon to one side of the crown with a bobby pin or by starting the braid with the ribbon as the third “strand”
- As you create the fishtail sections, alternate which strand goes over the ribbon, so the ribbon naturally weaves through the braid
- Keep the ribbon taut but not so tight that it pulls the braid structure—it should sit naturally within the braid
- When you reach the end, secure the ribbon and hair together with the elastic, then tie the ribbon ends in a small bow or tuck them into the braid
- Adjust the ribbon so it’s visible and sits evenly throughout the length of the braid
- Use bobby pins to anchor the ribbon at the midpoint if it tends to shift or twist
Pro tip: Silk ribbons are less likely to create friction damage to hair than synthetic ribbons, and they drape more beautifully in photos.
9. Multistrand Fishtail with Texture
Rather than a traditional two-strand fishtail, incorporate multiple strands to create a more complex, intricate pattern. This might mean braiding with four, five, or even more strands, with fishtail-style alternating patterns that create a densely textured, intricately patterned braid. This style requires more skill to execute but creates a show-stopping effect.
When Complexity Creates Beauty
A multistrand fishtail is the style to choose when a bridesmaid has thick, long hair and genuinely wants to make a statement with her updo. The intricate pattern is visually sophisticated and photographs exceptionally well at close range, making it ideal for bridesmaids who will be featured prominently in photos or who are standing nearest to the bride. The density of the braid also means it holds beautifully throughout a full day of activity—all those interlocking strands create a secure structure that resists loosening or unraveling.
Building a Multistrand Pattern
- Start with a four-strand base if attempting multistrand for the first time, which is the next logical step beyond a standard two-strand fishtail
- Section hair into four equal sections at the crown
- Begin by crossing the right outer strand over the right inner strand
- Then cross the left outer strand over the left inner strand
- Continue alternating sides, maintaining even tension so all four strands stay equal in width
- As the braid develops, you can add fishtail elements by taking thin pieces from the outer strands rather than moving whole strands
- Keep the braid relatively tight for a structured, defined appearance
- Finish by gently teasing the braid to soften it slightly and create visual texture within the pattern
Pro tip: Mark the sections with temporary hair dye or clips the day before to practice if this is a new technique—execution matters more with complex braids, so rehearsal time is worthwhile.
10. Half-Up Fishtail with Accessory Upgrade
Take a classic fishtail half-up and elevate it with a statement accessory at the securing point. Rather than a simple elastic, use a decorative claw clip, a vintage hair stick, a beaded barrette, or a custom metal hair cuff. The accessory becomes a focal point that adds personality and polish to an otherwise simple style.
Choosing an Accessory That Complements the Look
The right accessory can transform a basic fishtail from simple to sophisticated. Vintage-inspired pieces add romance and old-world glamour, while modern geometric clips read as contemporary and edgy. Metallic hair cuffs add luxury, while beaded or crystal barrettes add sparkle. The key is choosing something that coordinates with the dress, the bride’s accessories, or the wedding’s overall aesthetic. An accessory should feel intentional, not like an afterthought, so it needs to coordinate in color, scale, and style with the rest of the bridesmaid look.
Securing Hair with Style
- Complete the fishtail braid as normal, braiding back to the crown
- Rather than using a standard elastic, wrap a decorative hair accessory around the secured braid
- If using a claw clip, position it so the clip mechanism is hidden under the loose hair, making it appear the braid naturally terminates into the hair clip
- If using a hair cuff or bangle, thread the secured braid through the center of the accessory for a sleek, intentional look
- Ensure the accessory is secure enough that it won’t slip during dancing or movement
- Leave the secured braid visible—it’s now a focal point rather than something to hide
- Consider the scale of the accessory relative to the thickness of the braid; a delicate braid needs a delicate accessory
Pro tip: Bring backup accessories the day of the wedding in case one shifts or breaks—small variations in braid thickness mean what fits perfectly on one bridesmaid might be slightly loose or tight on another.
11. Undone Fishtail for Relaxed Elegance
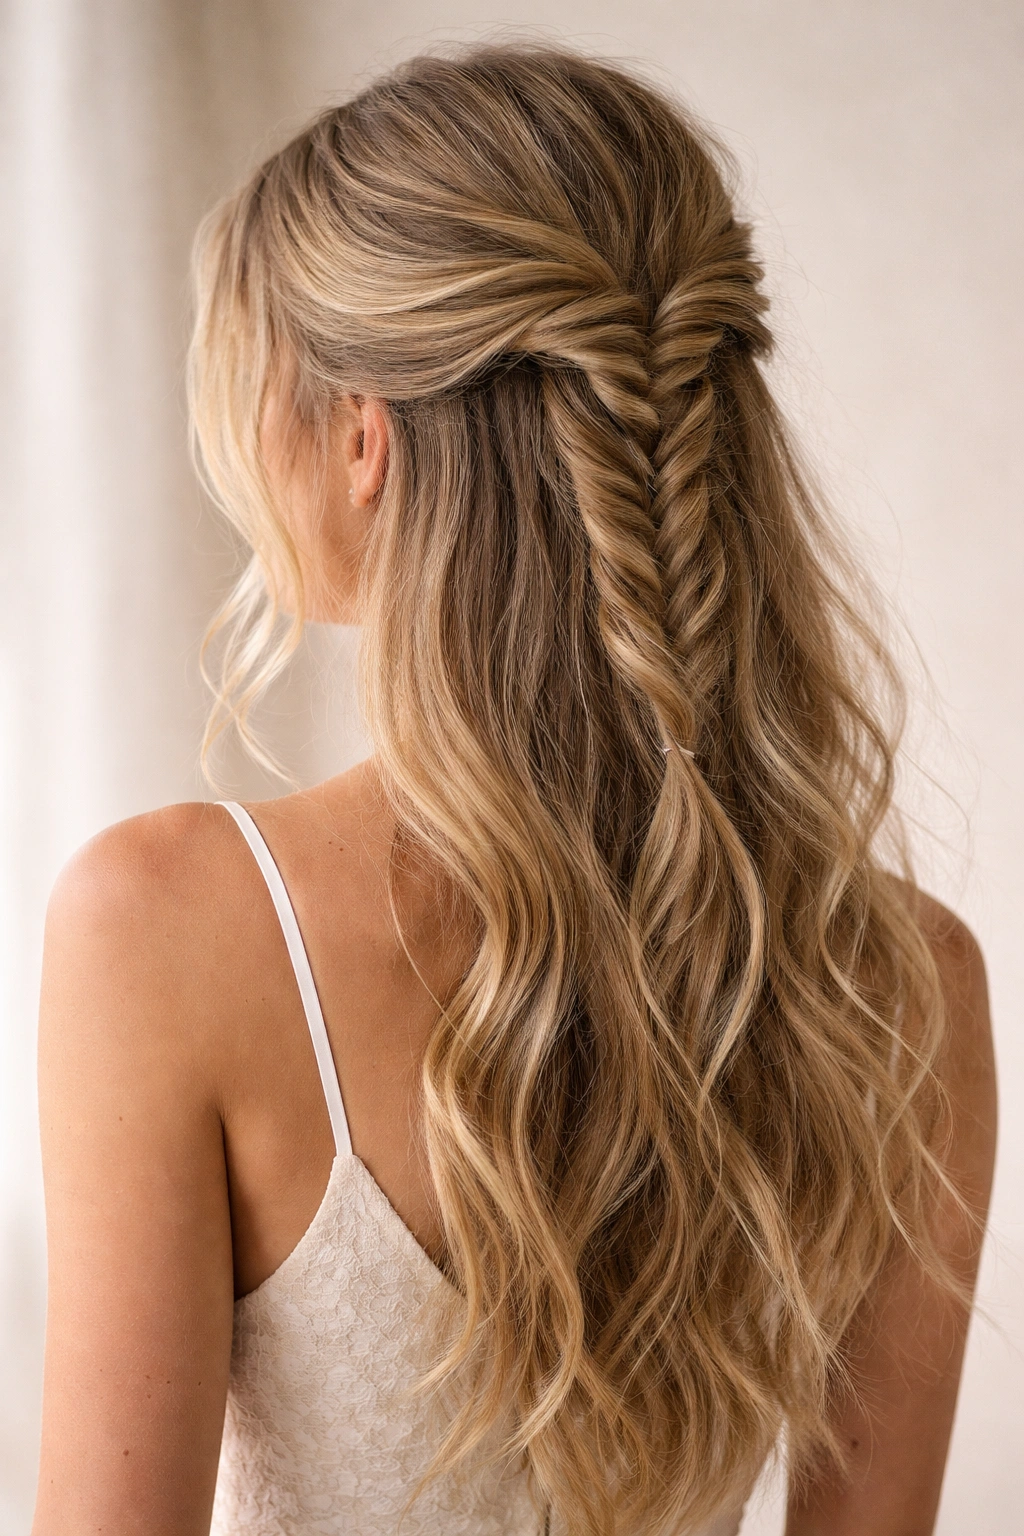
Not every wedding demands polished perfection, and for more casual or outdoor celebrations, an intentionally undone fishtail half-up creates a relaxed, effortless aesthetic. The braid is looser, slightly messy, with hair falling slightly out of the pattern and texture emphasized over precision. This style feels current and romantic without appearing formal or constrained.
The Art of Looking Intentionally Casual
An undone fishtail requires the right mindset—you’re not aiming for perfection, but you are aiming for intentional imperfection. The braid should read as chosen and styled, not as though the bridesmaid just threw her hair in a braid without thinking. This is achieved by loosening the braid strategically, adding texture throughout, and allowing small pieces to fall around the face naturally. This style works beautifully for bohemian weddings, destination events, garden ceremonies, or any celebration with a relaxed vibe. It’s also a practical choice for outdoor events where wind and humidity will naturally loosen a tight braid anyway.
Creating Deliberately Undone Texture
- Begin with textured, slightly wavy hair rather than perfectly smooth hair
- Create the fishtail braid more loosely than you normally would, taking slightly thicker sections
- Don’t tease the braid to make it fuller—instead, gently and deliberately pull the outer edges to create a messier, less structured appearance
- Pull small face-framing pieces out of the braid intentionally, creating a piece-y effect around the face and temples
- Use a texturizing spray or light hairspray rather than a heavy-hold product—the goal is to make the braid look like it just happened
- Leave the securing elastic completely hidden under the loose hair so no hardware is visible
- Embrace the slight waviness or texture in the loose hair below the braid rather than trying to create perfect curls
Pro tip: This style benefits from being done closer to the ceremony than a tight, polished braid, as the intentional messiness reads best when fresh.
12. Dutch Braid into Fishtail Half-Up
Begin with a Dutch braid (an inverted braid that sits on top of the hair rather than nestled within it) at the crown, then transition into a fishtail pattern as you move toward the back. This hybrid style offers visual complexity with the thick, defined Dutch braid component combined with the delicate intricacy of the fishtail. The contrast between the two techniques creates a distinctive, dimensional look.
Combining Two Techniques for Impact
A Dutch braid into fishtail is technically sophisticated but creates an impressively unique style. The Dutch braid component is bold and graphic, sitting proudly on the surface of the hair, while the fishtail component adds delicate detail. The combination works because both patterns are visually interesting in different ways—the Dutch braid draws the eye with its raised structure, while the fishtail engages the eye with its intricate interlocking pattern. This style is ideal for bridesmaids who want something truly distinctive without appearing costume-like.
Executing a Dutch-to-Fishtail Transition
- Begin at the crown with a Dutch braid, crossing strands over the top rather than under
- Keep the Dutch braid relatively wide so it reads clearly and creates a strong visual anchor
- After braiding about three to four inches, transition from the Dutch three-strand pattern into a fishtail by beginning to take thin sections from the sides rather than moving whole strands
- Maintain the raised position of the braid even as you transition to the fishtail pattern—don’t suddenly drop it into the hair
- Continue the fishtail back toward the crown and secure with an elastic
- Gently tease both the Dutch component and the fishtail component to create softness and visual texture
- The Dutch portion should remain relatively defined while the fishtail can be slightly looser for contrast
- Finish with hairspray to set both components and prevent the transition point from looking obviously constructed
Pro tip: Practice this hybrid style at least once before the wedding day—the transition from Dutch to fishtail requires a moment of mental shift that feels awkward until you’ve done it a few times.
Final Thoughts
Fishtail half-up styles offer bridesmaids a romantic, sophisticated look that bridges the gap between fully up and fully down hair. Each of these twelve variations can be adapted to suit different hair types, wedding aesthetics, and personal preferences, meaning no bridesmaid has to feel like she’s forcing herself into an uncomfortable or unflattering style.
The beauty of these styles is their flexibility. A classic fishtail with loose curls works equally well at a formal black-tie wedding and a casual backyard celebration—it’s all about how you accessorize and finish it. The same braid that looks romantic paired with fresh flowers transforms into something modern and minimalist when adorned with delicate pins or worn with a relaxed texture.
When planning bridesmaids’ hair, consider doing a trial run with each person if possible. Hair texture, length, and density vary significantly, and a style that looks stunning on one person might need tweaking on another. A tight fishtail that photographs beautifully on thick hair might feel too constrictive on fine hair; the same braid might appear smaller and less impressive on shoulder-length hair versus waist-length hair. Build in flexibility for minor adjustments while maintaining overall cohesion across the bridal party.
Remember that bridesmaids will be wearing these styles for eight hours or more on your wedding day. Choose styles that feel comfortable, that don’t pull or create headaches, and that will maintain their appearance through movement, heat, humidity, and dancing. A beautifully executed fishtail that feels lovely to wear will translate into natural, relaxed photos—and that’s what matters most when you’re looking back at your wedding day images months or years later.