Sunday hair asks for more than looking neat for ten minutes. If your curls are anything from loose waves to tight coils, church hairstyles for curly hair need to survive a little more than a mirror test: hugs at the door, a warm sanctuary, a bit of humidity, and maybe a long drive home with the windows cracked. You do not need to flatten your texture to make it look polished.
The styles that hold up best are the ones that work with your curl pattern instead of fighting it. A clean part, a smart twist, a careful tuck, or one good accessory can make hair look intentional without making it feel stiff. I like styles that still move when you turn your head or take off a coat. That tiny bit of softness matters.
Curly hair has a memory of its own. Too much heavy cream and it goes limp. Too little hold and it frizzes before the first hymn is over. The sweet spot is a style that gives the crown shape, keeps the front controlled, and leaves enough curl visible so the hair still looks like yours. Start with the look that fits your length and curl type, and the rest gets easier fast.
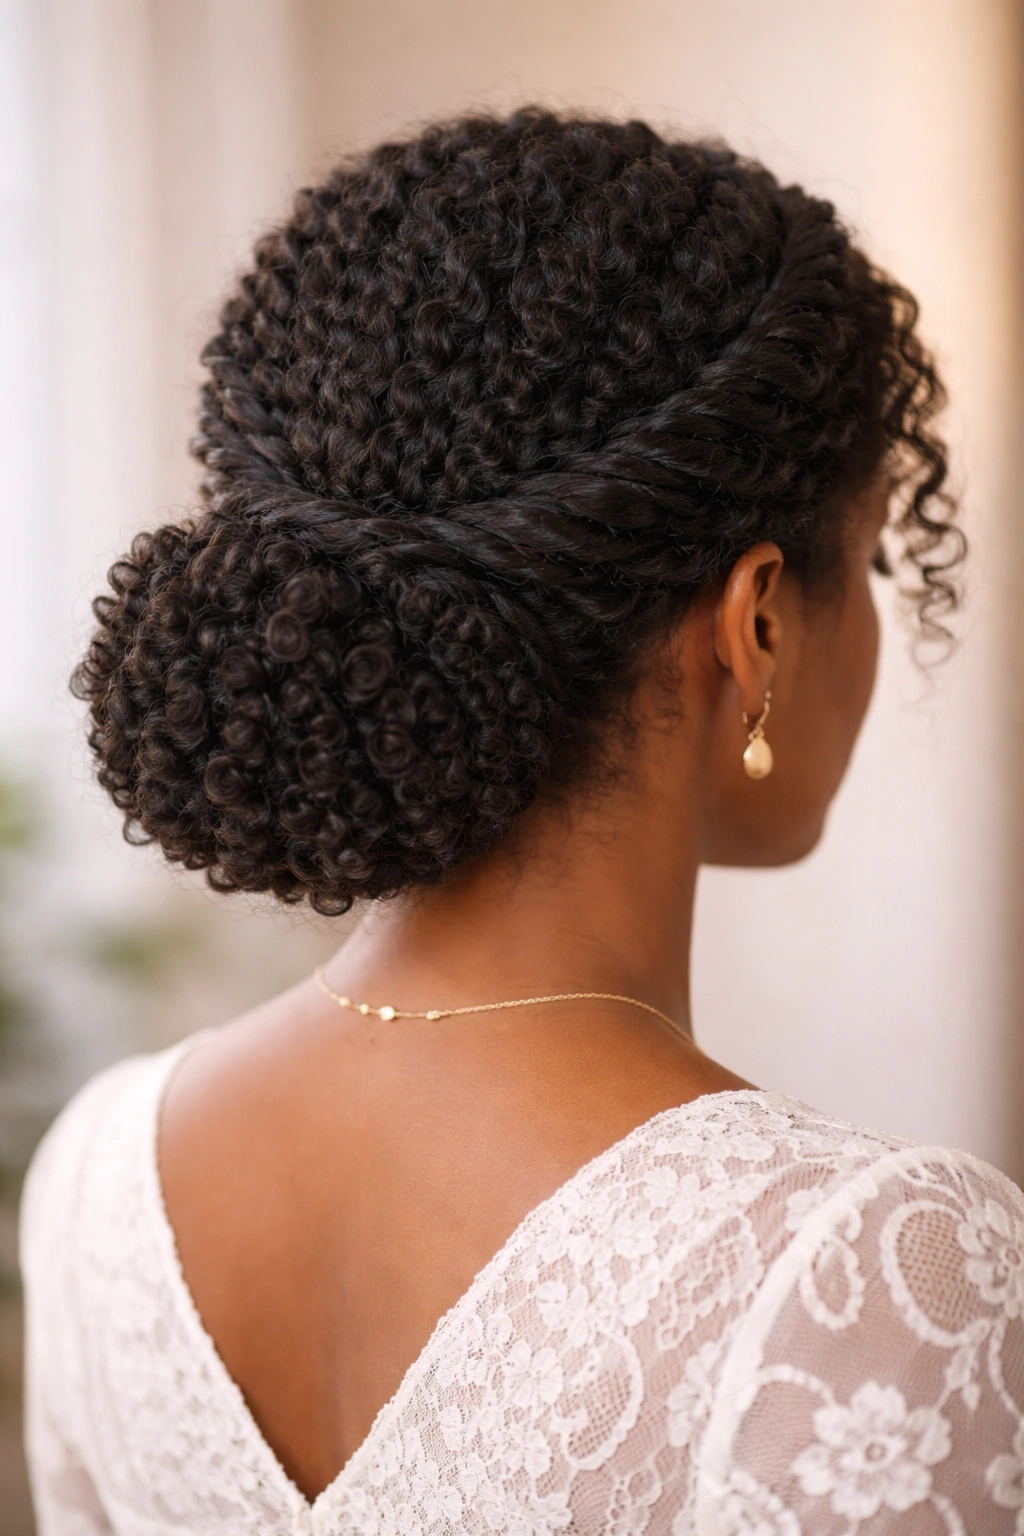
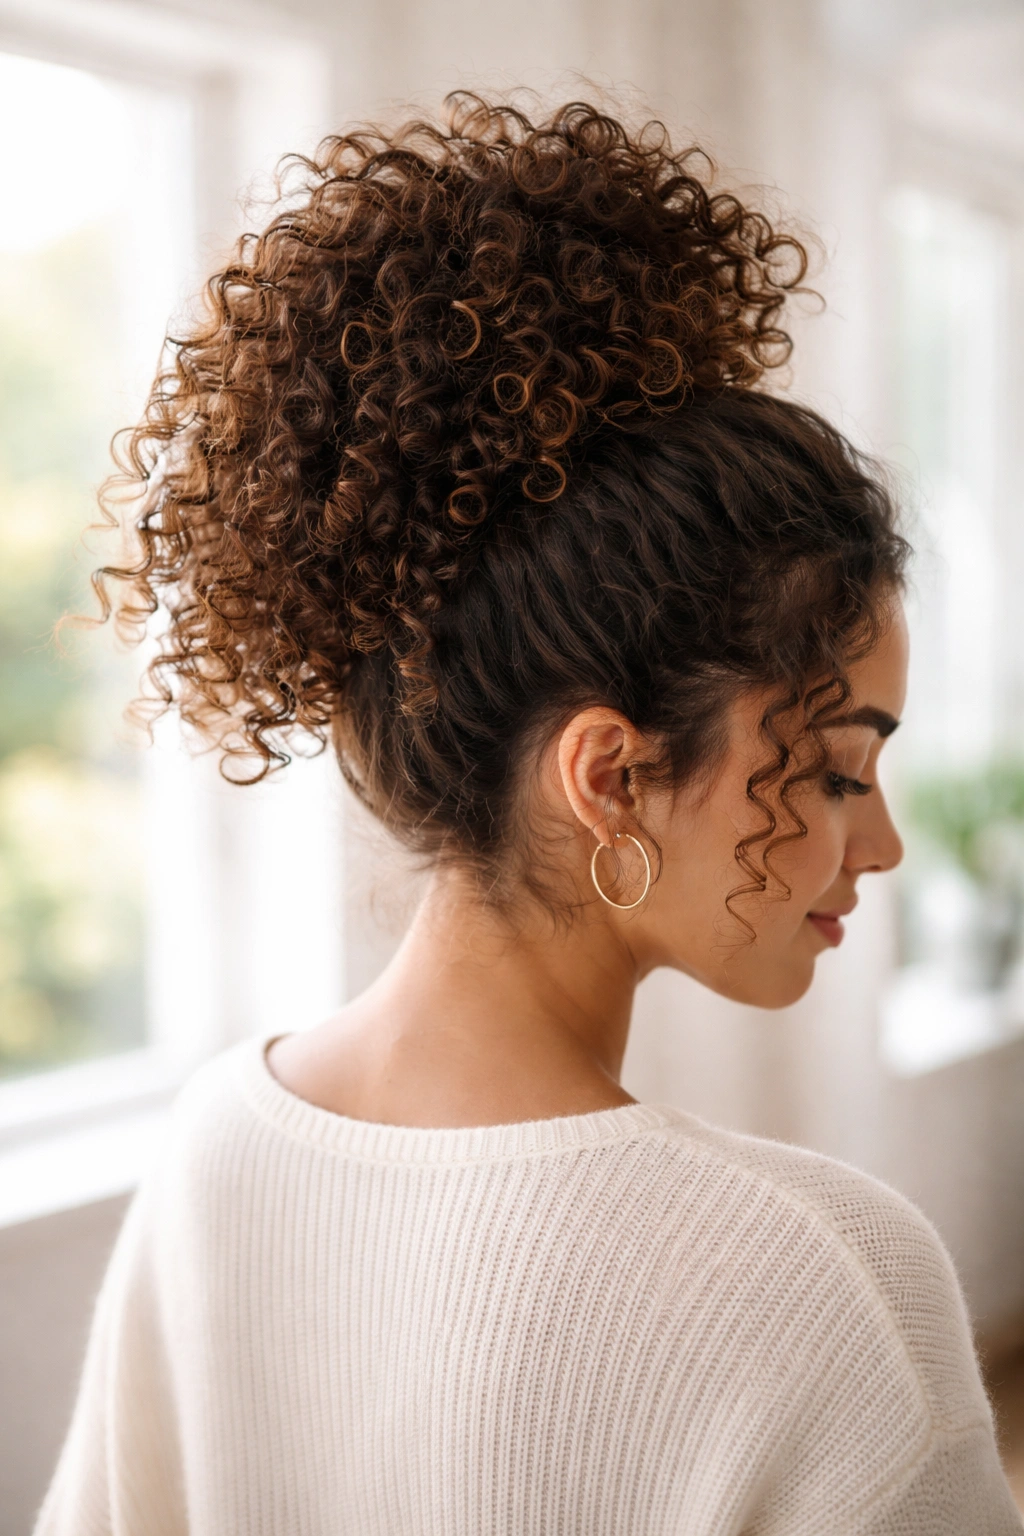
1. The Low Curly Chignon for Church Hairstyles for Curly Hair
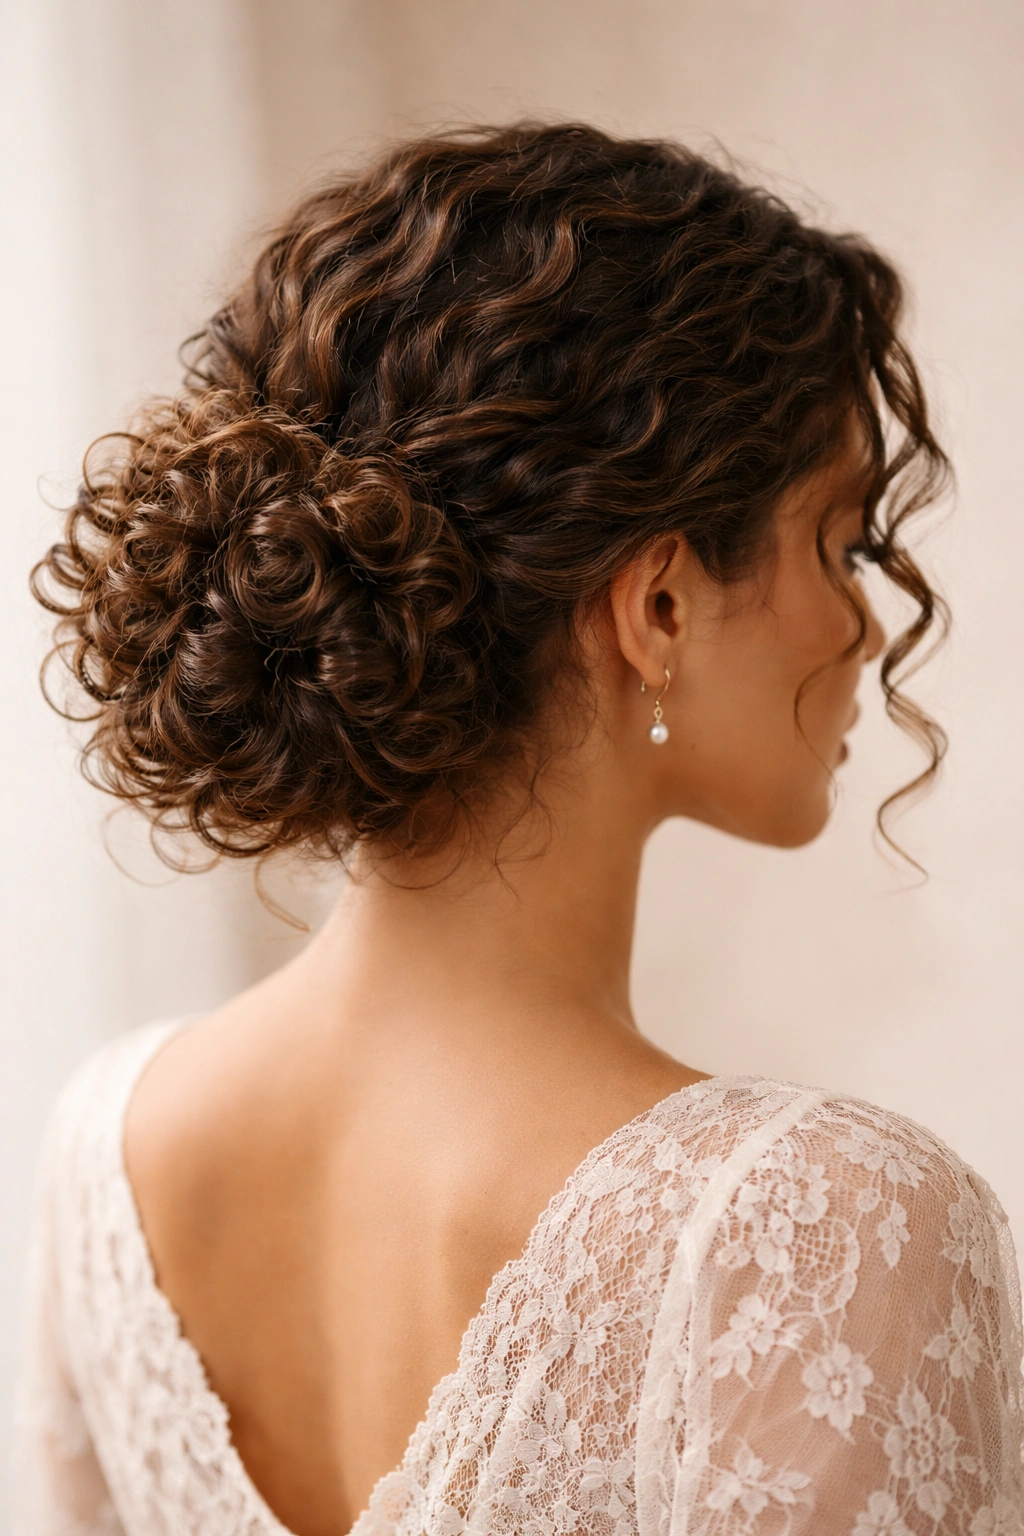
A low chignon is one of those styles that looks calm from every angle. It sits at the nape, keeps the face open, and has just enough structure to feel dressy without looking fussy.
The trick is not to smooth your curls into submission. Gather the hair low, keep the part clean, and twist the length into a soft knot instead of a tight ball. A little texture makes the style look richer, not messy. If you have layered curls, leave a few shorter pieces free around the hairline so the bun does not look like a helmet.
What helps most:
- A side part or soft middle part
- 4 to 8 bobby pins that match your hair color
- A light gel or edge cream on the front only
- A satin scrunchie if your hair is thick or dense
Tiny detail, big payoff. Cross two pins in an X at the base of the knot and the whole style feels steadier. That one move saves you from fiddling with it halfway through service.
If you like a neat, quiet look with a little polish, this is the one I would reach for first.
2. Half-Up Twist Styles for Church Hairstyles for Curly Hair
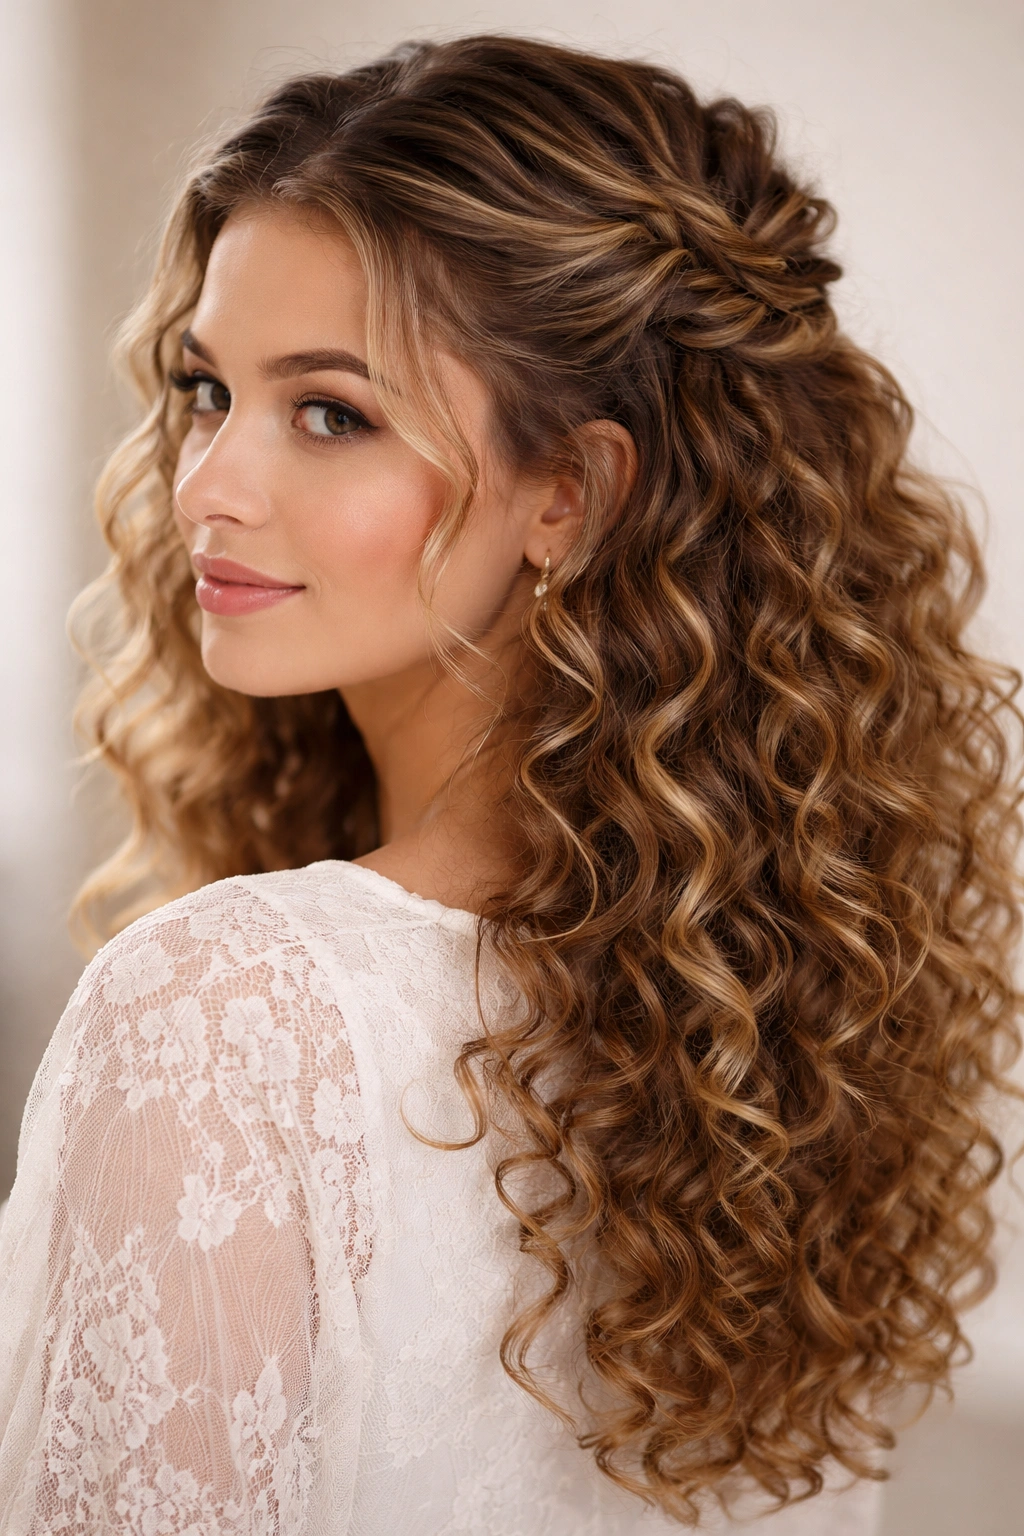
What if you want your curls to stay visible? Then a half-up twist is the move. It gives you control at the front and crown while letting the back keep its shape, bounce, and length.
Start by taking a section from each temple, twisting it back toward the crown, and securing both sides with a small clip or a pair of hidden pins. The twists should sit snug, not tight. Pull them too hard and the style starts to look strained. Leave the rest of the curls loose, then shape them with your fingers so the ends do not look scraggly.
This style works especially well when your curls are defined but not freshly washed. Day-two or day-three hair usually has enough grip to hold the twists better, which is helpful if you do not want to pile on product. A mist of water and a pea-sized amount of curl cream can wake up the ends without making the roots heavy.
It also solves a practical problem. Hair off the face, curls still on display, no giant updo to wrestle with before breakfast. That balance is why it keeps showing up in my own mental shortlist.
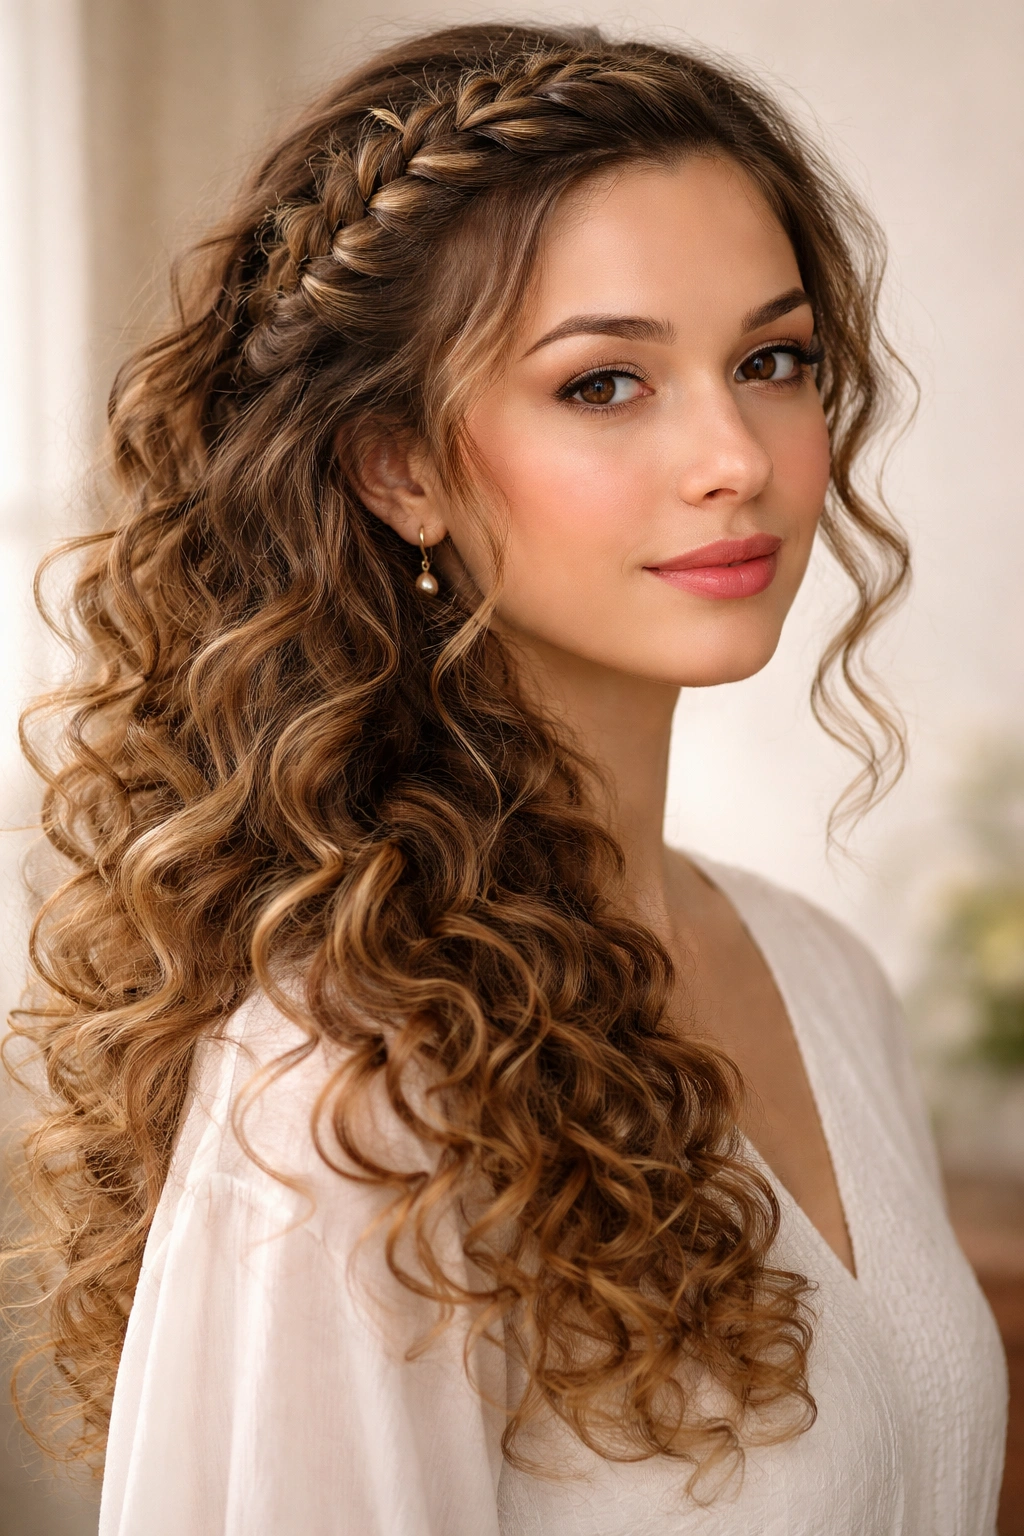
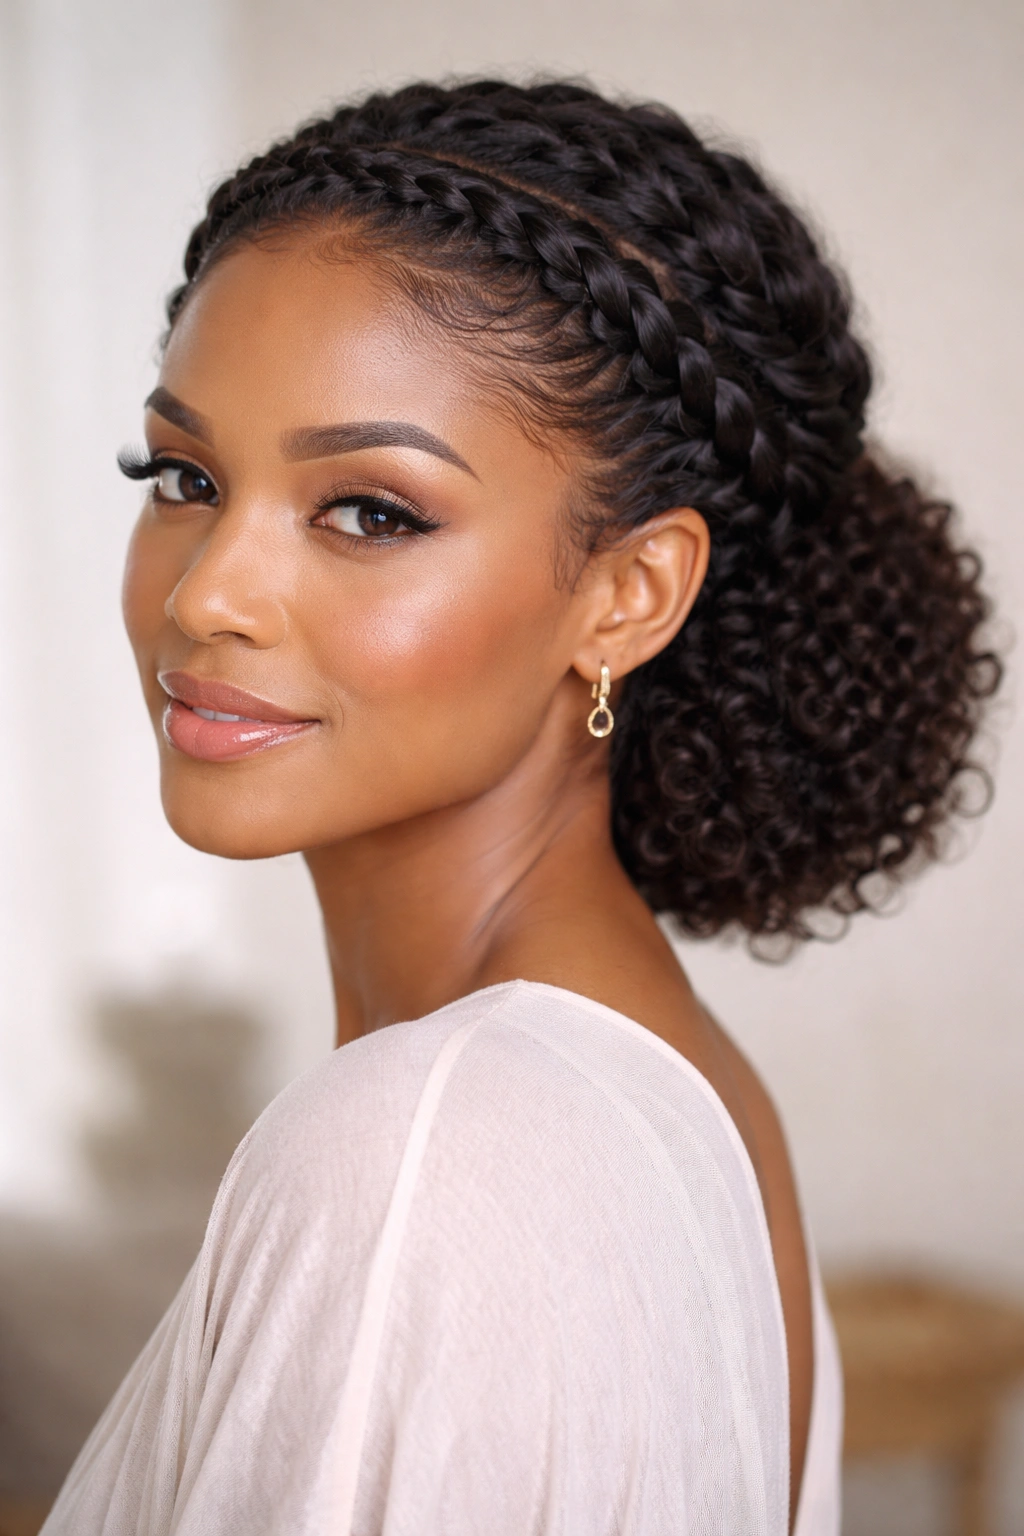
3. The Braided Crown That Leaves the Ends Soft
A braided crown feels like the hair equivalent of a well-made jacket. It has shape, it frames the face, and it gives you that neat edge that reads polished the second you walk in.
The look starts at the temples. Braid or rope-twist each side, bring both sections toward the back of the head, and pin them so they meet near the center or just behind one ear. Keep the tension even, but not harsh. If your curls are thick, let the braid be a little chunky; tiny braids on dense hair can look overworked and tend to poke loose by the third song.
Why It Holds So Well
The crown sits on the parts of the head that move the least. That is why this style usually lasts longer than a loose side clip or a soft puff. Once the pins are anchored into a braided section, they have something solid to grab.
How to Finish It
Leave the ends of the curls soft and visible. A few spiral pieces around the shoulders make the whole thing feel lighter. If you want a cleaner finish, tuck the ends under the braid and pin them flat.
This is one of my favorite church hairstyles for curly hair when the outfit is simple and the hair needs to do a little more work.
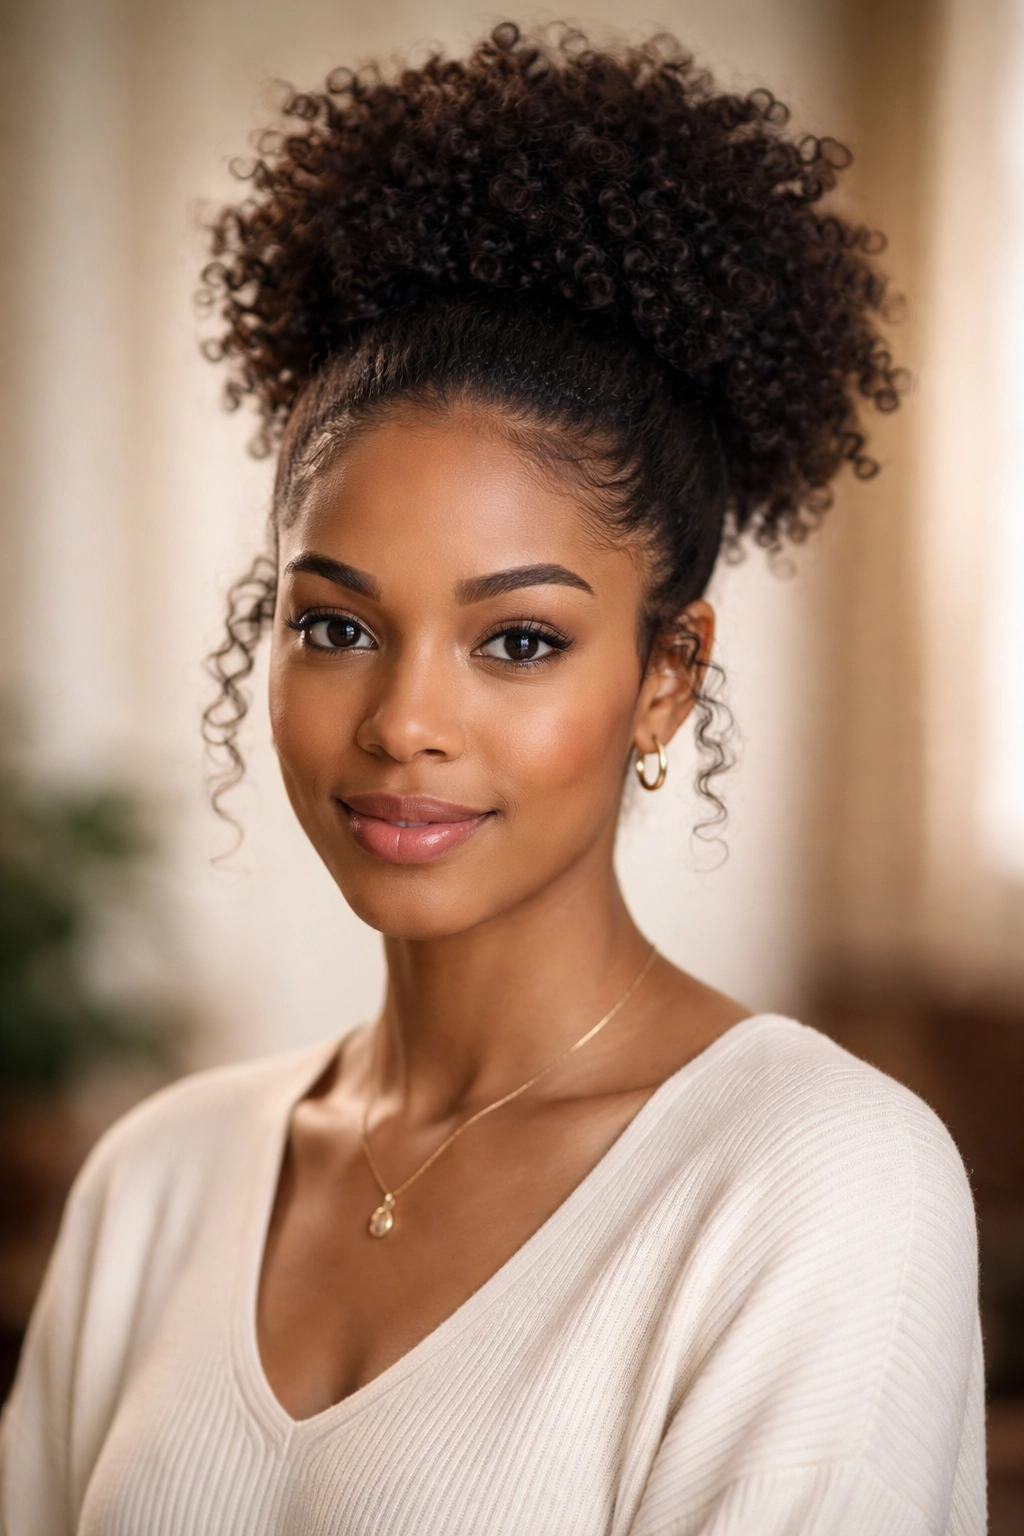
4. The Curly Puff That Never Looks Lazy
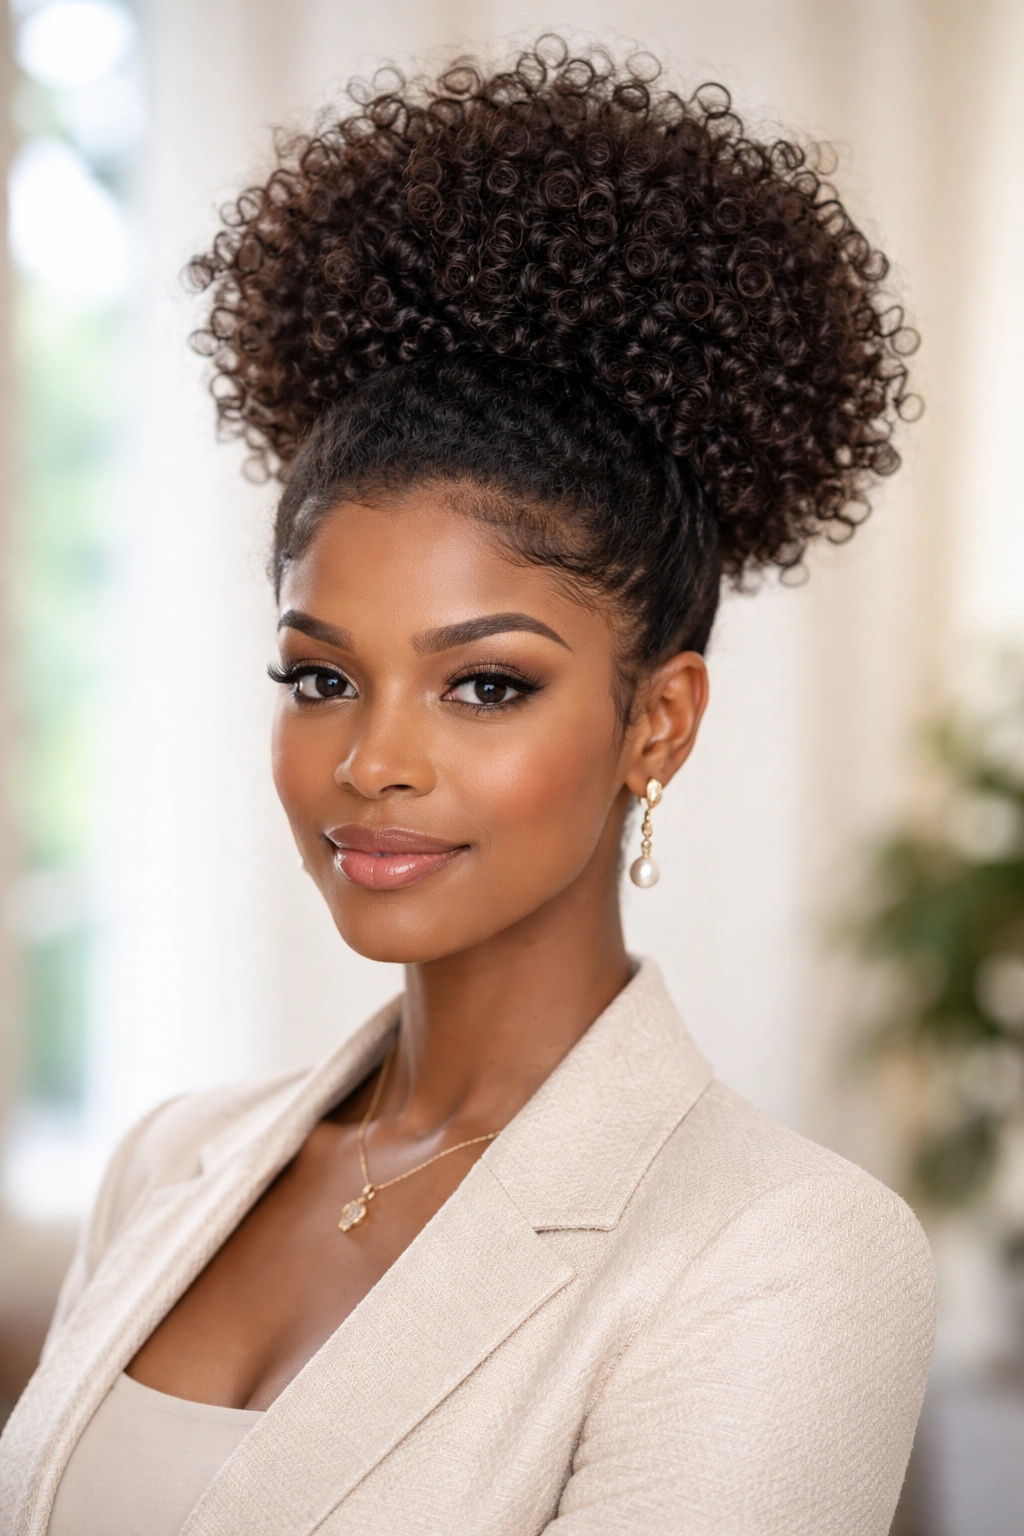
A puff is not the lazy choice. Done right, it looks sharp, intentional, and full of life.
The whole point is height. Gather the hair where the puff looks balanced on your face shape — high for a lifted look, mid-height if you want something softer — then secure it with a stretch-friendly band or satin scrunchie. Fluff the puff with your fingers or an afro pick so the outside keeps its shape. Do not rake through it like you are trying to comb it out. That is how you lose the good volume.
This style shines on coily textures, especially when shrinkage gives you natural lift. It also works well if your ends are not cooperating. Sometimes that is the honest answer: not every curl wants to sit in a tidy bun, and the puff is the smarter choice.
What makes it look finished:
- A neat base wrapped with a small section of hair
- Smooth edges, if that is your preference
- Earrings that show under the puff
- A little shine spray on the outer layer, not the roots
No stiffness. No overthinking. Just shape, height, and enough control to keep it from looking accidental.
5. Side-Swept Pinned Curls for a Quietly Formal Look

Picture walking into the sanctuary with one side tucked cleanly behind the ear and the rest of the curls falling over one shoulder. It is simple, but it never reads plain.
The best thing about side-swept curls is how little they demand. You do not need to rework the whole head. A deep side part, one or two pins on the smaller side, and a bit of shaping on the longer side usually does it. If your curls are already defined, even better. If not, finger-coil a few front pieces so the face-framing sections do not look limp.
This style works well for bob lengths, shoulder-length curls, and anyone who wants to keep the neck cool without going fully up. It also plays nicely with small decorative pins. Pearls, tortoiseshell, brushed gold — all of them can look right if the rest of the hair stays soft.
One thing to watch: don’t overload the pinned side. Three well-placed pins beat six fussy ones every time. Too much hardware and the style starts looking overbuilt, which is the opposite of what you want here.
It feels calm. That’s the charm.
6. The Twisted Low Bun for Thick Coils
Why do thick coils look so good in a low bun? Because they give the bun body from the start. You are not fighting flatness. You are shaping volume.
Begin with two front sections and twist them back toward the nape. Gather the rest into a low ponytail, split it once or twice depending on density, then coil the length into a bun and pin it down with U-pins or sturdy bobby pins. The bun should look rounded and full, not smashed into the scalp. If the hair is especially dense, a slight off-center placement keeps it from looking bulky in one spot.
What to Watch For
- Too much gel can leave flakes once the hair dries.
- Too few pins will let the bun sag before you even leave the house.
- Pins placed only on the surface do not hold; anchor them into the base of the coil.
A little softness at the front helps here too. A twisted side piece or a few curl tendrils around the temples stop the bun from feeling severe. That matters if you are wearing a dress with a softer neckline or anything with lace.
This is the style I would choose when the rest of the outfit is already doing plenty of work.
7. A Pearl Barrette Half-Up Style for Church Services
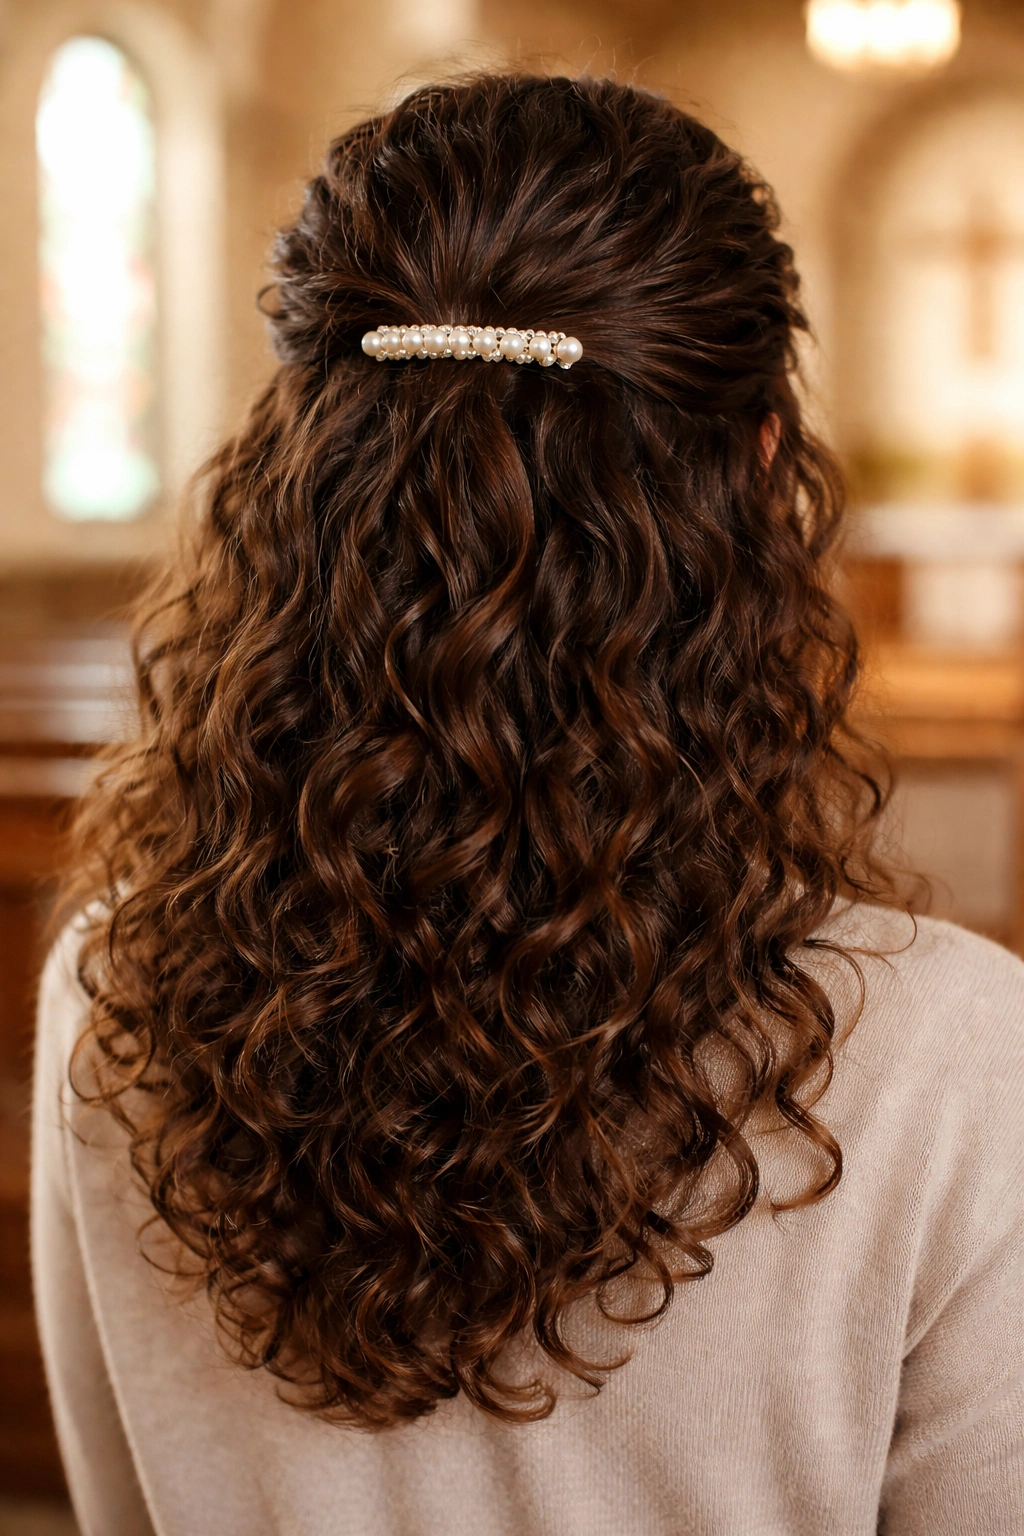
Unlike a full updo, this style keeps most of the curls down, which means you still get movement and fullness. The barrette does the quiet heavy lifting.
Take a section from each side of the crown, bring them together at the back, and secure them with a pearl barrette or a polished clip. The goal is to lift the front just enough to keep it from falling into your eyes. Leave the rest of the hair loose and let the curls frame the shoulders. If your hair slips out of clips, slide two hidden bobby pins underneath the barrette first; that gives the clip something to hold onto.
This look is especially nice when you want one accessory to carry the style. A barrette with a little shine can make second-day curls look deliberate instead of rushed. That said, keep the rest of the finish simple. If the clip is doing the speaking, the curls should stay soft.
It works well for loose ringlets, medium-density hair, and anyone who does not want to spend twenty minutes building a shape that will get flattened by a coat collar anyway.
Small effort. Clean result. That is the appeal.
8. The High Puff That Keeps the Face Open
A high puff solves a practical problem: it keeps your face open and makes the rest of the hair look intentional. That is why it shows up so often in curly styling conversations, and for good reason.
Pull the hair upward, secure it with a soft band, and smooth the perimeter with a brush or your hands. If your roots need a little stretch, a gentle blow-dry with a diffuser on low heat can help. If not, leave the shrinkage alone and shape the puff where it naturally wants to sit. Pushing it too high can make the style look tense.
This is a strong option when you want your earrings, neckline, or makeup to stay visible. It also suits singing, greeting, and moving around a lot because the hair stays off the shoulders. A puff with a clean base can look just as finished as a bun, maybe more so, because it keeps the texture front and center.
A few things that help:
- A satin scarf set for 10 to 15 minutes can flatten the base
- A wrapped section of hair around the band makes it look cleaner
- A little edge control goes a long way, but only at the hairline
It works. It really works.
9. The Side Braid Into Loose Ends
The hair that falls just past the shoulder can be awkward on church mornings. A side braid into loose ends fixes that without making the whole head feel locked down.
Start with a section from the front hairline or temple, braid it toward one side, then stop before the ends and let the rest of the curls fall free. That creates structure at the front while keeping movement through the lengths. If your hair has layers, braid only the top third; trying to force every strand into the braid usually makes the finish look thin.
This style has a nice practical edge. It keeps one side under control, leaves the other side soft, and does not require a lot of pinning. A small decorative clip at the braid end can make it feel more finished, especially if the rest of the outfit is simple.
It also handles a little texture variation better than people expect. Loose curls at the back, a tighter braid at the front, maybe a few spirals around the face — that mix can look richer than a style where every curl is forced into the same shape.
No need to make it precious. A clean braid and healthy-looking curls do most of the work.
10. The Pineapple Bun for Long, Dense Curls
If you wake up with a soft curl set and do not want to redo it, the pineapple bun can save the morning. It is high, loose, and kind to the curl pattern.
Gather the hair at the top of the head with a satin scrunchie, but do not drag it tight. The curls should sit up and over, not get mashed flat against the scalp. Let the ends fan out a little, then tuck or pin any pieces that look too wild. The result should feel airy, not accidental.
This style is especially useful for long, dense curls that turn heavy in low styles. A bun at the crown keeps the weight off the neck and helps the face stay visible. It also works if you want to preserve yesterday’s definition instead of starting over with water, cream, and a full refresh.
Use It Best When
- Your curls are long enough to gather without tugging
- You want volume more than sleekness
- You need a style that can survive a long morning
- Your ends still have good shape from the day before
A little shine serum on the tips can keep the puffed ends from looking dry. Use a tiny amount. More than that, and the whole style can go greasy fast.
It is easy, but not sloppy. That difference matters.
11. The Flat-Twist Halo for Sensitive Edges
Flat twists are kinder than braids for some scalps. They lie close to the head, keep the crown neat, and create a halo effect without a lot of tension.
Start at one temple and flat-twist along the hairline toward the other side, working in small sections and adding hair as you go. Repeat on the opposite side if you want a fuller halo, or keep one continuous twist if your hair is shorter. The finish can be pinned into a circle at the back or tucked into a low side shape.
Why Flat Twists Feel Lighter
They spread tension across more of the scalp than a tight braid does. That can matter if your edges are delicate or if you simply do not want a style that leaves your head sore by lunchtime. The result still looks tidy, but the feel is softer.
How to Finish It Well
Use small pins that disappear into the hair, and choose a satin ribbon or narrow barrette if you want a decorative touch. A braid crown and a flat-twist halo can look similar from across a room, but the twist version has a calmer line and usually less pull.
That is why I reach for it when the day needs polish but not drama. Clean shape. Less strain. Better for the scalp.
12. The Soft Roll-Under Updo for Church Hairstyles for Curly Hair
The soft roll-under updo is the style I reach for when the outfit is more formal and the curls need to look deliberate from the front and back. It has the neatness of a classic updo, but it keeps the edges softer than a tight bun.
Work with stretched curls or a refreshed twist-out. Gather the hair at the nape, roll the length inward, and pin it under so the ends disappear into a smooth shape. Leave a few face-framing pieces loose if you want warmth around the cheeks. If the hair is thick, divide it into two sections before rolling; one giant roll usually gets lumpy in the middle.
A side part makes this look calmer. A center part makes it a little more formal. Both work, but the part has to be clean because the style shows it clearly.
A few finishing touches help a lot:
- Matching bobby pins so nothing flashes through
- A light mist of hairspray on the outer layer
- A satin ribbon or slim comb if you want a touch of detail
- Fingers, not a brush, for the front pieces
Soft, tucked, controlled. That is the whole point. When you want church hairstyles for curly hair that feel polished without losing the shape of your curls, this one holds its own.