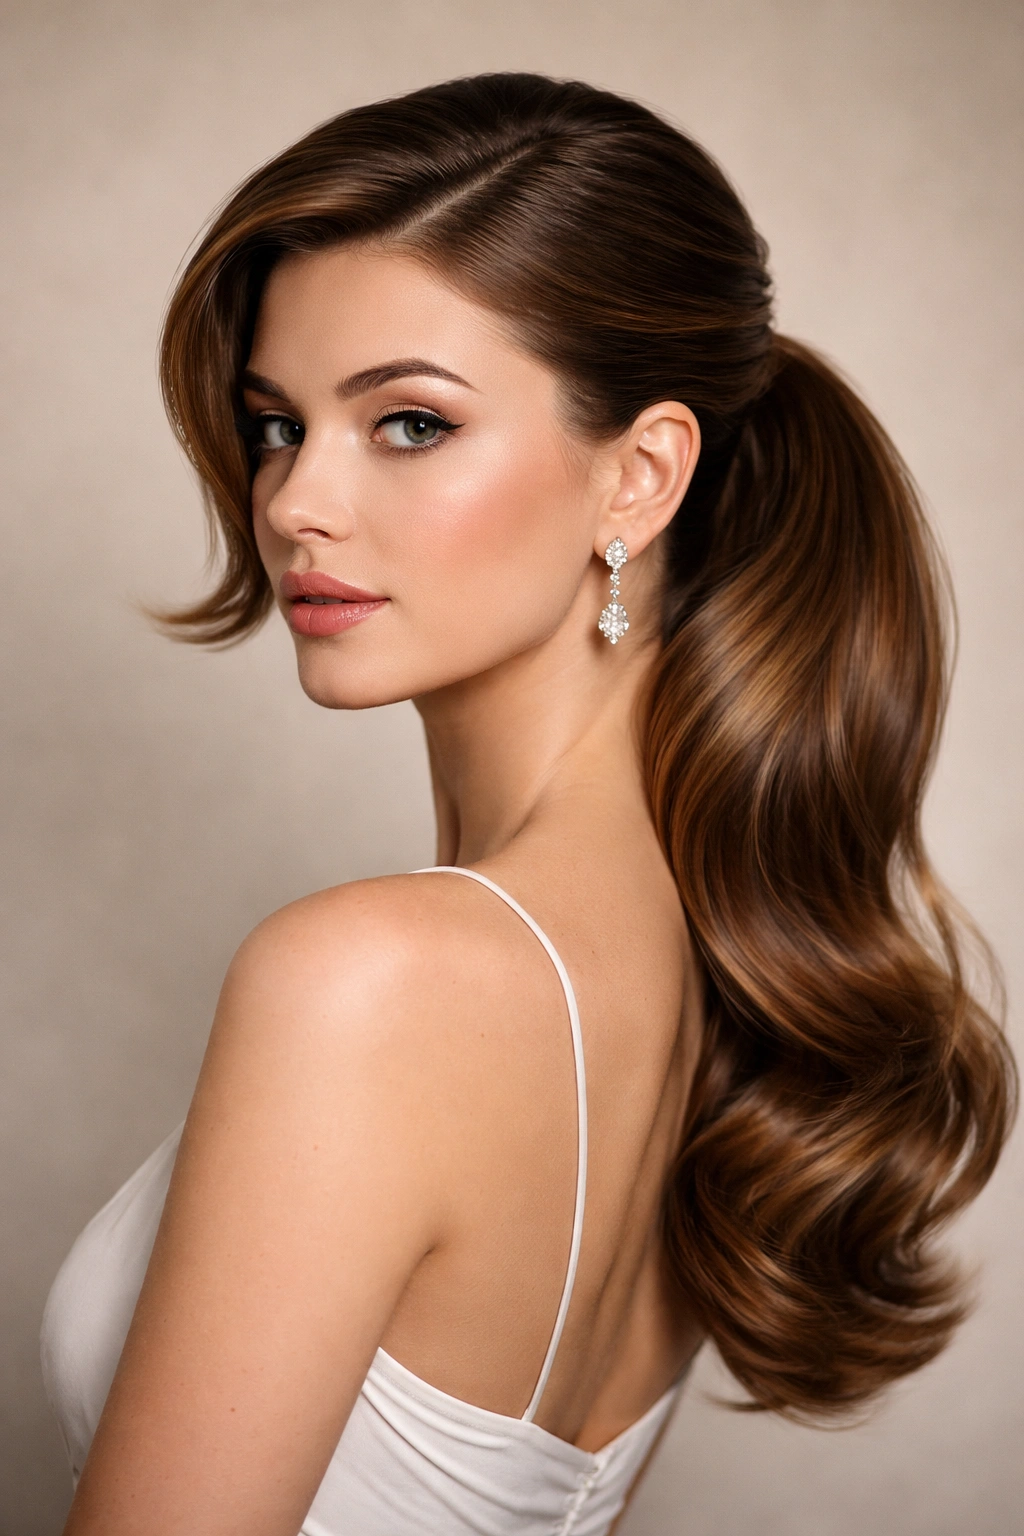
A sleek ponytail might seem like one of the easiest hairstyles to pull off, but when you infuse it with retro styling techniques, it transforms into something genuinely sophisticated and fashion-forward. The beauty of vintage ponytail styles is that they celebrate the hair itself rather than hiding it—they add volume, movement, and intentional detail that makes even a simple gathered tail feel polished and intentional. Whether you’re preparing for a themed event, wanting to refresh your everyday look, or simply craving that timeless glamour that feels equally appropriate at a casual brunch or a formal dinner, retro ponytails offer endless possibilities.
What makes these vintage styles so compelling is that they weren’t born from minimalism or the “effortless” aesthetic that dominates modern style. Instead, they’re rooted in techniques that require patience, good tools, and a willingness to work with your hair rather than against it. Teasing, rolling, pinning, wrapping, and sculpting were all standard practice—and the results spoke for themselves. The good news is that you don’t need a professional salon appointment to achieve these looks. With the right technique and products, you can recreate each of these classic styles at home and make them feel totally natural to your own contemporary wardrobe and personality.
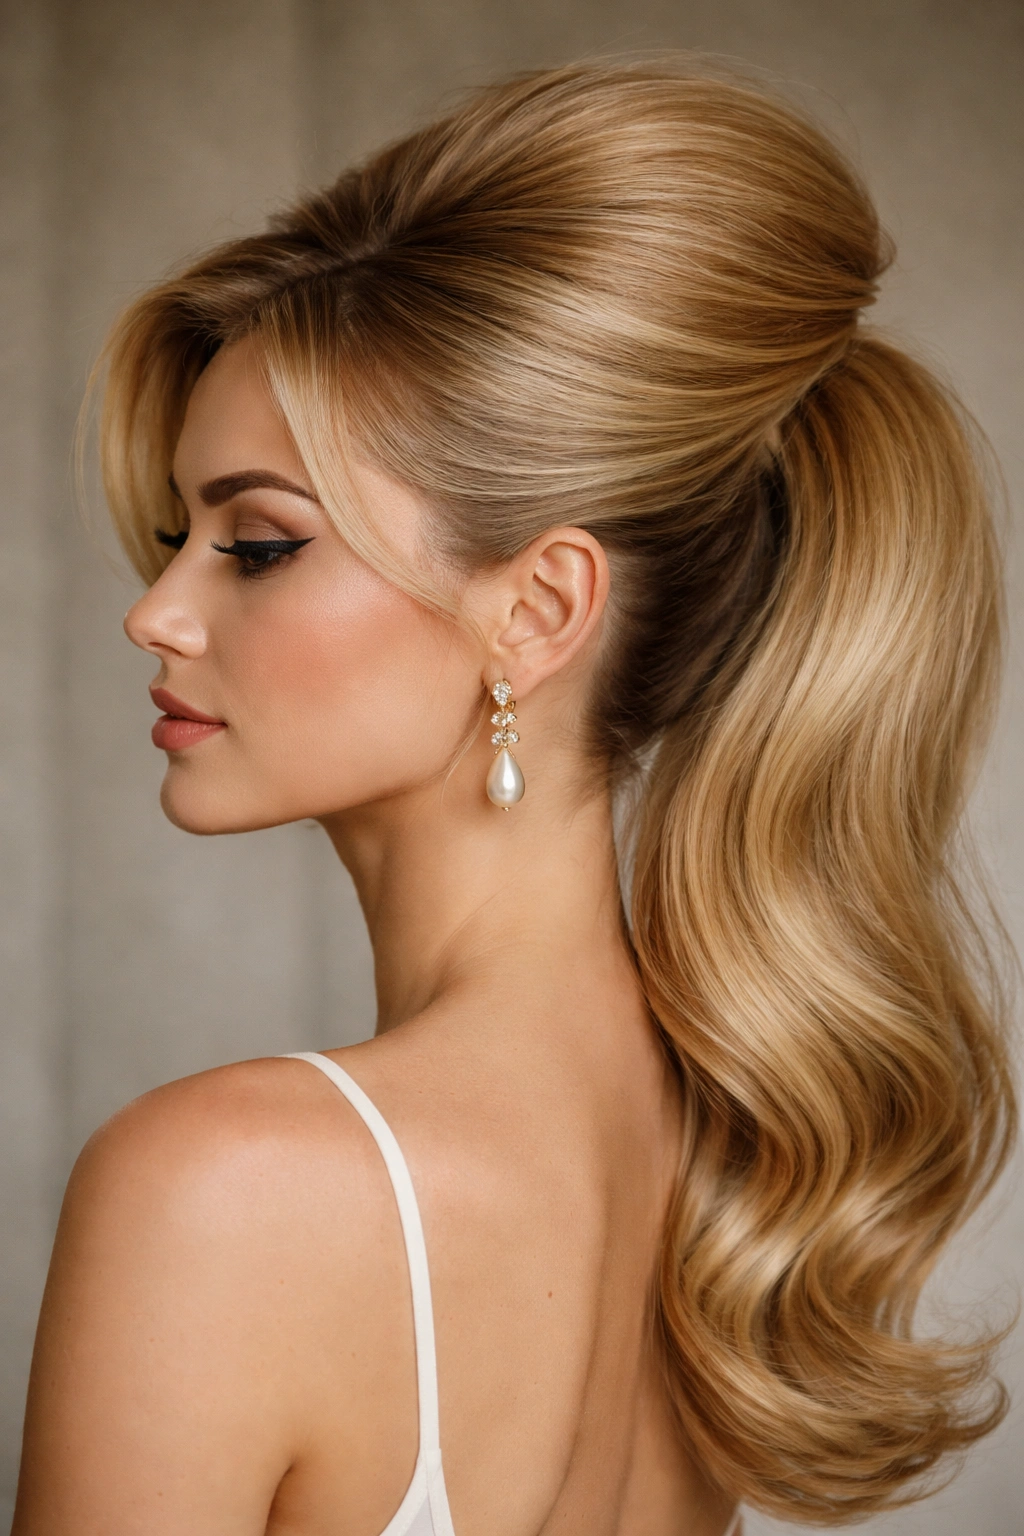
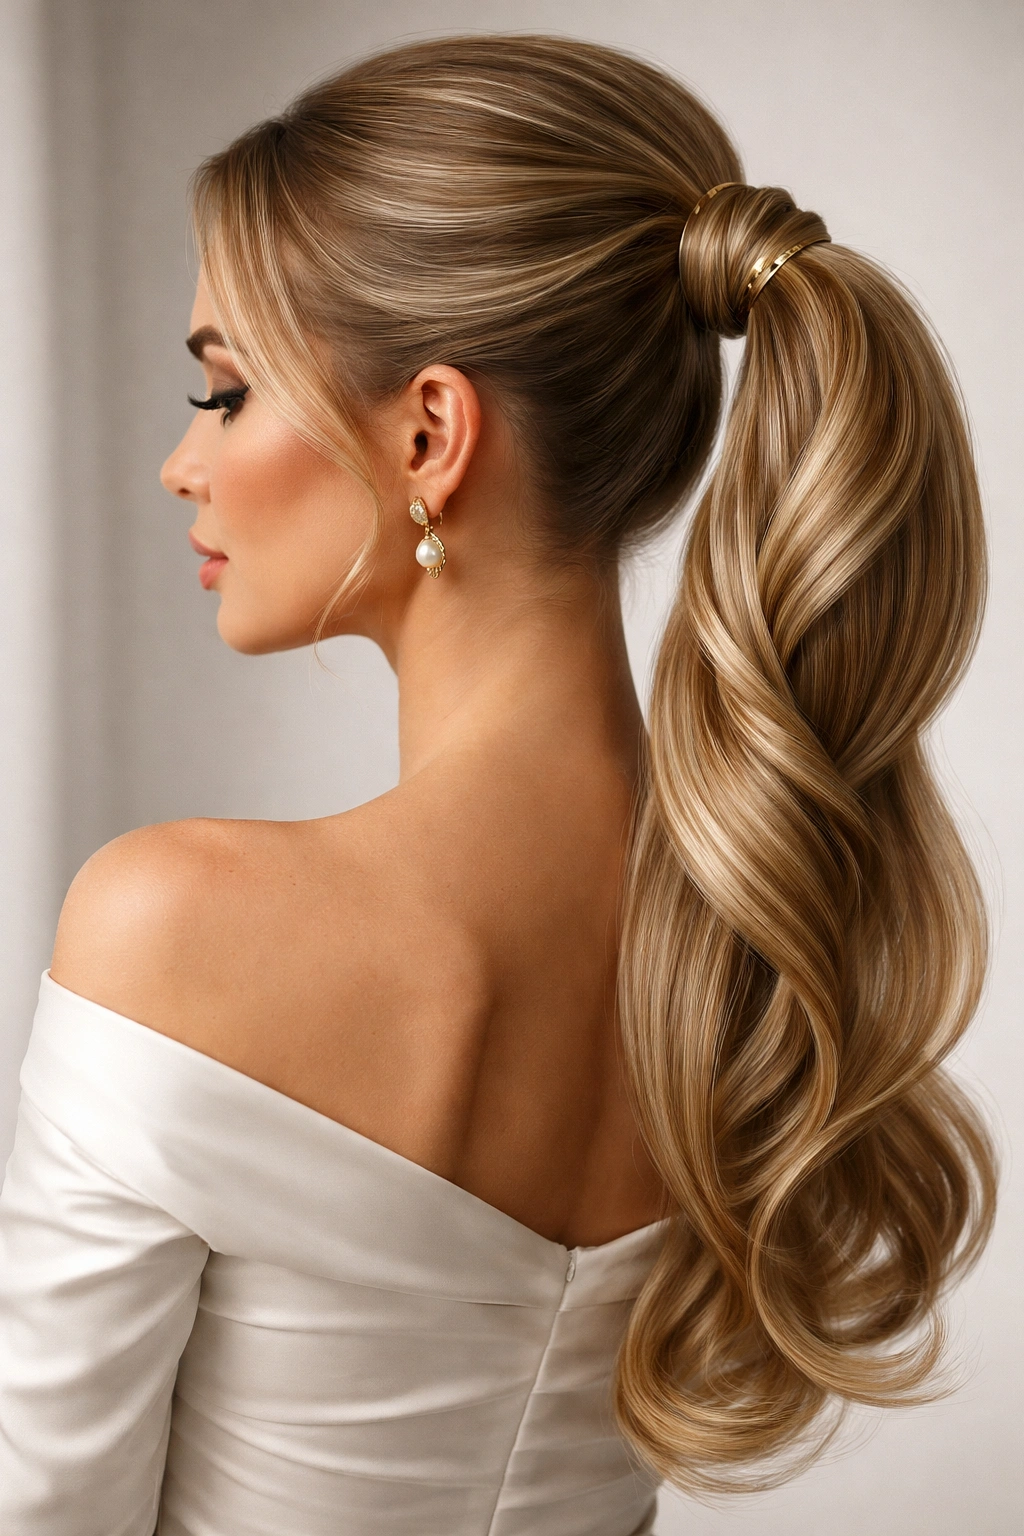
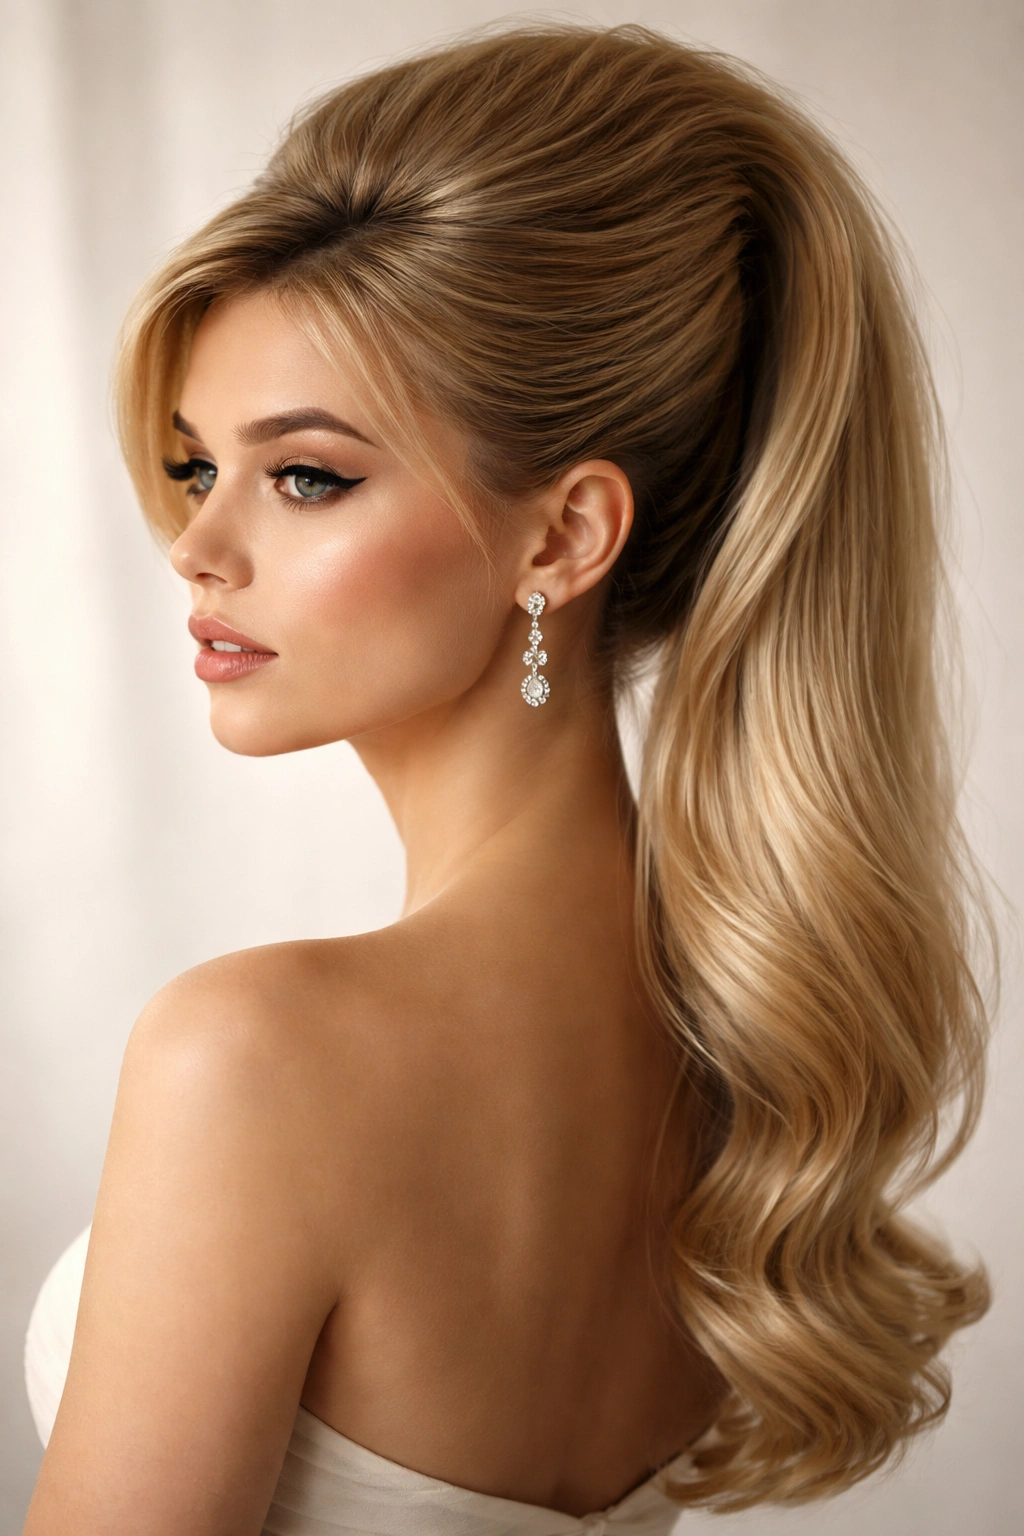
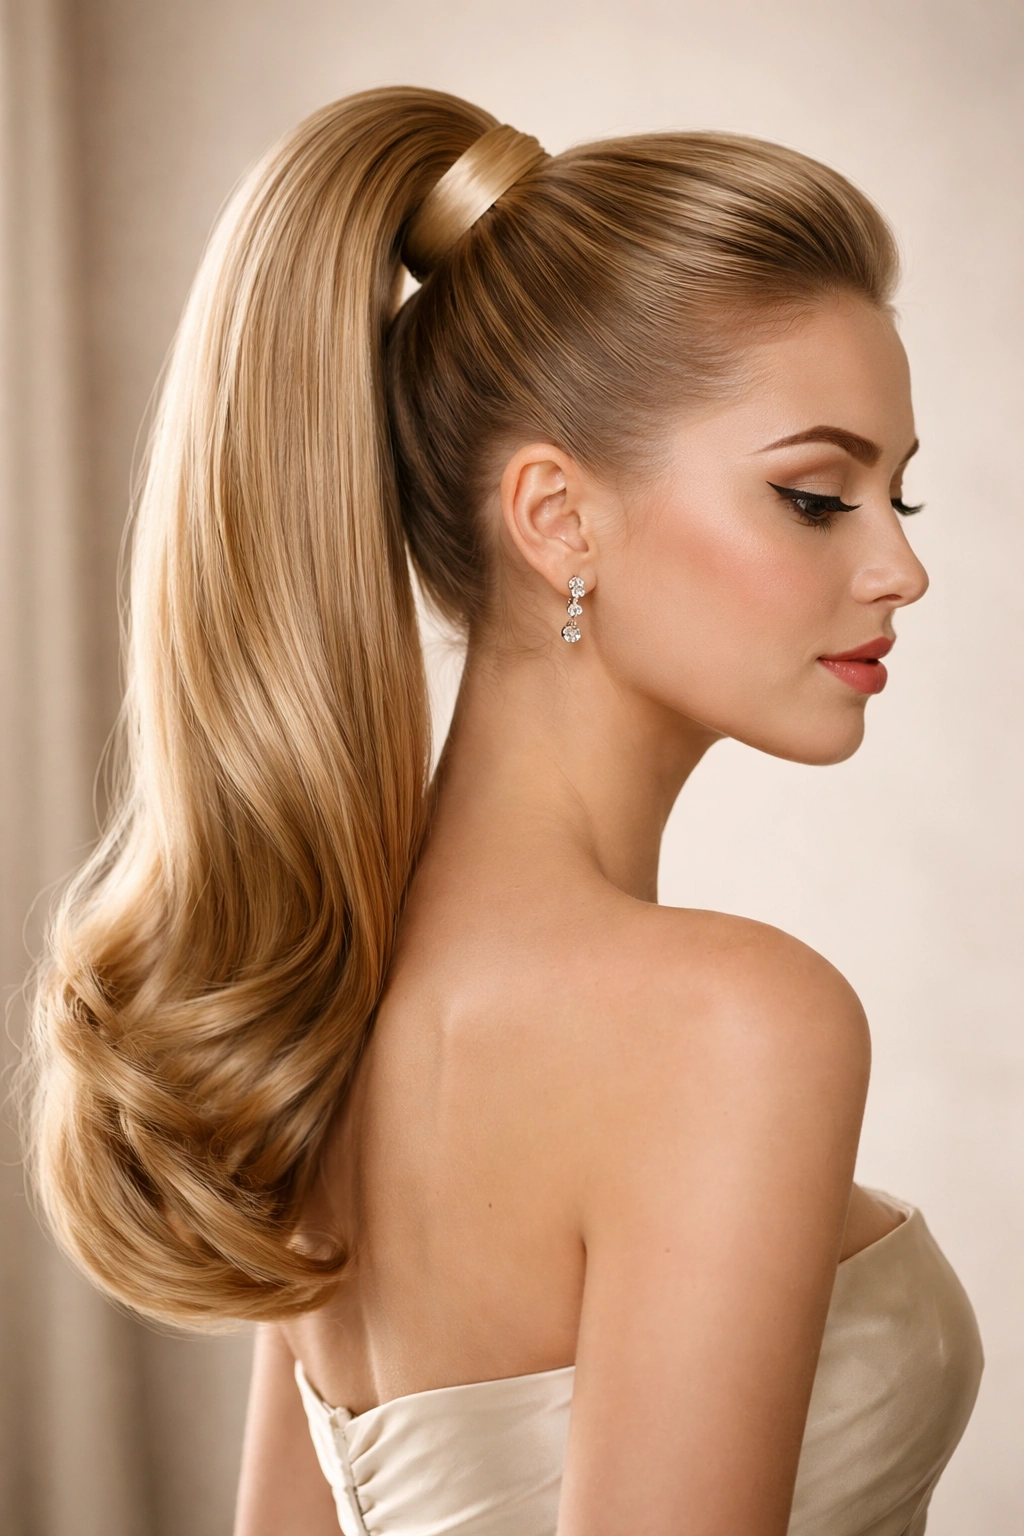
1. The High Polished Fifties Ponytail
This is the ponytail that made the era iconic—sleek, impossibly shiny, and positioned high on the crown with a perfectly smooth base. The fifties version isn’t just pulled back; it’s deliberately constructed with precision that catches the light and demonstrates real technical skill. The tail itself is gathered tight and often wrapped with a complementary ribbon, fabric strip, or even a coordinating hairpiece to create a finished, intentional look that was considered the height of grooming standards.
Why This Style Still Works
The high fifties ponytail reads as instantly polished and put-together in a way that feels both nostalgic and surprisingly current. It commands attention not through ornament alone but through the sheer execution—the smoothness of the base, the height of the placement, and the way it frames the face. Whether you’re dressing up or down, this style signals that you’ve made an effort and know what you’re doing with your hair.
How to Create the High Polished Look
- Start with completely dry or blow-dried hair for maximum smoothness; damp hair will not achieve the same polish
- Apply a smoothing serum or anti-frizz cream to tame flyaways and add shine
- Brush hair back firmly from your forehead and gather it high on the crown, about 1-2 inches from the very top of your head
- Use a fine-tooth comb to smooth the crown area backward without any bumps or irregularities
- Secure with a strong elastic, then wrap a silk ribbon, satin fabric strip, or decorative hairpiece around the base to conceal the elastic
- Tease the tail lightly underneath for subtle volume, then smooth the outer layer with a fine-tooth comb for that signature high-shine finish
- Use hairspray to lock the smoothness in place, focusing especially on any stray flyaways around the face and nape
This style requires a good quality elastic that won’t slip and creates a defined, tight hold. The wrapping element is essential—it elevates the look from simple to intentional. Consider using a silk ribbon in a contrasting color or matching shade to add visual interest and a vintage detail.
Pro tip: Create a tiny roll or sculpted curve at the very base of the ponytail by wrapping the tail around your finger before securing it. This creates a more three-dimensional, defined look that sits closer to the head rather than pointing straight out.
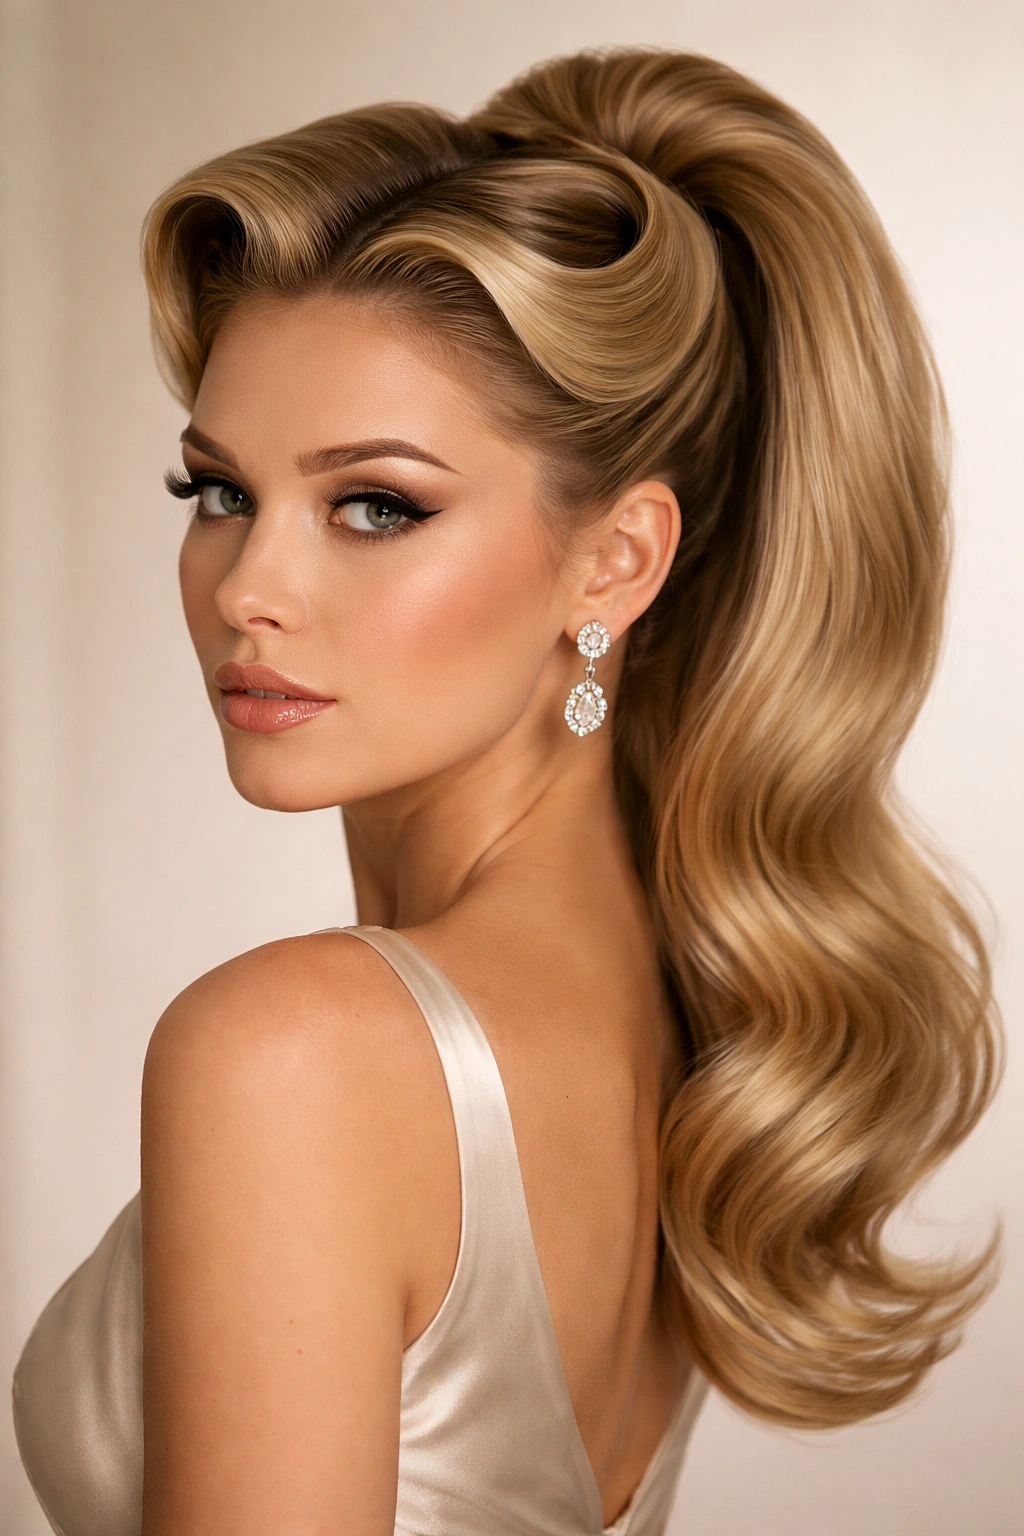
2. The Bouffant Ponytail
The bouffant ponytail takes everything about fifties glamour and amplifies the volume—especially around the crown and sides. This style requires teasing, precision, and a willingness to create genuine height and texture. Unlike a simple high ponytail, the bouffant version deliberately builds layers of volume that frame the face and create a sense of drama. The tail hangs smooth and polished while the crown area is intentionally textured and full.
What Makes the Bouffant Different
Where the polished fifties ponytail emphasizes smoothness, the bouffant celebrates controlled volume and dimensionality. The teasing technique creates a structured base that holds throughout the day and actually becomes more stable the fuller you tease it. This style requires confidence—it’s not subtle, and it shouldn’t be. The bouffant announces itself and commands a room.
Building Your Bouffant Step by Step
- Section your hair horizontally from ear to ear across the crown, separating the top section from the bottom
- Blow-dry the top section upward and away from your head to add natural volume at the roots
- Take small 1-inch subsections from the crown area and tease each one thoroughly at the roots using a fine-tooth teasing brush, working in short, swift downward motions
- Continue teasing throughout the crown and around the sides until you’ve built significant volume—this typically takes 5-10 minutes and is the foundation of the entire style
- Smooth the outer layer gently with your comb to seal the teased texture underneath while maintaining all the volume
- Gather all hair—both the teased top section and the smooth bottom section—into a high ponytail and secure tightly
- Wrap the base with ribbon or fabric, and consider adding a decorative clip or vintage hairpiece to anchor the look
- Spray the finished style with flexible-hold hairspray; bouffants benefit from products that provide support without making hair feel stiff
The key to a successful bouffant is not being timid with the teasing. You need genuine volume underneath the smoothed outer layer for the style to read as intentional rather than accidental.
Worth knowing: Bouffants actually improve throughout the day as the teased hair settles and becomes more structured. What feels slightly excessive when you first style it typically looks perfect by mid-day.
3. The Half-Up Retro Wrap
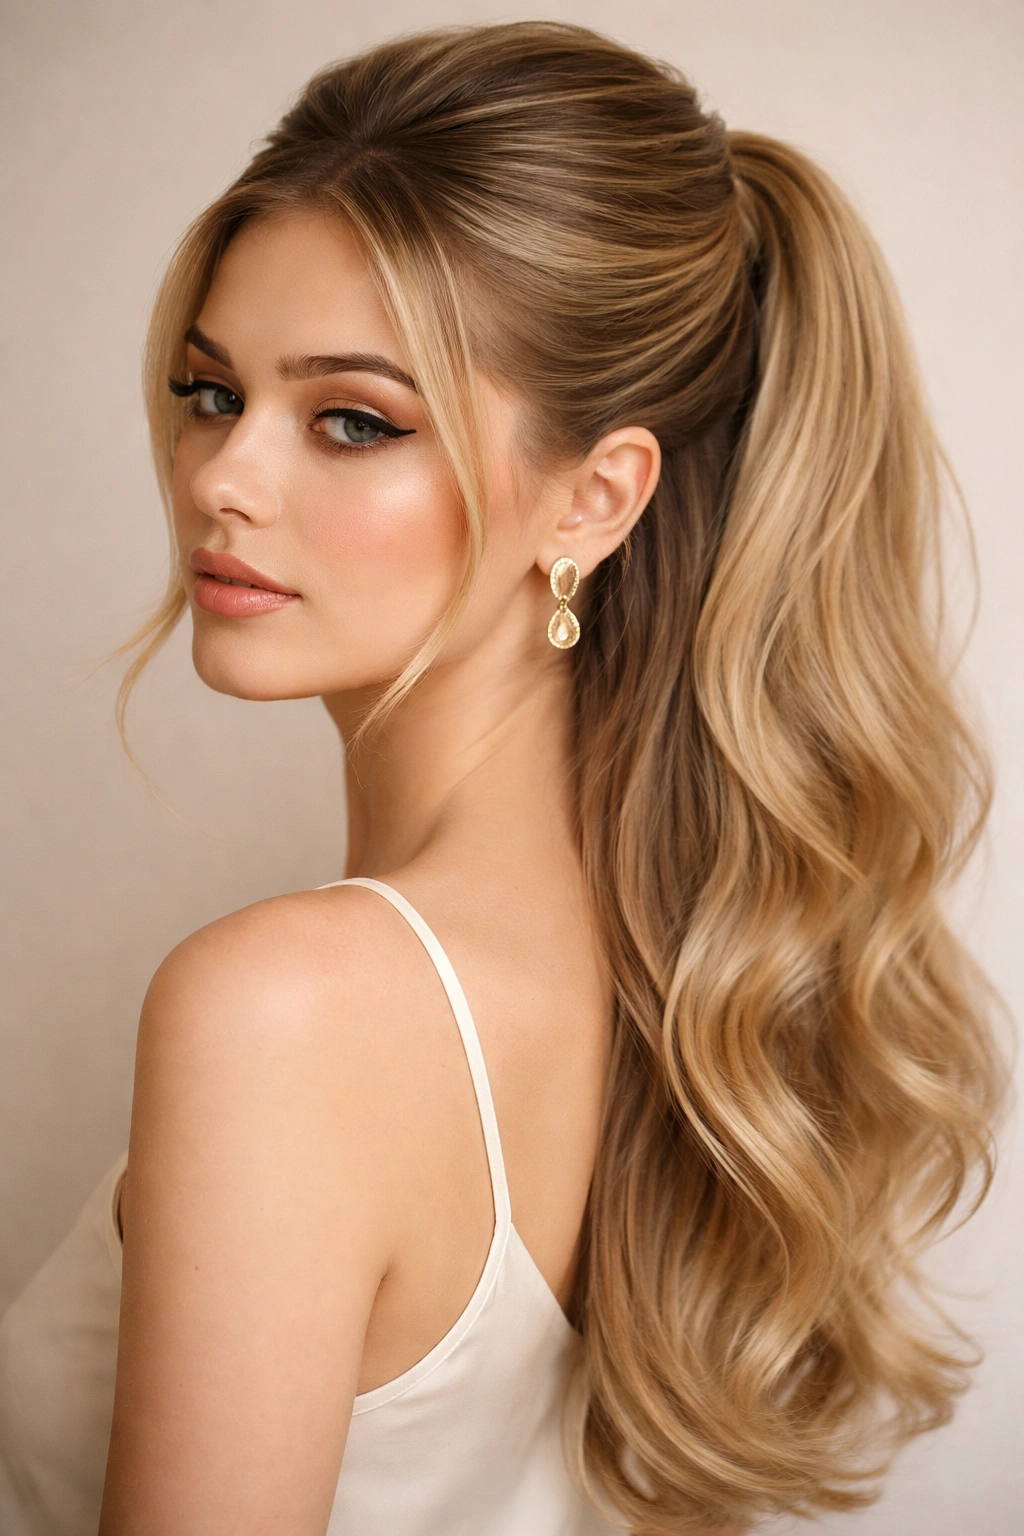
This style splits the difference between down and up, taking the front sections and crown area into a gathered ponytail while allowing the back length to flow freely. It’s the perfect option for occasions where you want your hair partially styled but not completely secured, or when you’re working with hair that’s longer and heavier. The half-up version is more forgiving than a full ponytail and works beautifully whether you prefer sleek or textured styling.
The Practical Appeal of Half-Up Style
Half-up ponytails are genuinely versatile—they work with nearly every hair type, length, and texture. They’re also practical for the real world: they keep hair out of your face while allowing the bulk of your length to create movement and shape. The vintage approach to half-up styling adds intentional wrapping details and strategic teasing that transforms the style from casual to deliberate.
Creating a Polished Half-Up Version
- Section your hair from temple to temple, separating the front sections and crown from the back length
- If you prefer volume, tease lightly throughout the crown area using a fine-tooth brush
- Take the front sections smoothly back and gather them at the crown along with a portion of the back hair—approximately the top third of your hair
- Secure this section with an elastic, positioning it about 2-3 inches down from where the crown meets the back section
- Take a thin strand of hair from the ponytail itself and wrap it around the elastic base 2-3 times to conceal the elastic and create a finished look
- Pin the wrapped strand in place using a bobby pin that matches your hair color
- Leave the remaining back length down, allowing it to flow over the gathered section and create dimension
- Use a medium-barrel curling iron to create loose waves throughout the back length if desired, enhancing the retro aesthetic
- Finish with flexible hairspray to hold the wrap and add shine
This style works especially well with texture—whether you’ve teased the crown gently or have naturally textured hair, the half-up approach celebrates volume while keeping it controlled.
Pro tip: Use a decorative clip or vintage barrette to secure the wrapped elastic section, turning it into a visible design element rather than trying to hide it. This elevates the style and makes it read as intentionally retro rather than half-finished.
4. The 70s Sleek Centerline Ponytail
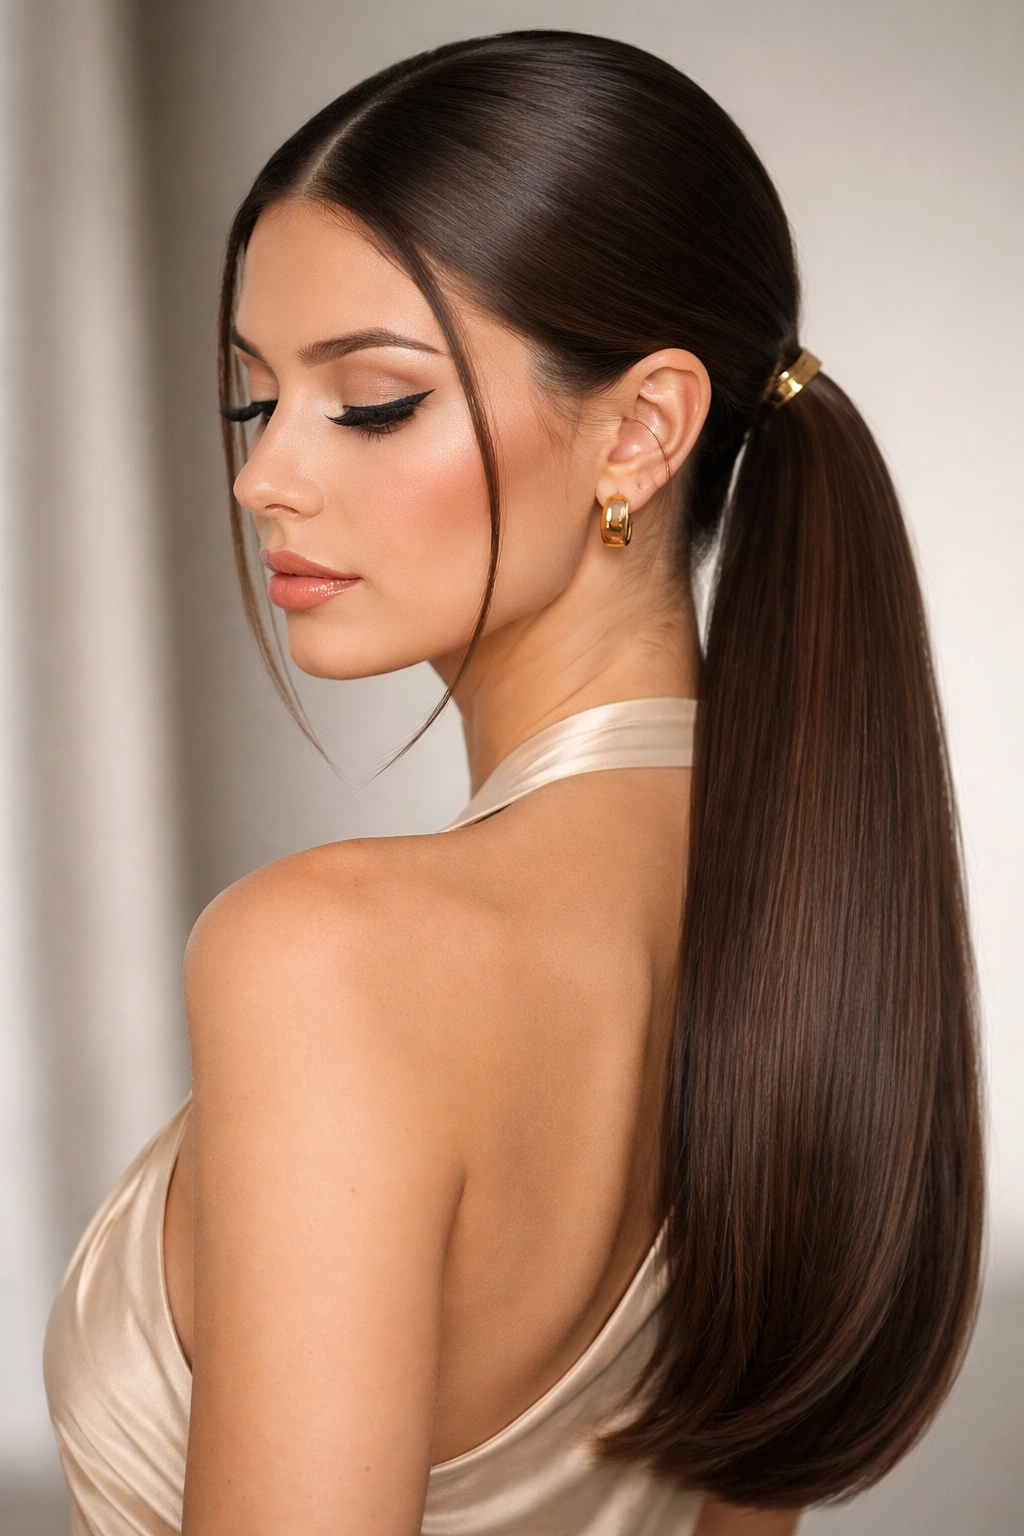
The seventies brought a different aesthetic to ponytails—sleeker, more elongated, and often adorned with metallic clips, silk scarves, or decorative rings. The centerline ponytail specifically creates a dramatic line down the middle of the head that emphasizes symmetry and clean, purposeful styling. This version is less about volume and more about refined simplicity with high-impact accessories.
Why This Era’s Approach Still Resonates
Seventies styling trusted in the natural texture and beauty of hair itself rather than heavy manipulation. The ponytail sat lower—often at the nape or mid-back of the head—and the emphasis was on shine, color, and dramatic accessory choices. This style works beautifully if you have healthy, shiny hair and want to let that quality shine without obscuring it under layers of teasing.
Styling the 70s Centerline Ponytail
- Create a deep side part or a perfectly centered part depending on your preference—the seventies embraced both, though centered parts feel more dramatically retro
- Smooth your hair back from your face using a smoothing serum or lightweight oil to add shine
- Gather your ponytail lower on the head—typically at the base of your skull or slightly lower—creating an elongated line
- Use a strong elastic to secure the tail tightly, ensuring it won’t slip throughout the day
- Select a decorative element: a silk scarf, metallic clip, beaded hair ring, or decorative leather strip
- Wrap your chosen element around the base of the ponytail, securing it tightly and making it a visible design feature rather than a hidden detail
- If using a scarf, let the tails drape down along the ponytail for added movement and visual interest
- Use a shine-enhancing spray rather than heavy hairspray—the seventies look depended on visible shine and light reflection
This style pairs beautifully with seventies-inspired clothing and makeup, and the lower placement makes it feel more casual than higher ponytails despite being equally polished.
Worth knowing: Seventies ponytails look better the shinier your hair is. If your hair tends toward dry or dull, invest in a good conditioning treatment and shine serum before styling.
5. The Victory Rolls Ponytail Hybrid
This style borrows the sculpted, rolled technique of vintage victory rolls but applies it as a ponytail base rather than as the entire style. Two thick rolls frame the sides of the head and meet at the back, where they merge into a single ponytail. It’s architecturally interesting, dramatically retro, and demonstrates serious styling skill. This is the style for someone who wants to make a confident statement with their hair.
The Art of the Victory Roll Base
Victory rolls originated in the forties as a symbol of femininity and strength, and incorporating them into a ponytail base creates that same powerful aesthetic. The rolls require patience and practice, but once you understand the technique, they become easier with repetition. This style works best on hair with some natural texture or wave, though you can achieve it on straighter hair if you backcomb the sections lightly first.
Building the Victory Roll Ponytail
- Section your hair from the center part, dividing it into two equal halves
- Starting on one side, take a 2-inch section of hair from your temple area
- Gently backcomb this section at the roots to create grip and help the roll hold structure
- Roll this section toward the center of your head, tucking the roll under itself as you work
- Secure the roll with bobby pins that match your hair color, tucking them into the roll itself so they’re invisible
- Repeat the process on the opposite side, creating a symmetrical roll that mirrors the first
- Allow both rolls to meet at the back center of your head, where they naturally join
- Gather the rolls and any remaining back hair into a single ponytail at the nape or mid-back
- Secure tightly with an elastic, then wrap a silk ribbon or decorative element around the base
- Use flexible-hold hairspray to keep the rolls in place without making them feel stiff or artificial
The beauty of this style is that the rolls create an elevated, sculptural look that’s immediately recognizable as deliberately retro.
Pro tip: Practice the rolling technique on a day when you’re not planning to go anywhere. The first few attempts might feel awkward, but by your fifth or sixth time, the motion becomes intuitive and much faster.
6. The Twisted Rope Ponytail
Instead of gathering hair straight back, the twisted rope ponytail builds spiral detail into the gathering process itself. Two or more strands of hair are twisted around each other as they move back toward the ponytail base, creating a braided appearance without the complexity of actual braiding. This technique adds visual interest and dimension while remaining achievable for most skill levels.
Why Twisted Details Matter
Twisting is gentler than teasing and creates a different kind of texture and hold. The twisted sections frame the face naturally and draw the eye along the direction of the twist, creating movement even if the rest of your hair is perfectly still. This style bridges the gap between simple and intricate—it looks more complicated than it is, which is always a win in vintage styling.
Creating Twisted Rope Elements
- Section off a 2-inch piece of hair on one side of your head, starting near your temple
- Divide this section into two equal strands and begin twisting them around each other in a clockwise direction
- As you twist, continue to add small sections of loose hair from your scalp into one or both strands, similar to how you’d build a French braid but using twists instead
- Continue this twisted section back toward the center-back of your head, twisting and gathering as you move
- Repeat the process on the opposite side, creating a symmetrical twisted section that mirrors the first
- Once both twisted sections reach the back, combine them with the remaining hair into a single high or mid-height ponytail
- Secure tightly with an elastic, and wrap the base with ribbon or a complementary hair tie
- Gently tug at the twists to make them appear slightly looser and fuller—this creates a more romantic, vintage aesthetic
- Finish with hairspray, focusing on keeping the twist structure in place
The beauty of this style is that slight imperfection actually enhances the retro aesthetic. Perfectly precise twisted sections can read as too modern, while slightly relaxed, slightly fuller twists feel authentically vintage.
Pro tip: Practice your twisting technique by working with dry hair and using a smoothing serum. The serum makes the twisting process smoother and the finished result shinier.
7. The Velvet Ribbon Ponytail
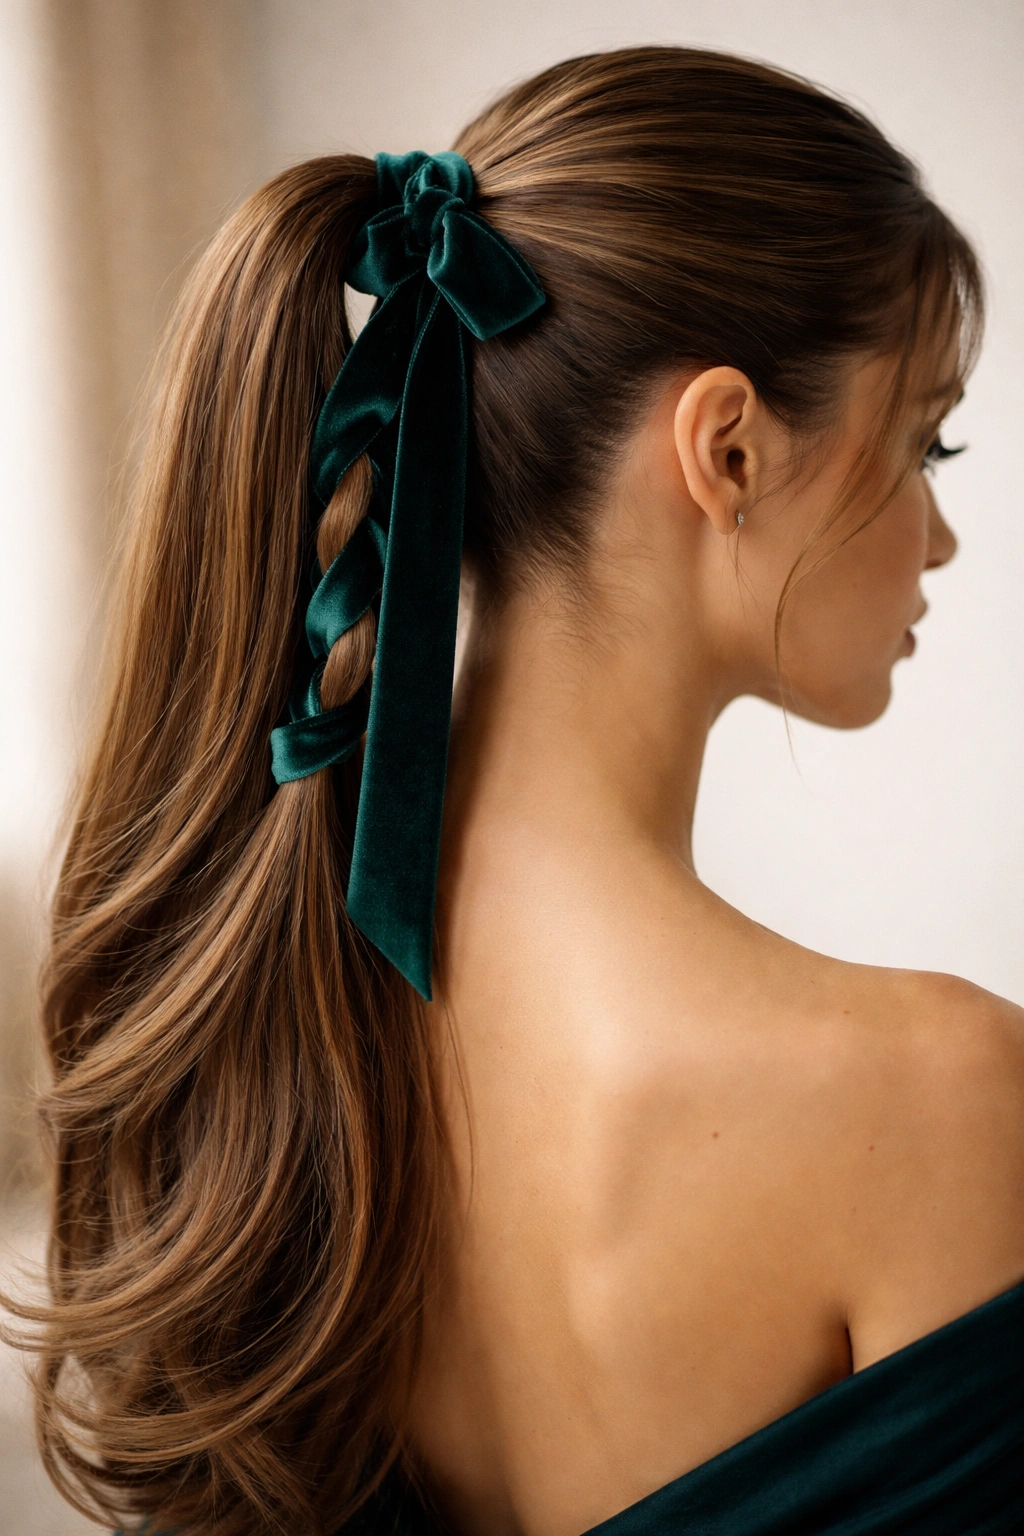
This style emphasizes accessory as design element rather than an afterthought. A luxurious velvet ribbon—typically in jewel tones, metallics, or rich colors that contrast with your hair—is woven through or wrapped around a sleek ponytail, creating a look that feels simultaneously vintage and fashion-forward. The texture of the velvet contrasts beautifully with the smoothness of the hair, adding sensory depth to the style.
The Power of Textile Details
The velvet ribbon ponytail works because velvet itself feels inherently luxurious and slightly unusual as a hair accessory. It immediately signals that you’ve put thought and intention into your styling. Unlike standard hair elastics, ribbon transforms a ponytail from utilitarian to decorative. This approach works whether your ponytail is high and dramatic or low and sleek.
Styling With Velvet Ribbon
- Create your base ponytail: smooth and high, textured and voluminous, or twisted—your velvet ribbon will work with any foundation
- Choose a velvet ribbon in a color that either matches your hair for a monochromatic look or contrasts dramatically with it
- Secure your ponytail with a clear or colored elastic that matches your hair tone
- Take your ribbon and weave it through the ponytail from the elastic downward, creating a spiral pattern as you move down the length
- Alternatively, wrap the ribbon tightly around the elastic base and the top 2-3 inches of the ponytail, securing it by tucking the end under itself and using a small bobby pin if needed
- You can also create a more dramatic look by loosely wrapping the ribbon around the ponytail several times, allowing it to create a dimensional, textured appearance
- Tie or tuck the ribbon ends at the very bottom of the ponytail, or let them loose for added movement
- Use light hairspray to prevent flyaways from competing with the ribbon detail
This style is especially effective when you want your ponytail to make a statement without requiring dramatic hair manipulation.
Worth knowing: Invest in quality velvet ribbon—cheap versions look cheap and undermine the entire aesthetic. A single high-quality ribbon can be used repeatedly and improves the look of multiple ponytails.
8. The Teased and Smoothed Vintage Ponytail
This is the foundation technique underlying many retro styles—creating volume through strategic teasing, then sealing it with a smooth outer layer that creates dimension and texture. The ponytail itself sits high, the crown is full and sculpted, and the overall effect is one of controlled glamour. This style works on all hair types and genuinely improves the longevity of your ponytail throughout the day.
Understanding the Teasing Technique
Teasing (also called backcombing or ratting) creates a framework that supports volume and prevents your ponytail from falling or losing shape as the day progresses. The genius of the vintage approach is that you tease strategically where you need hold, then seal everything with a smooth layer that hides the texture. The result looks polished, not messy, and reads as intentional rather than accidental.
The Complete Teasing and Smoothing Process
- Divide your hair into sections: crown, sides, and back—this ensures balanced, even volume
- Start with the crown section and take 1-inch subsections, teasing each at the roots using downward motions with a fine-tooth brush
- Work methodically through the entire crown area, building volume as you go—this typically takes 5-10 minutes
- Move to the side sections and tease lightly, focusing on areas just in front of where your ponytail will sit
- Once you’ve teased all your sections, gently smooth the outer layer using a fine-tooth comb, sealing the teased texture underneath while maintaining volume
- Gather all hair into a high ponytail and secure with a strong elastic
- Wrap the base with ribbon, fabric, or a decorative clip to create a finished appearance
- Smooth any flyaways with the comb and your smoothing product
- Lock everything in place with flexible-hold hairspray—flexible hold preserves movement while keeping the style intact
The key to this technique is understanding that you’re creating structure underneath, not a bouffant explosion. The smooth outer layer should look polished while hiding all the teased work beneath.
Pro tip: Once your ponytail is secured, take a thin strand of hair from underneath the tail and wrap it around the elastic base. This creates a professional, seamless finish that makes the ponytail look like it’s naturally sitting at that height rather than being held by an elastic.
9. The Side-Swept Vintage Ponytail
Rather than centering the ponytail, this style gathers hair dramatically to one side, creating an asymmetrical, romantic silhouette that’s instantly vintage. The swept direction creates movement and flatters nearly every face shape. The side placement also allows hair to flow over one shoulder, adding dimension and creating an elegant profile. This style works beautifully with both smooth and textured hair.
Why Side-Swept Styling Feels Effortlessly Retro
The side-swept ponytail has a romantic, almost film-noir elegance to it. Positioned off-center and often slightly lower than a traditional high ponytail, this style relies on the beauty of the hair itself and the drama of the asymmetrical line. It’s a style that photographs beautifully and works for both casual and formal occasions.
Creating a Sweeping Side Ponytail
- Create a deep side part, with significantly more hair on one side than the other—this is essential for the side-swept aesthetic
- Smooth the hair on the fuller side back and across toward the opposite ear, creating a diagonal line from your crown toward the back
- Gather the hair at approximately ear level or slightly lower on the back of your head, positioning the ponytail off-center
- Secure tightly with an elastic, making sure the gathered section is stable and won’t slip
- Gently backcomb the crown area to create subtle volume and support for the swept direction
- Smooth the backcombed area gently, maintaining volume while creating a polished appearance
- Wrap the elastic base with ribbon, leaving the ribbon tails to cascade down along the ponytail if desired
- Allow the remaining hair on the smaller side of your part to fall loosely alongside your face, creating a soft frame
- Use flexible hairspray to hold the swept direction without making it feel stiff
- If you prefer texture, create loose waves throughout the ponytail tail for added movement and dimension
This style is especially effective when you want something that feels both effortless and intentionally styled.
Pro tip: Sweep your hair toward your stronger side if you’re uncertain about the direction. Most people photograph better when hair sweeps toward their weaker side, but genuine comfort and how the style feels to wear matters more than traditional rules.
10. The Pin-Curl Ponytail

This ultra-retro style combines a sleek high ponytail with actual pin curls that frame the face, creating a hybrid look that’s equal parts polished and textured. Pin curls—those rolled, sculpted waves that were the hallmark of vintage hair—are created at the front sections and sides before being pinned into place. When released, they create perfect waves that frame the face while the back remains gathered into a smooth ponytail. This is the style for someone who wants full vintage transformation.
The Art of Pin Curls as a Design Element
Pin curls are a legitimate styling technique that creates structured waves without heat tools. They require patience—your curls need to set for several hours or overnight—but the results are undeniable. Pairing pin curls with a ponytail creates a look that’s neither fully up nor down, neither purely textured nor purely smooth. It’s a style that commands attention and demonstrates real styling knowledge.
Creating Pin Curls With Your Ponytail
- Start with dry or slightly damp hair; pin curls set best on hair that has some moisture but isn’t wet
- Divide the front sections of your hair (from temples back toward your crown) into manageable 2-inch sections
- Take the first section and roll it away from your face using your fingers or a pin-curl tool, creating a smooth, tight spiral
- Once the section is rolled to the scalp, secure it in place using bobby pins crossed over the curl—use at least two pins per curl for stability
- Continue this process throughout the front sections, creating a balanced pattern of curls on both sides of your head
- Cover the pinned curls with a silk scarf or bonnet, which helps them set and protects your work while you sleep
- Allow the curls to set for a minimum of 4-6 hours, ideally overnight—the longer they set, the longer the waves will last
- Once set, carefully remove the bobby pins and gently unroll each curl, allowing the wave to fall naturally
- Gather your hair into a high or mid-height ponytail at the back, leaving the pin-curled sections out to frame your face and neck
- Secure the ponytail tightly and wrap the elastic base with ribbon or a decorative element
- Use flexible hairspray to hold the curls and the ponytail, ensuring everything stays in place throughout the day
The beauty of this style is that the pin curls create drama and femininity while the ponytail keeps the back neat and controlled.
Worth knowing: Pin curls look better the second day than the first—the waves relax slightly and look more natural and less uniform. If you’re pinning your curls overnight, you’re actually getting a better result than if you pin them in the morning and wait a few hours.
Final Thoughts
The resurgence of retro styling isn’t about abandoning modern life or pretending we’re living in a different era. Instead, it’s about borrowing the techniques and intentionality that made vintage hair iconic and adapting them to our contemporary lives. Each of these ten ponytail styles offers something different—whether you’re drawn to the sculptural drama of victory rolls, the romantic sweep of a side ponytail, the glamorous volume of a bouffant, or the simple elegance of a perfectly wrapped tail.
What unites all of these styles is attention to detail and a willingness to work with your hair rather than against it. Vintage styling is fundamentally about technique over trends. It’s about understanding how to tease, wrap, twist, and sculpt hair into shapes that hold their integrity throughout the day. These aren’t rushed styles—they’re intentional, considered, and they improve when you take your time with them.
Start with whichever style speaks to you most strongly, and don’t get discouraged if your first attempt isn’t perfect. Teasing takes practice, rolling takes repetition, and pin curls require patience. But each time you create one of these styles, you’re building muscle memory and understanding exactly how your unique hair responds to different techniques. That knowledge is invaluable and makes every subsequent attempt easier and faster. Your retro ponytail is waiting—and it’s going to look absolutely stunning.