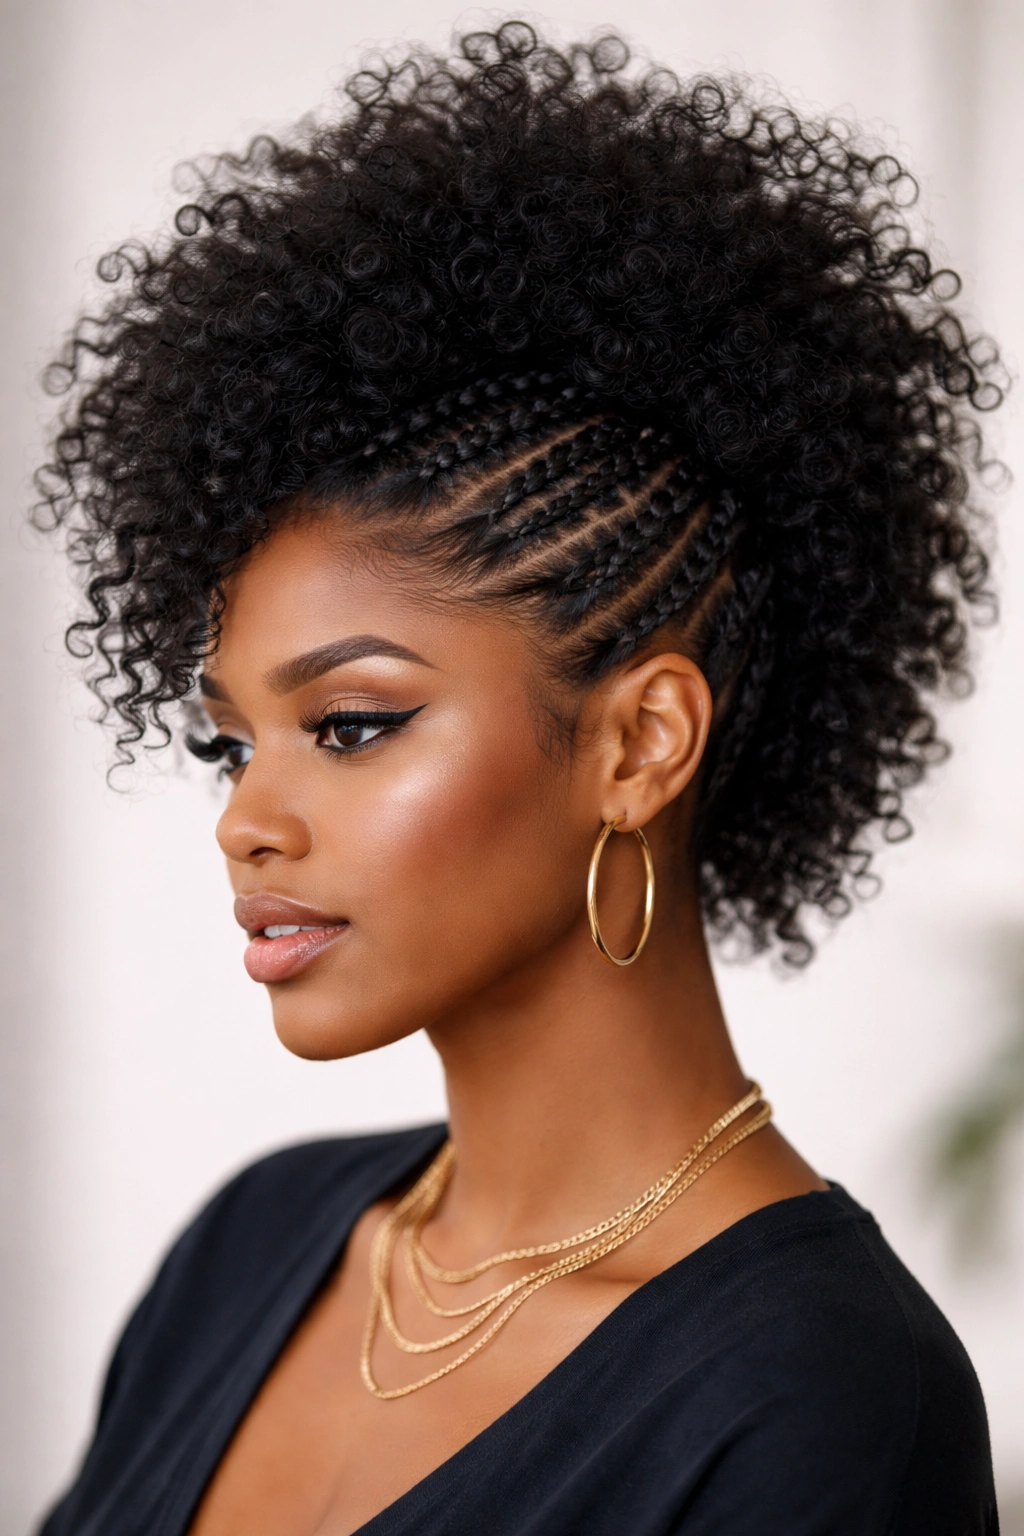
Afrohawk styles for natural hair have a way of looking more complicated than they really are. Once the sides are controlled and the center has some lift, the whole shape does the heavy lifting. That’s why the style has survived every passing hair fad that tried to crowd it out.
What I like about an afrohawk is how forgiving it can be. Tight coils, loose curls, stretched wash-and-gos, twist-outs, short TWA length, shoulder-length hair with some shrinkage — the silhouette still works. The trick is not forcing your hair into a fake version of itself. The trick is building a shape that lets your texture stay the main event.
And yes, details matter. A hawk can go sleek, soft, edgy, or playful depending on how you part it, how high you place the center ridge, and how much texture you leave exposed. Get the side control wrong and the whole style looks busy. Get it right and the shape looks clean from every angle, even when the curls start to loosen a little.
1. The Classic Full-Volume Afrohawk

If you want one afrohawk style that works almost anywhere, start with the classic full-volume version. It has that strong center ridge, pinned or slicked sides, and enough body in the middle to make the shape read fast from across the room. No guesswork. No fussing with too many details.
What makes this version so useful is the balance. The sides stay tight enough to show the hawk shape, but the center stays soft enough to show off your natural texture. If your hair is stretched in twists, braid-outs, or a quick blow-dry on low heat, the outline usually holds better and the volume sits where you want it instead of puffing out in random spots.
Why the shape works
The center strip should run from the front hairline to the nape in one clean line. That line gives the eye somewhere to land. From there, you can fluff the middle with a pick, separate curls with your fingers, or leave the texture a little compressed for a denser look.
Flat roots kill the style. You do not need giant volume at the base, but you do need enough lift that the hawk does not collapse into a narrow ridge.
A few details make the difference:
- Use a center section about 3 to 5 inches wide, depending on your density.
- Smooth the sides with gel only where needed, not all the way into the scalp if your hair gets flaky.
- Pin the sides with crossed bobby pins or small U-pins so the shape stays put.
- Fluff the center with a wide-tooth comb or hair pick, starting at the roots and working upward.
How to make it look finished
The classic afrohawk gets its polish from restraint. Leave enough texture to feel real, but keep the outline crisp. If the sides are too sleek and the middle too tiny, it starts looking severe. If everything is loose, it turns into a regular puff with ambitions.
A good rule: shape the silhouette first, then decide how much curl definition you want. That order matters. People often do it backward and end up fighting the hair instead of working with it.
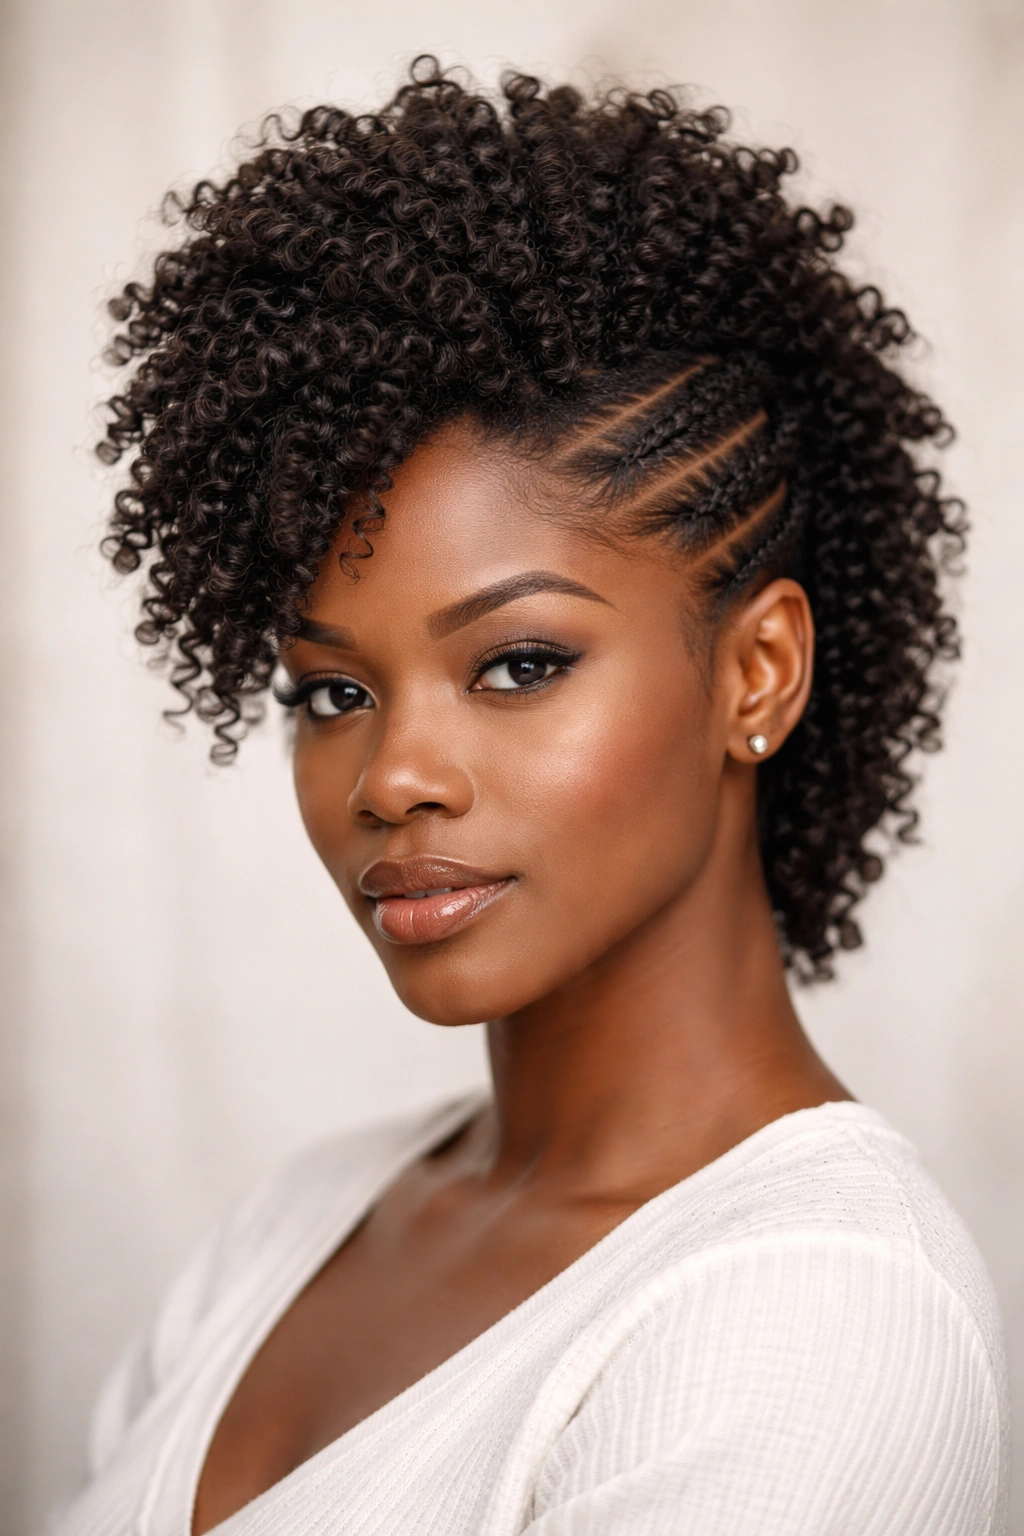
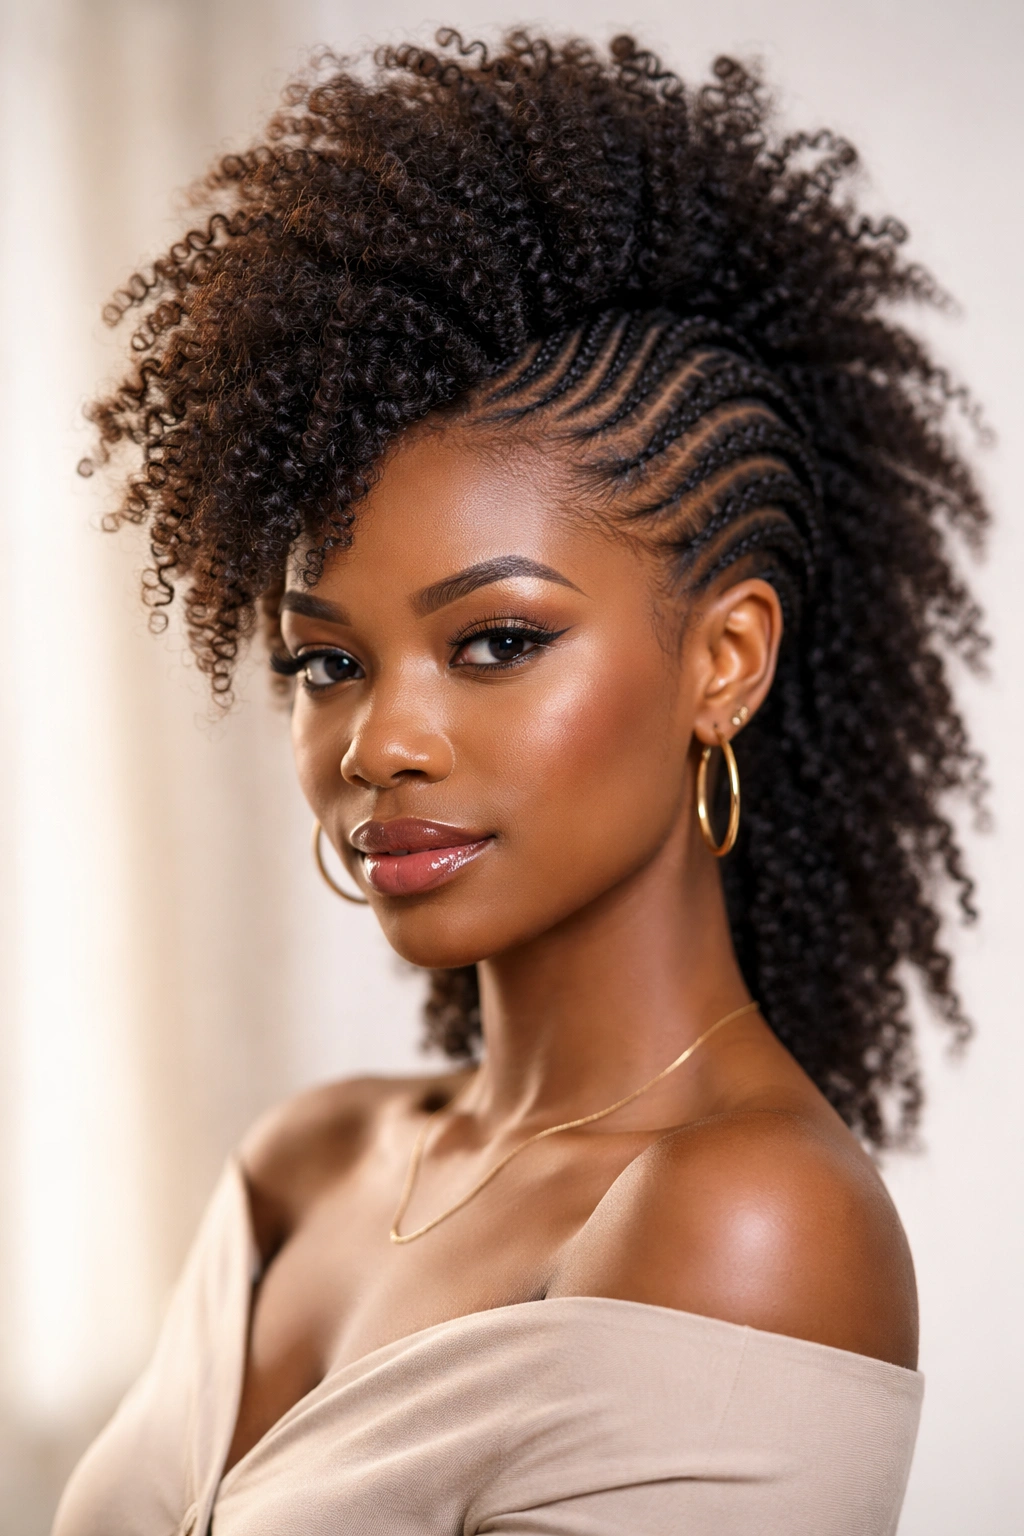
2. Flat-Twist Sides with a Curly Center
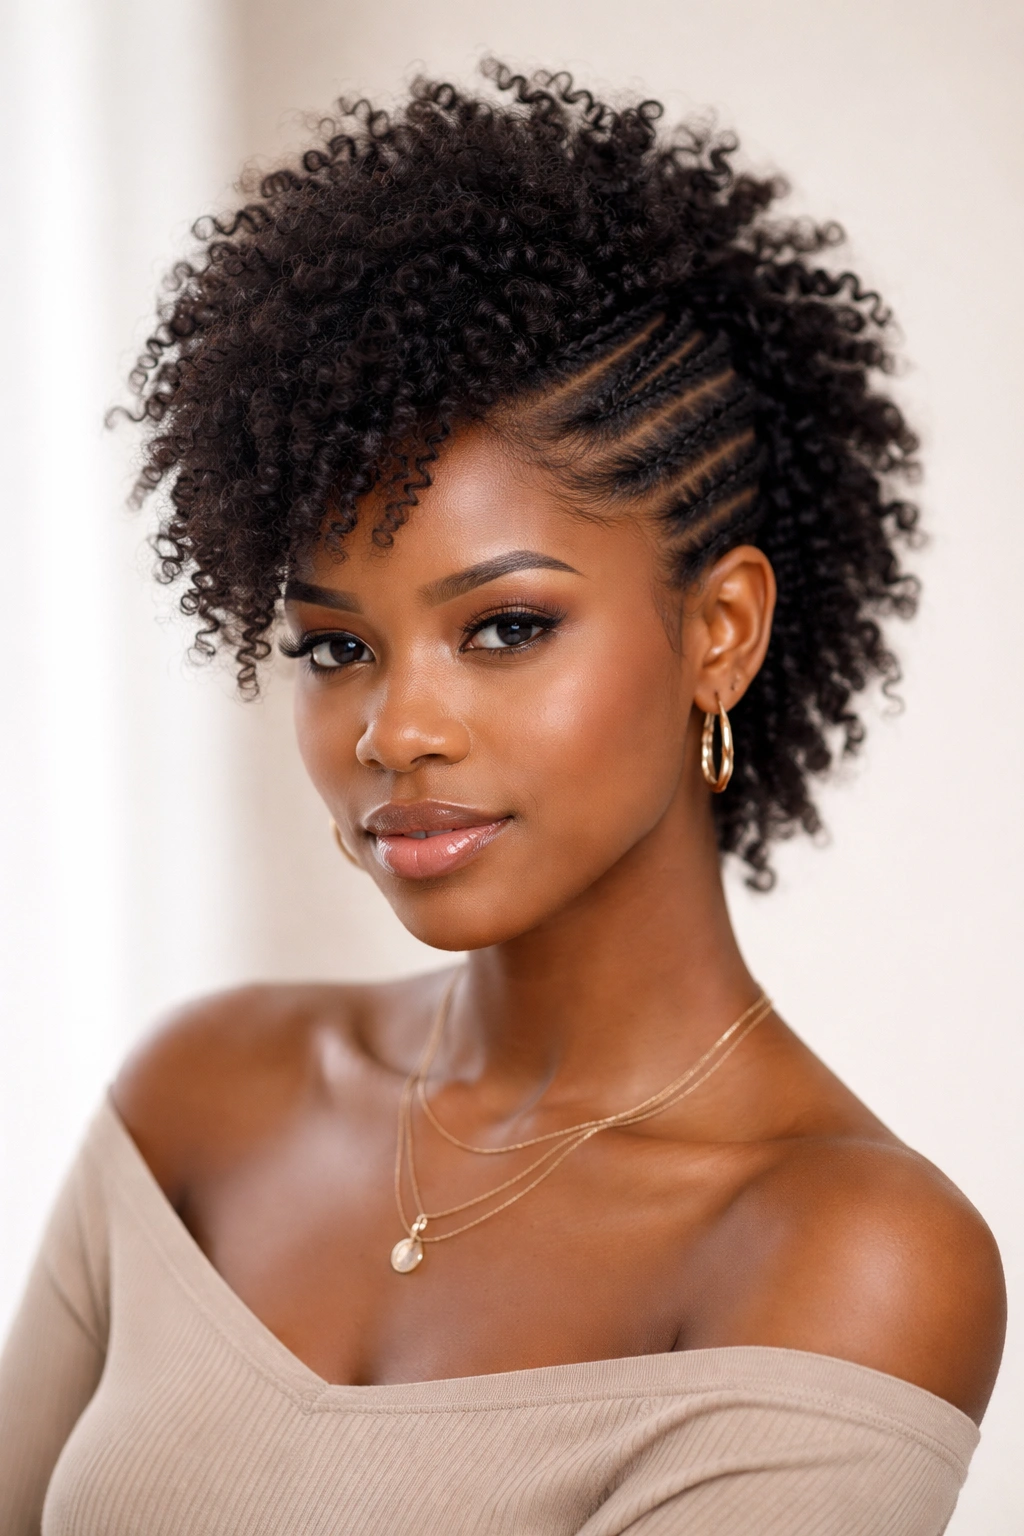
Want something cleaner at the sides without making the style stiff? Flat twists are the answer. They lie close to the scalp, they hold better than loose twists, and they give the whole afrohawk a neat frame without flattening the personality out of it.
This version is one of my favorites for natural hair that has a lot of shrinkage. The center stays soft and springy, while the sides look tidy and controlled. It has a smarter, more deliberate feel than a loose pinned hawk, and it usually lasts longer because the side sections are anchored from the start.
The trick is section size. Keep the flat twists around half an inch to 1 inch wide, especially near the temples. Bigger twists can look chunky in a way that fights the shape. Smaller ones sit flatter and give you that clean curve that guides the eye toward the middle.
The center can be left in curls, a twist-out, or a stretched puff. I prefer a center that still shows texture instead of a perfectly smoothed ridge. That little bit of movement keeps the style from looking overworked. And if your hair tends to puff up at the roots by the end of the day, that’s fine. The style actually looks better when it loosens a touch.
A satin scarf at night helps a lot here. Wrap the sides gently, not tight, and let the center breathe. If you need to revive the front in the morning, a light mist of water and a dab of leave-in will usually do more than another round of heavy gel.
3. Three-Section Puff Afrohawk
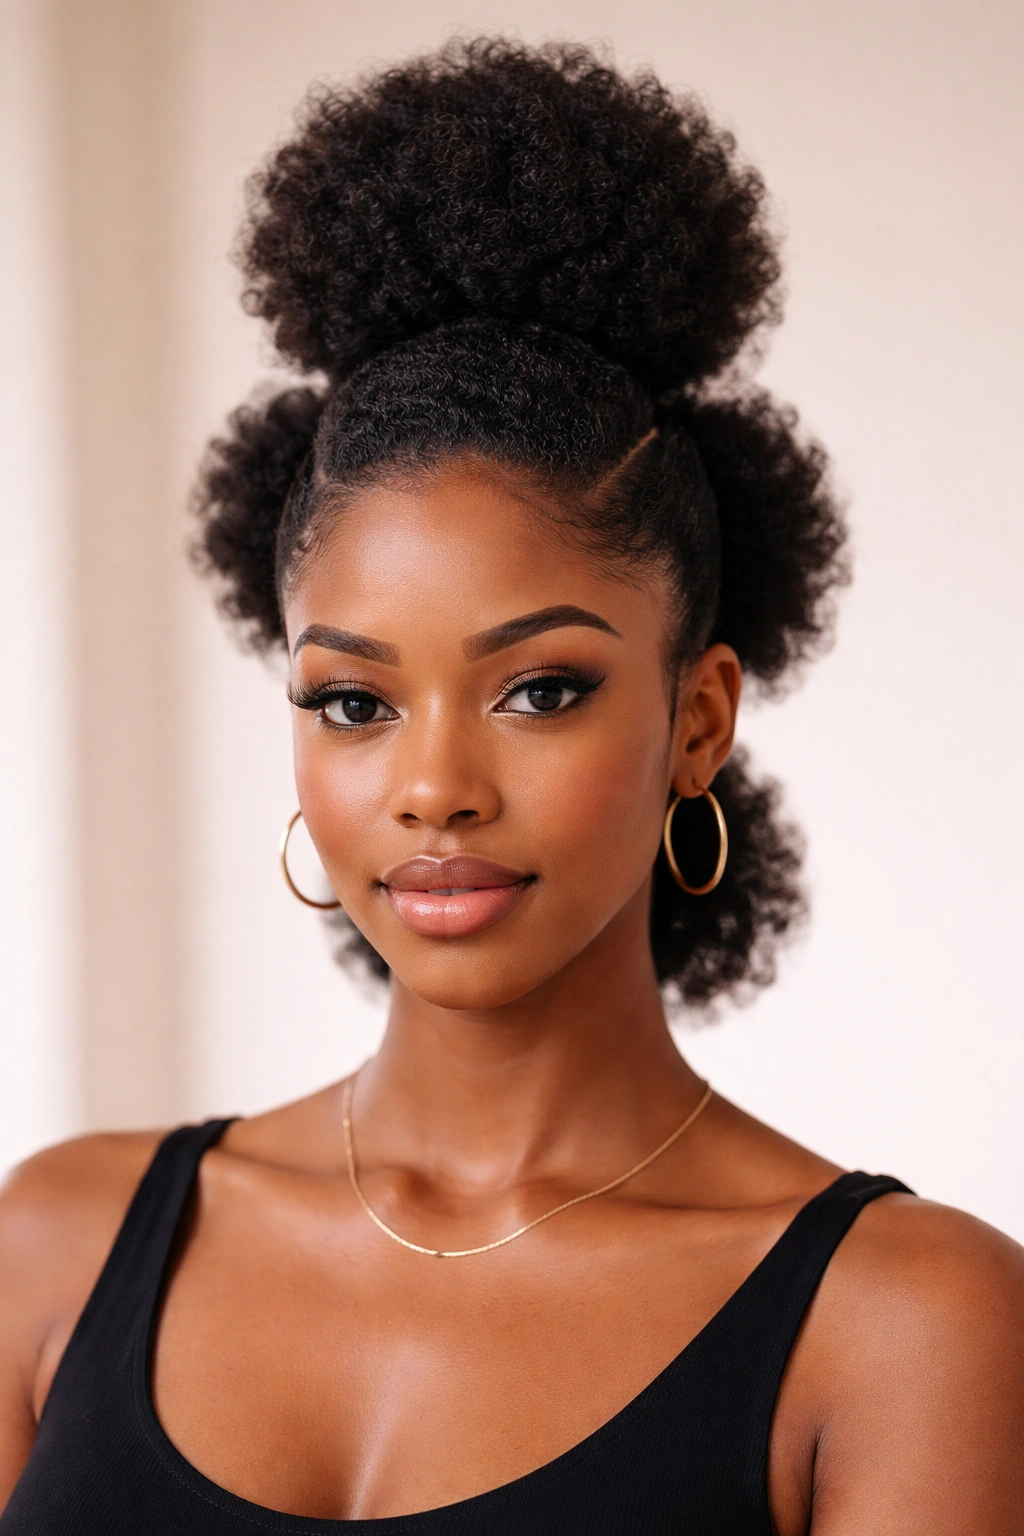
If your hair shrinks hard after wash day, a three-section puff hawk can save you from fighting the length you do not have. Instead of trying to force one long ridge, you build the style out of three smaller puffs placed down the middle. It looks intentional, not improvised, when the parts are clean.
This is especially good for short to medium natural hair. You get height without needing long stretched curls, and the shape stays lively because each puff has its own little bit of movement. The style also gives you more control over density. If the middle is thick and the ends are slimmer, the whole hawk still reads well.
Where each puff goes
- Front puff: sits at or just behind the hairline for lift without pulling the edges too hard.
- Middle puff: anchors the shape and keeps the style from collapsing in the center.
- Back puff: softens the nape and keeps the outline from ending abruptly.
Use snag-free bands, not tiny elastics that dig into the hair. That sounds small, but it matters. Thin bands can snap curls and leave the exact dents you do not want when the puffs come down.
One nice thing about this style is that it grows with you. A little more length just means fuller puffs, not a different hairstyle. If you want extra shape, lightly stretch each section overnight in two loose braids before styling. The result is a puff hawk that sits higher and looks less round, which makes the profile cleaner.
4. Bantu Knot Afrohawk
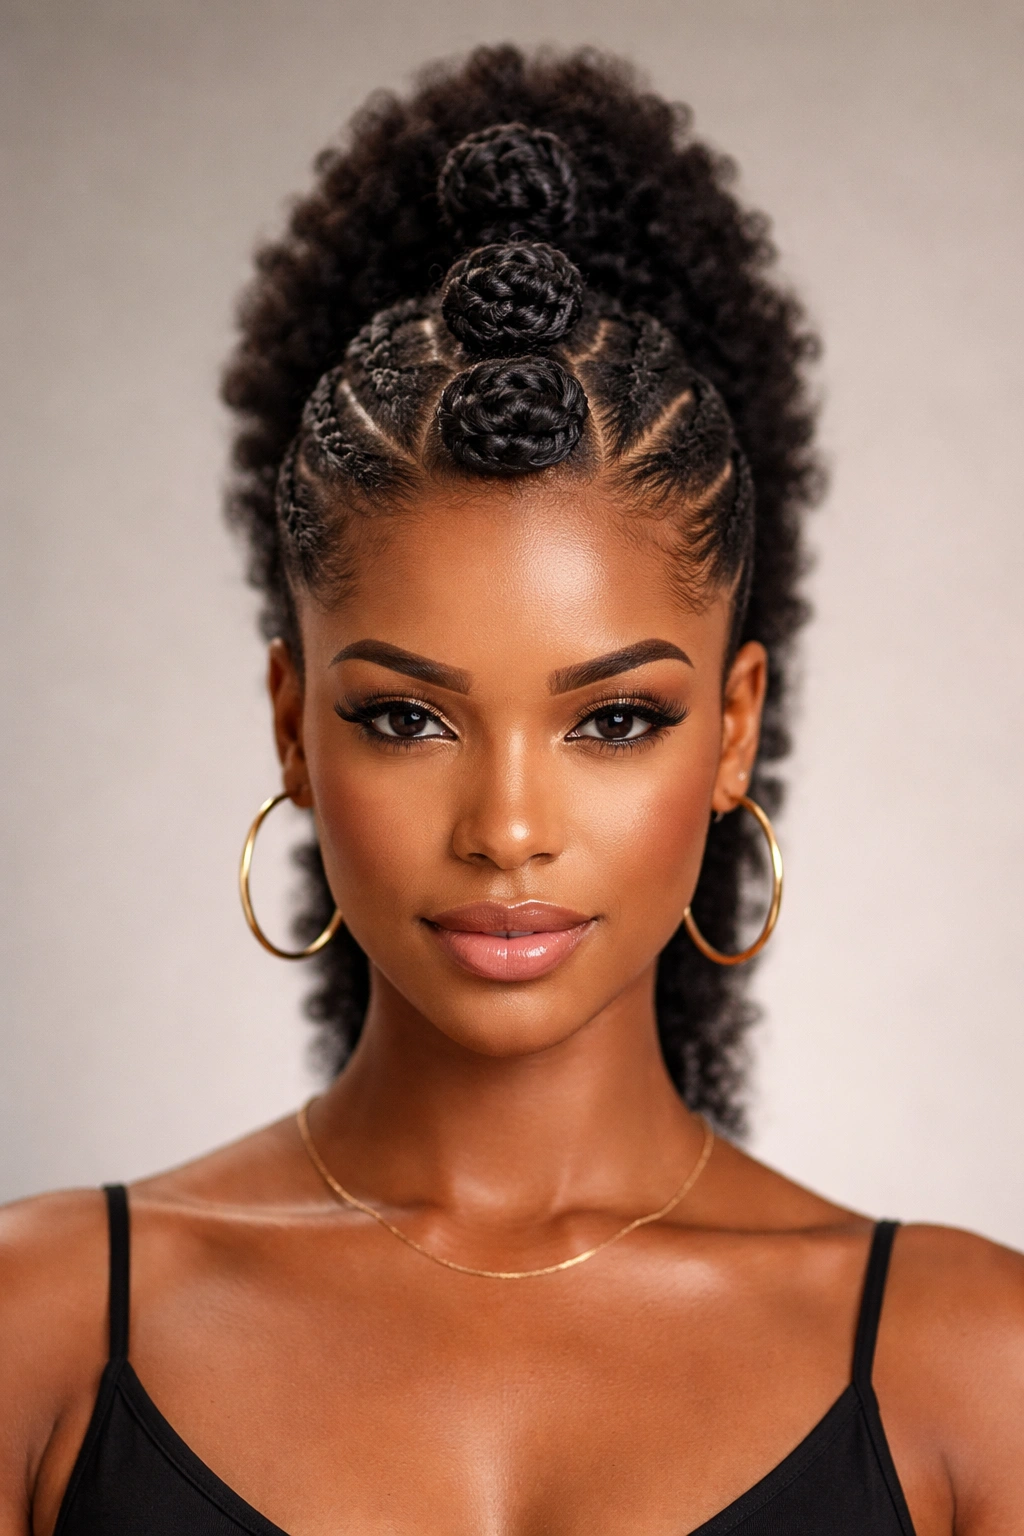
A bantu-knot afrohawk is the kind of style that looks playful until you notice how sharp the parting is. Then it starts looking almost architectural. The center row of knots gives the hawk a built-in rhythm, and the side control makes the shape feel tidy instead of busy.
This one works best when the sections are even and the knots are close together. Think 6 to 10 knots down the center, depending on hair length and density. Too few knots and the style looks sparse. Too many and it starts to feel crowded. Clean partings matter here more than anywhere else, because bantu knots are unforgiving if the sections wobble.
What I like most is the double life of the style. You can wear the knots as the finished look, or you can take them down later for a knot-out hawk with softer texture. That second version tends to have a nice springy halo around the center ridge. If your hair holds definition well, it can look gorgeous with just a little separating and a drop of lightweight oil on the fingertips.
A few people rush bantu knots and twist them too tightly near the scalp. Don’t. You want enough tension to hold the knot in place, not enough to make your roots sore by lunchtime. A creamy leave-in and a bit of styling foam usually give better grip than a pile of heavy gel.
Best for
- Medium to thick natural hair
- Styles that need a neat center line
- Anyone who likes a two-in-one look
If you want the hawk to stay crisp, set the knots on damp hair, let them dry all the way, and protect them with a satin bonnet. Half-dry knots are the fastest route to frizz that appears right where you want clean definition.
5. Braided Side Panels and a Loose Crown
A few neat braids at the temples change the whole mood. Suddenly the style looks more deliberate, more structured, and a little sharper around the face. That’s the appeal of braided side panels with a loose crown: the sides behave, and the center gets all the room it needs.
This version is useful when you want a hawk that lasts beyond a single day. The braids keep the front and sides in place, so the center can stay fluffy, curly, or lightly stretched without the silhouette drifting apart. It also works well if your hairline is tender and you do not want a lot of constant re-pinching or edge work.
How thick should the braids be?
Usually, medium braids work best. Thin braids can look busy if you use too many. Big braids can overpower the center. I like 4 to 6 braids per side for a fuller head of hair, or 2 to 4 per side if the hair is finer and you want a cleaner line.
The crown should stay loose enough to show texture, but not so loose that it swallows the whole style. If the center is too soft, the braided sides lose their purpose. If the center is too stiff, the hawk starts looking boxed in. That middle ground is where this style does its best work.
What to watch for
- Keep the braids angled slightly back, not straight down, so they point the eye into the center.
- Leave a little space at the top so the crown can be fluffed.
- Add braid cuffs or small gold rings only after the shape is set.
- If your hair frizzes fast, seal the braid ends with a tiny dab of cream before tucking them away.
This is one of those styles that rewards neat sectioning. Take an extra ten minutes on the parting, and the whole hawk looks cleaner without extra effort later.
6. Twist-Out Afrohawk with Sharp Partings
If your twist-out already has definition, the afrohawk shape does most of the work. That’s the honest truth. You are not rebuilding the hair from scratch; you are arranging texture that is already doing the heavy lifting.
The best part about a twist-out hawk is the softness around the center ridge. It has movement. It has a little bounce. It does not look stiff the way some sculpted styles do. That makes it a nice choice if you like a fuller silhouette but still want the hair to feel touchable.
The parting matters more than people think. Clean, angled parts on the sides create a stronger hawk line, especially near the temple and above the ear. If the parts wander, the shape gets cloudy. A rat-tail comb and a few duckbill clips can save you from having to redo the whole style.
Dryness is the other big thing. A twist-out that is even slightly damp at the roots can lose its shape within hours. Let it dry fully, and if you can, set it the night before with a satin bonnet or scarf. Do not separate the curls too many times. Twice is usually enough. After that, you are just making frizz.
This version suits people who like a style that starts neat and gets a little bigger as the day goes on. Some hair behaves that way. It is not a flaw. It’s the charm of the style. The hawk widens a touch, the curls loosen, and the silhouette stays interesting instead of going flat.
7. Tapered Cut Afrohawk
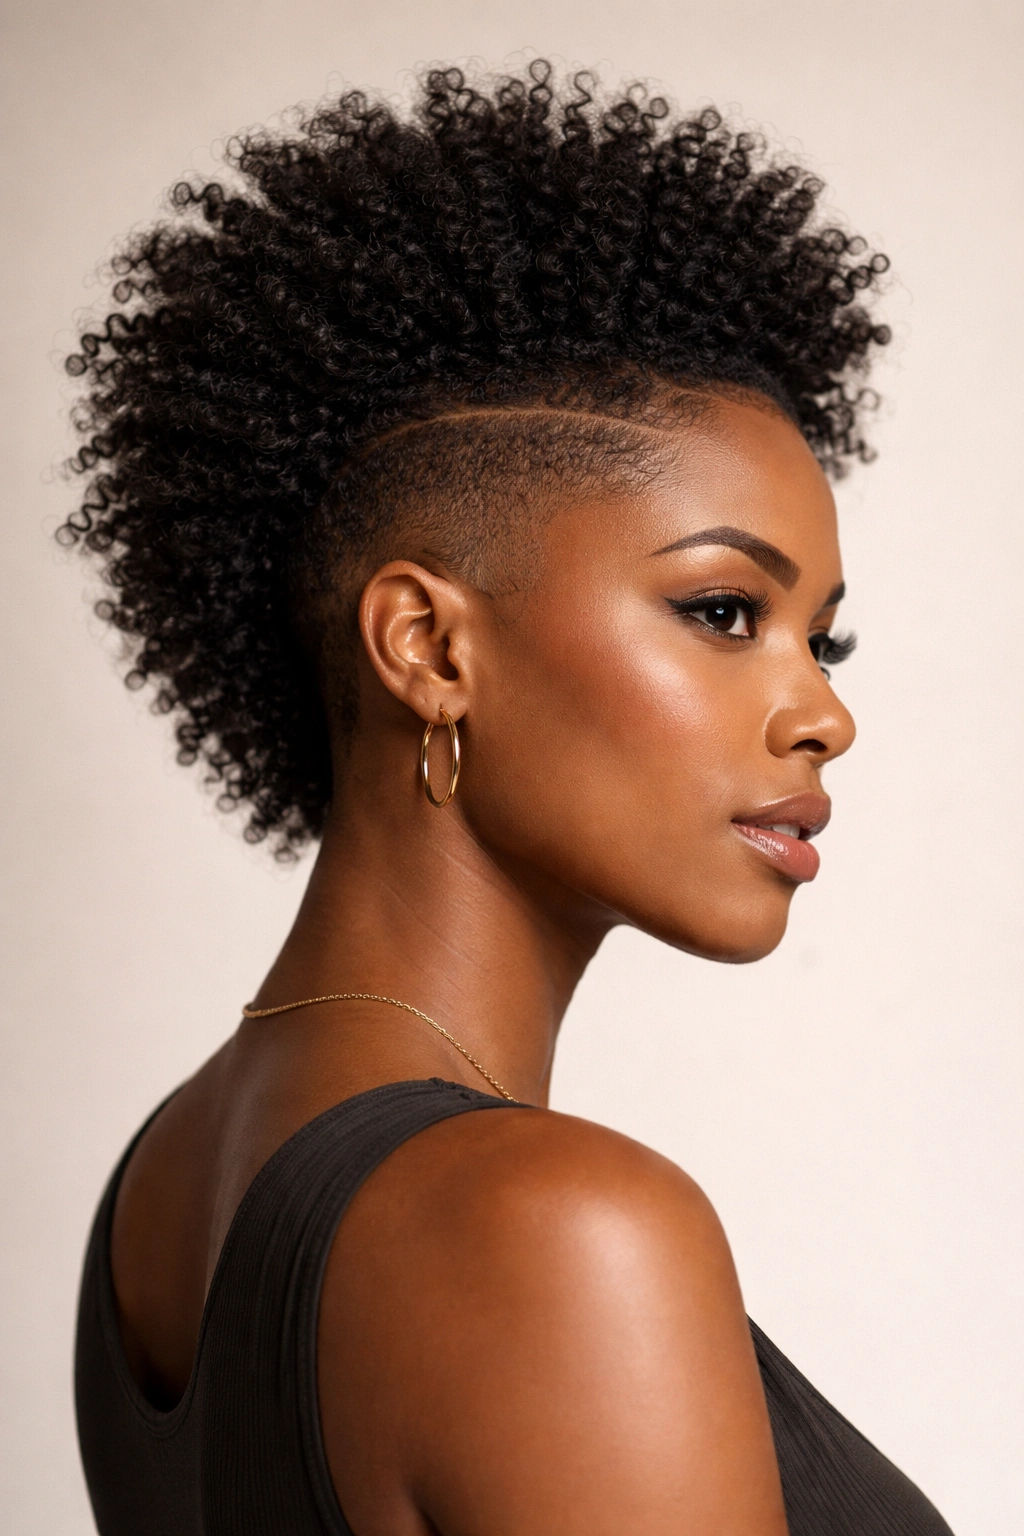
A tapered cut takes the guessing out of the shape. If the sides and nape are already shorter, the center reads as a hawk the second you step out with defined curls or a wash-and-go. No pinning marathon. No wrestling with four mirrors. Just shape.
I’m a fan of this version for people who hate spending time on daily styling. That sounds blunt, but it’s true. A tapered afrohawk is one of the few looks that can feel polished with minimal morning work, especially if the haircut keeps the sides tight around the temple and ear. The outline does the styling for you.
The center can be shaped several ways. Some people like a soft curly ridge. Others prefer a more exaggerated top with a lot of height and a tighter taper at the back. Both work. The cut decides the broad silhouette, and the styling just decides how loud or soft the finish feels.
One thing to keep in mind: this is not a lazy haircut. It needs maintenance. The taper loses its crispness when the sides grow out too far, and then the hawk shape starts to blur. A quick cleanup around the neckline and temple area keeps the whole look sharp. If your hair grows fast at the edges, you will notice the difference sooner than you expect.
Best for people who want
- Less daily pinning
- A strong profile from the side
- A style that still looks decent on low-energy days
- Natural curls with enough density to build height
If you like structure but do not want to spend half your morning creating it, this is probably the most practical hawk on the list.
8. Cornrow-Lead Afrohawk
Need a hawk that stays put through a long day, a windy commute, or a night that runs later than planned? Cornrow leads solve a lot of that. They keep the sides close to the scalp and give the center strip a strong frame, which means the style holds shape without constant rescue work.
The beauty of cornrow-led afrohawks is how much control they give you. The base is secure, the center remains free, and the whole style feels anchored from root to tip. That makes it a solid choice for thicker natural hair, especially if your hair tends to swell in humidity and eat the outline alive by noon.
How to keep the center from going flat
A lot of people make the center too tight at the roots. That kills the height. Leave enough room at the crown so the hawk can lift naturally, then shape the middle with twists, puffs, or a stretch-and-fluff finish. You want support, not a helmet.
Parting width matters here too. Narrow cornrows around the edges create a cleaner frame, while wider rows can feel heavy. I usually prefer 6 to 8 rows on each side for a medium-to-full head of hair, but the exact number depends on density and how much of the center you want to expose.
A few useful details:
- Start the cornrows with a firm grip, then ease up a little as you move back.
- Keep the crown section loose enough to puff.
- Tie the base with a silk scarf for 15 to 20 minutes after styling to smooth the roots.
- Avoid thick waxes near the scalp; they can build up fast and make the rows look dull.
This style also takes accessories well, but only if the shape is already doing its job. If the cornrows are clean and the center has lift, one or two cuffs are enough. More than that can start crowding the line.
9. Mini Puff Afrohawk for Short Natural Hair

Short hair doesn’t block the style. It just changes the scale, and honestly, that can be better. A mini puff afrohawk gives you the same lifted shape without pretending the hair is longer than it is. Tiny puffs stacked down the middle can look sharp, cute, or edgy depending on how clean the parts are.
This is one of the best options for a TWA or early grow-out stage. You do not need a huge length to make the shape read. You need a little lift at the center and careful placement of the puffs. Put them too low and they disappear. Put them too high and the style starts looking top-heavy.
How to fake extra height
- Make 2 to 4 mini puffs instead of one big one.
- Place the first puff slightly back from the hairline.
- Keep the side sections slicked or finger-laid close to the head.
- Fluff each puff upward, not outward, so the line stays hawk-like.
A curl cream or soft styling custard works better than stiff gel here. Short hair can get crunchy fast, and crunchy short hair is a pain to reshape. You want enough hold to keep the puffs separated, but enough softness that the hair still moves.
This style also makes a nice case for tiny accessories. A few small barrettes, a narrow satin ribbon, or even a set of clear elastics can give the style more structure without hiding the texture. That matters when your hair is short enough that every inch shows.
If you are growing your hair out and hate the in-between stage, this is the style that keeps things interesting.
10. Beads, Cuffs, and Scarf-Accent Afrohawk
If the shape is already good, the finish can be spare or loud. I usually prefer spare. One small accessory placed well looks better than five things fighting for attention on the same hairstyle.
Beads, cuffs, and scarves each change the mood of an afrohawk in a different way. Beads pull the eye downward and work well on braid ends or twisted sections. Cuffs sharpen a braided hawk and make the parting look cleaner. A scarf can soften the whole look or pull the face shape inward if you tie it low and let the center stay high.
The mistake people make is treating accessories like a rescue plan. They are not. If the parts are messy, the accessory just sits on top of mess. If the shape is good, even one slim gold cuff can make the whole style feel finished.
Best uses for each finish
- Beads: best on medium-length braids or twisted ends that need weight.
- Cuffs: best on sleek side braids or a cornrow-led hawk.
- Scarf: best when you want to soften the front or protect laid edges overnight.
- Pins and clips: best for quick shape correction, especially on thicker hair.
A scarf can also save a style that is starting to puff unevenly. Wrap it around the base, leave the center free, and let the hair settle for 10 to 15 minutes. That small reset often does more than adding more product.
The truth is, the best afrohawk is the one that still looks like itself after you leave the mirror. Clean shape. Real texture. No nonsense. That’s the whole game.