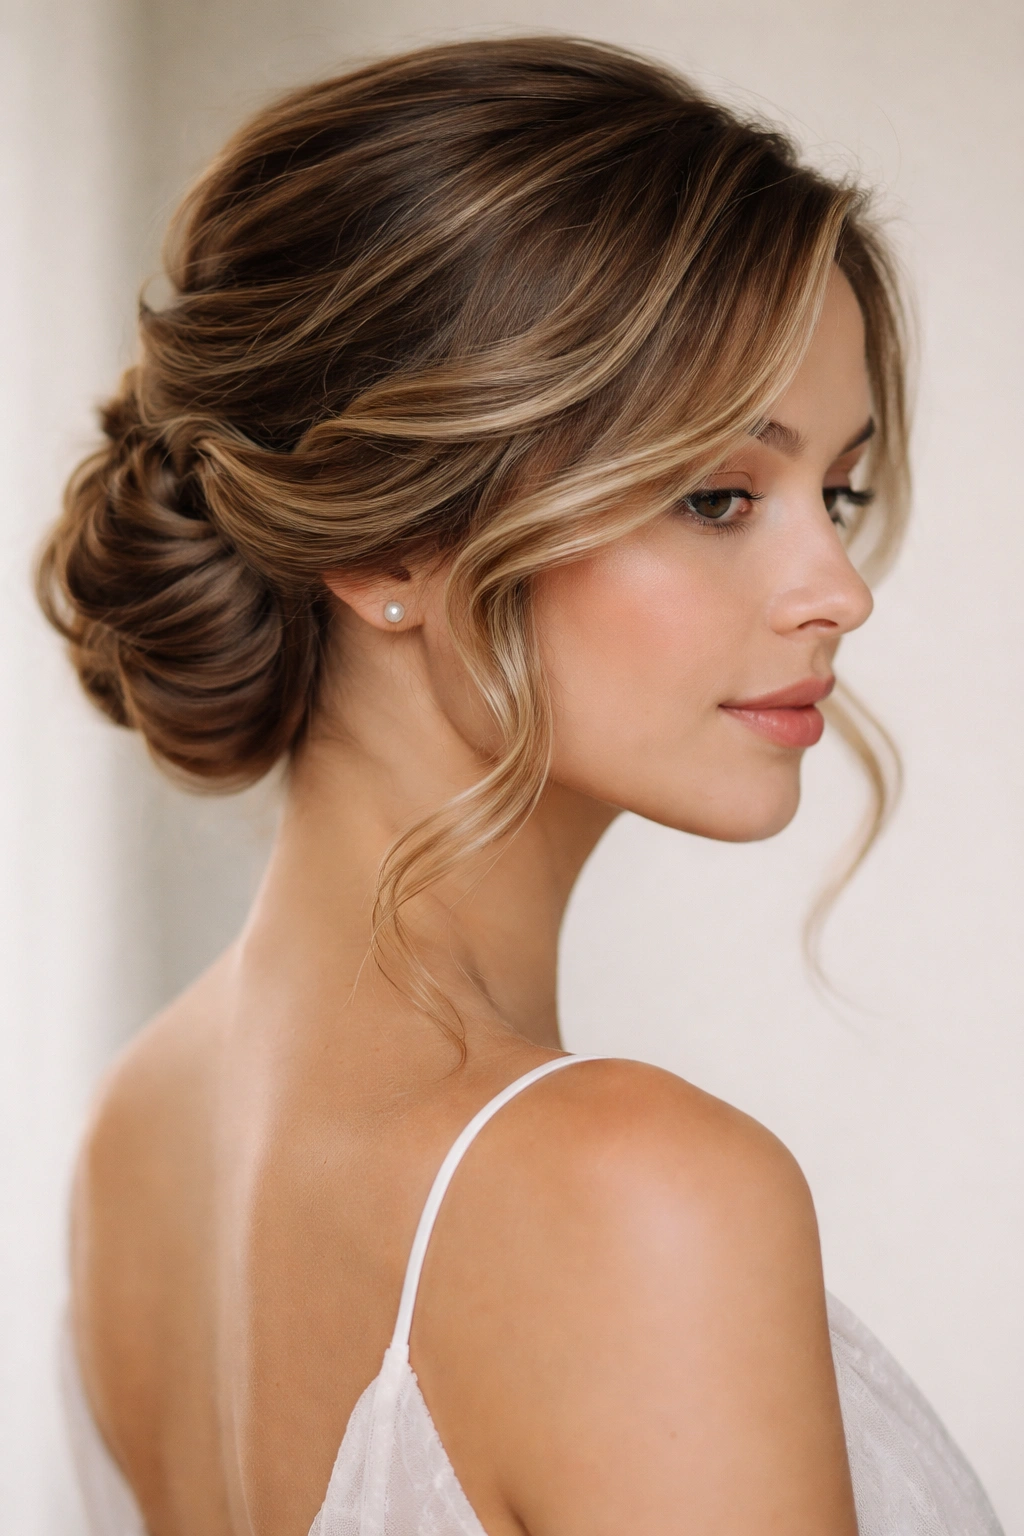
Wavy hair is a gift when it comes to updos. Unlike stick-straight hair that requires intense teasing and product to hold texture, or tight curls that demand specific pattern-respecting techniques, waves already have built-in dimension and grip. They hold pins better, fall in flattering ways, and create volume naturally—you’re literally starting with a textural advantage that most updo styles absolutely crave.
The challenge with wavy hair updos isn’t finding something that works—it’s choosing from the almost endless options. Waves can go polished and sophisticated, undone and effortless, romantic and loose, or sleek and controlled, depending on how you style them. You can play up the texture, smooth it down, add braids, wrap sections around the base, pile hair on top of your head, or let some fall softly around your face. Every mood has an updo that fits.
What makes an updo truly cute on wavy hair isn’t complicated styling or dozens of bobby pins. It’s about working with your natural texture instead of against it, choosing a shape that flatters your face, and understanding which techniques actually hold on waves versus which ones slip and slide. The updos that follow all share something in common: they’re designed specifically with wavy hair in mind, they range from five-minute messy styles to more involved date-night looks, and they all let your waves do the heavy lifting.
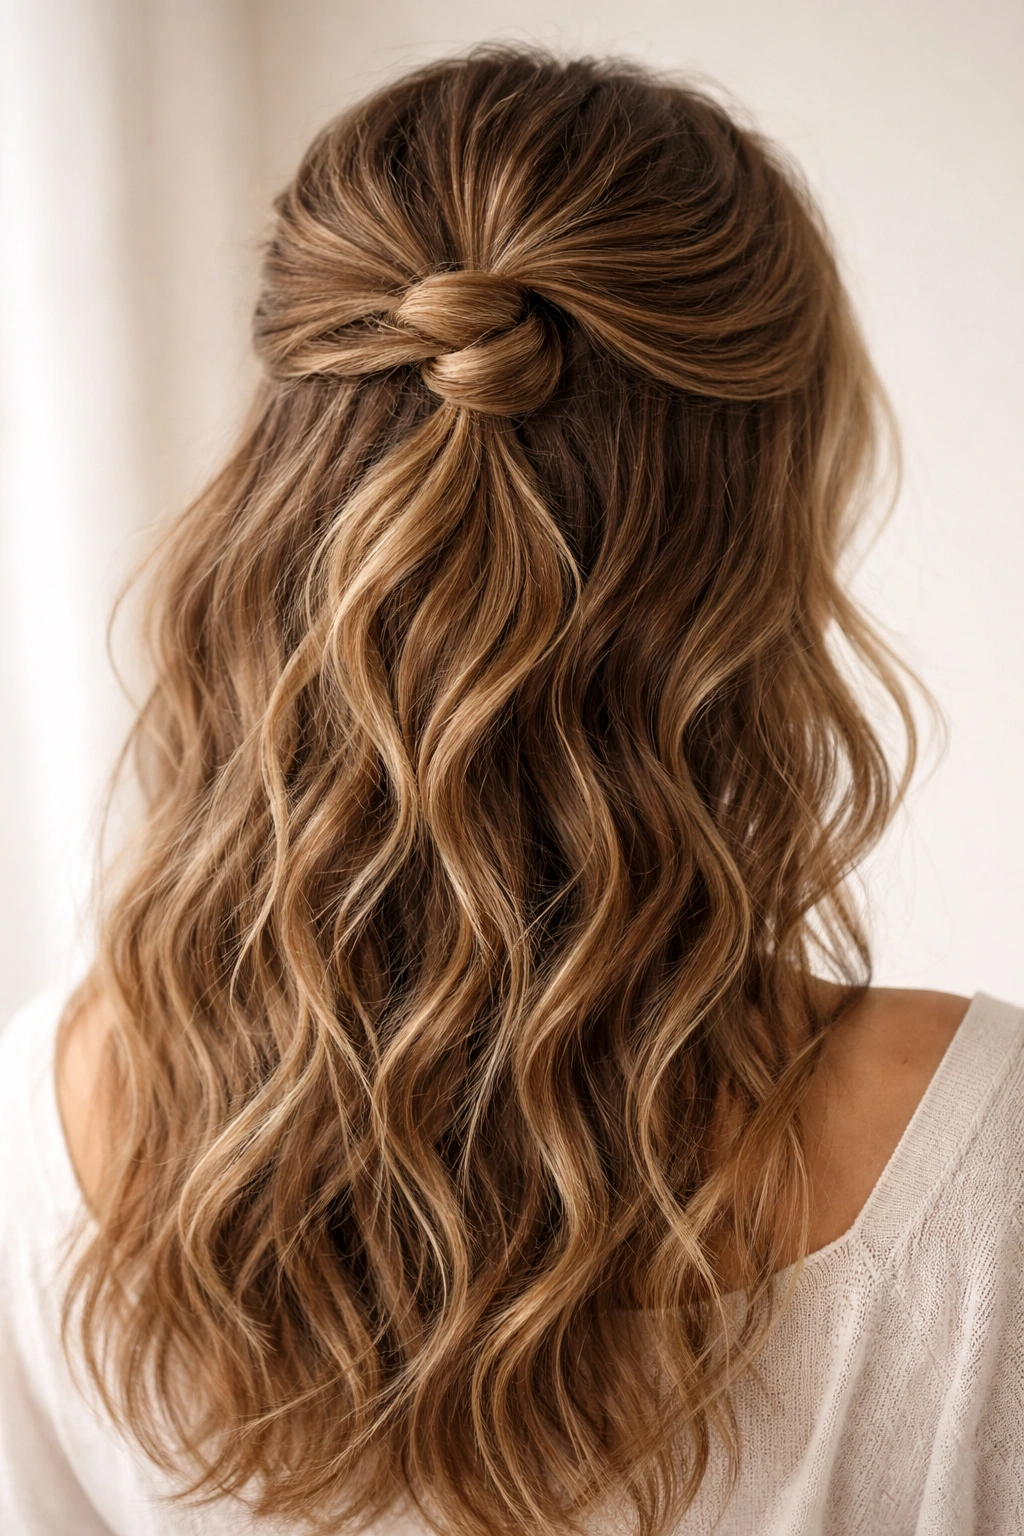
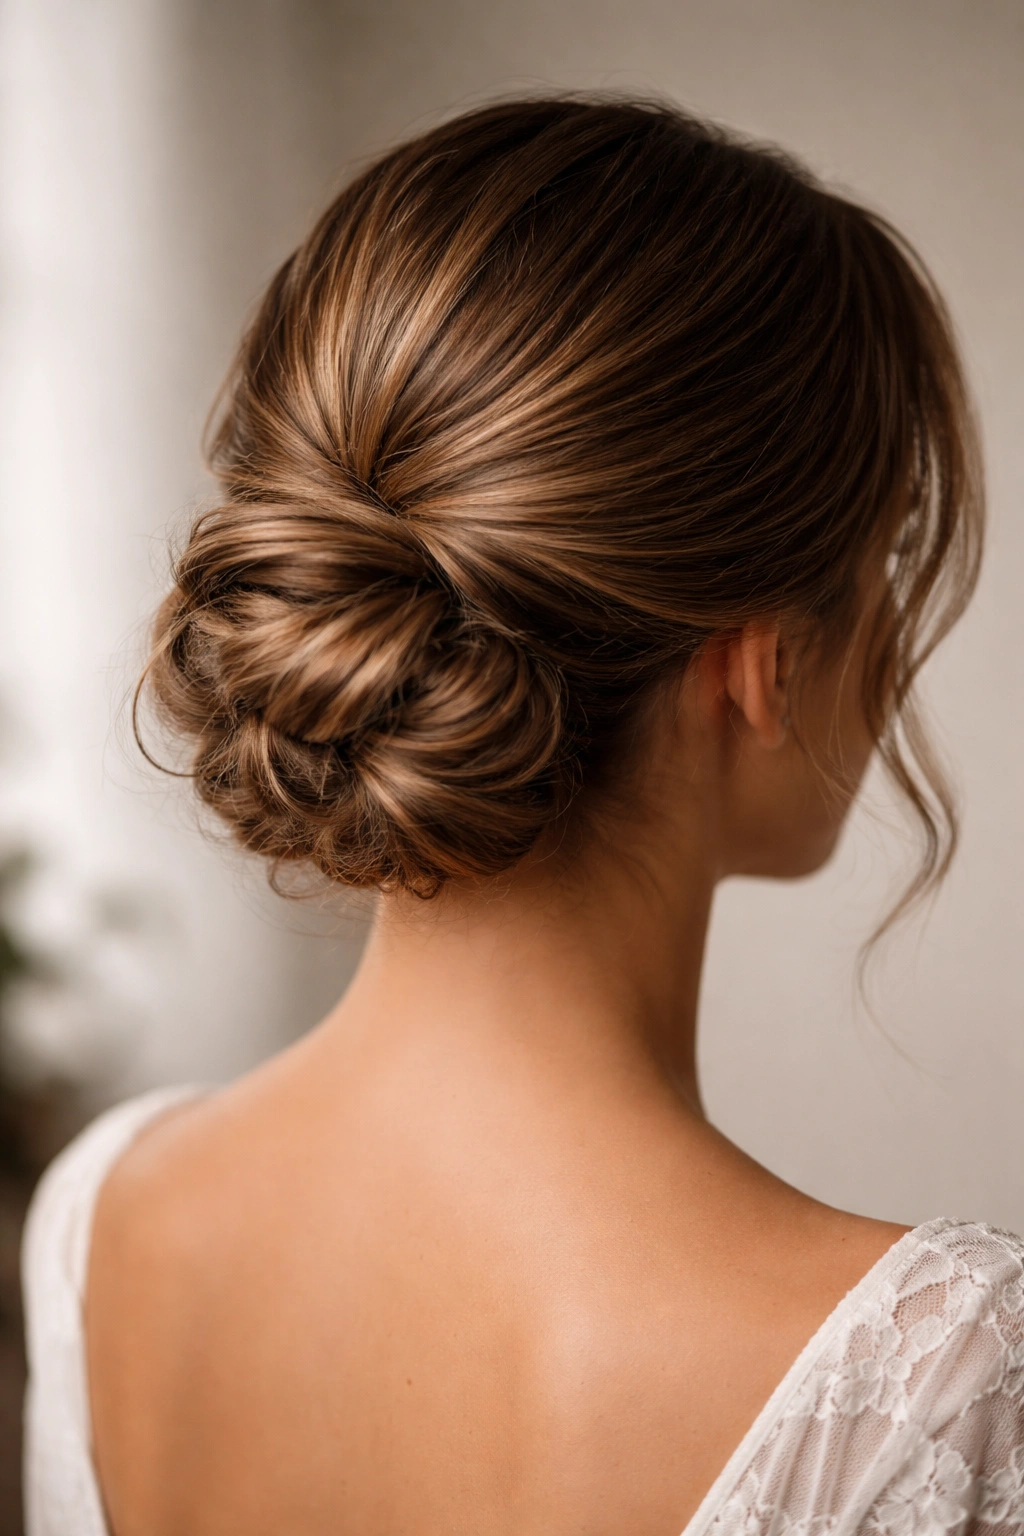
1. The Textured Topknot with Face-Framing Layers
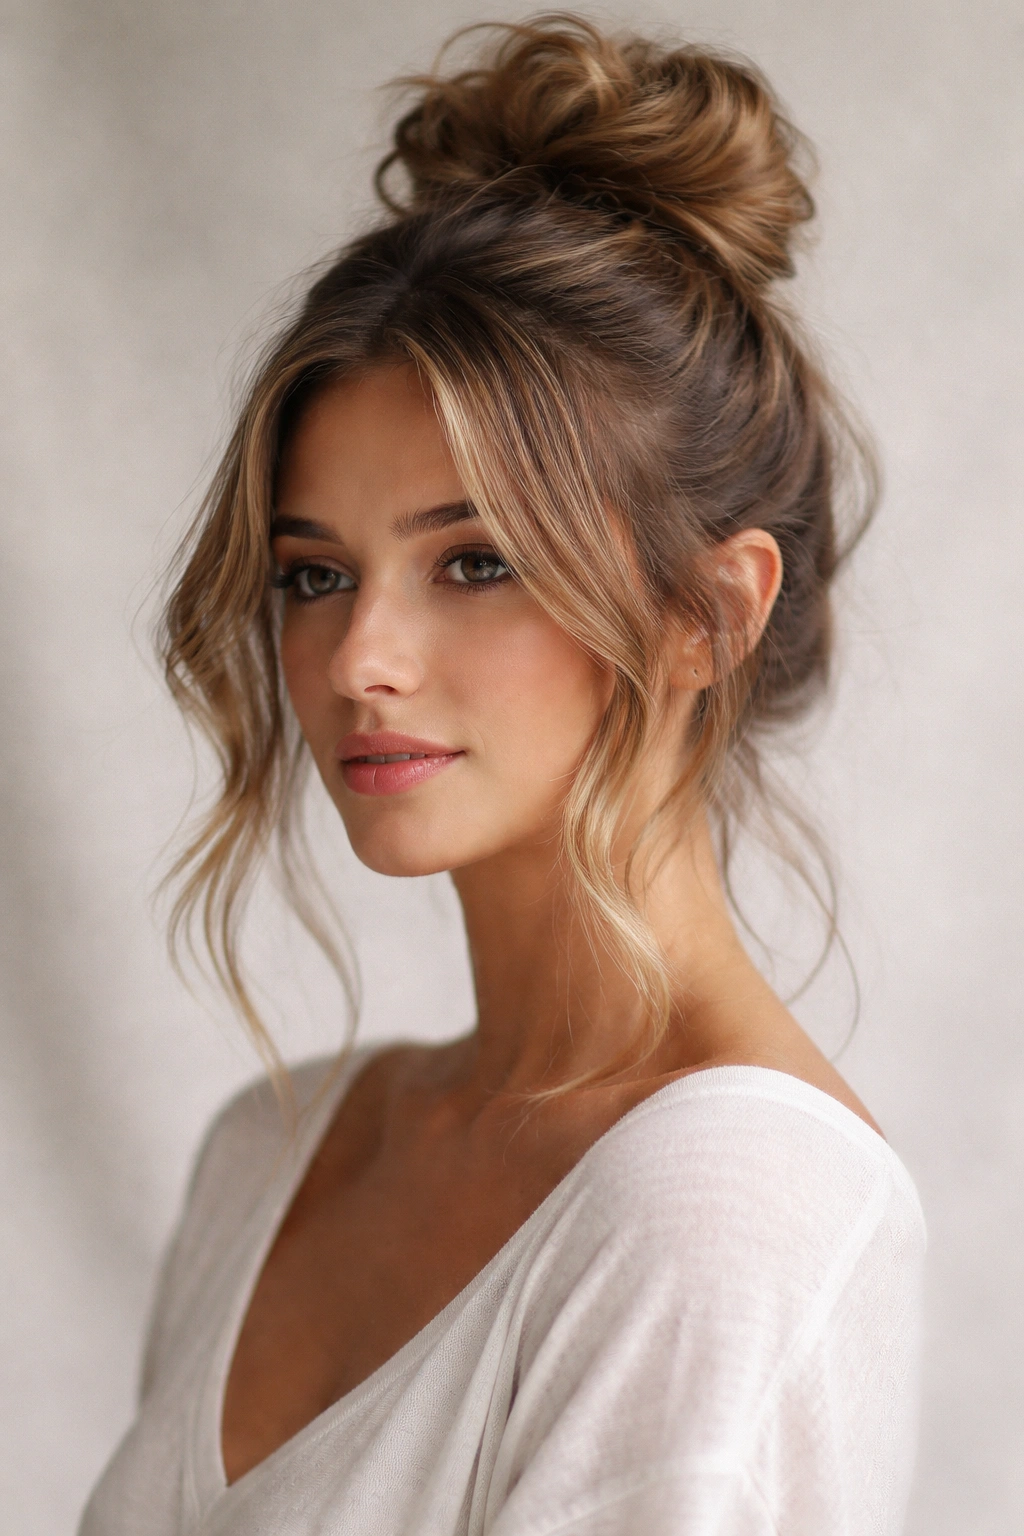
A topknot works beautifully on wavy hair because your waves prevent that sad, flat look that happens on straighter textures. Gather your hair into a high ponytail, twist it loosely, and wrap it around itself to create a knot, securing with bobby pins and a small elastic. The magic is leaving a few face-framing pieces loose around your temples—these soften the look and prevent that harsh “I pulled my hair back way too tight” appearance that nobody loves.
Why This Works for Waves
Wavy hair fills in topknots with texture instead of looking thin or wispy. The twisting motion you use to wrap the knot actually encourages your waves to spiral and stack on themselves, creating the kind of fullness that straight-haired folks have to tease in. Your natural texture is doing the work for you, and the result looks intentionally tousled rather than carelessly sloppy.
How to Execute It
- Brush through your hair gently to define the wave pattern without completely smoothing it out
- Create a high ponytail at the crown, leaving face-framing pieces out on both sides
- Twist the ponytail loosely and wind it around the base into a knot shape
- Use 3-4 bobby pins inserted horizontally into the knot to anchor it
- Gently pull out some of the twisted sections to add volume and texture to the knot itself
- Set with light hairspray to keep stray wisps in place without crunching the waves
Pro tip: Do this on second-day hair, not freshly washed waves. The slight oil buildup helps the topknot hold longer and look more intentional.
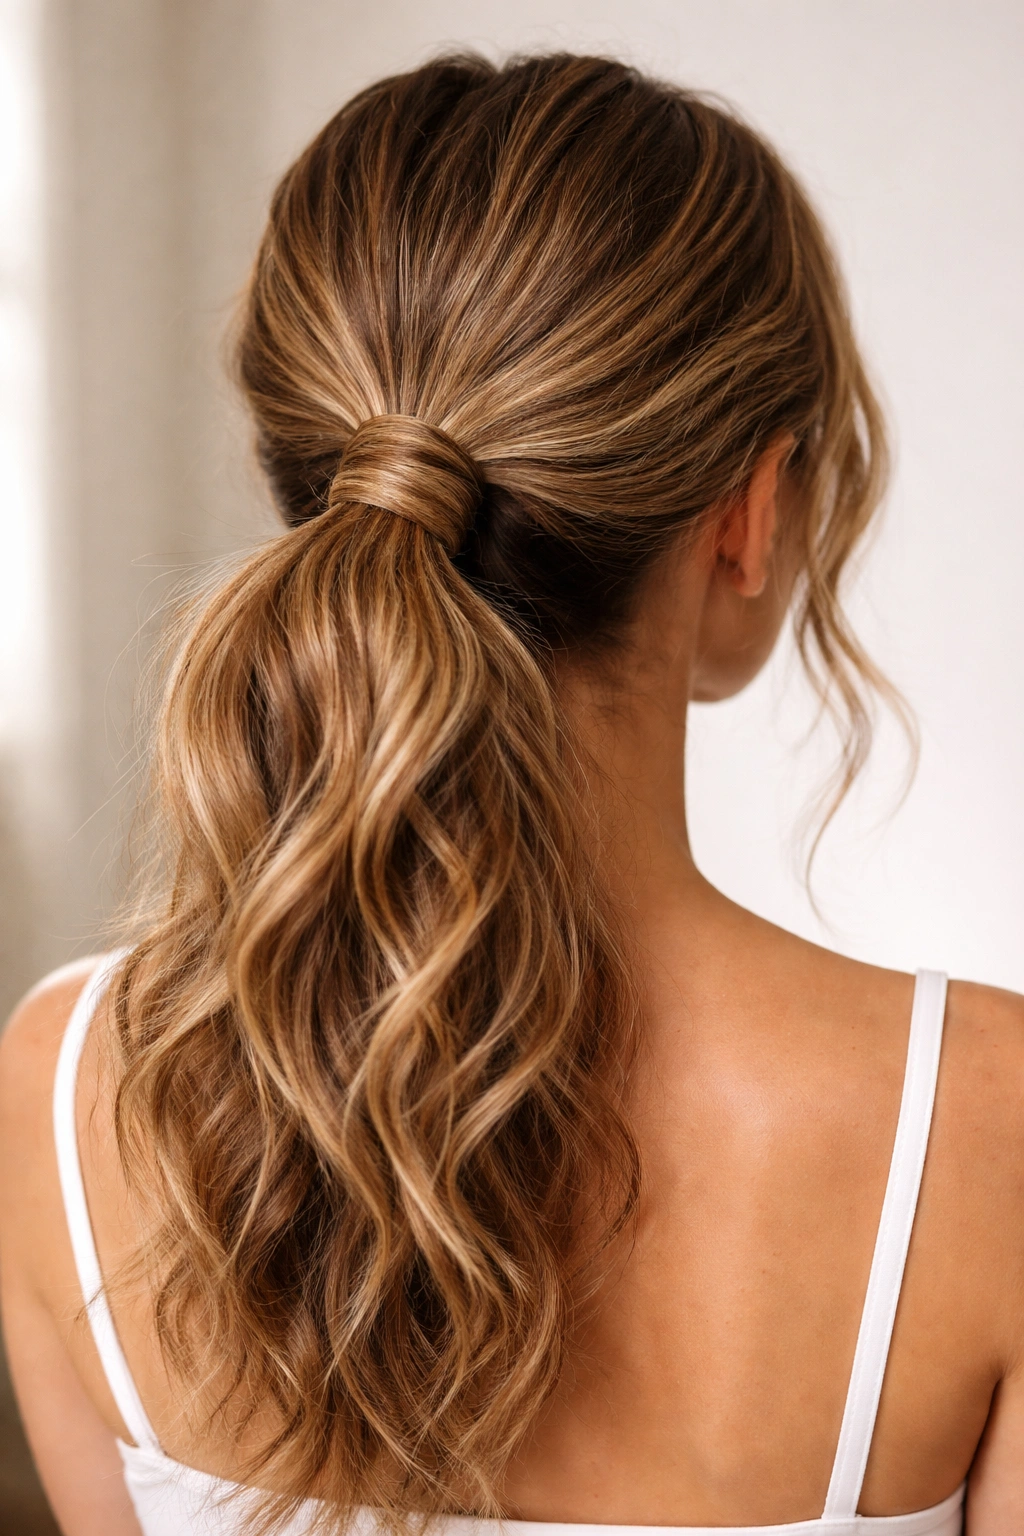
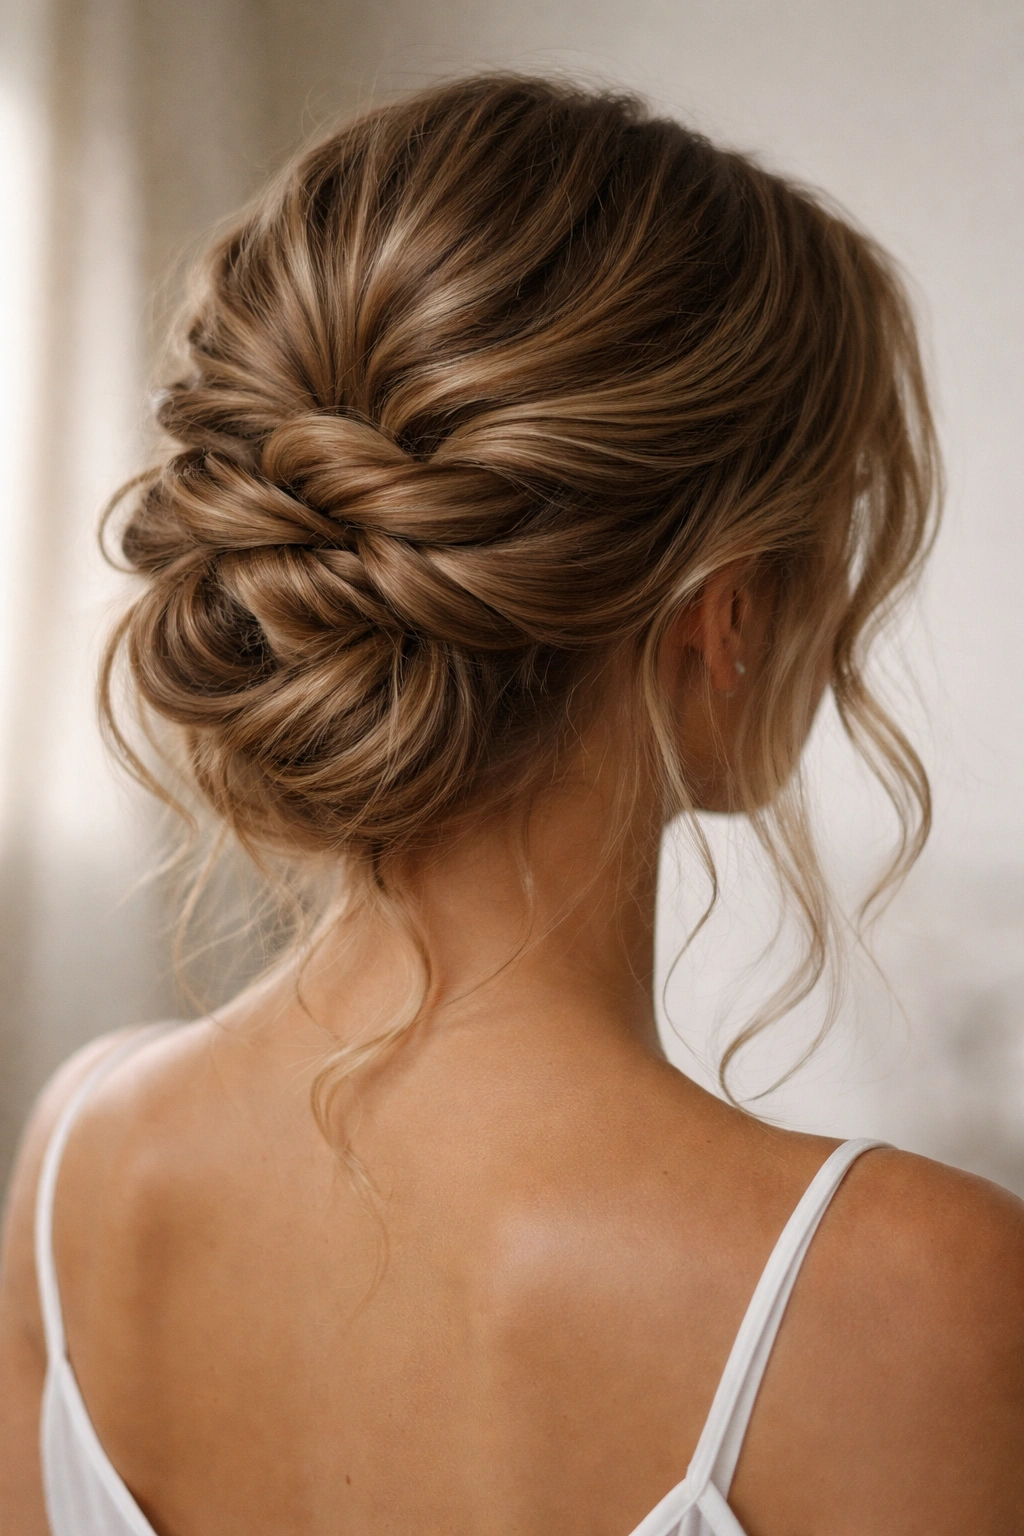
2. Low Textured Ponytail with a Twisted Crown
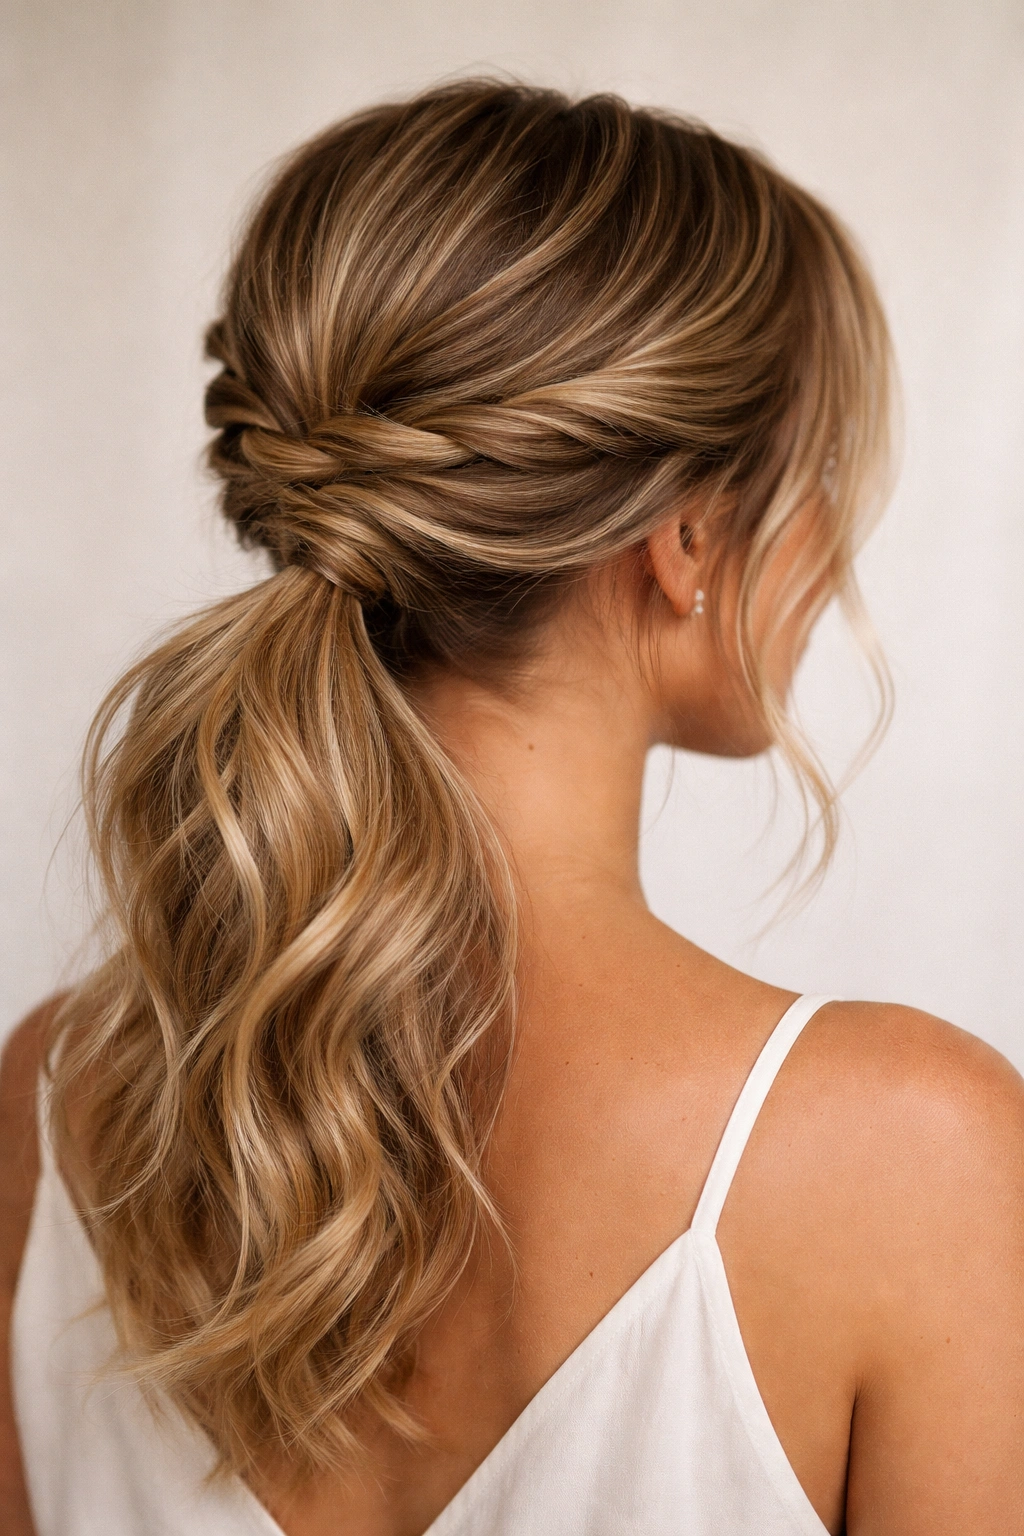
This is the updo that works everywhere—work, dinner, weekend errands, casual dates. You’re creating a low ponytail at the nape of your neck, but the trick is the crown detail. Before ponytailing, take a two-inch section from one side of your hair, twist it loosely, and wrap it around the top of where your ponytail sits, pinning it underneath to create the illusion of a twisted crown.
What Makes This Effortlessly Chic
The twisted crown adds enough intentionality that you look put-together, but the low placement and relaxed ponytail keep it approachable. It’s the updo equivalent of rolled-up jeans and a nice shirt—casual enough for daily wear but styled enough that it looks intentional.
How to Execute It
- Brush hair gently and create a deep side part
- Take a 2-inch section from the deeper side of the part and loosely twist it toward the back of your head
- Gather the rest of your hair into a low ponytail at the nape of your neck
- Wrap the twisted section around the base of the ponytail and secure with bobby pins underneath
- Leave a few wispy pieces around your face and at the nape for softness
- If your waves are loose, you can curl the ends of the ponytail with a curling iron for extra dimension
Worth knowing: This style works best when you skip the brush-through and let your waves sit naturally for an hour or two before styling.
3. Half-Up with Braided Sections
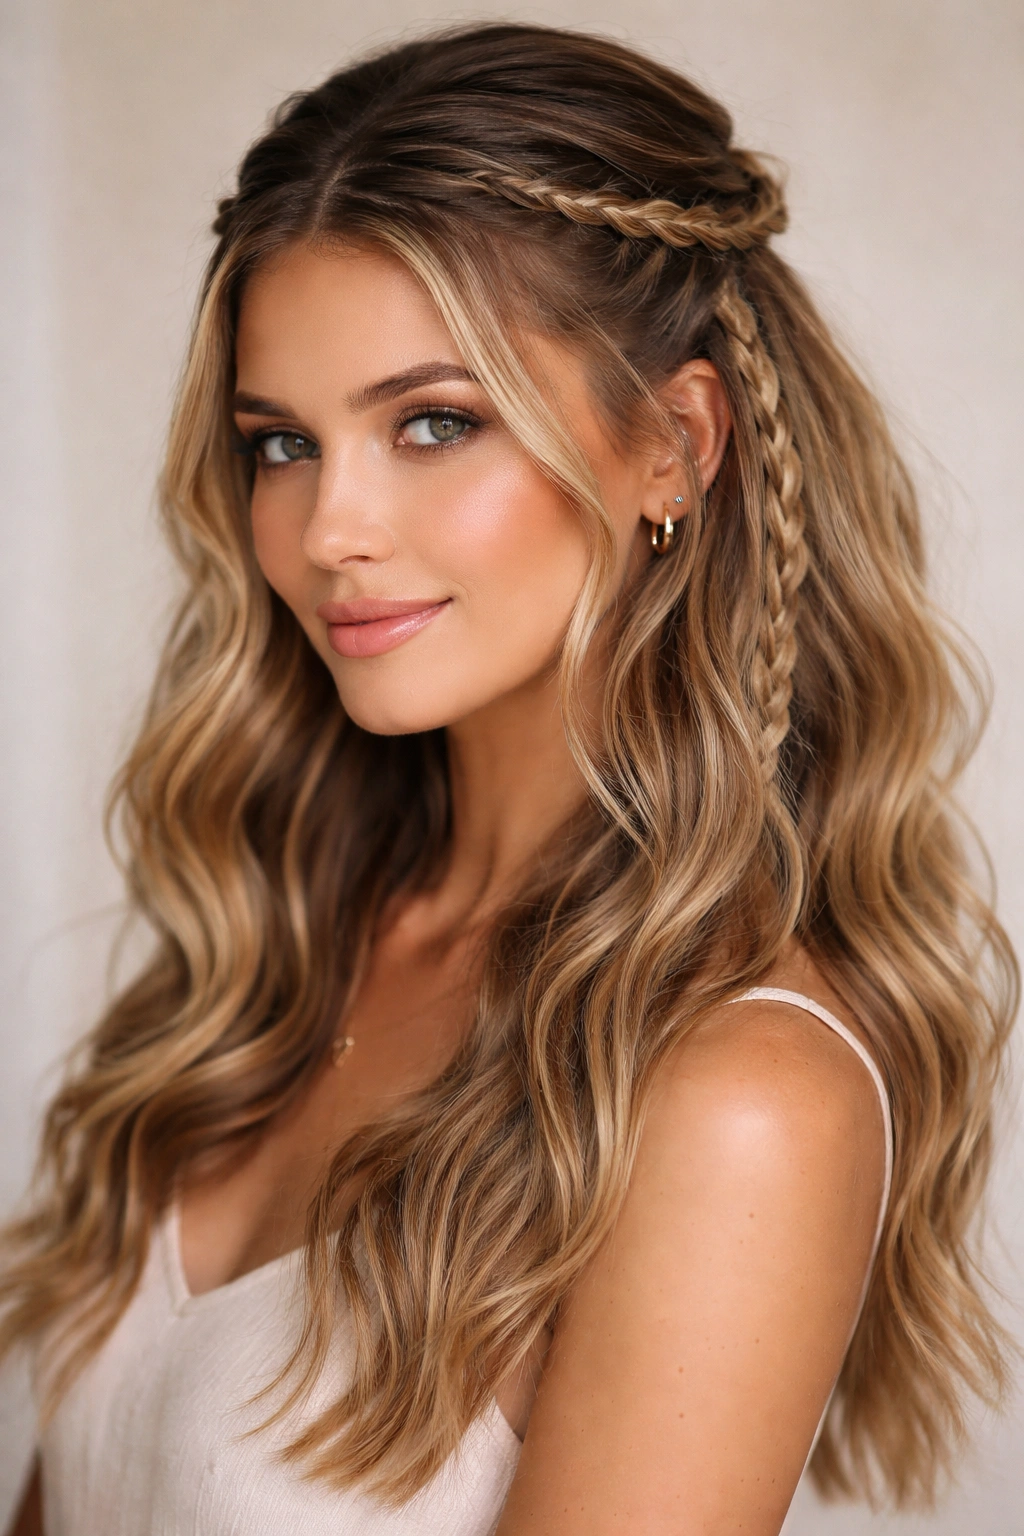
This sits in that perfect middle ground between down and up—formal enough for occasions when you want some commitment, but casual enough for everyday wear. Braid a 1-inch section on each side of your head, then gather those braids plus some additional hair at the crown and secure with an elastic. The braids frame your face while the loose waves below your ears maintain softness.
Why Waves Make This Look Richer
When you braid wavy hair, the braid isn’t perfectly smooth—it captures the waves and integrates them, creating a complex, textured look that’s way more interesting than braiding straight hair. The waves feed movement into the braids instead of the braids looking like rigid ropes.
How to Execute It
- Create a deep side part and brush the hair gently
- Starting from one side near your temple, braid a small 1-inch section downward toward the back of your head
- Repeat on the opposite side—both braids should angle toward the nape
- Gather the two braids together with some loose hair from the crown section
- Secure with a clear elastic, leaving the bottom half of your hair down and wavy
- Release a few pieces around your face for a softer frame
Pro tip: Tease the section of hair where you’ll secure the elastic before putting the elastic in—this gives you a better grip and helps the updo last longer.
4. Messy Bun with Undone Texture
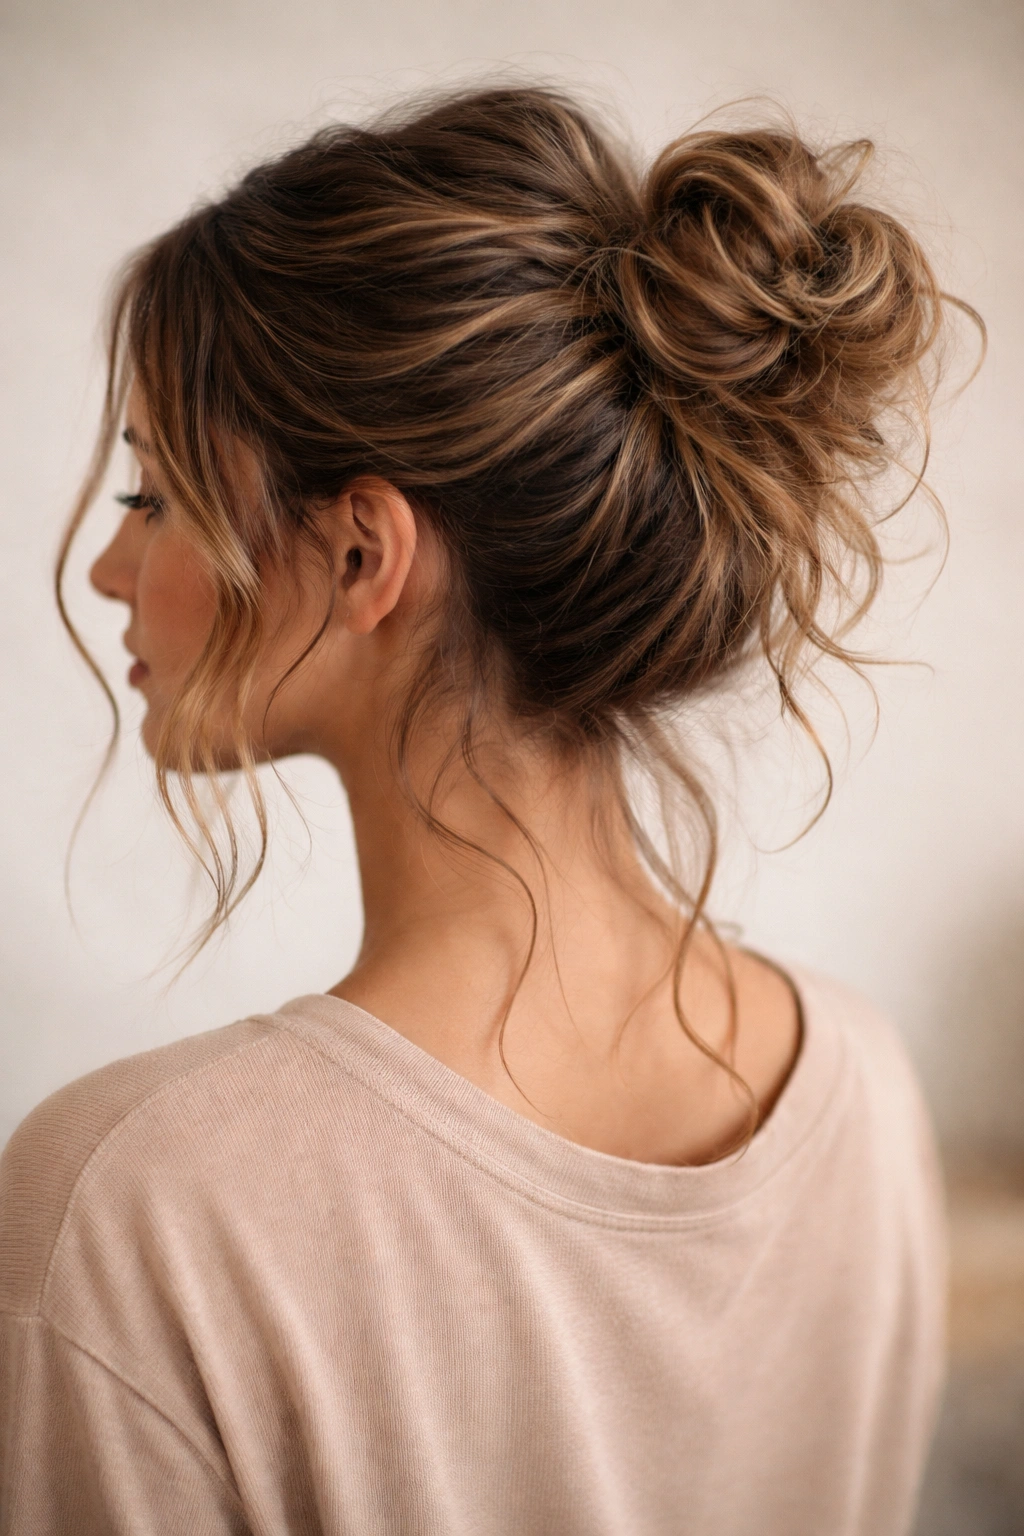
This is the “I didn’t try that hard but somehow look pulled together” updo that everyone secretly loves. Gather your hair into a high or mid-level ponytail, twist it loosely, wrap it into a bun, and deliberately leave it slightly undone—some pieces sticking out, some sections tighter than others, the whole effect deliberately imperfect.
The Beauty of Messy on Wavy Hair
Straight hair has to work to look messy and intentional; it’s easy to just look like your bun fell apart. Wavy hair’s natural texture is the messiness, so when you intentionally leave pieces loose and let your waves escape the bun, it reads as “I styled this way on purpose” rather than “my hair situation is out of control.”
How to Execute It
- Apply a light texturizing spray or sea salt spray to damp or dry waves
- Create a ponytail at your desired height (high and playful, or lower and sophisticated)
- Twist the ponytail loosely around your finger and tuck the ends into the elastic
- Use bobby pins to secure the bun, leaving wisps intentionally loose around the crown
- Gently tug and pull different sections of the bun to add volume and texture
- Shake your head gently so pieces fall where they naturally want to fall
Worth knowing: The better your texture spray, the better this style holds. A good sea salt spray will grip your waves and keep everything in place for hours without needing to be soaking wet.
5. Side Sweep with Tucked Waves
Imagine all your hair swept to one side, with the back and underside neatly tucked, while the top waves are left flowing and visible from the front. You’re creating an asymmetrical updo that’s sophisticated without looking stiff. This works beautifully on wavy hair because the waves visible from the front are doing all the visual work—they don’t need to be perfect, they need to be textured.
Why This Reads As Elevated
Side-swept updos automatically feel more formal and intentional than center-parted styles. There’s something about the asymmetry that reads as “this person has somewhere important to be.” Combined with wavy texture, it looks effortless-but-intentional rather than overdone.
How to Execute It
- Create a deep side part and brush hair smoothly to one side
- Gather the smaller side of hair back and twist it, tucking the twist beneath the main body of hair
- Secure with bobby pins underneath the visible waves
- Clip or pin the larger side of hair at the nape, creating a low twisted knot or wrap
- Leave the top and front waves visible and arranged over your shoulder
- Smooth with light hairspray to keep pieces in place without flattening waves
Pro tip: Blow-dry your waves with your head tilted to one side the day of to encourage them to fall naturally in that direction.
6. Double Twisted Crown Bun
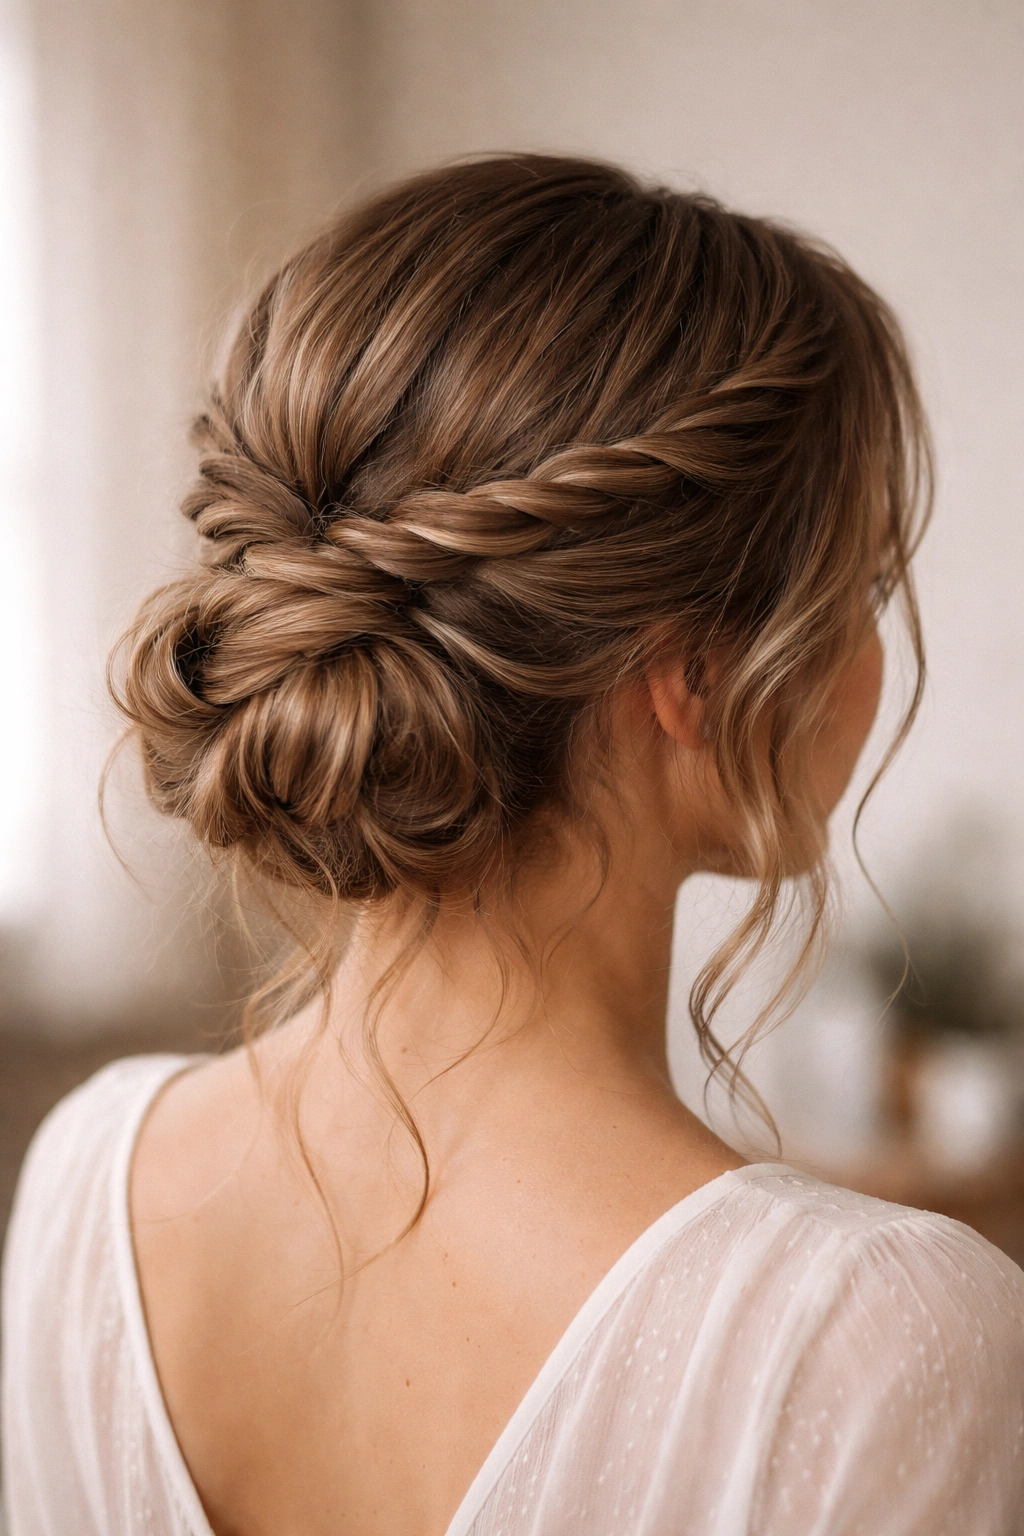
This is a step up in effort but absolutely worth it for special occasions. Create two thin twisted sections—one starting from each side of your head—and wrap both around your head like a crown, then gather everything into a bun at the back. The crown detail adds visual interest and makes a simple bun look significantly more styled.
What Makes This Stand Out
The double crown creates dimension and complexity that reads as intentional styling. It’s the kind of detail that makes people ask “how did you do that?” even though it’s simpler than it looks.
How to Execute It
- Create a side part and brush hair smoothly
- Take a 1-inch section from one side near your temple and twist it loosely toward the back of your head
- Repeat on the other side, with the second twist moving toward the back from the opposite direction
- Let both twists meet at the back of your head and secure together with bobby pins
- Gather all remaining hair into a low ponytail and create a bun shape
- Wrap the bun with the twisted crown still intact and secure everything with pins
- Gently release some texture from the twists and the bun for added dimension
Worth knowing: Practice this with damp or slightly product-dampened waves first—they hold the twist shape better than completely dry hair.
7. Romantic Braided Updo with Loose Tendrils
This is the updo for weddings, anniversaries, or any time you want to look genuinely romantic. Create one or two braids starting from the sides, gather them at the back with loose hair, and secure into a soft bun or twisted knot. Leave multiple pieces loose around your face and nape—these tendrils soften the entire look and add movement.
Why This Feels Special on Wavy Hair
The waves in your tendrils catch light differently than straight tendrils do, creating a more dynamic, romantic effect. The braids integrate your wave pattern instead of fighting it, and the loose pieces move and flow naturally instead of falling flat.
How to Execute It
- Brush hair gently and create a center or deep side part
- Starting from one side, braid a section loosely down toward the back of your head
- Repeat on the opposite side if desired (one or two braids both work beautifully)
- Gather both braids plus some additional loose hair at the nape
- Secure with an elastic and create a soft bun or twisted knot with the gathered section
- Leave 6-8 pieces around your face, temples, and nape completely loose
- Curl the loose pieces with a curling iron for enhanced softness and movement
Pro tip: Spray the finished updo with holding spray that’s flexible, not crunchy—you want the tendrils to move gracefully, not stick in place.
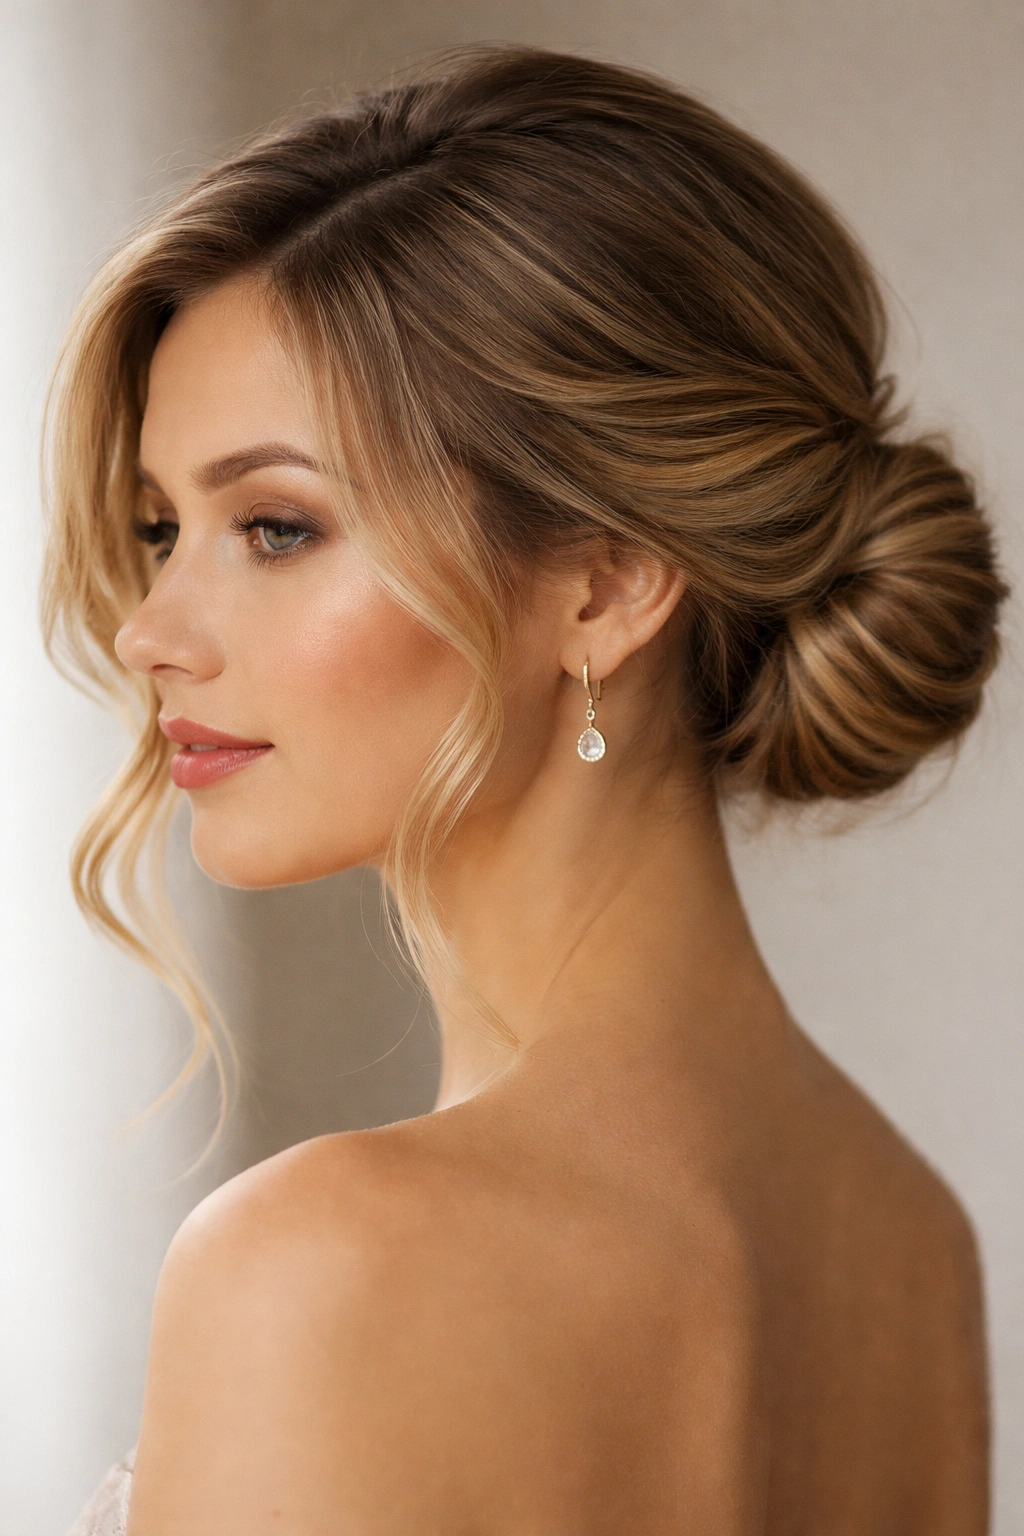
8. The Sleek Low Knot with a Subtle Texture
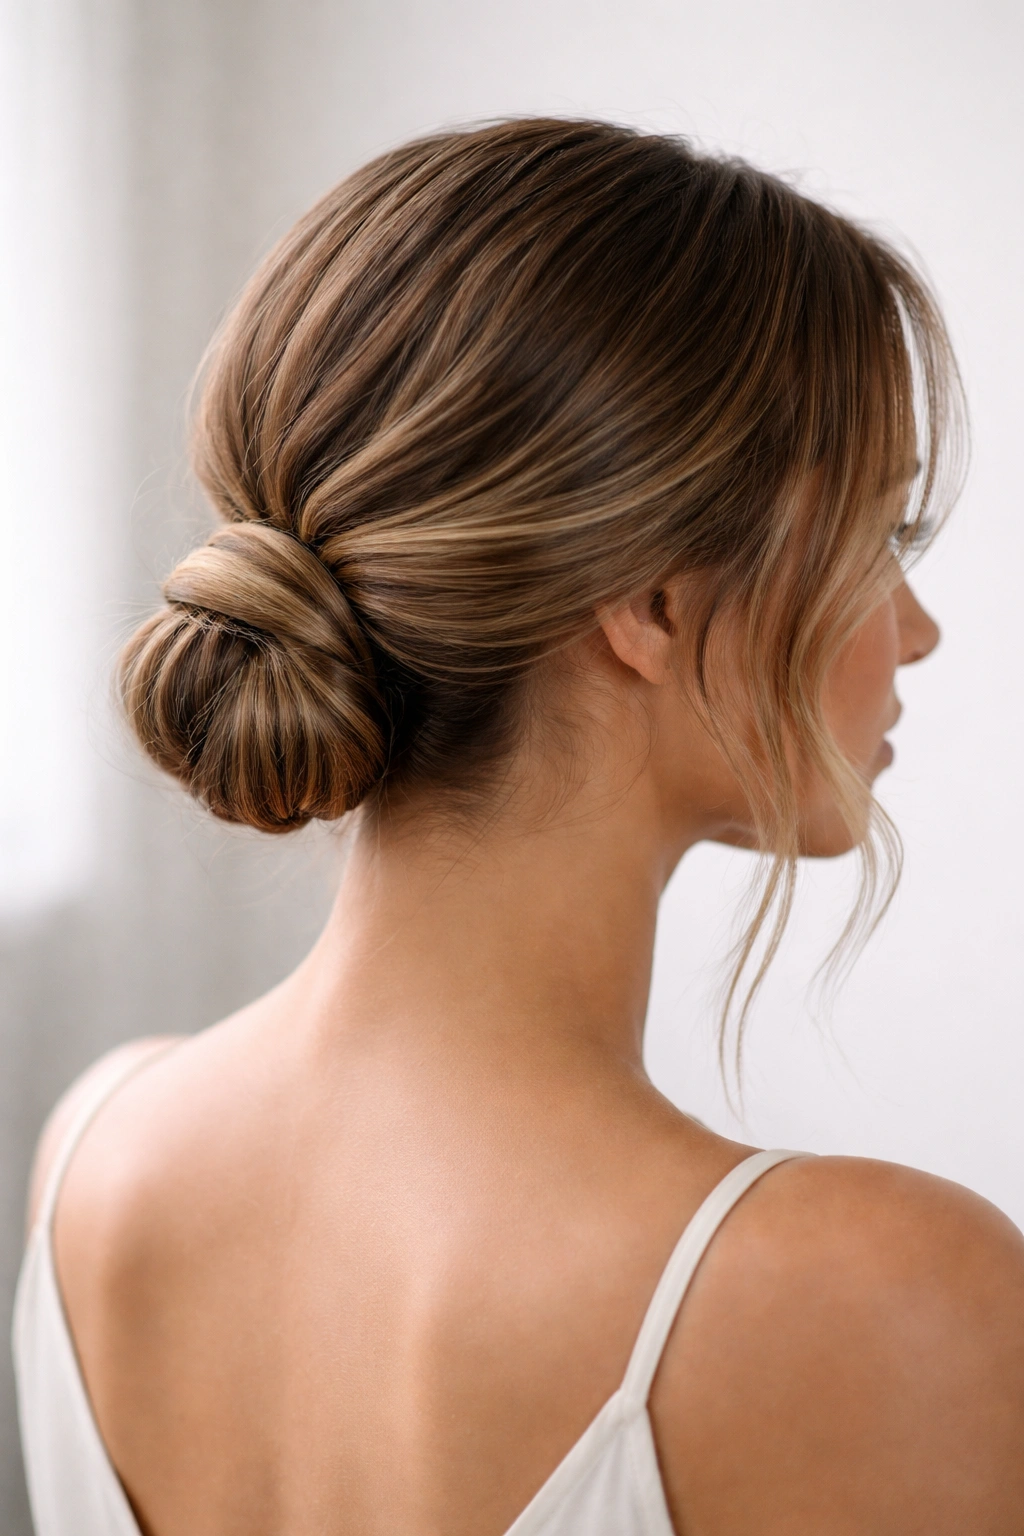
When you want polish and sophistication, sleek matters. But you don’t have to completely straighten your waves to achieve sleekness. Create a low knot using smoothing cream or gel to tame your waves into a neat shape, but don’t eliminate the texture entirely—keep just enough wave to prevent the “I used an iron” look that screams “my hair has been tortured.”
How to Make Sleek Work for Wavy Hair
Trying to make waves look completely straight is fighting your hair’s nature. Instead, smooth them into submission while preserving their texture, and the result looks intentional and sophisticated rather than like you’re trying to be something you’re not.
How to Execute It
- Apply smoothing cream or gel to damp hair and blow-dry with a round brush for a sleek-but-textured finish
- Create a low ponytail at the nape of your neck
- Twist the ponytail loosely and wrap it into a knot, securing with bobby pins
- Use a fine-tooth comb or smoothing brush to tame any flyaways
- Set with flexible-hold hairspray that won’t make the knot look stiff or crunchy
Worth knowing: This style works beautifully with pieces of jewelry like hair clips or decorative pins at the base of the knot, adding visual interest without requiring additional styling effort.
9. Textured Ponytail with Wrapped Base Detail
A mid-height ponytail with a wrapped base detail is the daily updo that somehow looks like you tried harder than you did. Gather your hair into a ponytail, then take a thin section from the ponytail itself and wrap it around the elastic at the base multiple times, securing the end with bobby pins underneath. This wrapping hides the elastic and creates a professional, intentional look.
Why Wrapping the Base Changes Everything
That elastic visibility is what makes a ponytail look unfinished. Wrapping it transforms the entire style from “I threw my hair in a ponytail in 30 seconds” to “I styled my ponytail intentionally.” It’s one of those small details that completely shifts how polished the look feels.
How to Execute It
- Gather hair into a clean, textured ponytail at your desired height
- Take a thin 1-inch section from the underside of the ponytail
- Wrap this section tightly around the elastic, covering it completely
- Tuck the end underneath and secure with a small bobby pin, hidden by the wrapping
- Leave a few face-framing pieces loose around your temples
- Curve the ponytail slightly at the end with a curling iron if desired for a softer finish
Pro tip: The thinner your wrapping section, the neater the final wrapped look. Don’t grab a huge chunk of hair to wrap—an inch or so is perfect.
10. Twisted Double Bun (Space Buns with Texture)
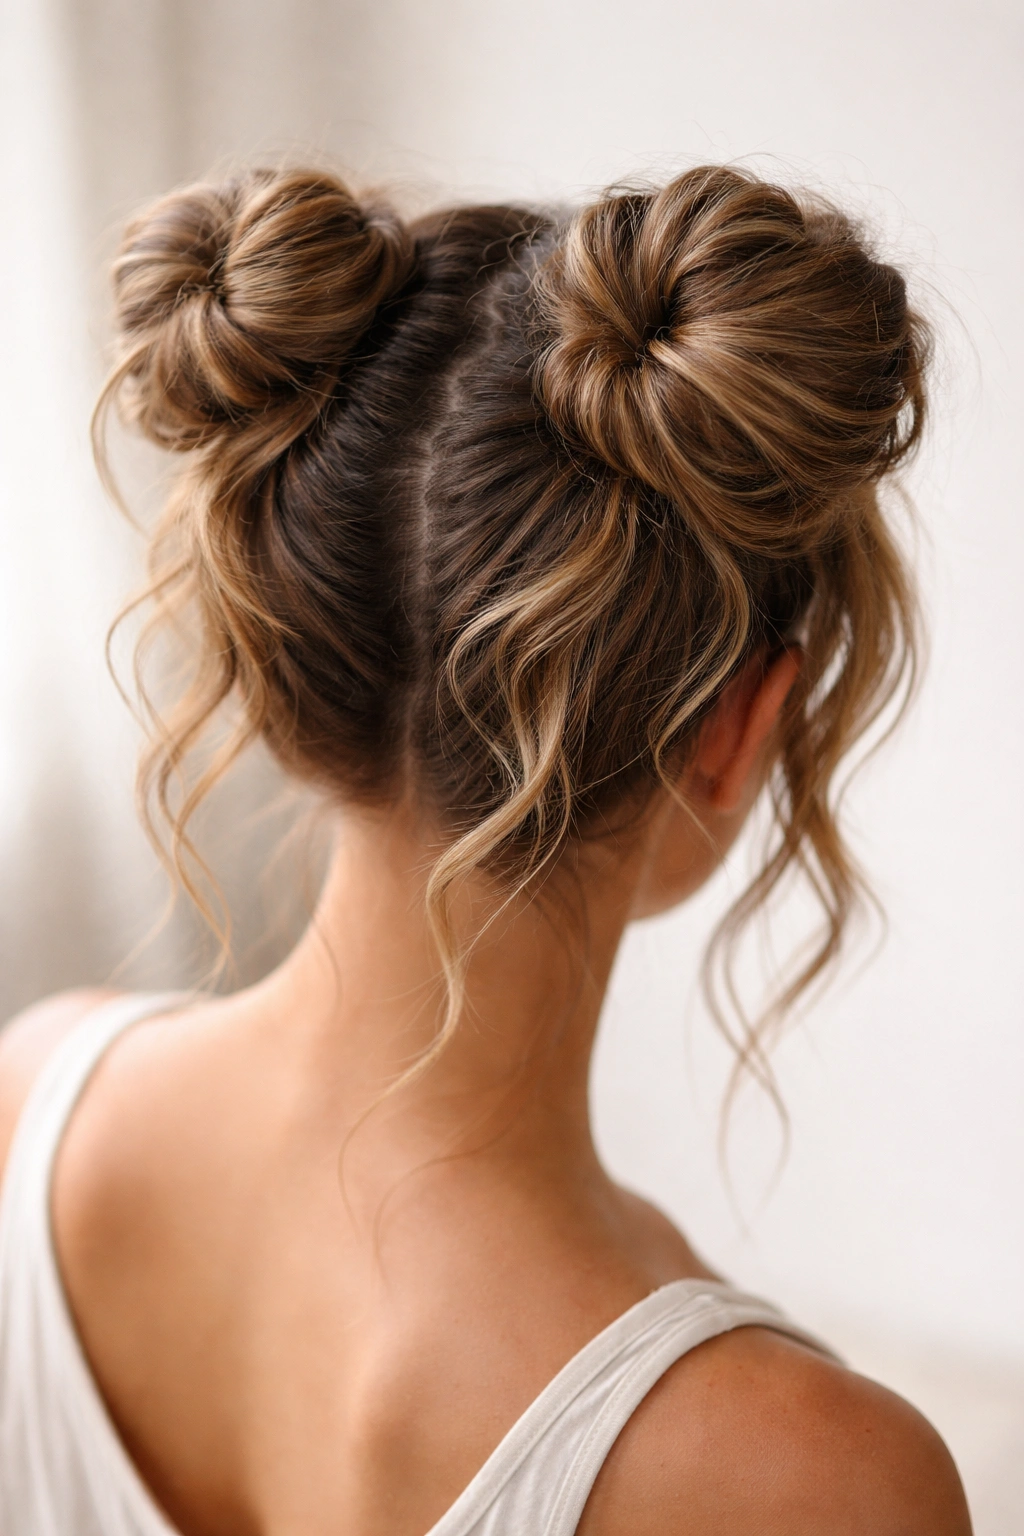
Double buns get a bad rap for looking juvenile, but when you style them on wavy hair with intentionality, they absolutely read as playful-yet-sophisticated. Create two sections at the crown, twist each one, and wrap into knots on either side of your head. The key is positioning them correctly and leaving texture intentionally loose—this isn’t about tight, perfect buns.
Making Double Buns Look Intentional
The difference between “oops, I styled my hair like I’m 12” and “I intentionally chose a playful style” is texture and placement. Higher, looser buns with visible waves, positioned at the crown rather than directly on top, read as intentional. Lower placement, near the back of the head, also reads as more adult and sophisticated.
How to Execute It
- Create a center part and divide hair into two equal sections
- Gather each section into a high ponytail on either side of the crown
- Twist each ponytail loosely and wrap into a knot, securing with bobby pins
- Gently pull out sections of each knot to add texture and volume
- Leave wisps loose around your face and neck
- Position the buns slightly lower and more toward the back of your head for a grown-up vibe
Worth knowing: This style works beautifully for casual Fridays, weekend plans, or any time you want something playful that still looks intentional.
11. Wrapped Low Ponytail with Decorative Clip
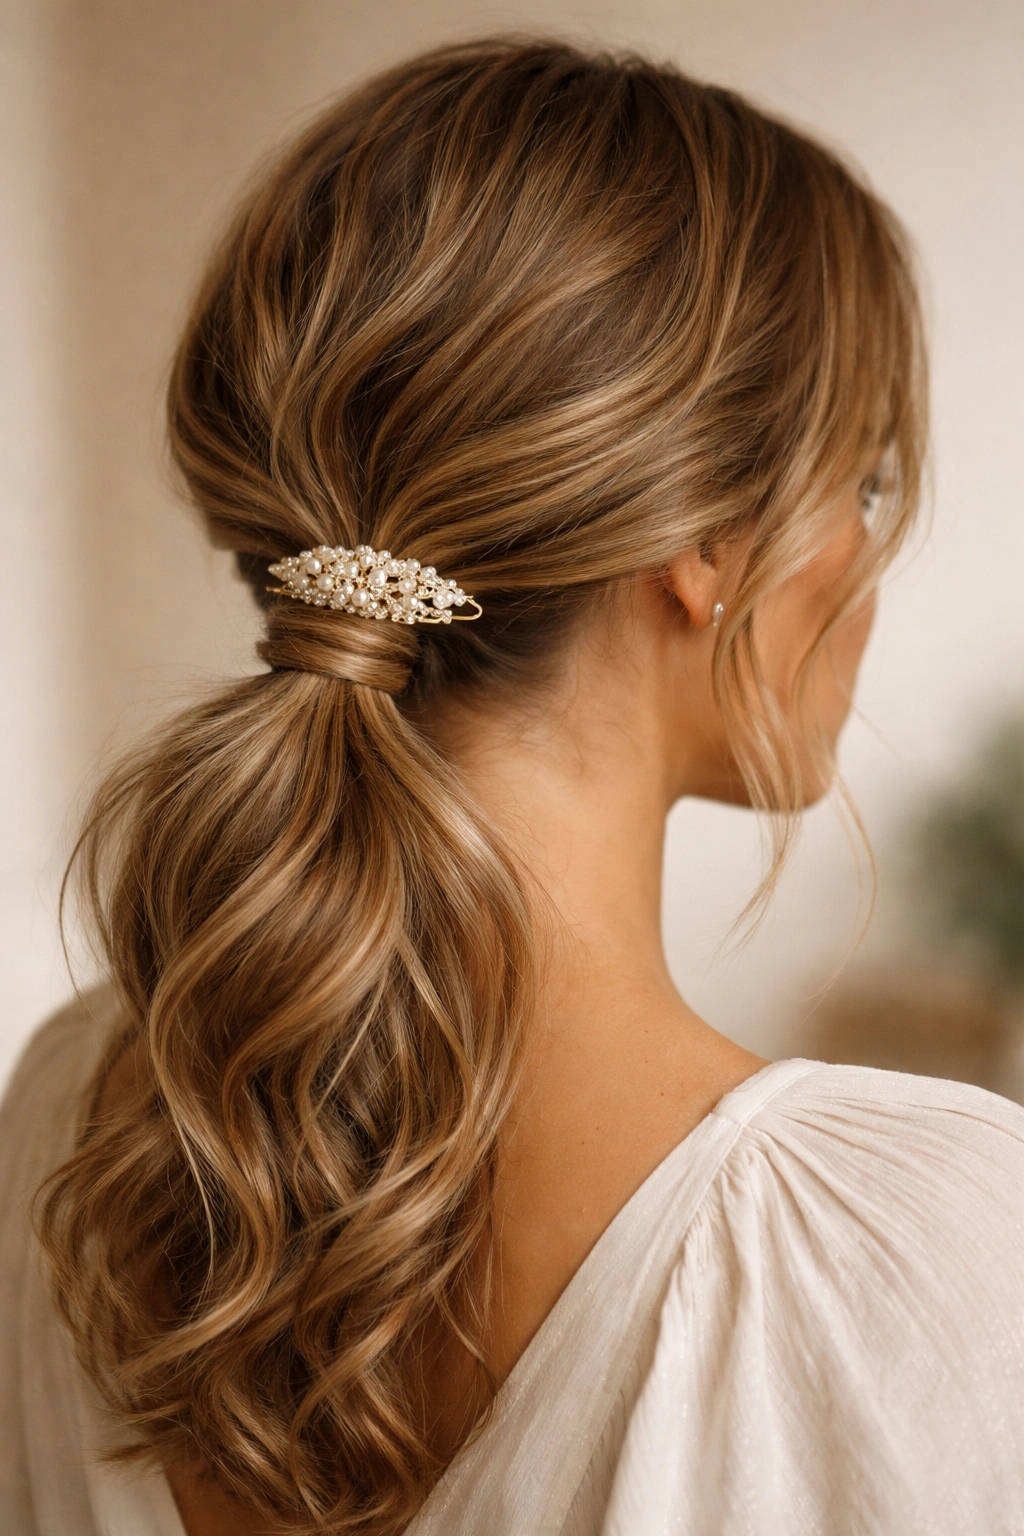
Sometimes the simplest styles are the most flattering. A low ponytail with a wrapped base detail is the foundation, but the addition of a decorative clip transforms it into something special. You’re not adding complexity, you’re just adding a visual focal point—a claw clip, a pearl clip, or anything else that coordinates with your outfit.
Why Accessories Make All the Difference
A plain ponytail is functional. A wrapped ponytail with a decorative clip says you thought about your appearance and chose something intentional. It’s the accessory equivalent of jewelry—it doesn’t require more styling effort, just one additional element.
How to Execute It
- Create a low ponytail at the nape of your neck, leaving a few pieces loose around your face
- Take a thin section from the ponytail and wrap it around the elastic, securing underneath with a bobby pin
- Position a decorative clip just above the wrapped base, securing it into the ponytail itself
- Make sure the clip sits at a slight angle for a more modern, intentional look
- Leave the ponytail loose and wavy below the clip
Pro tip: Matte or tortoiseshell clips look more sophisticated than shiny, reflective ones. Choose materials and colors that complement your hair and outfit.
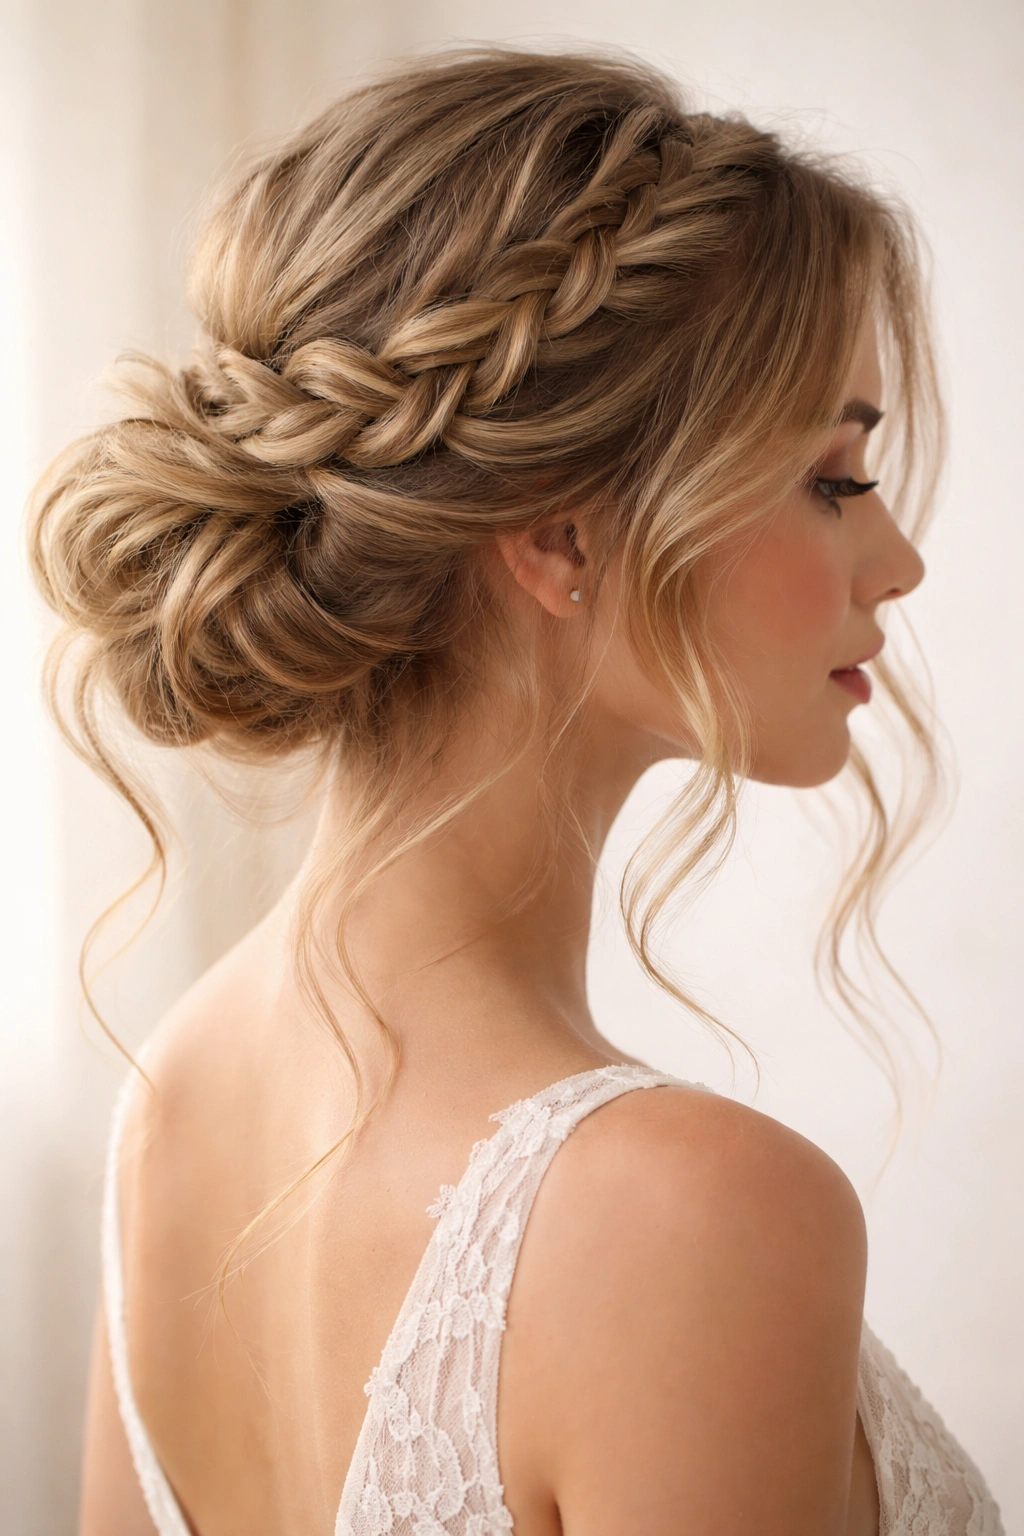
12. Braided Crown with Center Part and Loose Waves
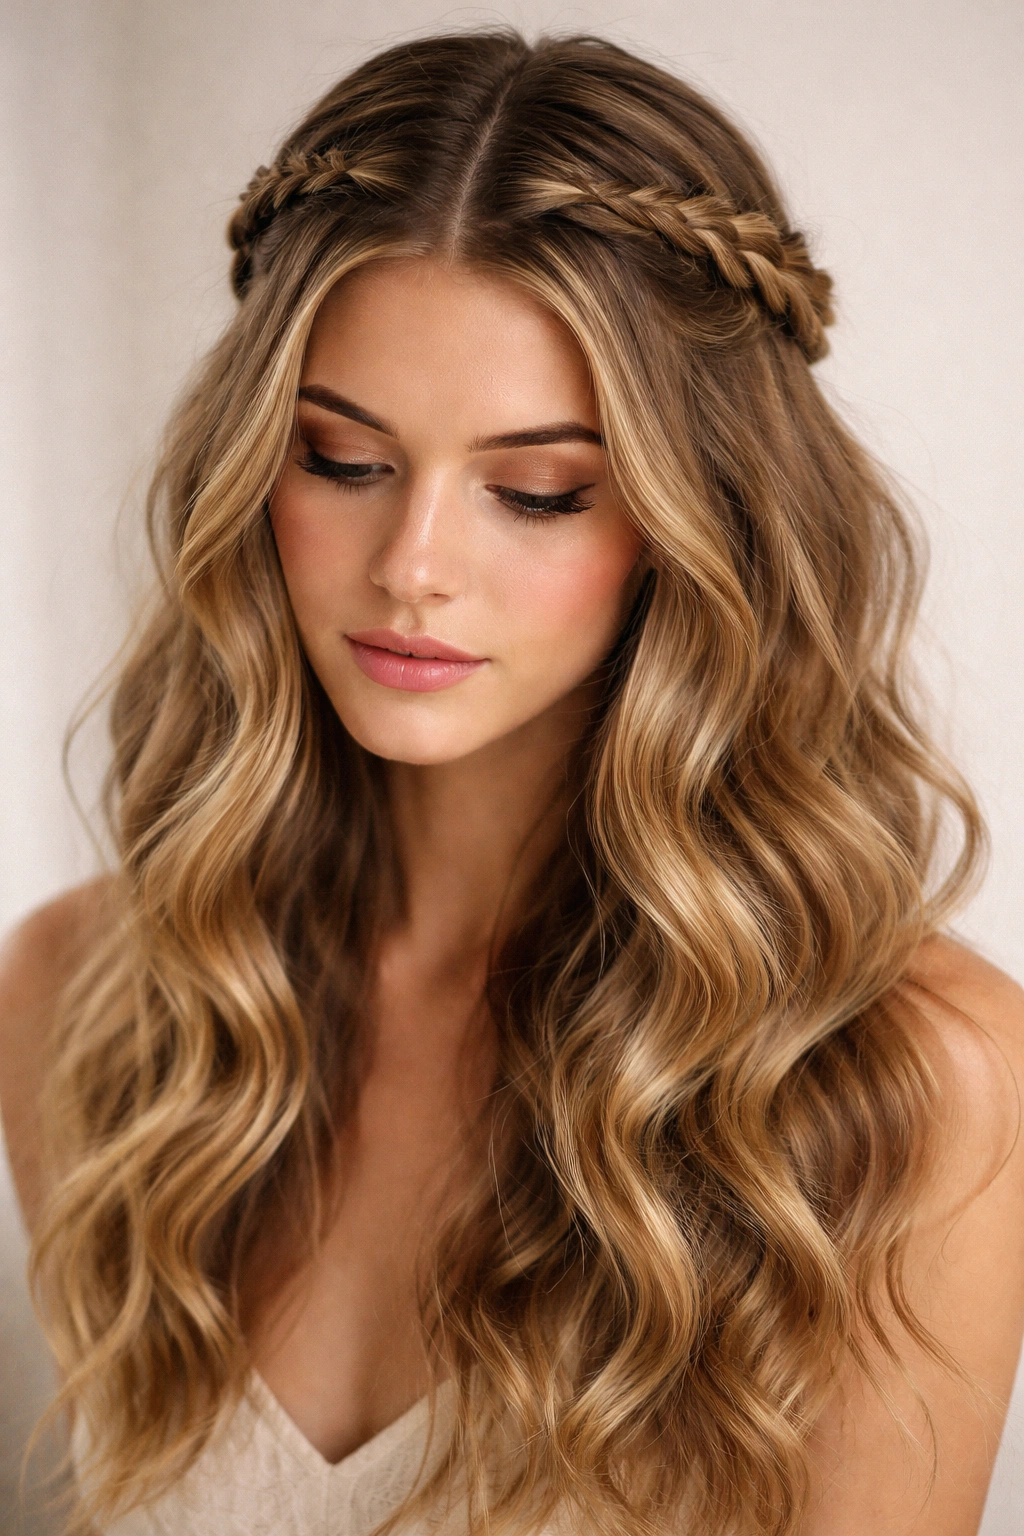
This is a gentler, more romantic version of the crown braid. Instead of tiny rope-like braids, create loose, thicker braids that follow the crown of your head from one side to the other, then secure them at the back. This creates the effect of a crown while maintaining the softness of your waves and leaving your hair mostly down.
What Makes This Flattering on Every Face Shape
Crown braids draw the eye upward and create a frame for your face. On wavy hair, the loose braid texture softens the effect, making it flattering regardless of face shape. This isn’t a hairstyle that works only if you have a specific face shape—it works beautifully on everyone.
How to Execute It
- Create a center or deep side part
- Starting from one temple, create a loose braid that follows the curve of your head toward the opposite ear
- The braid should sit in the upper crown area, not too low on the side
- Secure the end of the braid at the back of your head with bobby pins
- Leave all other hair down and wavy, cascading below the braid
- Gently tug and loosen the braid for a softer, more romantic appearance
Worth knowing: This style looks especially beautiful with face-framing pieces left loose around your temples and cheekbones.
13. Half-Up Twisted Knot with Textured Volume
A half-up style where the top section is twisted into a knot creates visual interest without requiring much technical skill. Gather the top section of hair, twist it into a knot, secure it, and leave everything below untouched—your waves below will provide all the visual weight you need. This is the updo for days when you want to pull your hair back but not completely commit to an updo.
Why Half-Up Is the Goldilocks Zone
Fully down feels too loose if you’re trying to accomplish something; fully up can feel severe on your face. Half-up hits the middle ground—you’re showing intention without going full commitment. On wavy hair, the down portion adds volume and movement that prevents the updo from looking top-heavy.
How to Execute It
- Brush the top section of your hair gently, creating a slight elevation at the crown
- Twist this section loosely and wrap it into a small knot at the crown
- Secure the knot with bobby pins, making sure it feels secure but not painfully tight
- Leave the bottom half of your hair completely down and wavy
- Add face-framing pieces by gently releasing a small section on each side before twisting
Pro tip: Tease the crown section slightly before twisting the knot—this gives you more volume and makes the knot appear fuller and more intentional.
14. Low Side Bun with Pinned Waves
A low side bun positioned near your ear, with the waves in front remaining visible and intentionally pinned in place, creates an asymmetrical look that’s undeniably chic. You’re not hiding your waves; you’re showcasing them while keeping them neatly contained in the back and side.
Why This Reads as Modern and Intentional
Side buns have a directional quality—they’re inherently asymmetrical, which reads as more contemporary than a centered style. The visible waves in front add texture and movement, preventing the whole look from feeling dated or overly polished.
How to Execute It
- Create a deep side part and brush your hair to one side
- Gather the hair on the dominant side (the side with more hair) and twist it
- Move the twist to the back of your head and wrap it into a low bun
- Secure the bun with bobby pins, making sure it sits at your ear level
- Take the smaller side of hair and gently pin it back, creating a subtle wave frame around your face
- Use small bobby pins that match your hair color to secure the pinned waves, making them as invisible as possible
Worth knowing: This style works particularly well if you have longer hair, as the low bun placement and asymmetrical wave frame requires sufficient length.
15. Bubble Ponytail with Textured Sections
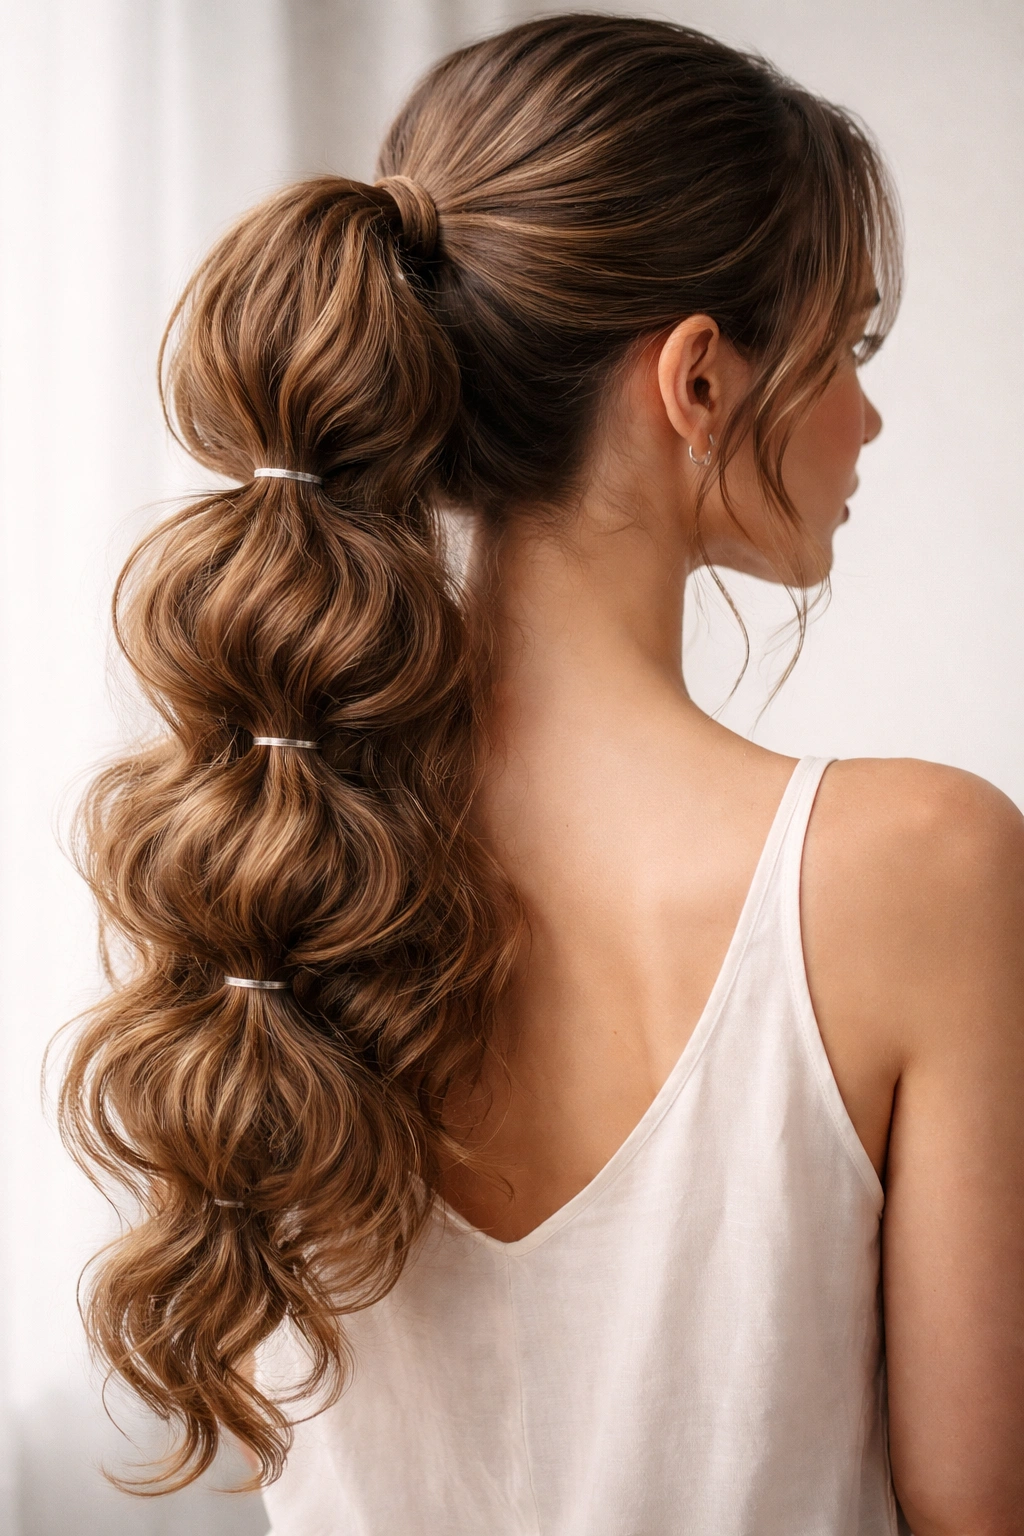
A bubble ponytail—where you create a ponytail and then divide it into sections with elastics, creating “bubbles” of hair between elastics—looks contemporary and playful on wavy hair. The waves fill in each bubble section with texture instead of looking thin and wispy like they might on straight hair.
Why Waves Make Bubble Ponytails Look Fuller
The dimension in your waves means each bubble section looks full and textured rather than like a thin strand of hair stretched between elastics. The bubbles have visual weight and presence instead of looking wispy or sparse.
How to Execute It
- Create a ponytail at your desired height with an elastic
- Secure a second elastic about 2-3 inches down from the first, creating the first bubble
- Continue adding elastics every 2-3 inches down the length of the ponytail
- Between each elastic, gently tug and pull the hair section outward to create bubble volume
- Loosen the sections enough that the bubbles are visible but the ponytail still feels secure
- Curl the end of the ponytail for a finished look
Pro tip: Use clear elastics that match your hair color—they’re less visible and make the bubbles read as intentional rather than makeshift.
16. Twisted Side Updo with Loose Face Frame
Imagine gathering your hair to one side, creating one or more twists, wrapping them into a knot or coil at the side of your head, and leaving substantial sections loose around your face and the opposite side. This creates an asymmetrical updo that feels romantic and soft, not severe.
Why Side Positioning Softens an Updo
A centered bun or knot can feel severe on the face; a side placement feels inherently softer and more romantic. Adding loose face-framing pieces amplifies that softness while the twisted detail adds sophistication.
How to Execute It
- Create a deep side part and brush your hair to one side
- Take 1-2 inch sections from the back and twist them loosely
- Gather the twists together and wrap them into a knot or coil at the side of your head (roughly ear level or slightly back)
- Secure the knot with bobby pins, making sure it feels stable
- Leave hair around your face completely loose and wavy—your entire bangs area, your temples, and one full side of your head
- The loose sections should cascade over your shoulder
Worth knowing: This style works best when you skip heat styling and let your natural waves do the work—the looser, more textured your waves, the more romantic the overall effect.
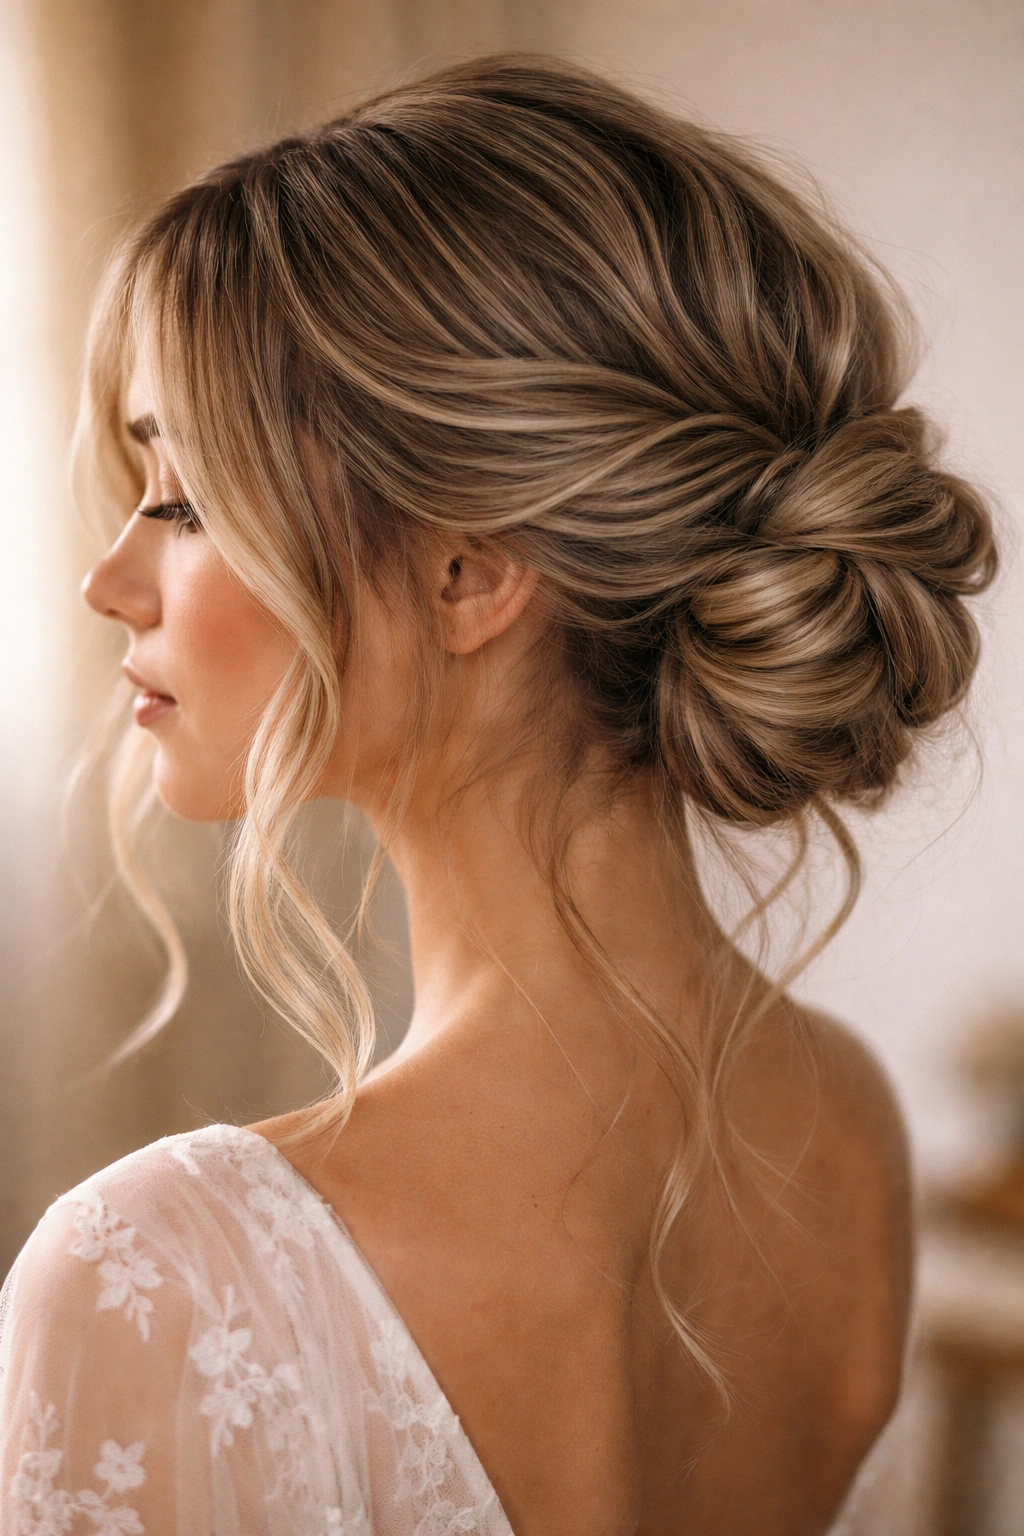
17. Neat Bun with Smooth Crown and Textured Ends
A polished bun doesn’t have to mean sacrificing all texture. Create a neat bun at the back of your head, smoothing the crown area for polish, but intentionally leave texture and looseness in the bun itself. This gives you the sophistication of a neat updo with the softness that wavy hair naturally provides.
Balancing Polish and Texture
The smoothed crown says “I styled this carefully”; the textured bun says “I’m not trying too hard.” Together, they create a balanced look that’s professional without being severe.
How to Execute It
- Apply smoothing cream to damp hair and blow-dry the crown smooth with a round brush
- Gather your hair into a low ponytail at the nape of your neck
- Create the bun by twisting the ponytail loosely and wrapping it into a knot shape
- Use bobby pins to secure the bun in place, allowing it to remain slightly textured and loose
- Smooth any flyaways around the crown with a fine-tooth comb
- Allow the bun itself to have visible texture and imperfection
Pro tip: Buns look neater and more polished when they sit low on your head, just above the nape of your neck.
18. Rope Twist Updo with Layered Volume
Create multiple loose rope twists—where you twist two thin sections of hair around each other rather than twisting a single section—and coil them around each other at the back of your head to create a layered, dimensional updo. This requires more technique but the result is the kind of textured updo that looks complex and intentional.
Why Rope Twists Add Visual Interest
Rope twists create visual complexity and texture without requiring braiding skill. The twisted sections catch light differently than smooth sections, creating dimension that reads as intentional styling.
How to Execute It
- Divide your hair into 2-3 sections, leaving some pieces loose around your face
- Take two thin subsections from the first section and twist them around each other, creating a rope twist
- Repeat with the second and third sections, creating multiple rope twists
- Gather all the rope twists together at the back of your head and coil them around each other
- Secure the coiled rope twists with bobby pins, allowing them to maintain visible texture
- Leave face-framing pieces completely loose
- Gently pull and loosen each rope twist for added volume and texture
Worth knowing: This style works best on hair with substantial texture or waves—loose waves hold rope twists more securely than straight hair does.
Final Thoughts
Wavy hair’s natural texture is your biggest asset when it comes to updos, not an obstacle to work around. Every single one of these styles takes advantage of what your hair naturally does—creating volume, holding shape, and moving with dimension. The key to choosing the right updo is matching the level of formality and intentionality to your occasion and mood, but honestly, almost every wavy-hair-friendly updo looks better the less “perfect” you try to make it.
The best updos on wavy hair tend to be the ones that respect your texture instead of fighting it. That means loosely twisted knots that maintain visible texture instead of sleek, pulled-tight styles. It means leaving face-framing pieces loose to move. It means using flexible-hold products that don’t crunch or stiffen your waves. When you work with your waves instead of against them, styling becomes faster, the results last longer, and honestly, the updos look more beautiful.