Wavy hair has a superpower that most people with straight or coily textures would envy: the ability to look effortlessly chic with almost zero effort. But here’s the thing — the length of your hair dramatically changes how that ease translates into style. Short wavy cuts are a completely different beast from their longer cousins, and when paired with air drying, they open up a world of texture that feels fresh, modern, and undeniably low-maintenance.
The reason short wavy hairstyles and air drying go together like salt and pepper comes down to physics and surface area. When you have less hair, your natural waves have an easier time forming and holding their shape without the weight dragging them down. Air drying, instead of being the chaotic tangle it might be with longer wavy hair, actually becomes your secret weapon. You’re not fighting against gravity for hours; you’re working with your hair’s natural texture to create volume, movement, and definition that took many of us years to achieve with blow dryers and styling products.
The catch is that short wavy cuts need to be cut right to air-dry beautifully. Layers matter. Texture matters. The angle of each cut matters. A poor cut will look limp or undefined when air-dried, while a well-executed short wavy style practically styles itself. If you’ve been hesitating about going shorter because you worried you’d lose your waves or gain styling responsibility, this is your sign to reconsider — the right cut can actually make your waves work harder for you while demanding less.
Let’s walk through the short wavy hairstyles that absolutely crush the air-dry game, with all the details you need to ask your stylist for the exact cut and understand exactly how to care for it once you get home.
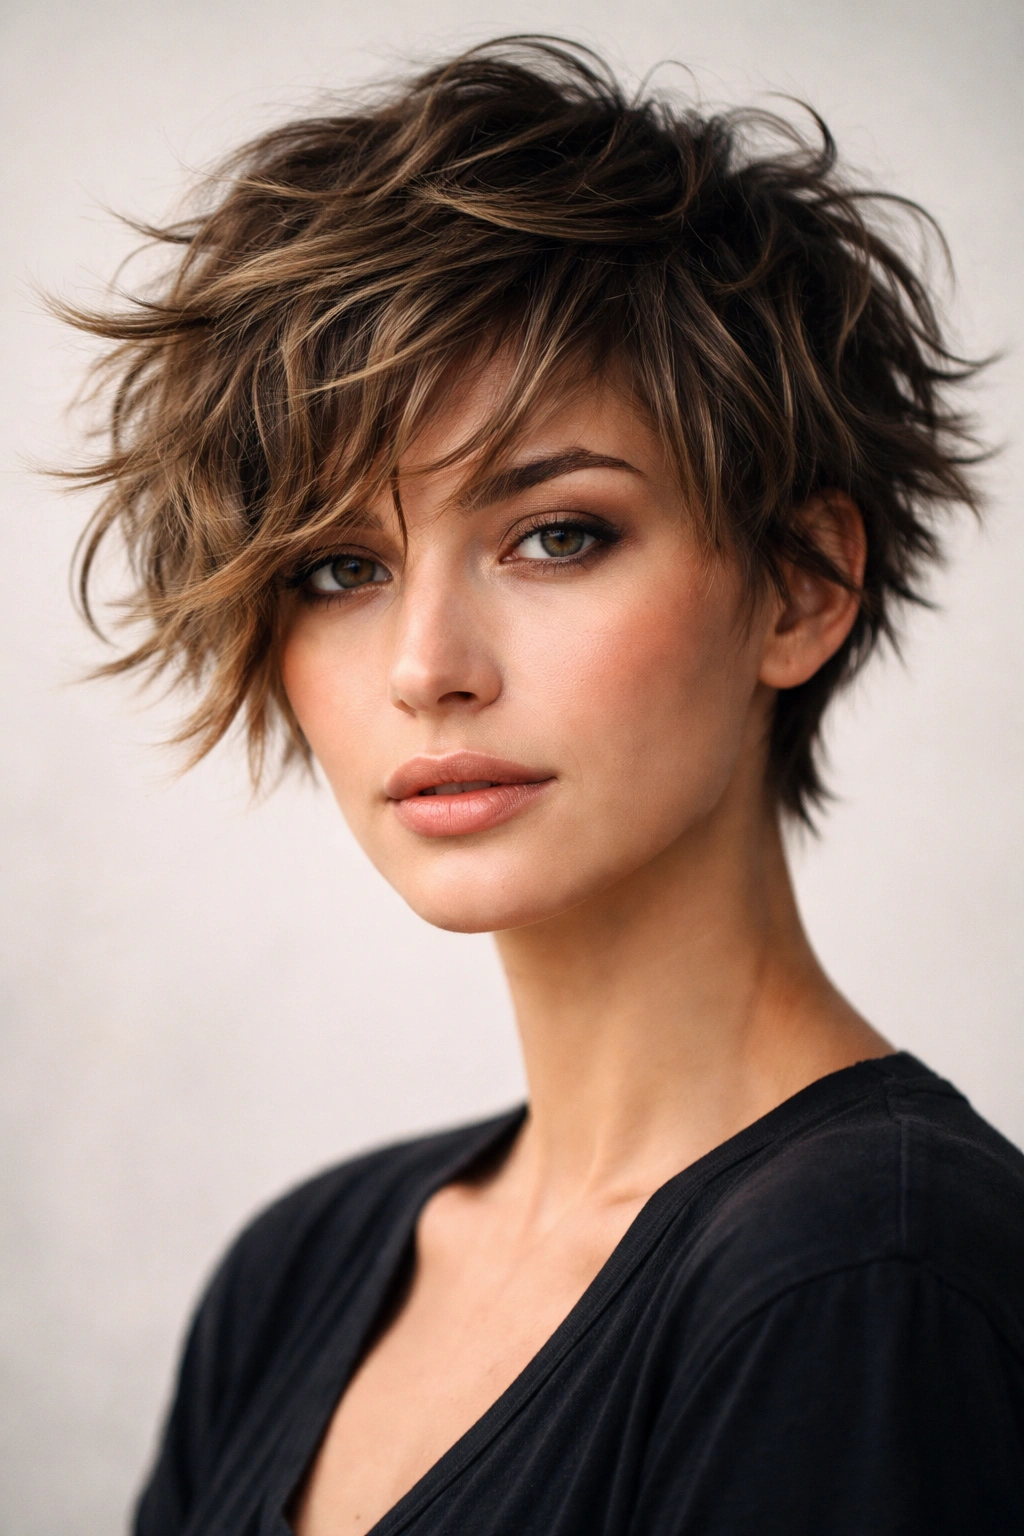
1. Textured Pixie with Waves
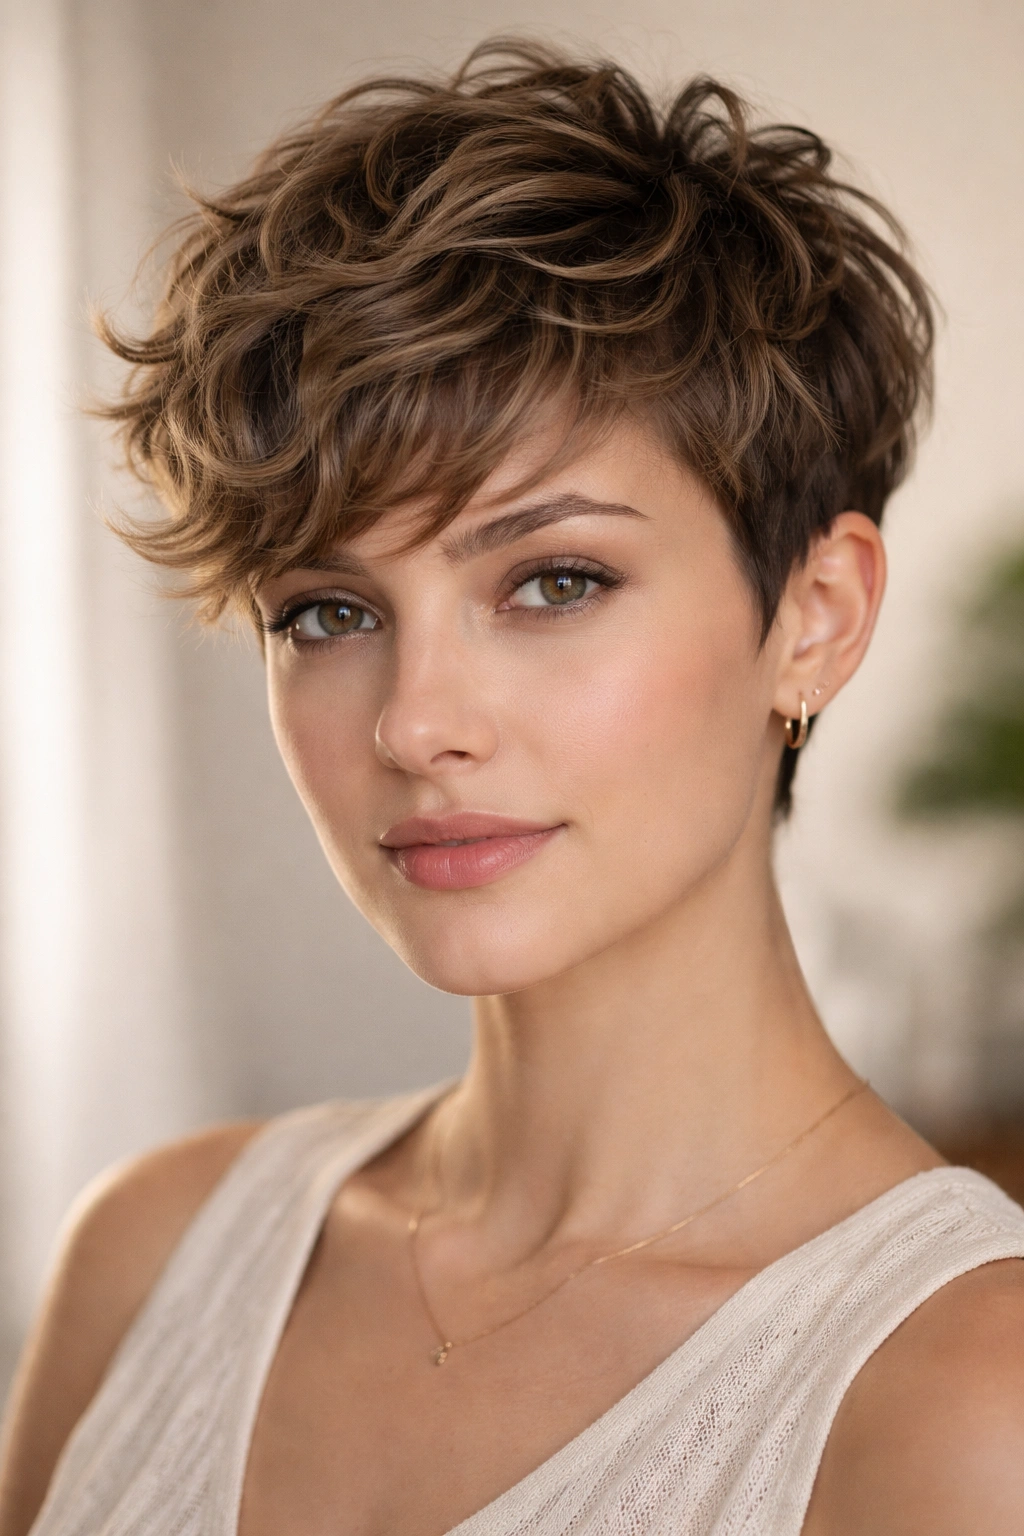
A pixie with wavy texture is the rebellious sibling of the sleek pixie cut. Instead of the geometric precision of a traditional pixie, a textured pixie embraces your natural wave and uses it as a design feature, not something to fight against. The sides are short and tapered, the back has a bit more length stacked for movement, and the top is longer and broken up with razor-cut layers that create individual texture rather than a uniform surface.
Why This Cut Works for Air Drying
A textured pixie is almost designed to air-dry. Because there’s so much of the cut happening at different lengths, air flows through your hair from multiple angles and activates the wave at each layer independently. You’re not trying to dry one dense block of hair; you’re drying a collection of shorter sections that naturally find their own texture and shape as they dry. The layering also means that any frizziness gets absorbed into the overall textured aesthetic rather than standing out as a flaw.
How to Style It for Air Drying
Start with damp hair right after your shower. Apply a lightweight curl cream or wave-defining mousse to the top and sides while your hair is still quite wet — this gives your waves something to hold onto as they dry. Use your fingers to gently encourage the wave and create a bit of height at the roots if that’s your preference. Let it air dry for 20-30 minutes without touching it much. Once it’s about 70% dry, you can gently tousle it with your fingers or use a loose fist to scrunch and add texture. The final result should look lived-in and slightly undone, never perfect or slicked.
What You Need to Know
- Maintenance required: A textured pixie needs a trim every 4-6 weeks to keep the layers looking intentional and the shape defined. As it grows out, it can start to look shaggy rather than textured.
- Best wave type: This cut works beautifully for naturally wavy to slightly curly hair. If your hair is very straight, you might need a bit of heat styling to activate the waves.
- Product essentials: A light mousse or wave cream is your main player here. Skip heavy oils or butters that will weigh down the delicate texture.
Pro tip: Sleep on damp hair with a silk pillowcase and you’ll wake up with naturally refreshed waves — no re-wetting required.
2. Tousled Shag Cut
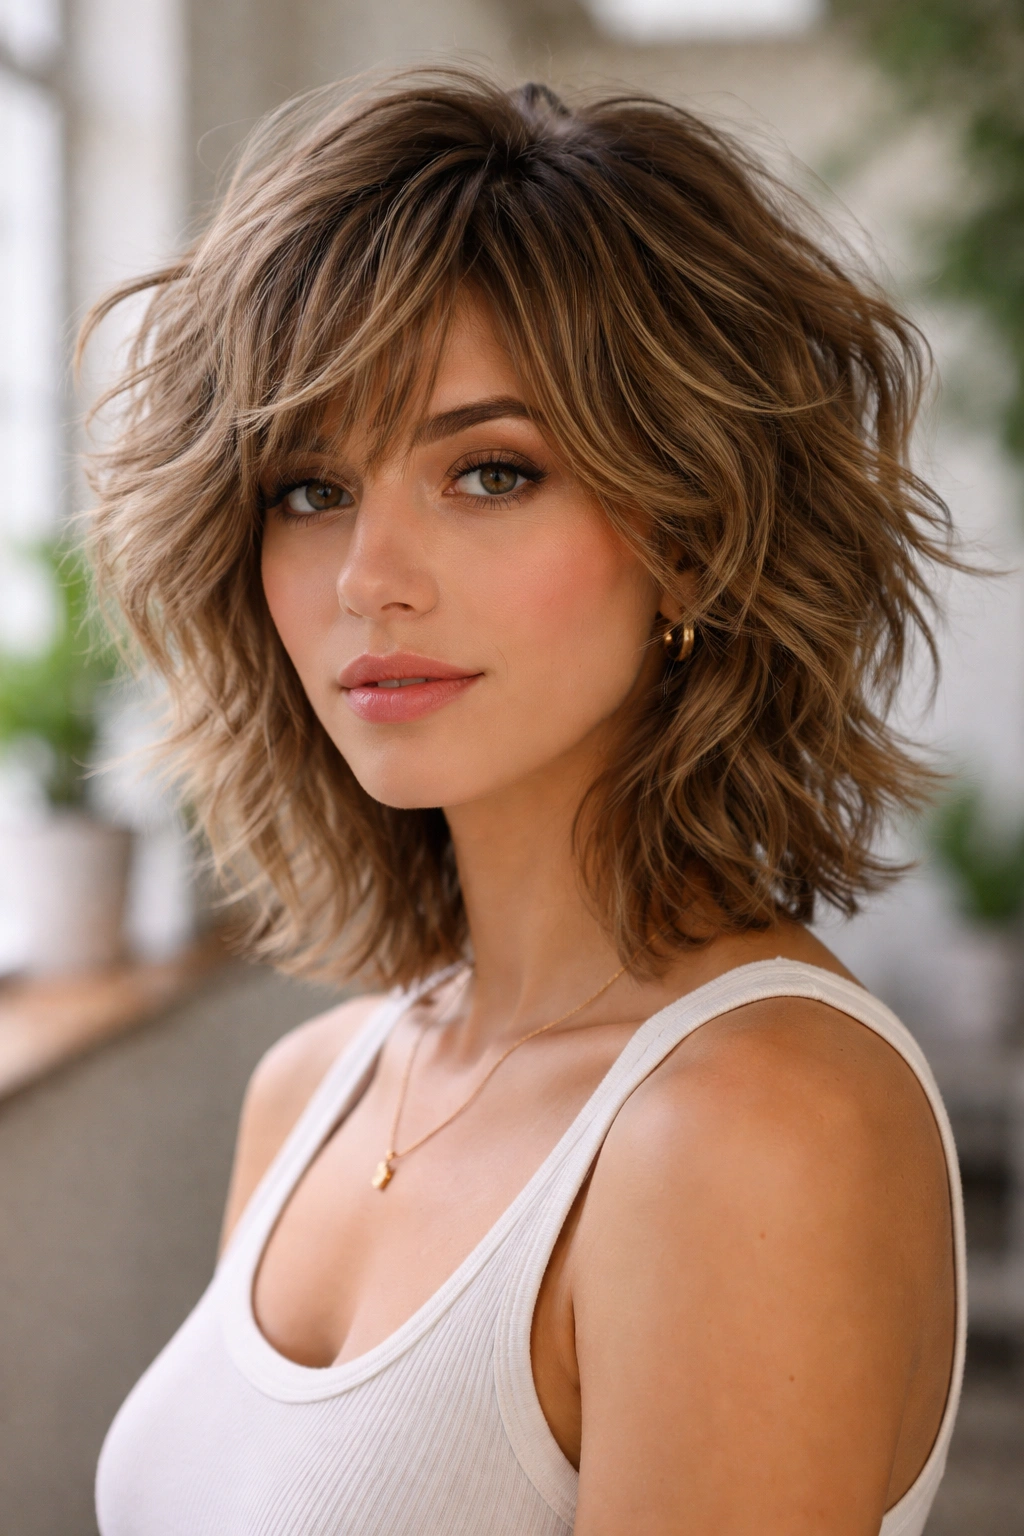
The shag is having a major moment, and for good reason. A modern shag cut for wavy hair is built on the foundation of strategic layering throughout, creating choppy texture and movement that practically begs to be air-dried. The crown has volume and lift, the layers throughout create internal texture, and the overall effect is edgy, cool, and somehow both effortless and intentional at once.
Why This Style Shines When Air-Dried
A shag cut is literally engineered for volume and movement. Every layer catches air independently, so as your hair dries, it’s developing texture and shape automatically. There’s no such thing as a flat shag — the cut itself prevents that. When you air-dry a shag, you get the exact shaggy, slightly wild aesthetic the cut is designed to achieve. Heat styling would actually flatten it and work against the cut’s intention.
How to Style It for Air Drying
Shags are genuinely forgiving. Start with damp hair and apply a texturizing spray or a lightweight curl-defining product if you want extra hold and definition. Run your fingers through your hair to separate and encourage the layers to fall in different directions — this is the fun part, and there’s no “wrong” way to do it. Let it air dry while you go about your day. The messier and more tousled you let it get, the better it looks. You’re not aiming for precision; you’re aiming for that “I just came in from the wind and somehow look cool” vibe.
What You Need to Know
- Layer density matters: A good shag has layers woven throughout, not just at the ends. Ask your stylist for layers starting closer to your roots for maximum movement.
- Length options: Shags look great anywhere from ear-length to chin-length and even shoulder-length. The shorter versions are more pixie-shag hybrid, and the longer ones have more flow.
- Styling freedom: Unlike some cuts, a shag doesn’t need to look exactly the same every day. One day it might look sleek and separated, the next day more piece-y and textured. Both versions are correct.
Worth knowing: Shags can look a bit fluffier or wilder when freshly air-dried than you might want first thing in the morning. If that bothers you, try styling with damp hair and letting it dry while you have breakfast — it’ll settle as it fully dries.
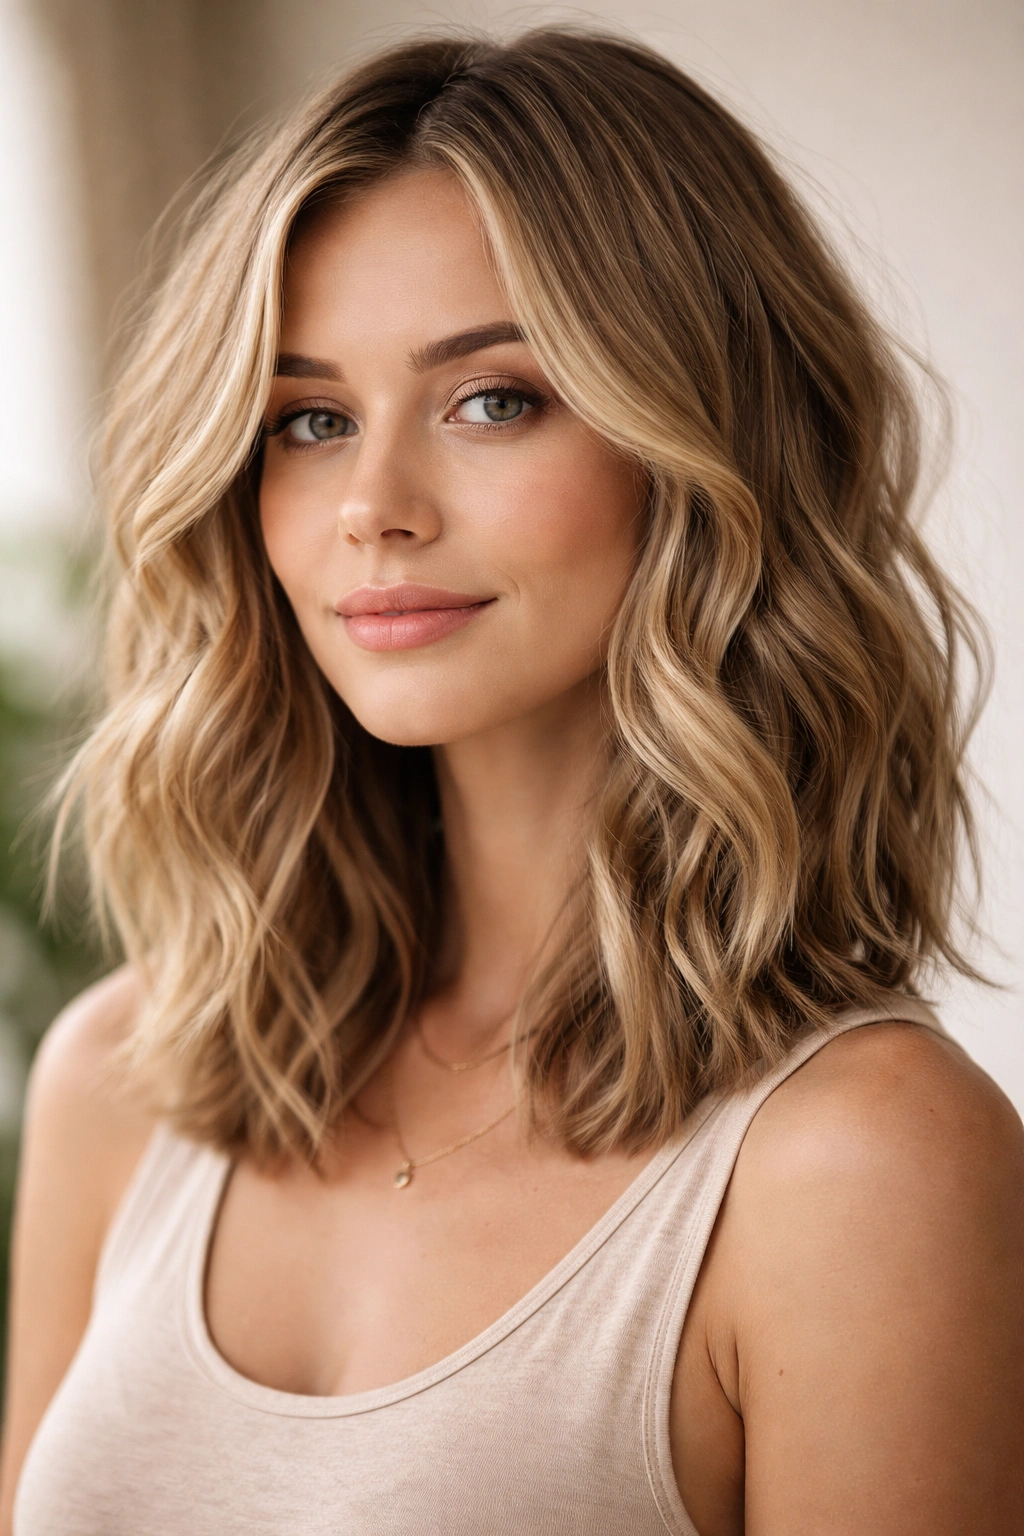
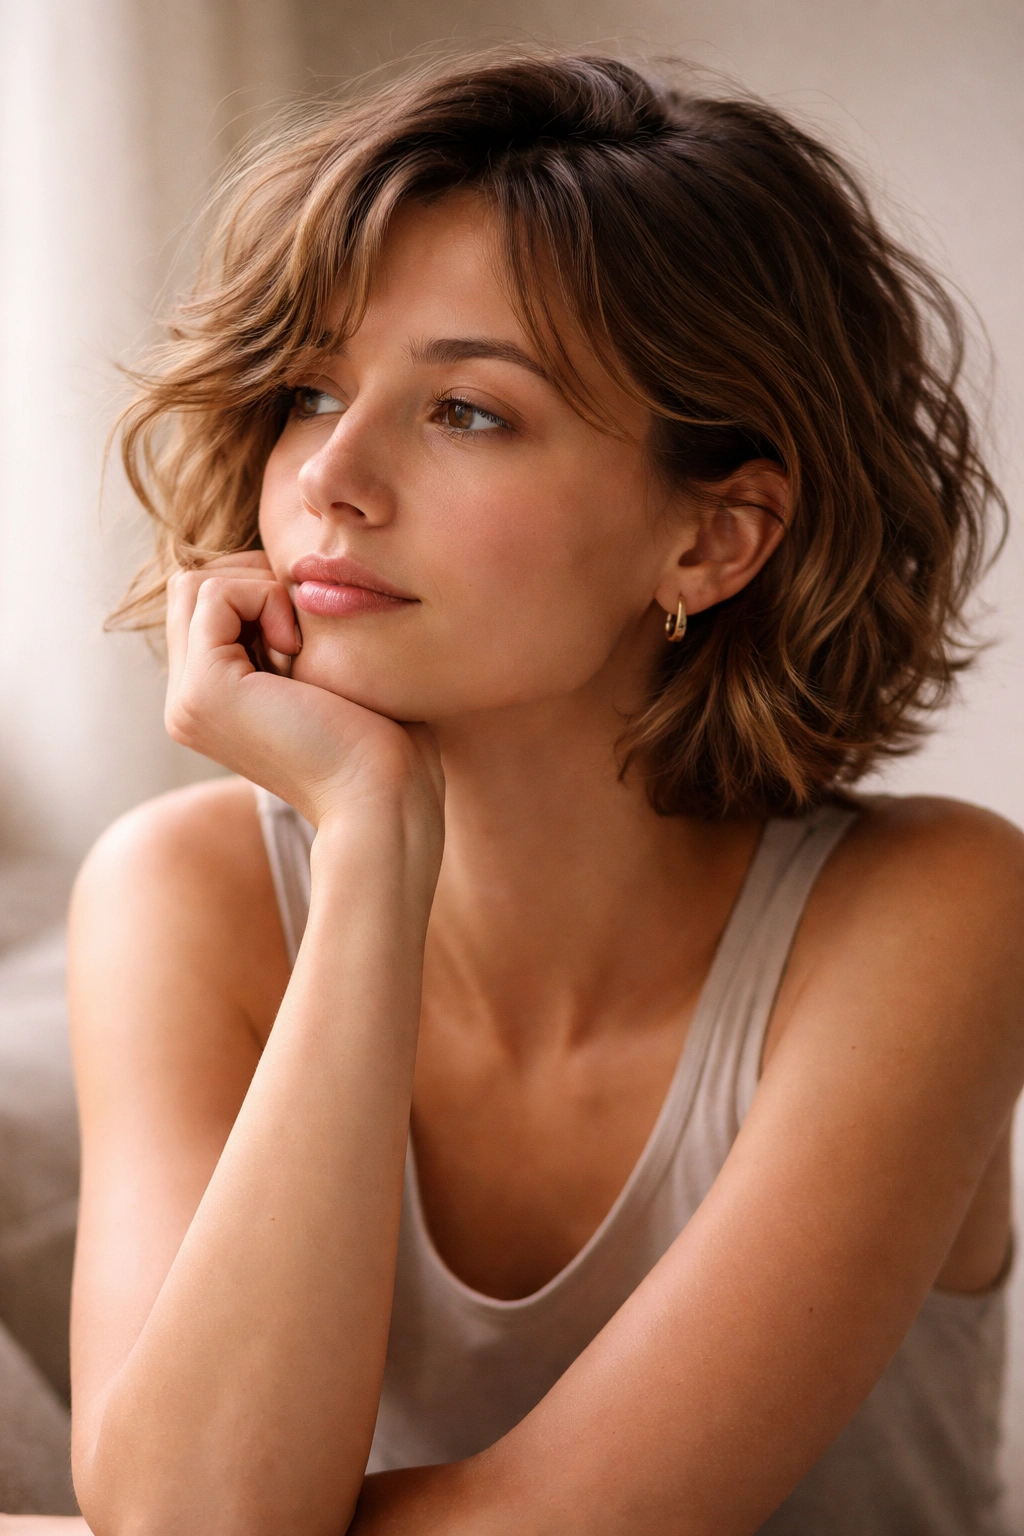
3. Shoulder-Length Waves with Layers
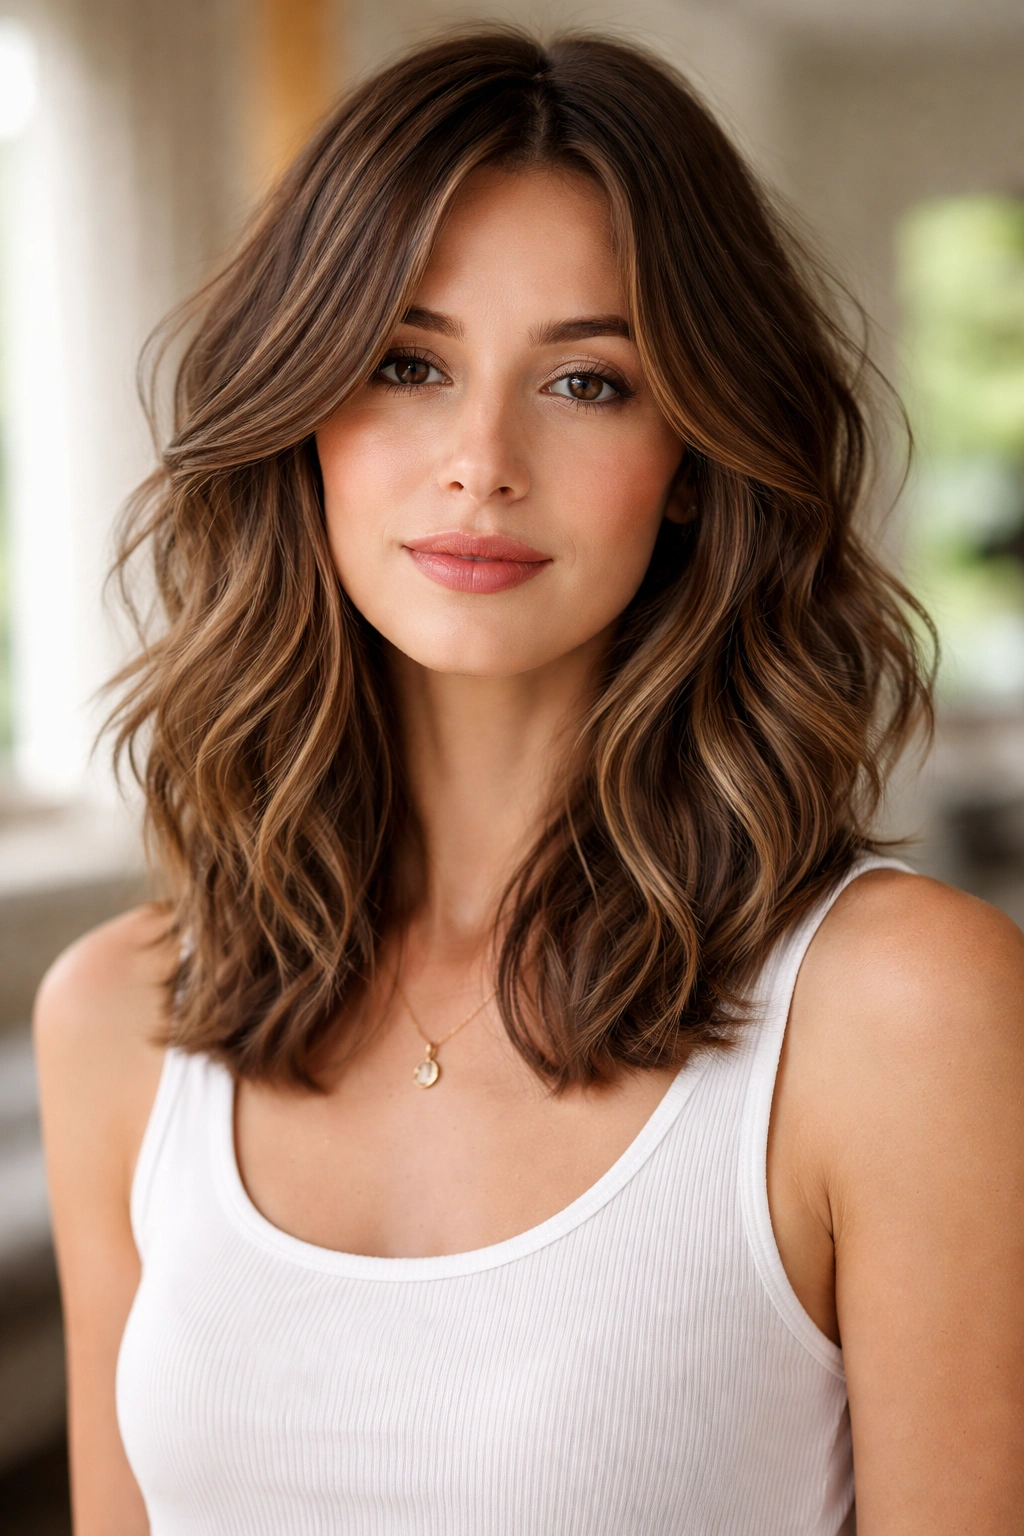
This style straddles the line between “short” and “medium,” but it absolutely deserves a spot here because it’s one of the easiest lengths for air-dried waves. Somewhere around shoulder-length or a few inches shorter, this cut has enough length to show wave flow while still being short enough that air-drying is genuinely effortless. The layers are usually closer to face-framing and end-texturizing rather than super choppy throughout, giving you a more polished feel than a shag while maintaining all the air-dry ease.
Why This Length Is the Sweet Spot
Shoulder-length is long enough that waves have enough length to fully form and create actual wave definition rather than just texture, but short enough that it dries quickly and the weight isn’t fighting against the wave formation. It’s the Goldilocks length for air drying. You get movement, dimension, and a flattering shape that works for nearly every face shape.
How to Style It for Air Drying
This length is genuinely low-maintenance. After your shower, apply a wave cream or curl-defining product while your hair is still wet. Use your fingers to create loose sections and encourage the wave to form. You can flip your head upside down for 10-15 minutes to add volume at the roots and let gravity help activate the wave, or simply let your hair dry naturally. The length means you can get away with minimal product and still have beautiful definition.
What You Need to Know
- Face-framing is key: Layers around the face are what make this length flattering. They create movement at the cheekbones and soften the overall look.
- Texture needs strategic placement: Unlike choppy shags, this cut benefits from layers that are mostly at the ends and around the face, keeping the bulk of the hair one length for more control and shape.
- Great for most hair types: Whether your waves are subtle or more pronounced, this length accommodates. Even straighter hair can achieve a beautiful wave effect at this length.
Insider note: If you want a super polished look, you can straighten the roots while air-drying the ends — this creates a sleek top with wavy ends that feels more refined than fully air-dried waves.
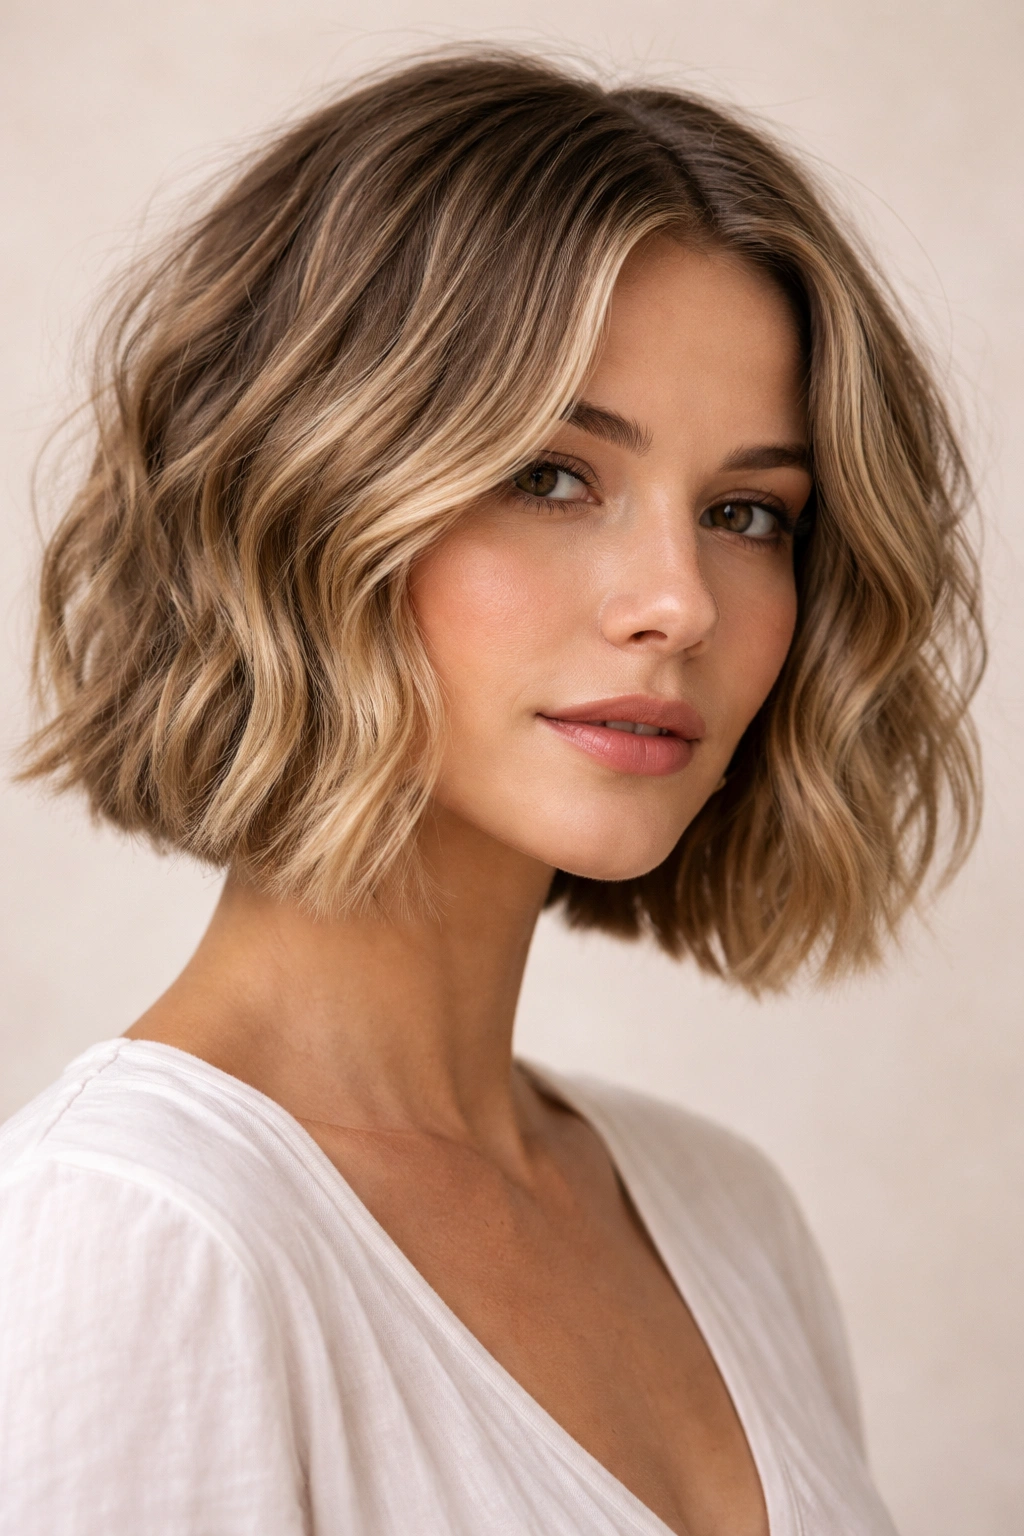
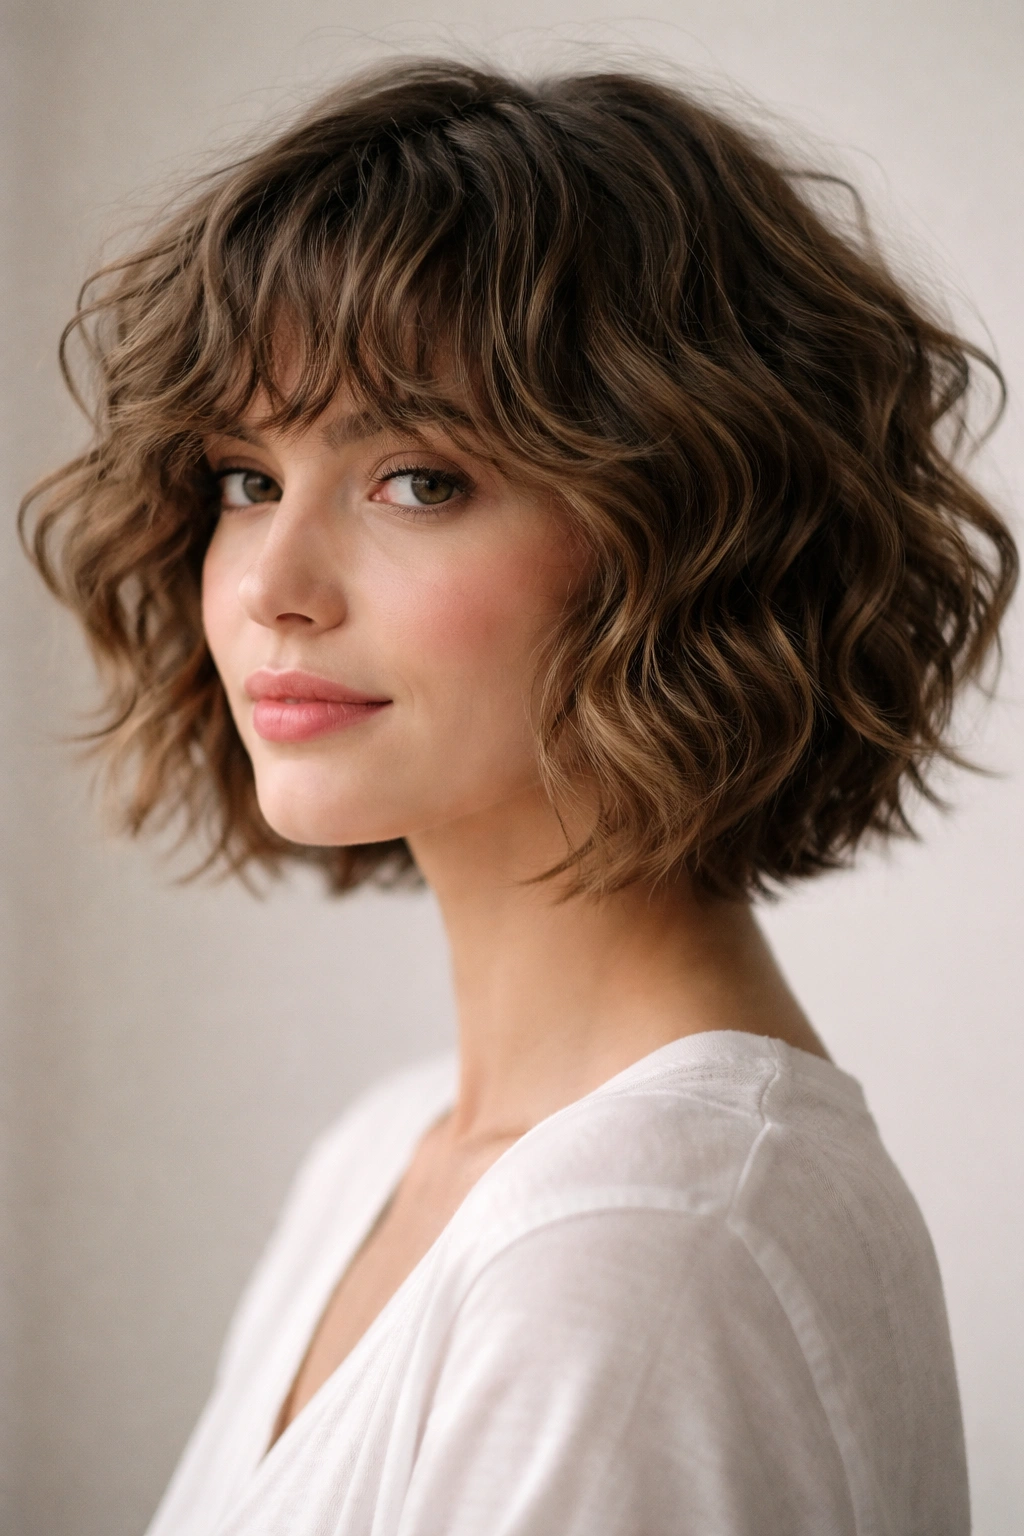
4. Messy Bob with Soft Waves
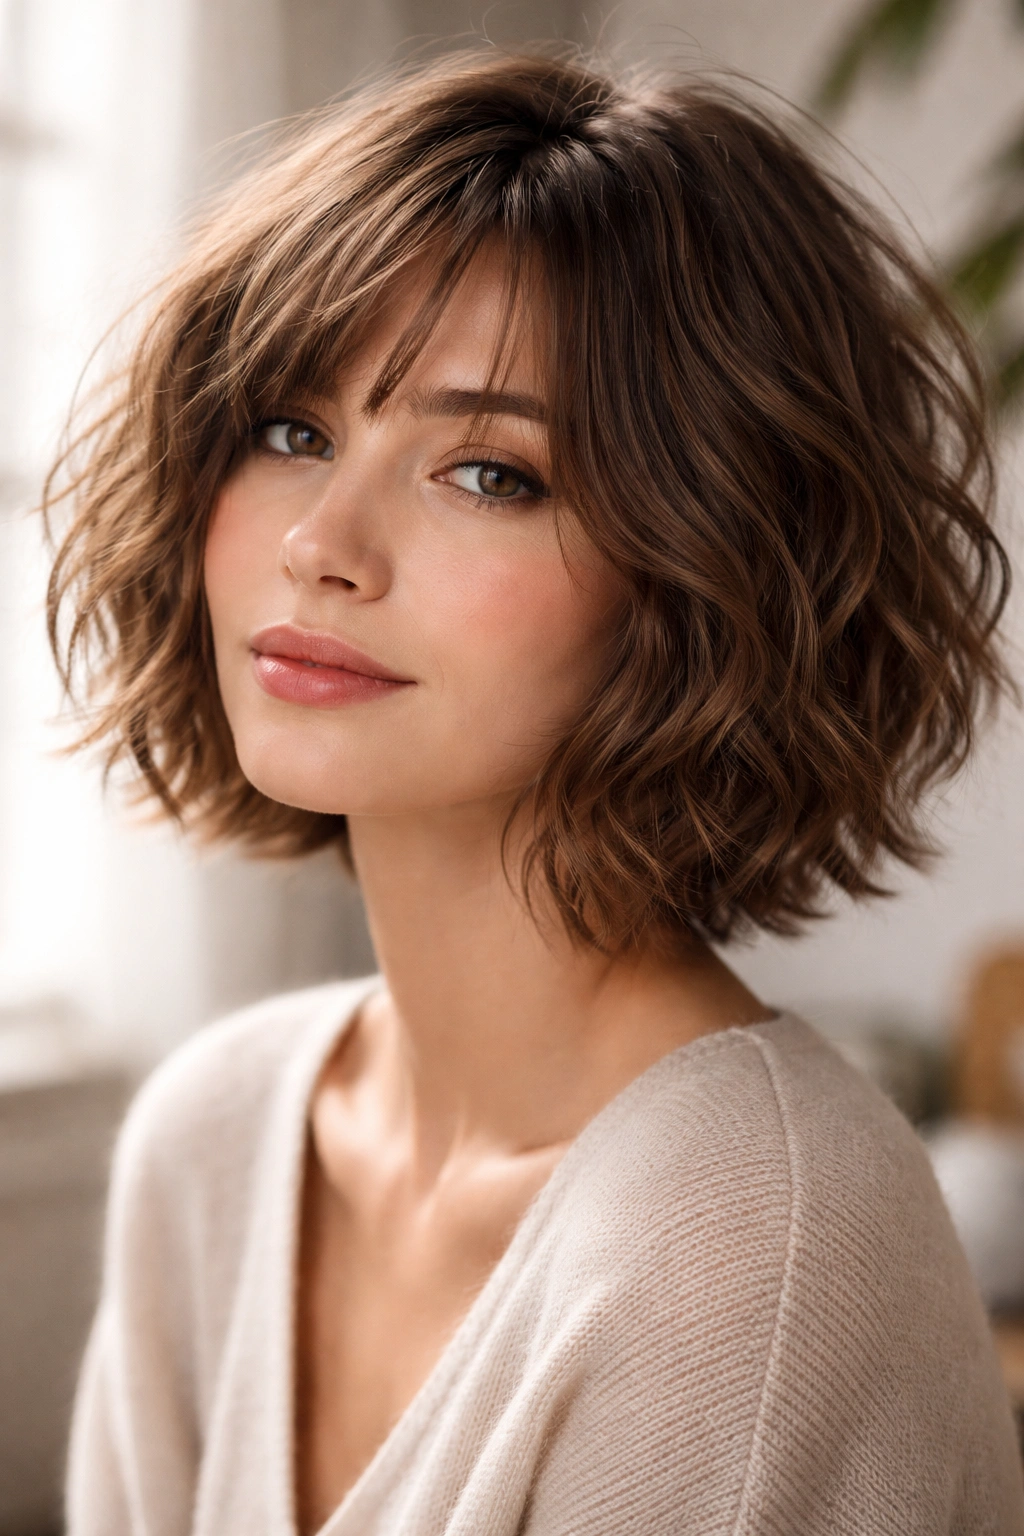
A classic bob gets a serious upgrade when you embrace the waves rather than fighting them. A messy bob for wavy hair is usually cut just below the chin with choppy layers throughout and a slightly shorter back. The “messy” part isn’t accidental — it’s built into the cut through strategic layering and angle that creates movement and texture rather than a blunt, uniform line.
Why This Cut Begs for Air-Drying
A perfectly blunt bob needs regular touch-ups and often requires styling to look pristine. A messy bob, by contrast, actually looks better when it’s slightly undone. Air-drying creates the exact tousled texture the cut is designed for. You’re not working against your natural hair; you’re letting the cut and your texture work together.
How to Style It for Air Drying
This is where the styling is wonderfully simple. With damp hair, apply a lightweight texturizing mousse or dry shampoo spray (yes, you can use it on damp hair too). Tousle your hair gently with your fingers, separating the layers and encouraging the waves to form. You can use a round brush for about 30 seconds to lift at the roots if you want extra volume, but it’s completely optional. Then let it air-dry completely. The final result should look effortlessly bedhead-chic.
What You Need to Know
- Regular trims matter: A bob needs a trim every 6-8 weeks to keep the shape defined. Because of the layers, it loses its shape faster than a pixie.
- Product weight is crucial: Too much product will weigh this cut down and make it look limp. Stick with lightweight options only.
- Styling variations: You can wear the waves tousled and wild, or you can scrunch them more deliberately for defined waves. Both look intentional with this cut.
Pro tip: A messy bob photographs beautifully. The texture and movement that might feel slightly undone in person looks incredibly stylish and intentional in photos.
5. Choppy Crop with Movement
If you want to go genuinely short, a choppy crop is where it’s at for wavy hair. This is a very short cut — usually around ear-length or shorter — with choppy, razor-cut layers throughout that create texture and movement. It’s edgy without being too severe, and it’s one of the most freeing styles you can choose in terms of styling time.
Why This Cut Is an Air-Dry Dream
With a choppy crop, you have so much length variation that air is doing most of the work for you. The choppy nature of the cut means each section dries at slightly different times, and because the pieces are so short, they’re already mostly air-dried within a few minutes. There’s essentially no way to mess this up. It dries, it has texture, it looks intentional. Done.
How to Style It for Air Drying
A choppy crop barely needs styling at all. After your shower, you can apply a texturizing spray if you want extra hold and definition, or you can skip it entirely. Run your fingers through your hair to separate the pieces as it air-dries. That’s genuinely all you need to do. The cut does the heavy lifting.
What You Need to Know
- Requires a skilled stylist: A choppy crop is only as good as the cutting technique. You want a stylist who’s comfortable with razor-cutting and creating intentional choppy texture.
- Maintenance: Trim every 4-6 weeks to keep the layers looking sharp and prevent it from getting too shaggy.
- Works best for wavy to curly hair: Straight hair with a choppy crop can look a bit wispy. If you have straighter hair, you might want to consider a textured pixie or shag instead.
- Confidence factor: This is a statement cut. It looks best when you own it with confidence.
Worth knowing: A choppy crop sometimes photographs shorter than it feels in person. If you’re ever unsure about going this short, ask your stylist to show you photos from multiple angles so you know exactly what you’re getting.
6. Wavy Lob (Long Bob)
A lob — that in-between length that’s shorter than long but longer than a traditional bob — works beautifully for air-dried waves when it’s cut with the right layers. A wavy lob usually falls somewhere around collarbone length or slightly shorter, with face-framing layers and subtle choppy texture throughout. It’s sophisticated, versatile, and honestly one of the easiest lengths to maintain.
Why This Length Works for Waves
A lob is long enough to show substantial wave movement and flow, but short enough that air-drying is genuinely quick. You get the benefit of length and waves without the hours of drying time you’d need with longer hair. Plus, this length is incredibly flattering on most face shapes and works well with a huge range of styling options.
How to Style It for Air Drying
With damp hair, apply a wave cream or light mousse throughout. Separate your hair into sections and gently scrunch or coil the waves to encourage formation. You can add a bit of volume at the roots by flipping your head or using a round brush for 30 seconds, but again, it’s optional. Then let it dry. A lob usually takes 30-45 minutes to fully air-dry depending on thickness, which is very manageable.
What You Need to Know
- Face-framing is essential: Layers around the face create flattering movement and prevent the style from looking blunt or too one-length.
- This length suits almost everyone: Whether your face is round, square, long, or heart-shaped, a lob can be tailored to flatter your specific proportions.
- Styling flexibility: You can wear it wavy and textured, or you can straighten it for a different vibe. It’s genuinely versatile.
- Maintenance: Trim every 8-10 weeks to keep the layers looking fresh and prevent the ends from looking scraggly.
Pro tip: A lob looks amazing with slightly damp waves scrunched and left to air-dry naturally, but it also works beautifully with a light blowout and round brush for more polished waves.
7. Blunt-Cut Waves with Texture
This is a style that might seem contradictory — a blunt cut is usually associated with sleek precision, not waves. But a blunt-cut style with intentional texture pieces is a modern, sophisticated look that absolutely works for air-dried waves. The bulk of the hair is one clean length, but strategically placed choppy pieces throughout the cut create movement and prevent it from feeling heavy or blunt. It’s polished but textured.
Why This Cut Balances Polish and Texture
A blunt cut provides a clean, defined shape while the textured pieces throughout add movement and dimension. When you air-dry it, you get the best of both worlds: a sharp, intentional silhouette with soft, wavy texture. It’s less undone than a full shag but way more textured than a simple one-length cut.
How to Style It for Air Drying
Start with damp hair and apply a lightweight wave product or mousse. Rather than scrunching everything, focus on encouraging the texture pieces to form their own waves while leaving the longer sections relatively smooth. You can use your fingers to separate the choppy pieces and create definition. Let it air-dry naturally. The contrast between the clean lines and the textured pieces is what makes this look intentional.
What You Need to Know
- Cutting precision matters: This cut requires a stylist who can do both blunt lines and textured choppy pieces cleanly.
- Less frequent trims: Since the shape is more defined by the blunt line than by layers, you can sometimes go 10-12 weeks between trims instead of the usual 6-8.
- Works beautifully with highlights: The texture pieces catch light beautifully, so this style is perfect if you’re considering adding dimension through color.
Worth knowing: This cut can actually look better slightly tousled than perfectly smooth. The texture pieces that might seem subtle when you first style them actually become more prominent and beautiful as the day goes on.
8. Piece-y Undercut Waves
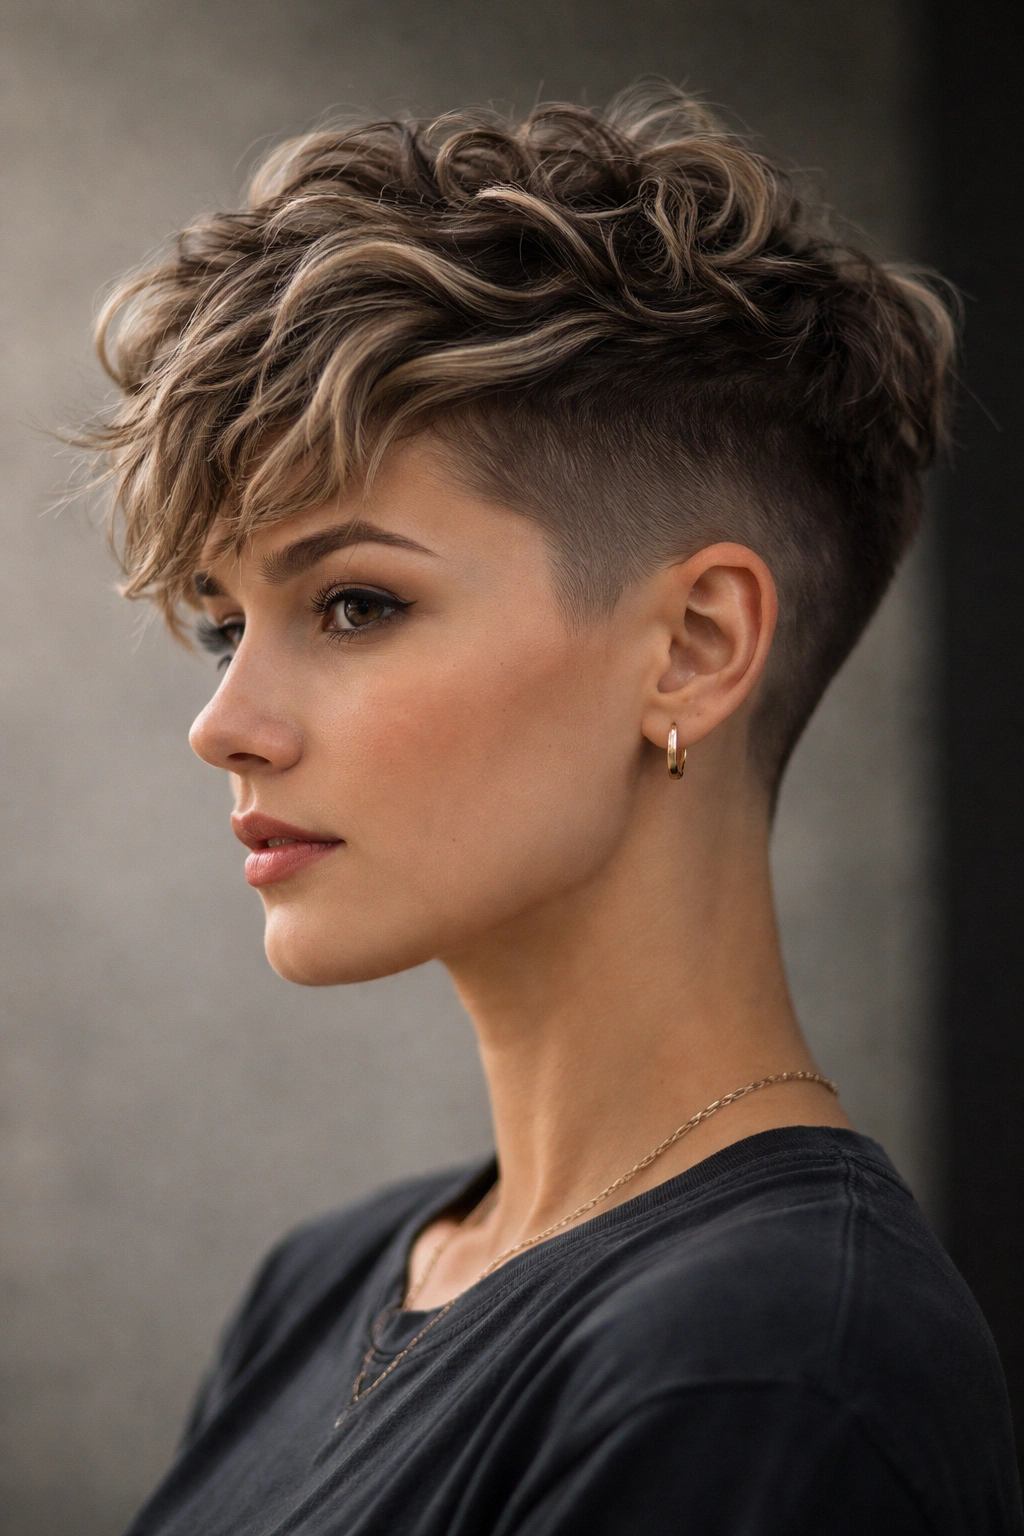
An undercut — where the sides and back are cut very short while the top is left longer — is an unconventional choice for wavy hair, but when done right with textured top layers, it’s incredibly cool. The undercut gives you sharp definition and a modern edge, while the longer, choppy top provides all the wavy texture you want. It’s bold, it’s architectural, and it absolutely air-dries beautifully.
Why This Cut Suits Air-Drying
An undercut is designed to show off texture and shape, and air-drying highlights both. The short sides and back air-dry in seconds, while the textured top layers air-dry with natural wave definition. There’s no way for this cut to look weak or undefined — the architecture of the cut itself prevents that. Air-dried waves on an undercut look intentional and strong.
How to Style It for Air-Drying
This is where you have creative freedom. You can style the top layers as waves, coils, texture, or even slicked back — whatever suits your mood. Apply your styling product of choice to damp hair, encourage the texture you want on top, and let it air-dry. The undercut requires minimal to no styling on the sides and back, which is a huge time-saver.
What You Need to Know
- Not for everyone, but confidence-boosting for the right person: This is a statement cut. If you like attention and enjoy being visually distinctive, you’ll love it. If you prefer a more conservative style, it might feel too bold.
- Requires professional cutting: You need a stylist comfortable with precision clipper work and creating sharp lines. It’s not a DIY-friendly cut.
- Low maintenance on most of it: While the top might need regular styling, the sides and back essentially need nothing. Trim every 3-4 weeks to keep the undercut looking sharp.
- Works for all hair types: Straight, wavy, or curly — an undercut with wavy texture on top is striking on everyone.
Insider note: An undercut actually makes thick, heavy wavy hair feel lighter and more manageable because you’re removing so much weight from the sides and back.
9. Curly Fringe with Waves
Adding a fringe (bangs) to a short wavy cut creates a completely different visual impact. A curly or wavy fringe paired with waves throughout the rest of your hair is trendy, flattering, and creates an instant focal point. The fringe is usually cut with texture and movement rather than bluntly, so it complements rather than contrasts with the wavy aesthetic. This works especially well with shags, choppy crops, and shoulder-length cuts.
Why a Fringe Changes Everything
A fringe instantly refreshes a style and makes the whole cut feel more intentional and curated. When the fringe has the same texture as the rest of your hair, you’re creating cohesion while adding personality and movement around your face. Air-dried waves with a textured fringe look modern, cool, and like you meant to style it this way.
How to Style It for Air Drying
The fringe is where air-drying requires a tiny bit of intention. With damp hair, apply your wave product throughout. For the fringe specifically, encourage it to form gentle waves or texture by running your fingers through it and scrunching slightly. You want it to dry in a way that feels intentional — either separated into pieces or gently waved, depending on your preference. As the rest of your hair air-dries, check on the fringe occasionally to make sure it’s drying in a direction you’re happy with. Once it’s dry, you’re done.
What You Need to Know
- Fringe maintenance: A fringe needs trimming more frequently than the rest of your hair — usually every 3-4 weeks — because you notice it more when it gets longer.
- Face-framing matters: A well-placed fringe should fall just above your eyebrows when dry and frame your face flattering. Work with your stylist to get the angle right for your face shape.
- Styling variation: You can wear the fringe smooth, textured, swept to the side, or separated into pieces. This gives you styling flexibility while still being low-maintenance.
Pro tip: If you’re new to bangs and worried about committing, ask your stylist for a soft, piece-y fringe rather than a blunt one. Soft fringes are much more forgiving if the length isn’t perfect, and they’re easier to style around as you’re getting used to having them.
10. Taper Fade with Textured Waves
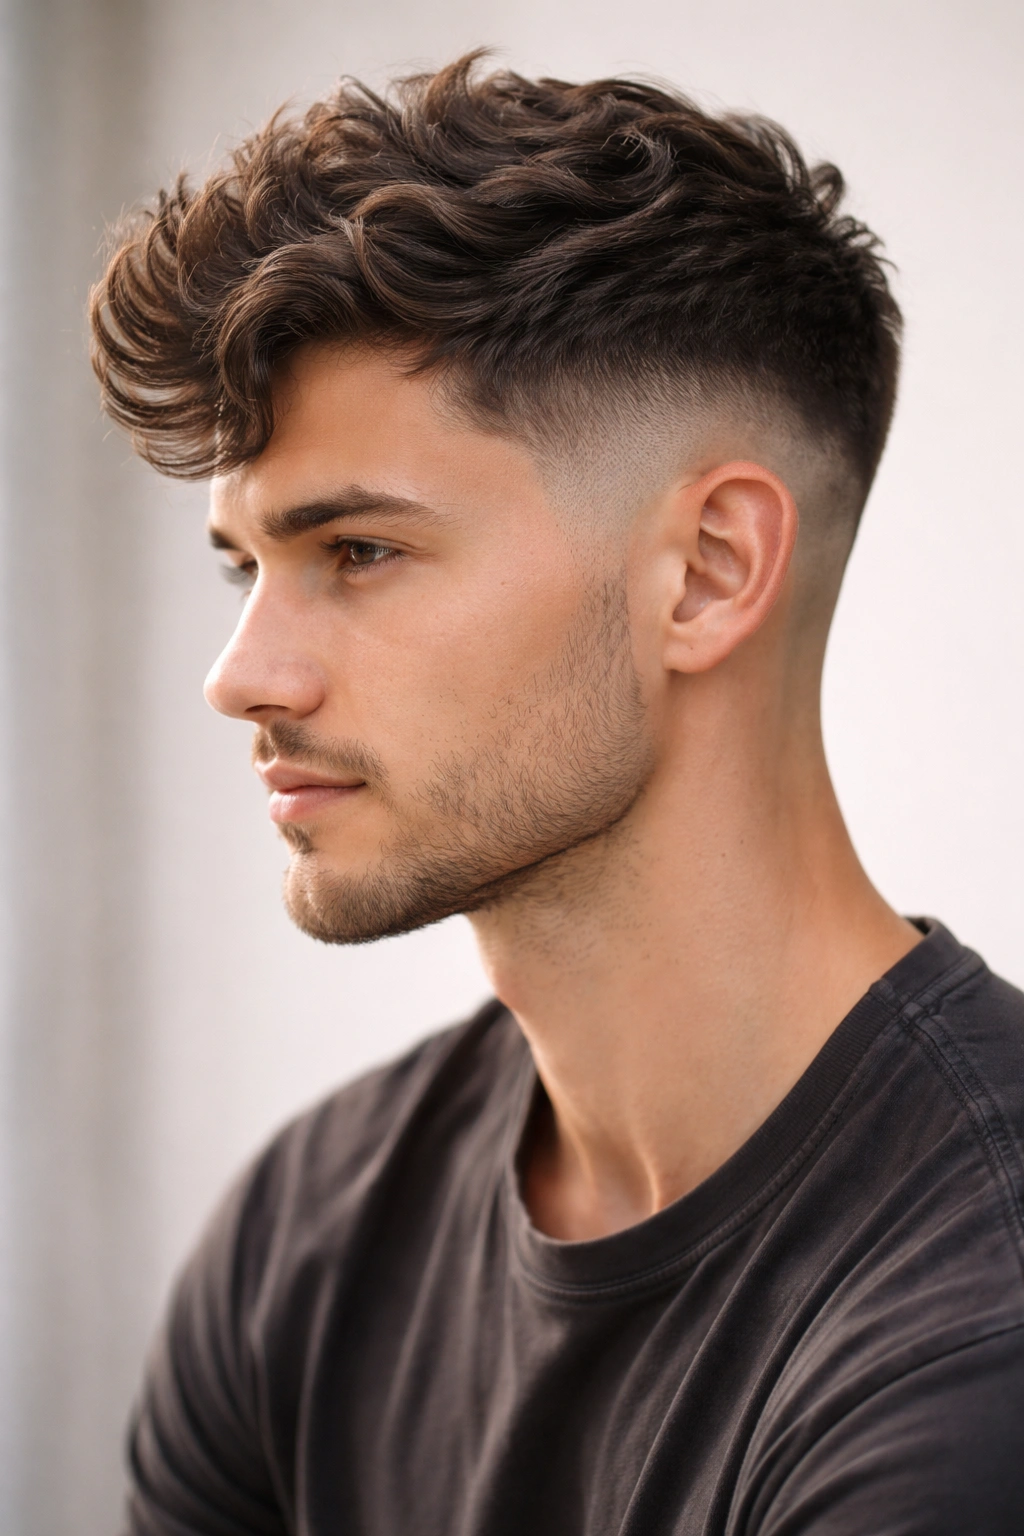
The taper fade — where the sides and back gradually fade from short to longer — is typically associated with more masculine styling, but when paired with textured waves on top, it creates a fresh, modern look that transcends gender. The fade gives you a clean, sharp silhouette while the textured top provides all the wavy interest. It’s an edgy take on short wavy styles that looks sophisticated rather than severe.
Why This Cut Maximizes Texture
A taper fade puts all the focus on the top and the texture there. Because the sides and back are so clean and minimal, any waves or texture on top becomes the main event. Your natural wave pattern shines without competition from dense hair on the sides. Air-drying becomes incredibly straightforward because there’s so little hair on the sides and back to dry.
How to Style It for Air Drying
With damp hair, apply a texturizing product to the top and any length on the sides if there is some. Encourage the waves or coils to form on top, leaving the faded sides relatively untouched. Let it air-dry naturally. The result is a super clean look with plenty of textured interest on top. You can keep the styling minimal or add more product for extra definition, depending on your mood.
What You Need to Know
- Professional cutting required: A good taper fade requires skill and usually clippers. You’ll want a barber or stylist experienced with fades.
- Frequent trims necessary: To keep the fade looking sharp, trim every 2-3 weeks. The fade grows out quickly, and once it does, it loses its impact.
- Styling flexibility: You can style the top waves loose and relaxed, or more defined and precise. Both look intentional with the clean fade underneath.
- Works for all hair types: The texture of your top hair is what matters. Wavy, curly, or even straighter hair with waves looks great with a taper fade.
Worth knowing: A taper fade with textured waves on top is an incredibly cool, contemporary look. If you want a fresh, sharp, modern style that’s still low-maintenance, this is it.
Final Thoughts
Air-dried waves are not about accepting a less-polished version of your hair — they’re about working with your hair’s natural texture to create something that actually looks better than if you’d blow-dried it. The key is having a cut that’s specifically designed for this goal. When your stylist understands that you’re going for the air-dry aesthetic, they can cut your hair with that in mind: layers placed strategically, angles designed to encourage rather than fight your natural wave, and enough texture throughout that drying time is minimal.
Every single one of these cuts works because it’s built on the foundation of embracing rather than resisting your waves. You’re not trying to force waves into straight hair or straighten naturally wavy hair — you’re cutting in a way that lets your hair do what it naturally wants to do and making that process look intentional and cool.
The maintenance piece is real — most short wavy cuts need trimming every 4-8 weeks depending on the style — but that’s offset by how genuinely low-maintenance the day-to-day styling becomes. You’re trading frequent styling time for frequent trims, which is a trade most people are happy to make.
If you’ve been on the fence about cutting your hair shorter because you thought it would mean more styling responsibility, these styles prove the opposite is true. The shorter your hair, and the more intentionally it’s cut for your natural texture, the less work it becomes. Air-drying stops being something you do when you’re in a rush and becomes your default, go-to styling method because it actually looks better than anything you could achieve with heat tools.