Beehive cornrows represent one of the most striking and versatile protective styling options available to anyone with textured hair. These sculptures blend the intricate technique of cornrow braiding with the voluminous, architectural shape that defines the classic beehive — creating styles that are both functional and undeniably bold. The beauty of beehive cornrows lies in their incredible range: you can go minimalist with just a few thick rows stacked upward, or create an elaborate multi-row masterpiece that turns heads every single time you walk into a room.
What makes beehive cornrows so appealing is that they work as both a protective style and a statement. Your hair gets the low-manipulation benefits of braiding while you simultaneously get a look that commands attention. Whether you’re protecting your edges while growing them back, simplifying your daily styling routine, or just wanting to express your personal aesthetic, beehive cornrows offer genuine versatility. The style can sit anywhere on a spectrum from refined and polished to edgy and experimental, depending entirely on how you approach the execution.
The real trick to pulling off beehive cornrows is understanding how different configurations and techniques create completely different visual effects. A few key decisions — like whether your rows are thick or thin, how tightly you spiral them, whether you incorporate curls or beads, and how high you stack them — transform the entire vibe of the style. Let’s explore ten distinct beehive cornrow variations that showcase the full range of what’s possible with this technique.
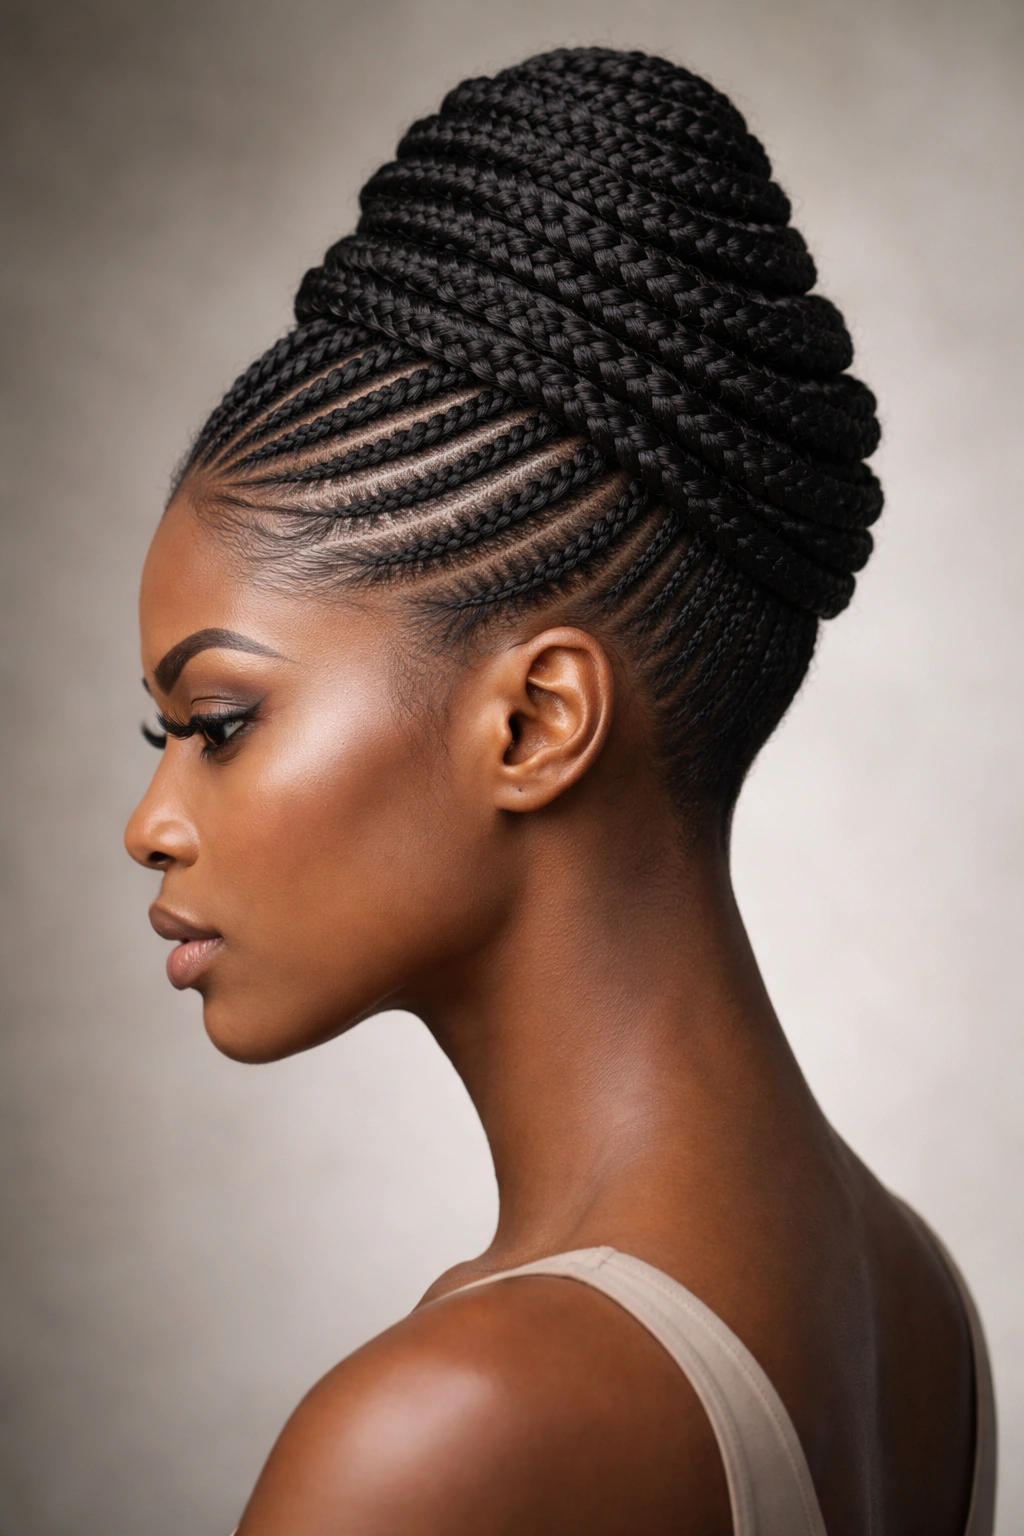
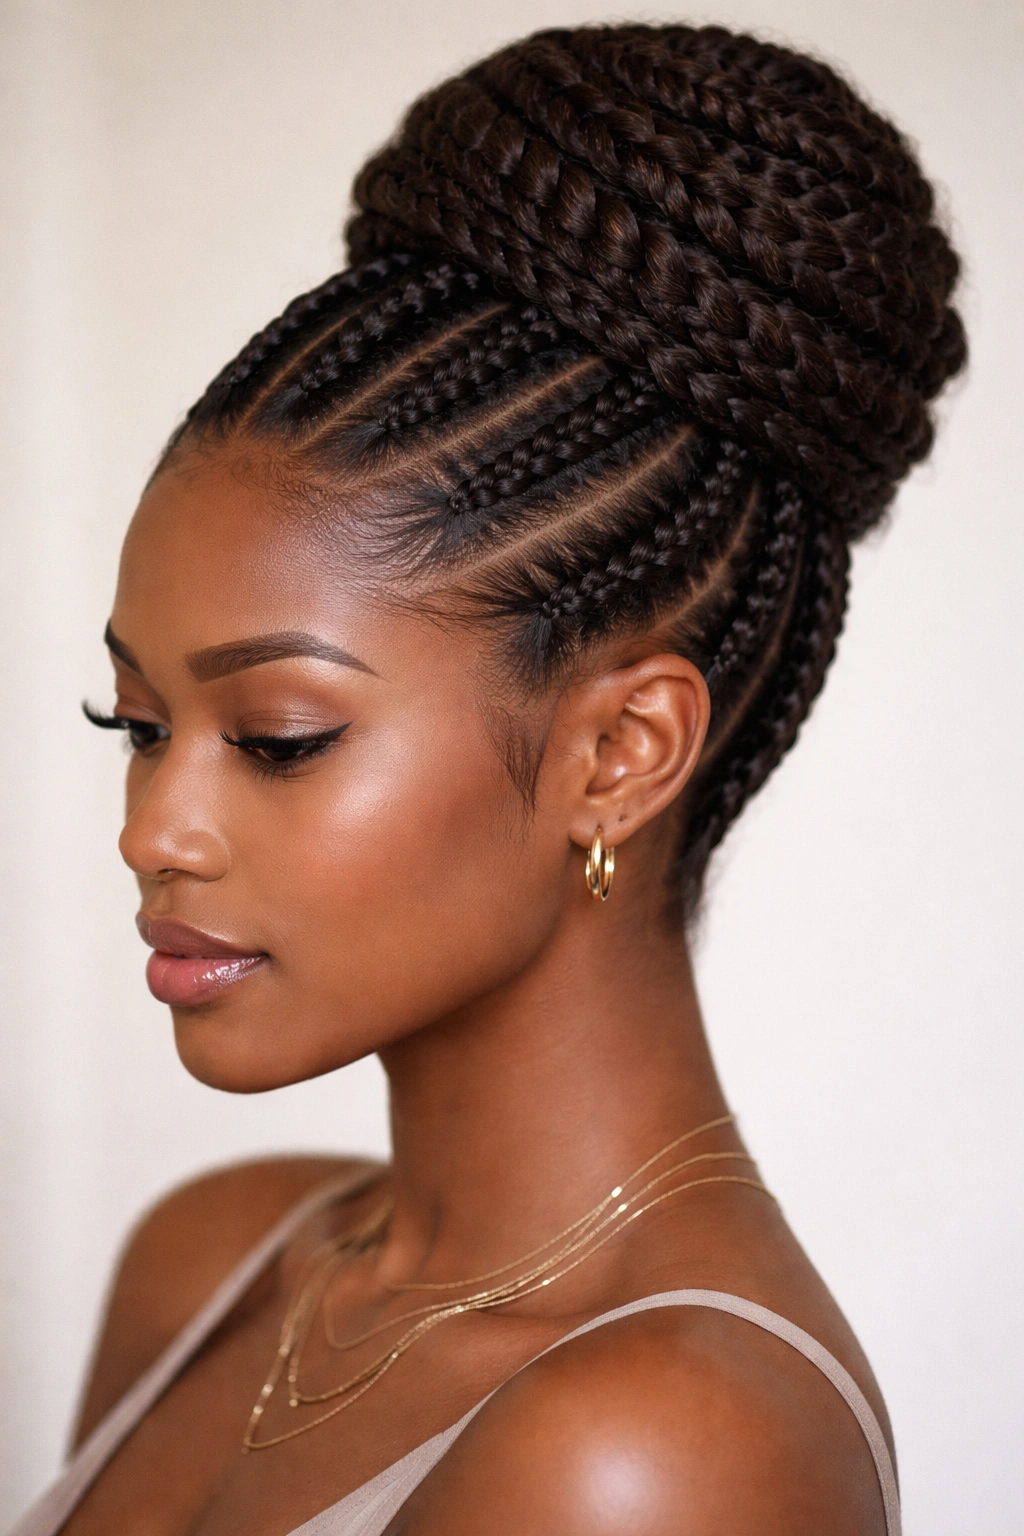
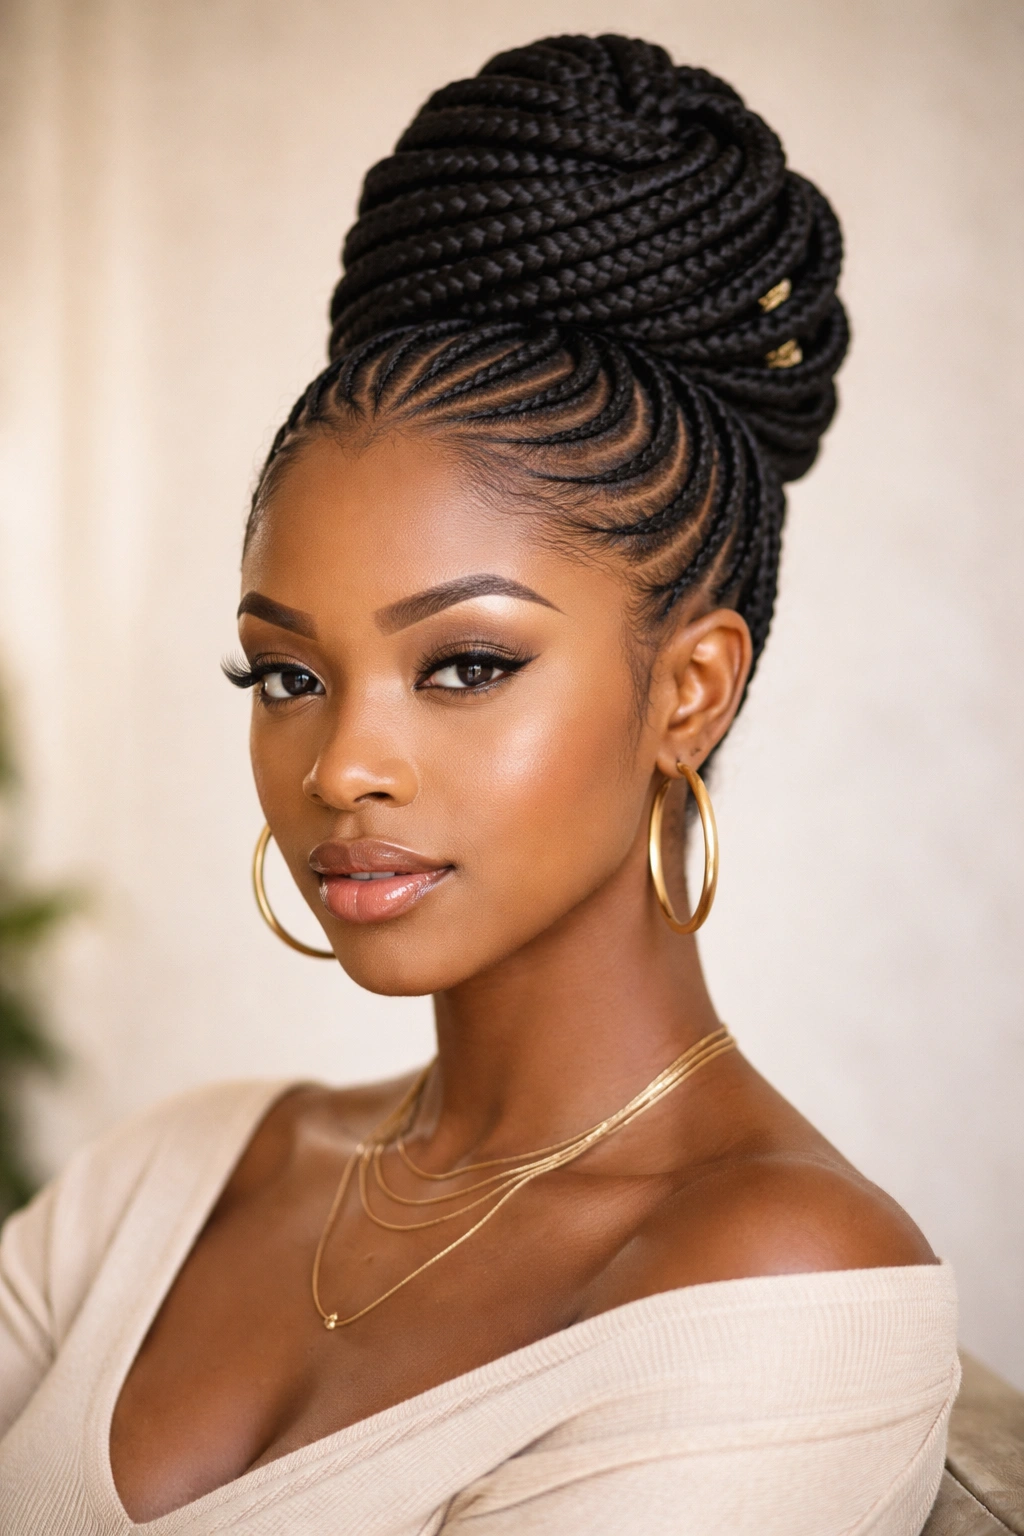
1. Classic Spiral Beehive
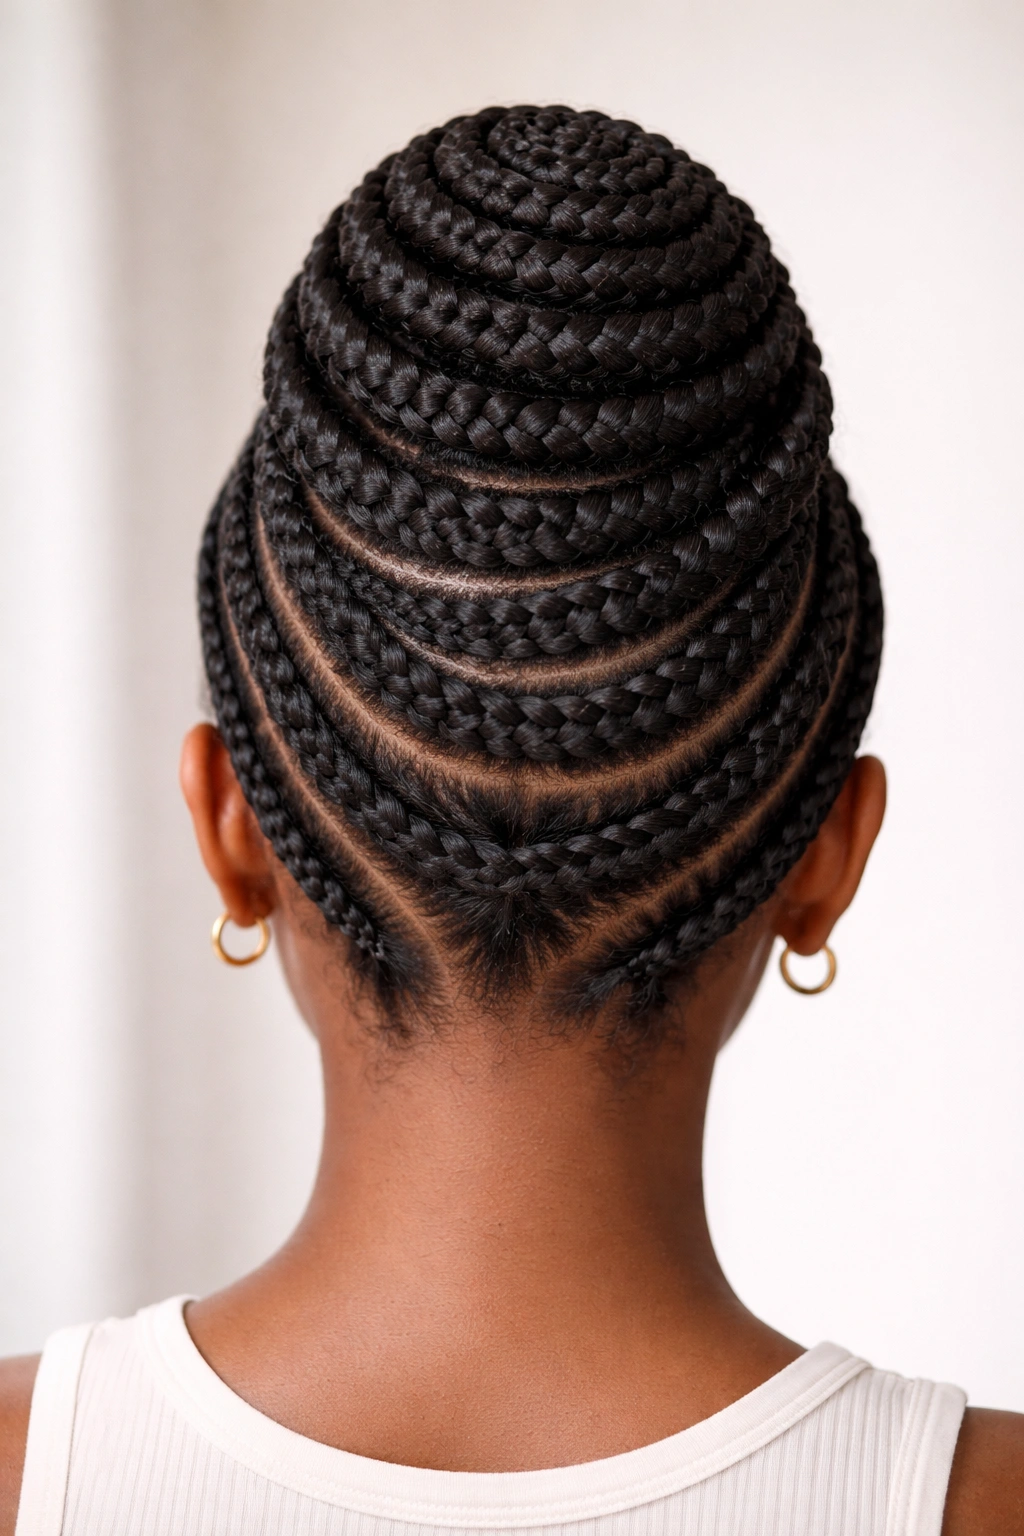
The classic spiral beehive is the purest expression of the style: multiple cornrows that spiral upward around the crown in a cohesive, rounded dome shape. This version typically uses 8-12 rows of medium thickness, each one starting at the hairline and spiraling inward toward the center as the rows move backward, creating that signature beehive silhouette.
What Makes It Timeless
The spiral beehive works because it follows the natural contours of your head while creating visual movement that’s genuinely flattering. The upward spiral draws the eye upward and creates the illusion of height and elegance. This isn’t an accident of styling — it’s a fundamental principle of how the human eye processes curves and vertical lines. The spiral also distributes tension evenly across your entire head, which means less stress on any single area and genuinely better longevity for your edges and hairline.
How to Style It for Maximum Impact
- Ensure each row is smooth and tightly braided without being painfully tight — there’s a genuine difference between secure and damaging
- Use extensions that match your hair texture or blend well; this allows you to add volume without compromising your own hair
- Keep the spiral consistent in the number of rotations from front to back — inconsistency breaks the visual flow
- The top should sit at least 2-3 inches higher than the crown of your head for that classic beehive volume
Worth knowing: This style typically holds beautifully for 4-6 weeks if you maintain it with regular edge-smoothing and nighttime protection.
2. Double-Stacked Beehive Cornrows

The double-stacked version takes the concept and layers it: you create one complete beehive at the crown, then add a second layer of rows beneath it, creating height and dimension that’s almost architectural. This is the statement-making version of beehive cornrows, the one that announces itself before you do.
The Structural Brilliance
Double-stacking works because it creates actual 3D depth rather than just visual height. Your braids occupy real space on your head, giving the style genuine substance. This approach is particularly striking because each layer remains visible — the rows don’t blend into each other, so every single braid showcases the craftsmanship. The layering also allows for creative color combinations; many people add a lighter shade to one layer and a darker shade to another, creating visual contrast that amplifies the style’s impact.
Installation and Maintenance Considerations
- Installation typically takes 4-6 hours because you’re literally braiding two complete hairstyles on top of each other
- The weight can be substantial, so make absolutely certain your hair is in healthy condition before committing to this version
- Nighttime protection becomes critical because you have more hair volume to protect and more braids to keep secure
- You should plan for this style to last 6-8 weeks maximum, as the second layer creates more tension on your natural hair underneath
Pro tip: Use thinner braids for the bottom layer and slightly thicker braids for the top layer — this creates better visual hierarchy and makes the top beehive appear to float above the foundation.
3. High-Rise Minimal Beehive

This version strips the beehive down to its absolute essence: just 3-5 very thick, high-definition rows braided straight upward and stacked tightly together. There’s no spiral here, no decorative elements, just unapologetic architectural height and clean geometry.
Why Minimalism Creates Maximum Impact
Sometimes less truly is more. The high-rise minimal beehive works precisely because it breaks the assumption that beehives need to be elaborate or complex. Five thick, perfectly executed braids create more visual impact than twelve delicate ones because your eye has nowhere to rest — it’s all about the clean lines and intentional structure. This approach also dramatically reduces styling time and the weight your natural hair needs to support.
Perfect for Specific Occasions
- Best for people with naturally thick hair who want the style without extensions
- Ideal if you’re growing out short natural hair and want a protective style that doesn’t require heavy extensions
- Works beautifully for athletic activities where you want your hair secure but not overdone
- Excellent choice if you have sensitive scalp and typically experience discomfort with complex, heavy styles
Worth knowing: This style photographs exceptionally well because the clean lines translate beautifully to photos and video — there’s no visual clutter to distract.
4. Spiral Beehive with Wrapped Ends
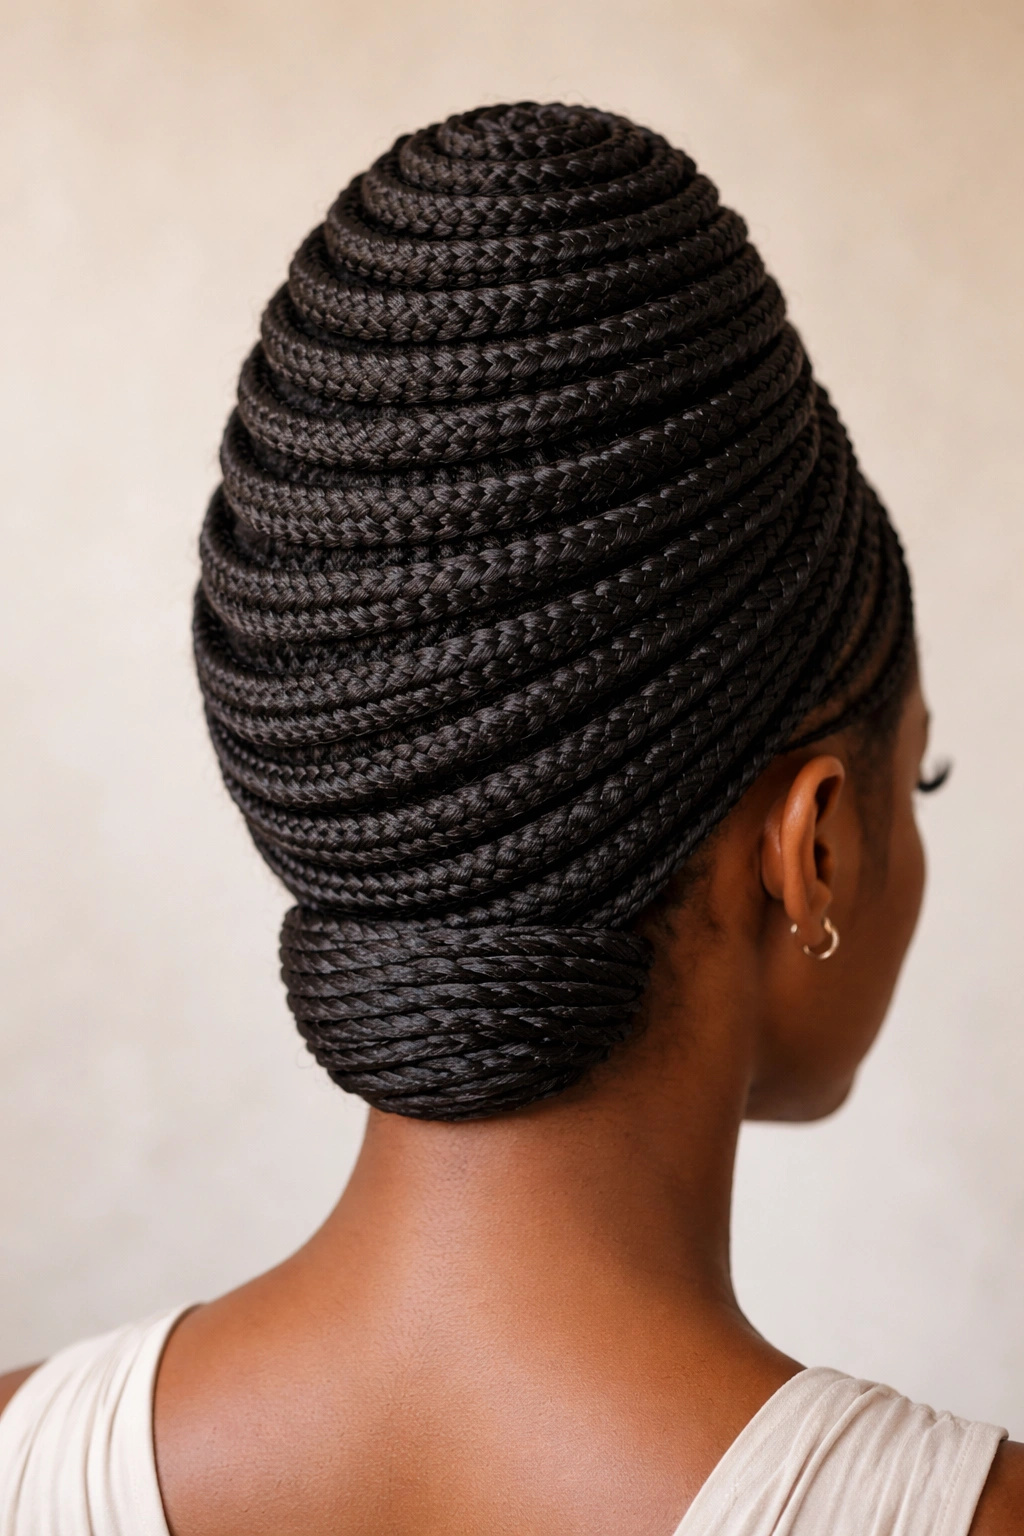
Take the classic spiral beehive and add a finishing touch: wrap the loose braided ends around the base of the beehive like a crown, then secure them with bobby pins and topical adhesive. This creates a completely finished, polished look where no braids stick out or look incomplete. It’s the beehive with the bow on top.
The Finishing Touch That Changes Everything
Wrapping the ends around the base serves both aesthetic and practical purposes. Visually, it creates a completely cohesive, finished silhouette — nothing dangles, nothing sticks out, everything contributes to the overall shape. Practically, securing the ends prevents them from rubbing against your clothing or getting caught on things, which extends the style’s wearability. It also protects the ends of your braids, keeping them from unraveling or fraying prematurely.
How to Execute the Wrapping
- Braid to the end of your hair, but leave the last few inches looser and thicker
- Use that thickness to wrap around the base of your beehive dome
- Secure with bobby pins tucked into the underside of the wrap where they won’t be visible
- Optional: use a small amount of edge control or topical adhesive to hold the wrap in place without weighing it down
- This step adds about 20-30 minutes to your total styling time but creates a genuinely finished appearance
Pro tip: If your wrapped ends feel too bulky, braid only partway down and pin the remaining loose hair to the base for a sleeker look.
5. Beehive with Curled Crown
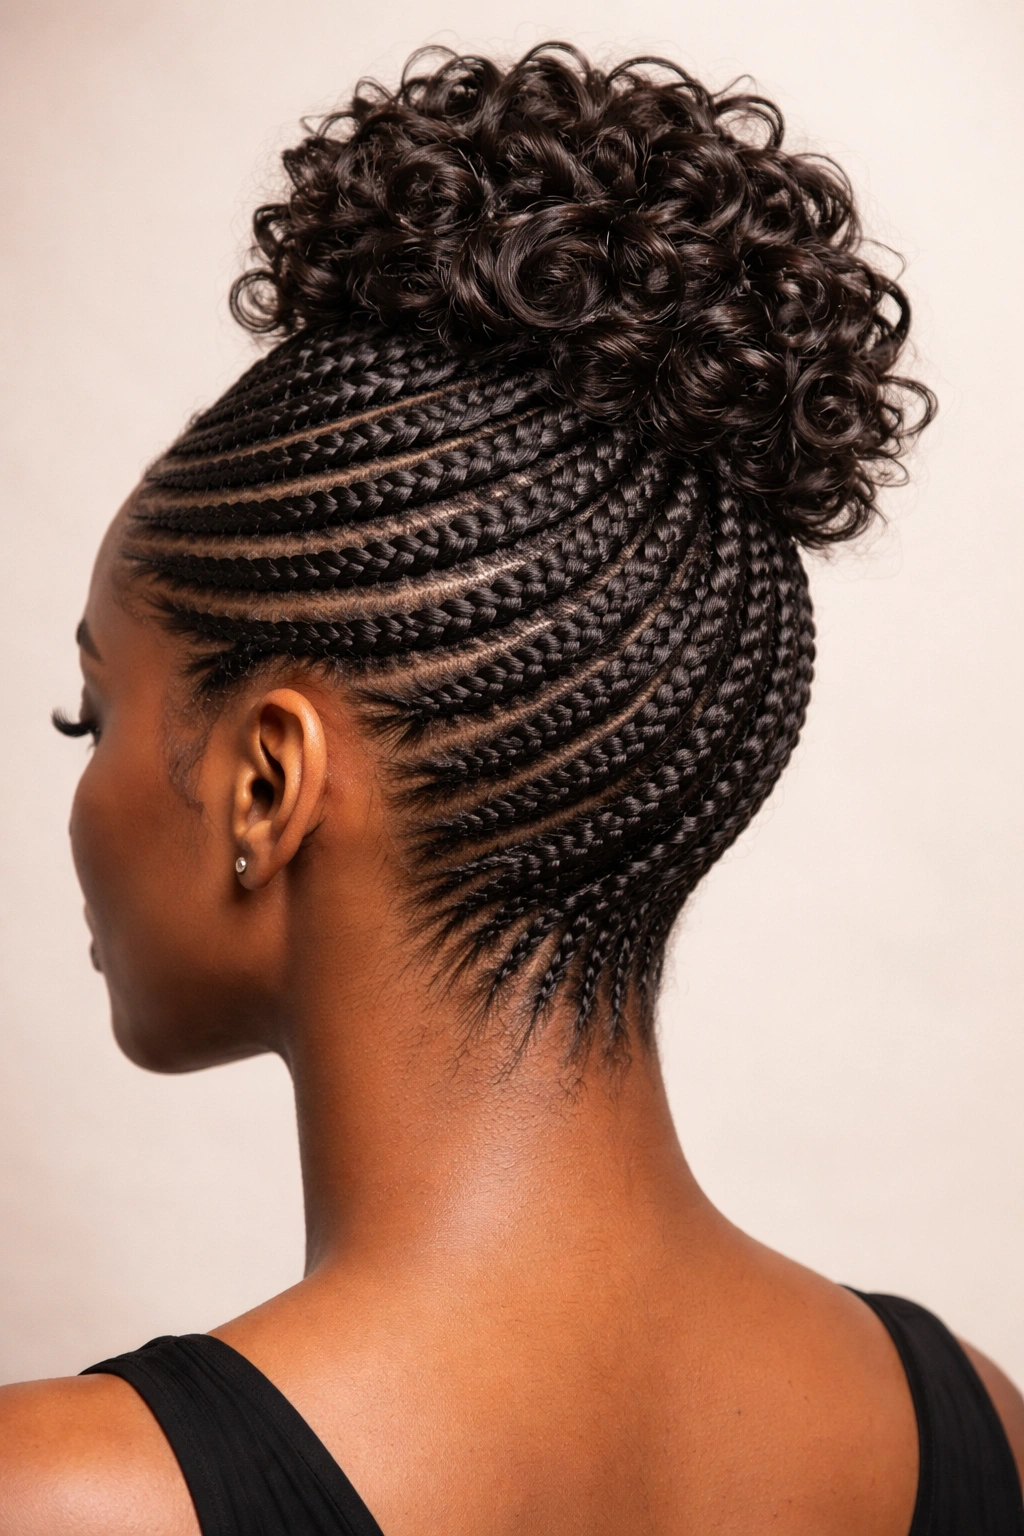
This variation keeps the spiral or stacked braids for most of the style but lets the very top — the crown of the beehive — transition into loose, flowing curls. It’s a hybrid style that balances the structured protection of cornrows with the femininity and softness of curls.
Blending Structure and Freedom
The curled crown approach appeals to people who want the protective benefits of braids but miss the versatility of loose hair. By cornrowing the majority of your hair and letting just the top transition into curls, you get protection where it matters most (the bulk of your hair) while still getting to wear curls where they’re most visible and expressive. This style also simplifies maintenance — you’re only styling a small section of loose hair rather than managing your entire head daily.
Creating Curls That Last
- Use flexi-rods or foam curlers at night to maintain curl pattern throughout the week
- Apply curl-defining cream or gel to set the curls and extend their lifespan
- Consider installing the braids with preformed curls already in the extensions — this guarantees consistency and reduces daily styling demands
- Pineapple the curls at night (gather them loosely at the top of your head) to preserve their shape
- The braided base allows you to skip daily shampoos, so your curls stay fresher longer
Worth knowing: This style typically lasts 5-7 weeks — the braids maintain their integrity, but the curls may gradually relax and need refreshing around week 4.
6. Multi-Colored Beehive Cornrows
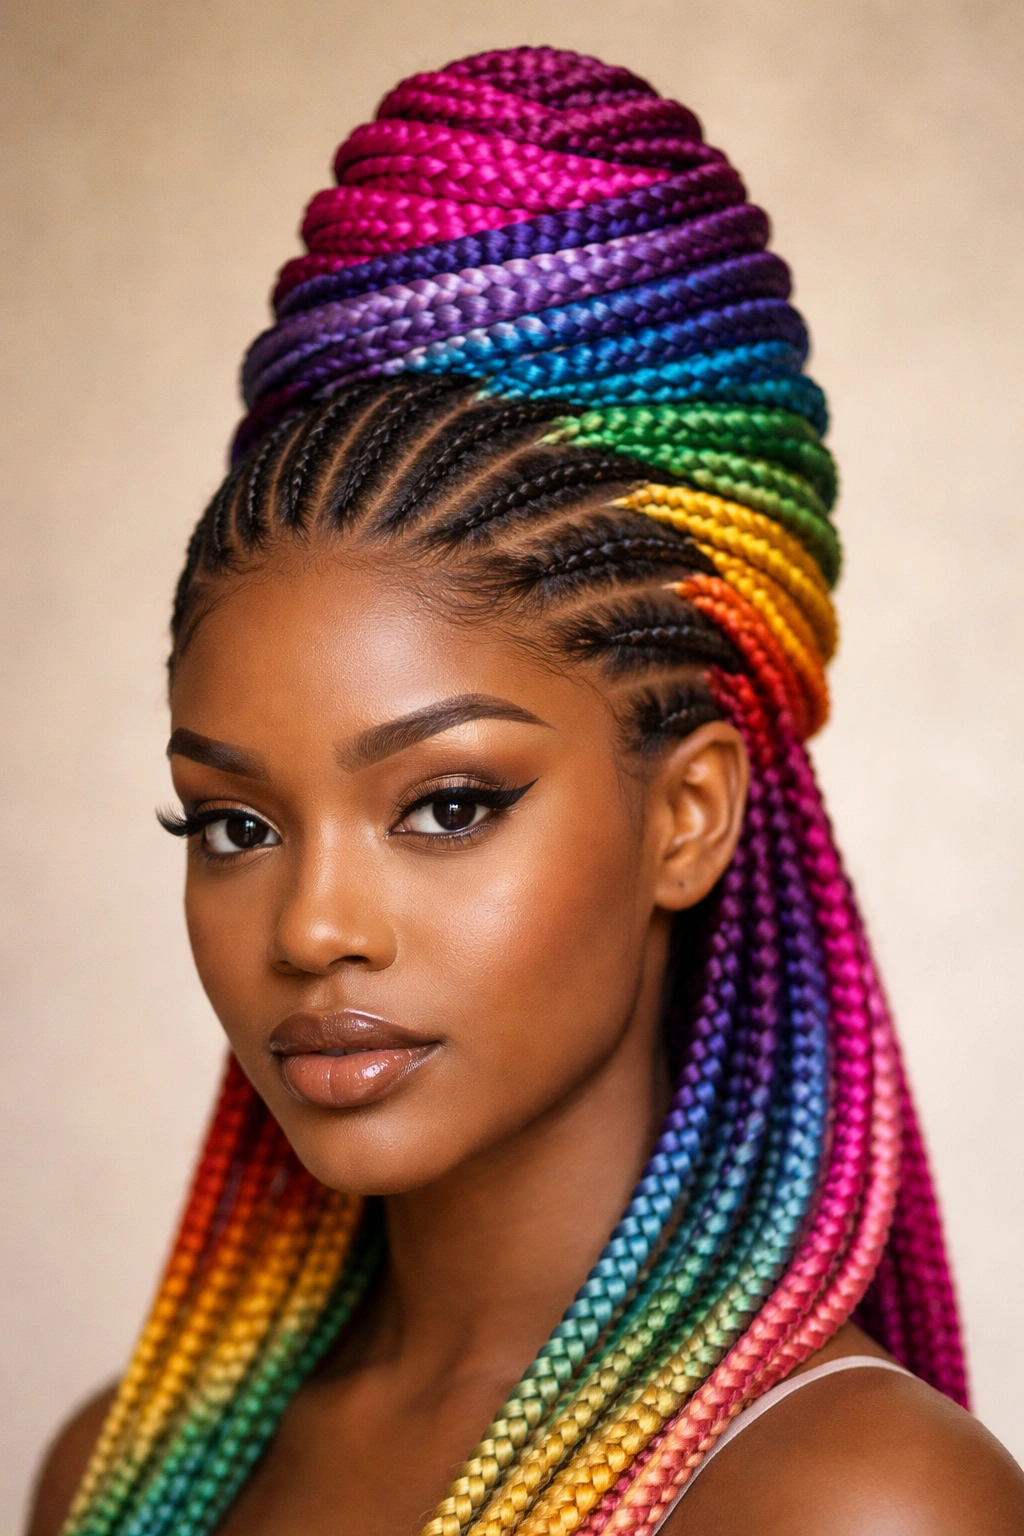
Take any beehive cornrow foundation and elevate it with color: use different-colored braiding extensions for different rows, creating a gradient effect, contrasting stripes, or even a complete rainbow cascade. This is where beehive cornrows become undeniable art.
Color Combinations That Work
- Ombré gradient: dark at the front transitioning to lighter shades toward the back, mimicking how light hits the beehive shape
- Contrasting accent rows: perhaps 80% of your beehive in your natural color with strategic rows in a bold contrasting shade
- Two-tone alternation: every other row in a different color, creating a striped, dimensional effect
- Rainbow progression: each row a different color as you move around the beehive, creating maximum visual interest
- Highlight rows: just 1-2 rows in a pop color against a neutral base
Choosing Colors That Flatter Your Complexion
Different colors interact with your skin tone in completely different ways. Warm tones (golds, coppers, warm browns, warm reds) tend to enhance deeper skin tones and create richness. Cool tones (silvers, cool reds, blues, purples) create striking contrast and make certain features pop. Neutral tones (black, white, natural browns) never fail but offer less visual drama. The key is choosing colors that either complement your natural undertones or deliberately contrast them depending on your desired effect.
Pro tip: Show your stylist reference photos of color combinations that appeal to you — cornrow artists are visual people and photos communicate far better than words ever can.
7. Beehive with Shaved or Faded Sides
This bold version incorporates a modern, edgy element: the sides and back of your head are completely shaved or faded very short, while the beehive cornrows crown the top. It’s a statement that commands attention and creates a striking contrast between the smooth, closely shaved sections and the sculptural braided top.
Why the Contrast Works
Shaving or fading the sides emphasizes the architecture of your beehive because nothing else competes for visual attention. The shaved sections also reduce overall hair weight, which means less tension on your braids and better comfort for extended wear. From a practical standpoint, caring for shaved sides is minimal — you’re just touching up the fade every 3-4 weeks, while your beehive braids remain intact and protected. The style works equally well for anyone who genuinely loves the aesthetic and anyone exploring a temporary bold expression.
Maintenance and Regrowth Considerations
- Plan for fade touch-ups every 3-4 weeks using clippers or visiting a barber
- Your beehive braids can stay in place while you get the sides maintained
- Shaved sides work best with high-rise beehives that sit well away from the shaved areas — this prevents the transition from looking too abrupt
- Protect your shaved scalp with sunscreen if you’re spending time outdoors; exposed scalp burns quickly and painfully
- The style gradually softens as your sides grow out, creating an interesting mid-stage look if you decide not to maintain the fade
Worth knowing: This version pairs beautifully with creative color — the contrast between shaved skin and colored braids is genuinely striking.
8. Beehive Cornrows with Bead and Shell Accents
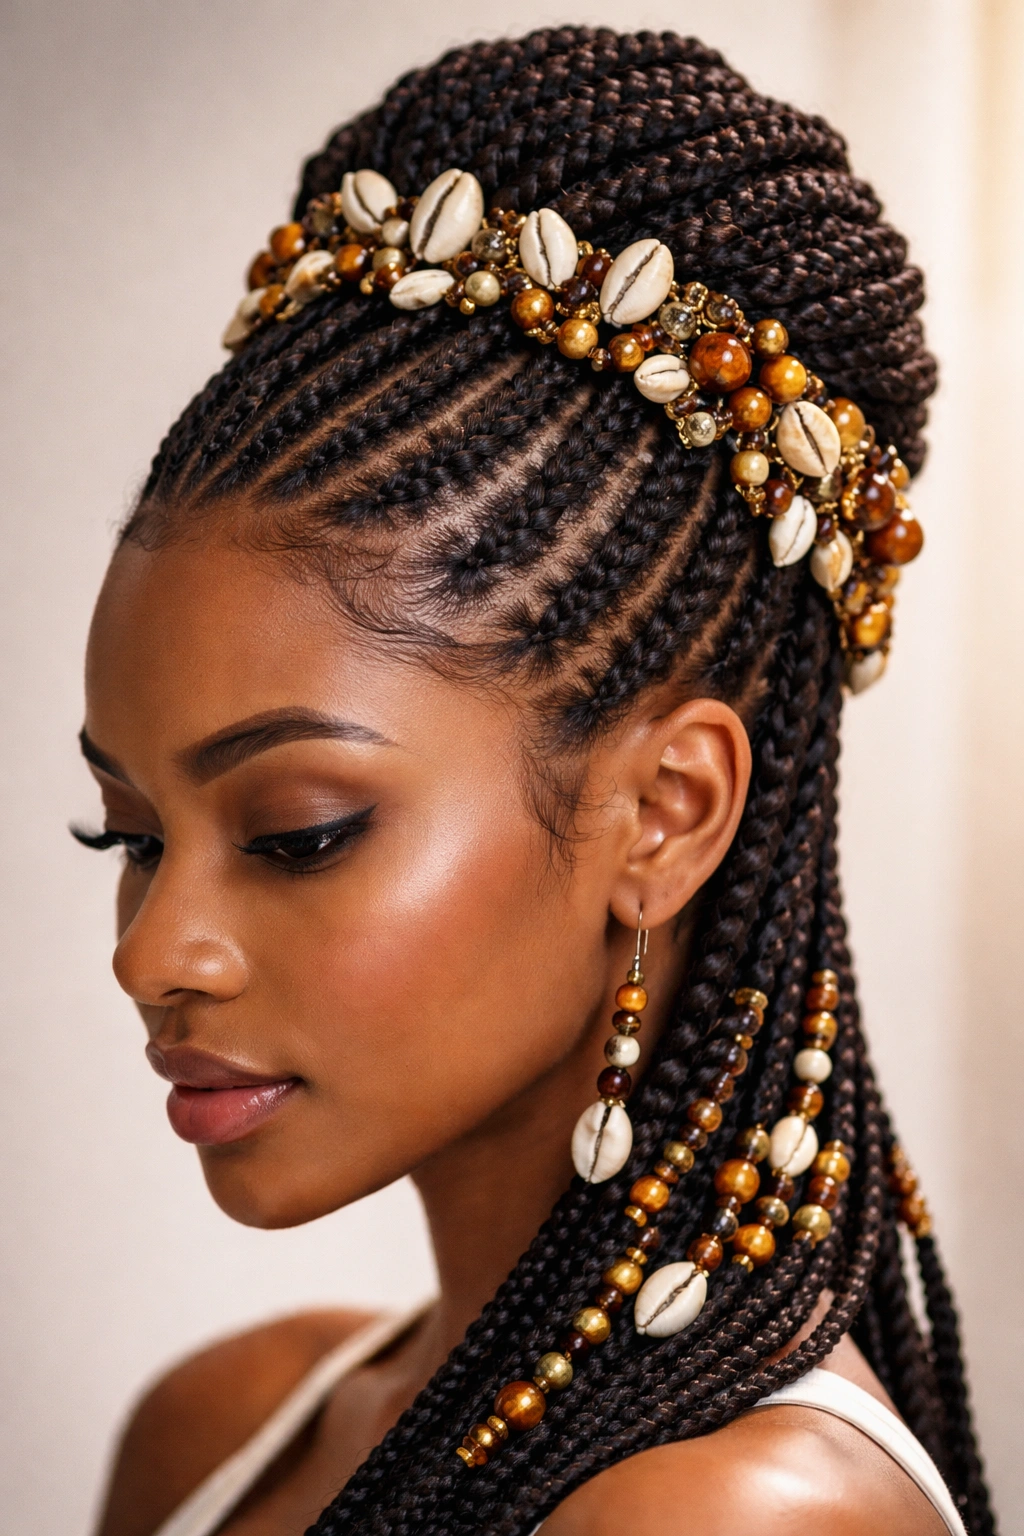
Add tactile, decorative elements to your beehive by incorporating beads and shells directly into your braids or attaching them to the finished beehive. This version prioritizes ornament and personality, turning your braids into wearable jewelry.
Where and How to Add Beads
- Thread beads onto your braiding hair before you start braiding — this distributes them throughout each braid
- Add beads at the ends of finished braids for a definitive clink and visual punctuation
- Attach decorative shells or larger statement beads to the crown of the beehive using bobby pins or small clips
- Consider your lifestyle: beads and shells add weight and create sound, which some people love and others find distracting
- Mix bead colors strategically: metallic beads add sophistication, wooden beads add texture, colorful beads add playfulness
The Aesthetic and Practical Considerations
Beads serve multiple purposes. Aesthetically, they add visual interest and personality to your braids — they turn a style into a complete expression of your taste and creativity. Practically, they help keep your braids compressed and prevent them from fuzzing or unraveling as quickly. That said, beads do add weight, which can increase scalp tension if you have too many or if they’re too heavy. Strike a balance between visual interest and comfort.
Pro tip: If you’re trying beads for the first time, start with a moderate amount and gauge how your scalp feels after a few hours — you can always add more next time.
9. Sleek Beehive Cornrows with Defined Edges
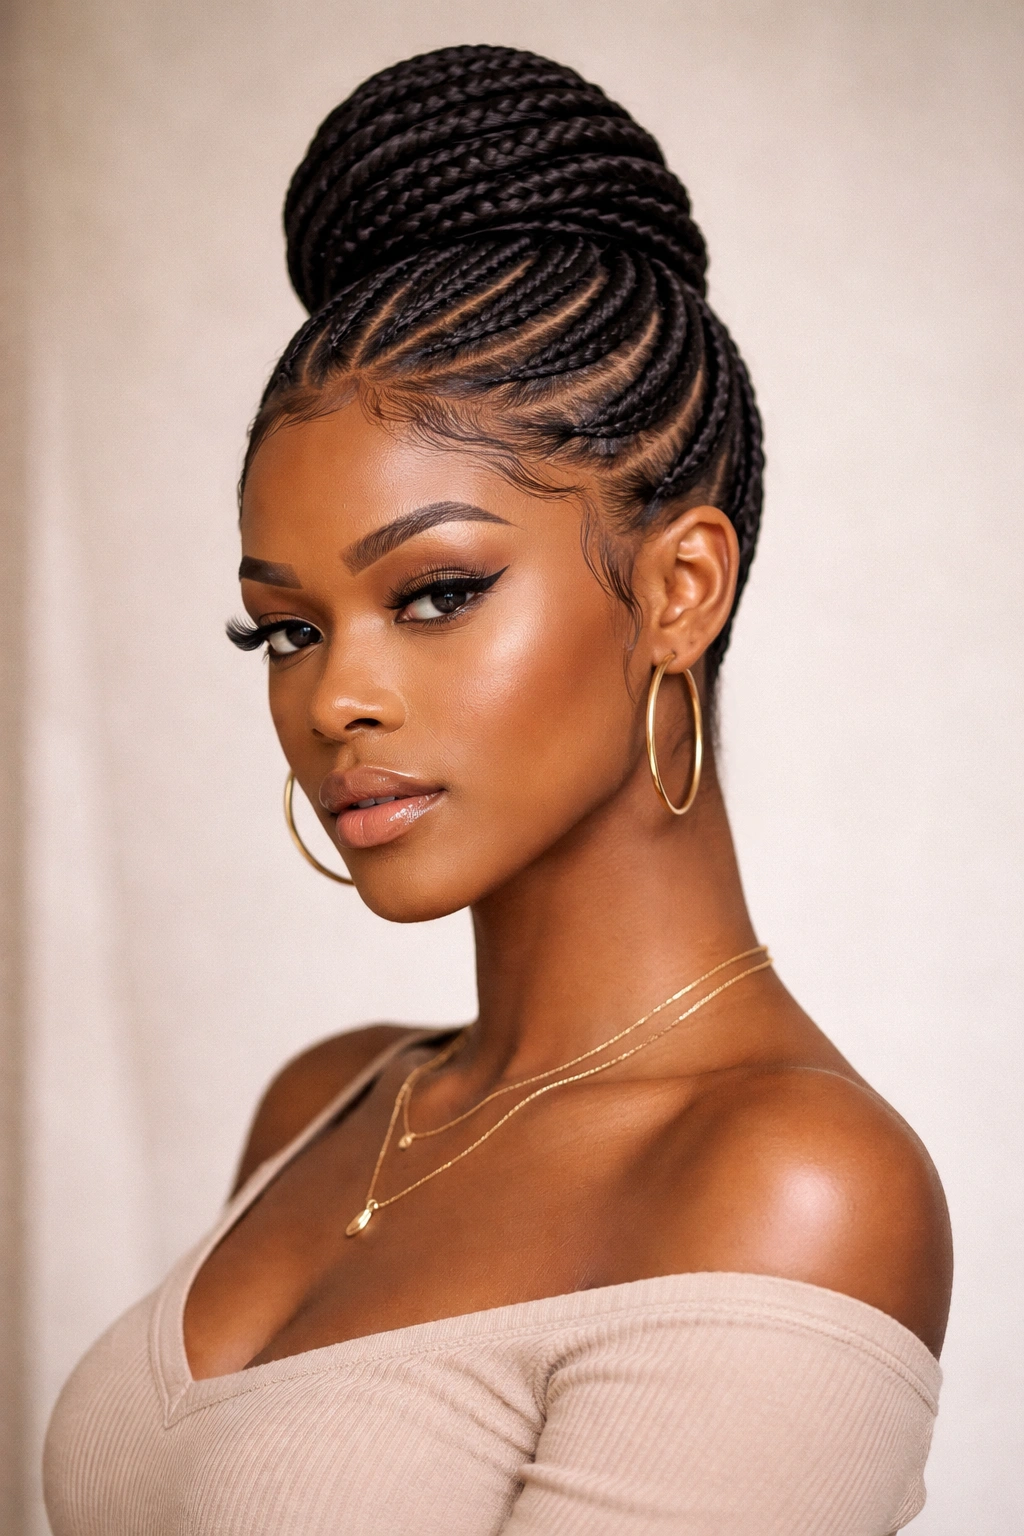
This version emphasizes polish and refinement: every single line is perfectly clean, every edge is sharply defined, and the entire style looks intentional and meticulously executed. This is the beehive for someone who wants undeniable elegance alongside boldness.
Achieving Perfectly Defined Edges
- Use firm edge control or topical adhesive on the edges of every braid, not just the perimeter of your hairline
- Smooth each braid down with a soft brush after braiding, pushing any flyaways into submission
- Consider slicking down the entire surface of the beehive with a light edge control, smoothing it with a brush so every braid sits perfectly in place
- Use a blow dryer on low heat to set the edge control and lock everything in position
- The goal is geometric precision — each braid should look intentional and defined, not soft or romantic
Why Precision Matters
A sleek, perfectly defined beehive simply photographs better and reads as more polished. It communicates that you’ve invested care and attention into this style. The cleanness of the execution becomes part of the statement — it’s not just about wearing cornrows, it’s about wearing them immaculately.
Worth knowing: Sleek beehive cornrows work best with a minimal color palette — either one natural color or a maximum of two colors — because multiple colors can make the style feel chaotic rather than refined.
10. Beehive Cornrows with Extensions That Match Natural Hair
The final version focuses on seamless integration: you choose braiding extensions that match your natural hair texture and color so perfectly that viewers have difficulty discerning where your natural hair ends and the extensions begin. It’s a beehive that feels like an organic expression of your own hair rather than an obvious protective style.
The Benefits of Seamless Integration
When your extensions blend completely with your natural hair, the beehive reads as your natural texture and color expressing itself in a sculptural form. This approach appeals to anyone who wants the protective benefits of beehive cornrows without the obvious “styled” appearance. It also works beautifully for professional environments where you want undeniable style but perhaps not maximum boldness.
Choosing the Right Extensions
- Have a consultation with your stylist about texture matching — curly extensions with curly hair, straight extensions with straighter hair
- Look at extensions under natural light, not just in the salon, to verify the color match
- Consider that extensions will look slightly different from your natural hair no matter how well they match, so aim for close enough rather than perfect
- High-quality human hair extensions integrate far better than synthetic — the investment is worth it for seamless blending
- Straight-cut extensions (the same length as your natural hair) blend better than extensions that taper or have a different shape
Pro tip: Many stylists have sample packs of extensions in various colors and textures — ask if you can see these before your appointment so you can help identify the perfect match.
Final Thoughts
Beehive cornrows represent genuine freedom in how you approach protective styling. Whether you choose the purity of classic spirals, the boldness of multi-color designs, or the seamlessness of matched extensions, you’re tapping into a versatile technique that protects your hair while expressing exactly who you are. The key is understanding what each variation offers and choosing the approach that aligns with your hair health, lifestyle, and aesthetic preferences.
The real secret to succeeding with beehive cornrows is finding a skilled stylist who understands your vision and has the technical ability to execute it. These styles demand precision and expertise — your braids need to be tight enough to last without being so tight they cause damage, your beehive needs to maintain its shape without looking stiff, and your overall style needs to feel intentional and beautifully executed. Take time to research stylists, look at portfolios, and communicate clearly about what you’re hoping to achieve. When everything aligns — the right stylist, the right style variation, and realistic expectations about maintenance — beehive cornrows become one of the most satisfying protective styles available.