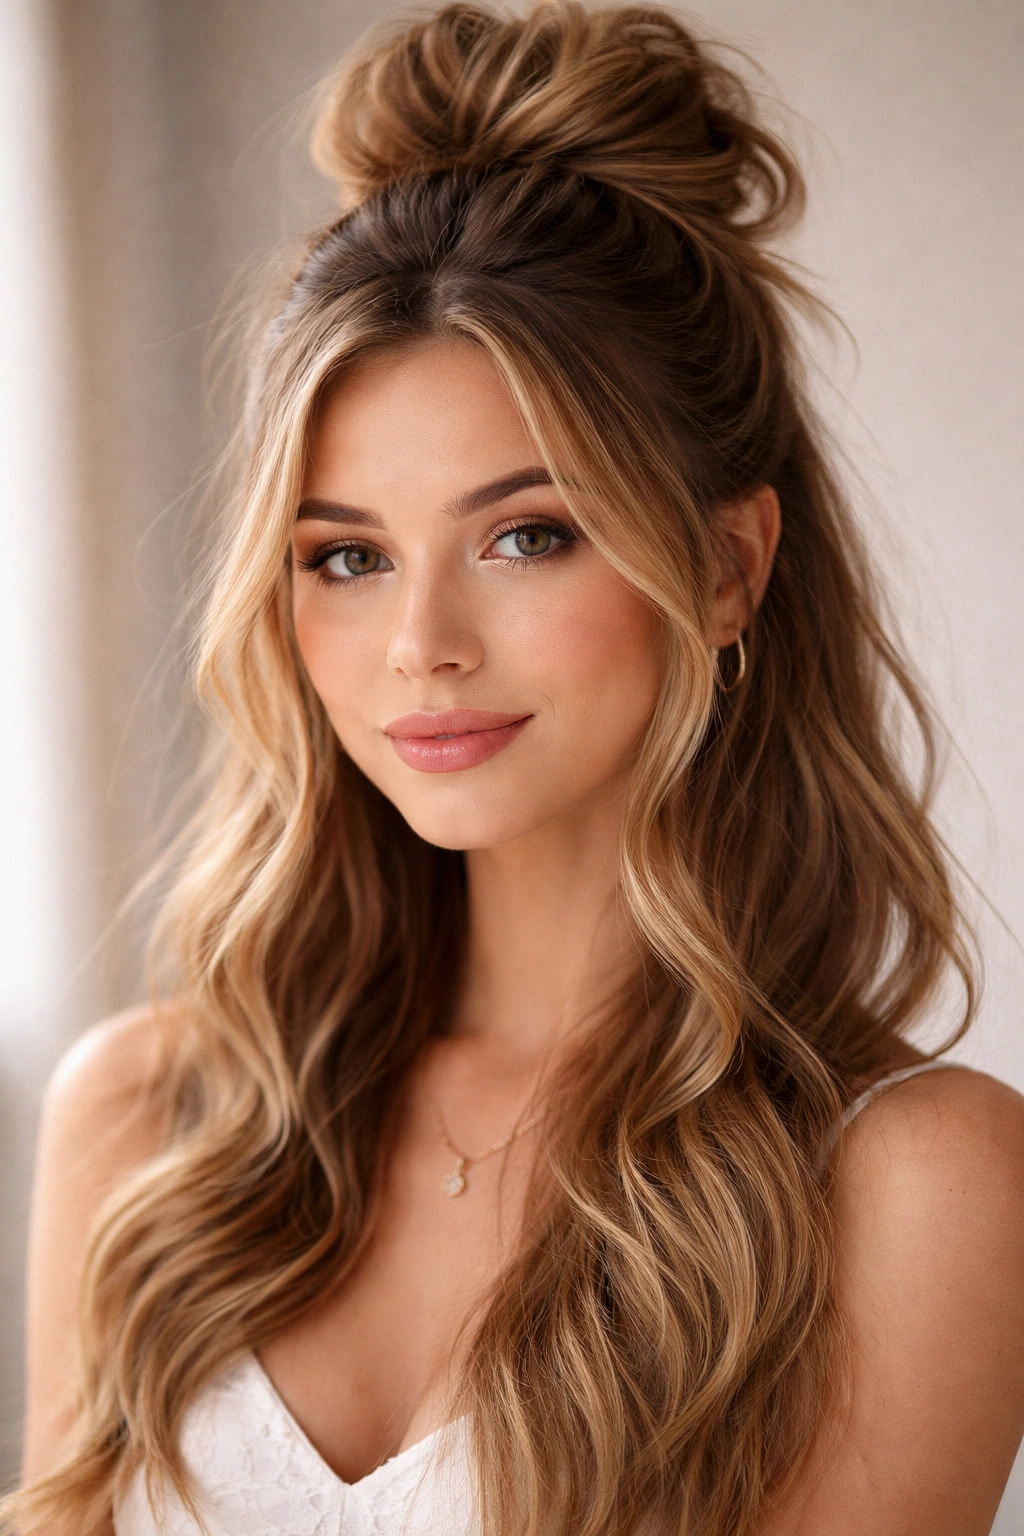
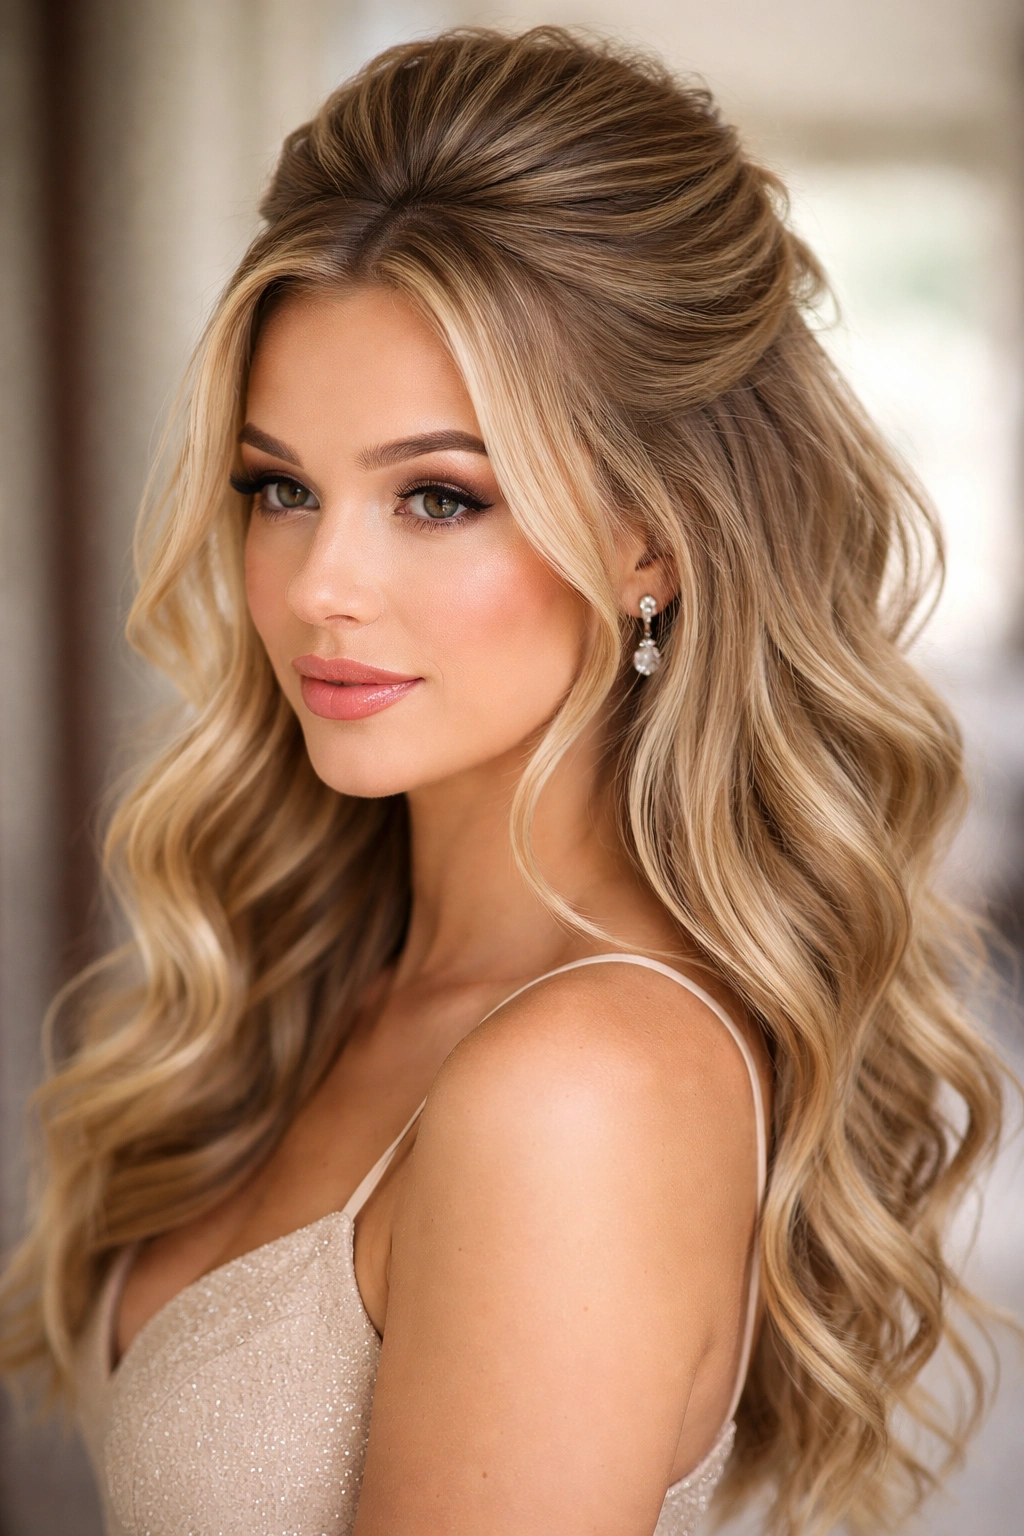
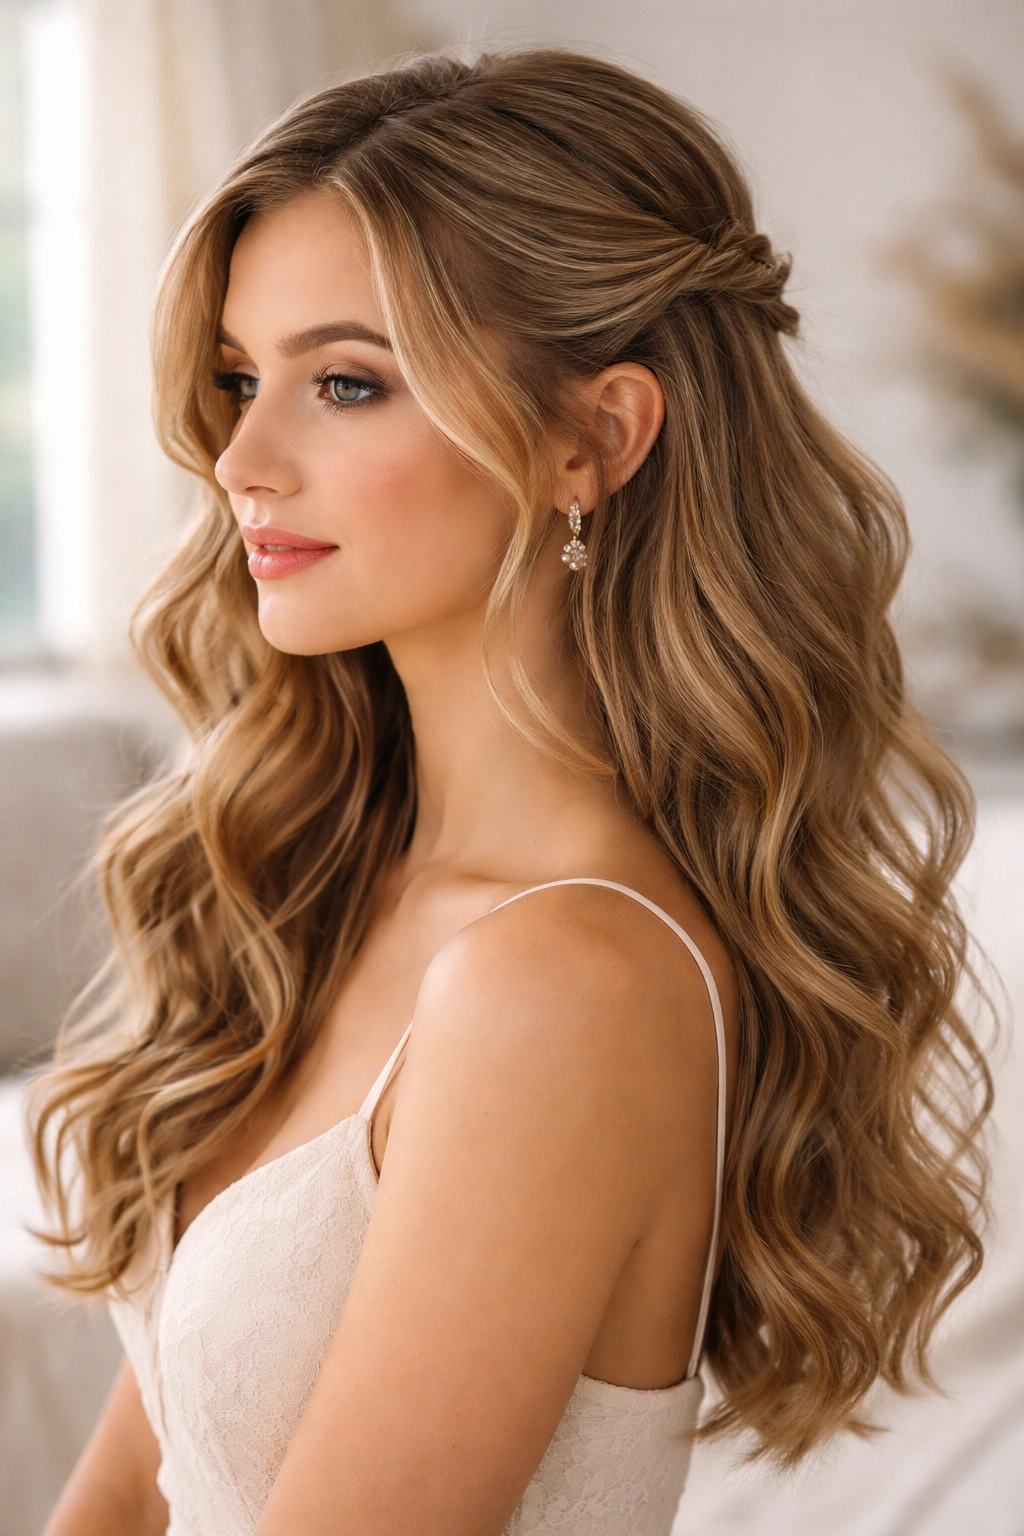
Homecoming is that magical moment when you want to look effortlessly put-together—polished enough for photos but not so formal that you feel overdone. The half up half down hairstyle is basically the MVP of homecoming hair because it hits that sweet spot perfectly. You get the elegance of an updo without committing fully to it, the volume and movement of your hair down, plus the practical benefit of keeping hair away from your face while dancing all night.
The beauty of half up styles is that they work for literally every hair type and length. Whether your hair is stick-straight or naturally curly, thick and voluminous or fine and delicate, there’s a half up look that’ll make you feel confident and gorgeous. These styles also photograph beautifully in those important homecoming pictures—your face is visible and framed nicely, your hair has dimension and movement, and everything looks intentional without screaming “I spent three hours getting ready.”
What makes half up styles so versatile for homecoming is how customizable they are. You can dress them up with jeweled clips and intricate braids, keep them soft and romantic with loose waves, or go modern and edgy with sleek lines and bold accessories. The foundation is always the same—gather the top section of your hair and secure it—but the variations are endless. Let’s dive into eighteen stunning half up half down styles that’ll have you feeling like the homecoming royalty you are.
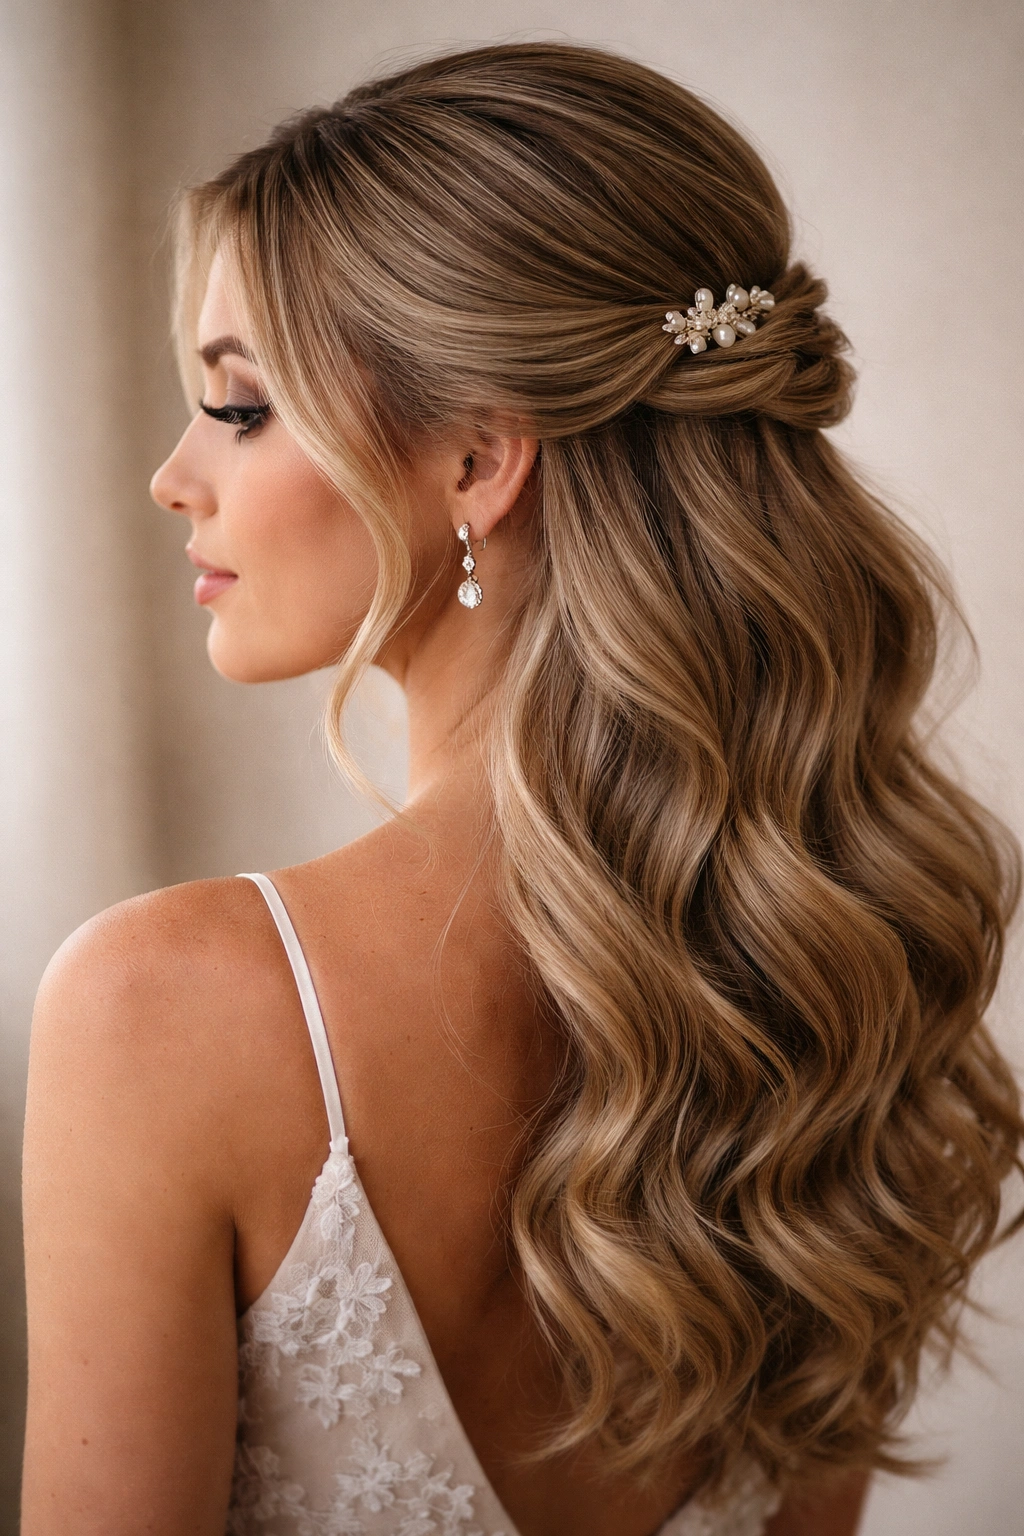
1. Soft Waves with Pearl Clips
This style is your go-to if you want to look effortlessly romantic without spending an hour styling. Start with clean, dry hair and apply a heat protectant spray all over. Using a 1.25-inch curling iron, curl small sections of hair away from your face, working through the entire head in the same direction for cohesion. Don’t worry about making perfectly uniform waves—the slightly undone quality is what makes this look so charming.
How to Create the Waves
Divide your hair into quarter-inch sections and curl each one, holding the iron for about three seconds before sliding it down to the ends. For the half-up portion, gently brush through the waves with a paddle brush to soften them into loose waves rather than tight curls. This gives you that soft, romantic texture that photographs beautifully under homecoming photos.
The Half-Up Assembly
Take a section of hair from your right temple across to your left ear, making sure it’s thick enough to look substantial but not so heavy that it pulls uncomfortably. Twist this section gently two or three times as you bring it to the back of your head, then secure it with bobby pins. Add two or three pearl clips—gold or silver depending on your dress color—along the twist for an elegant finishing touch that catches the light when you move.
Pro tip: Spray the finished waves lightly with a flexible hold hairspray that won’t make your hair stiff or crunchy. You want the waves to move naturally with you on the dance floor while staying in place.
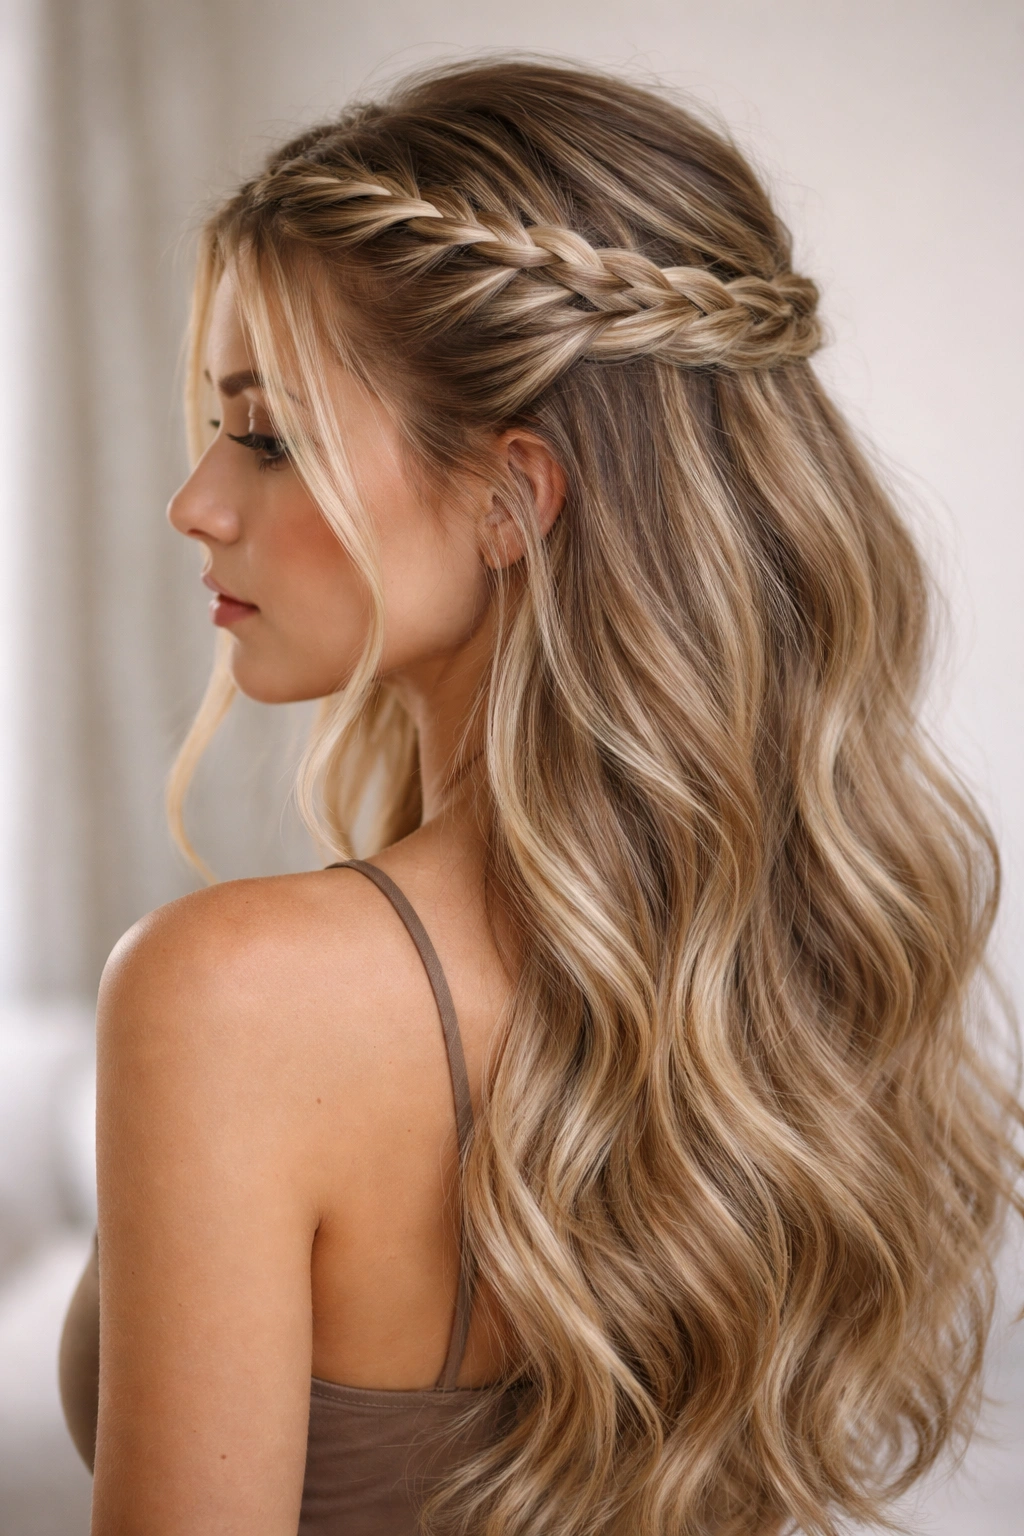
2. Braided Half Up with Floral Pins
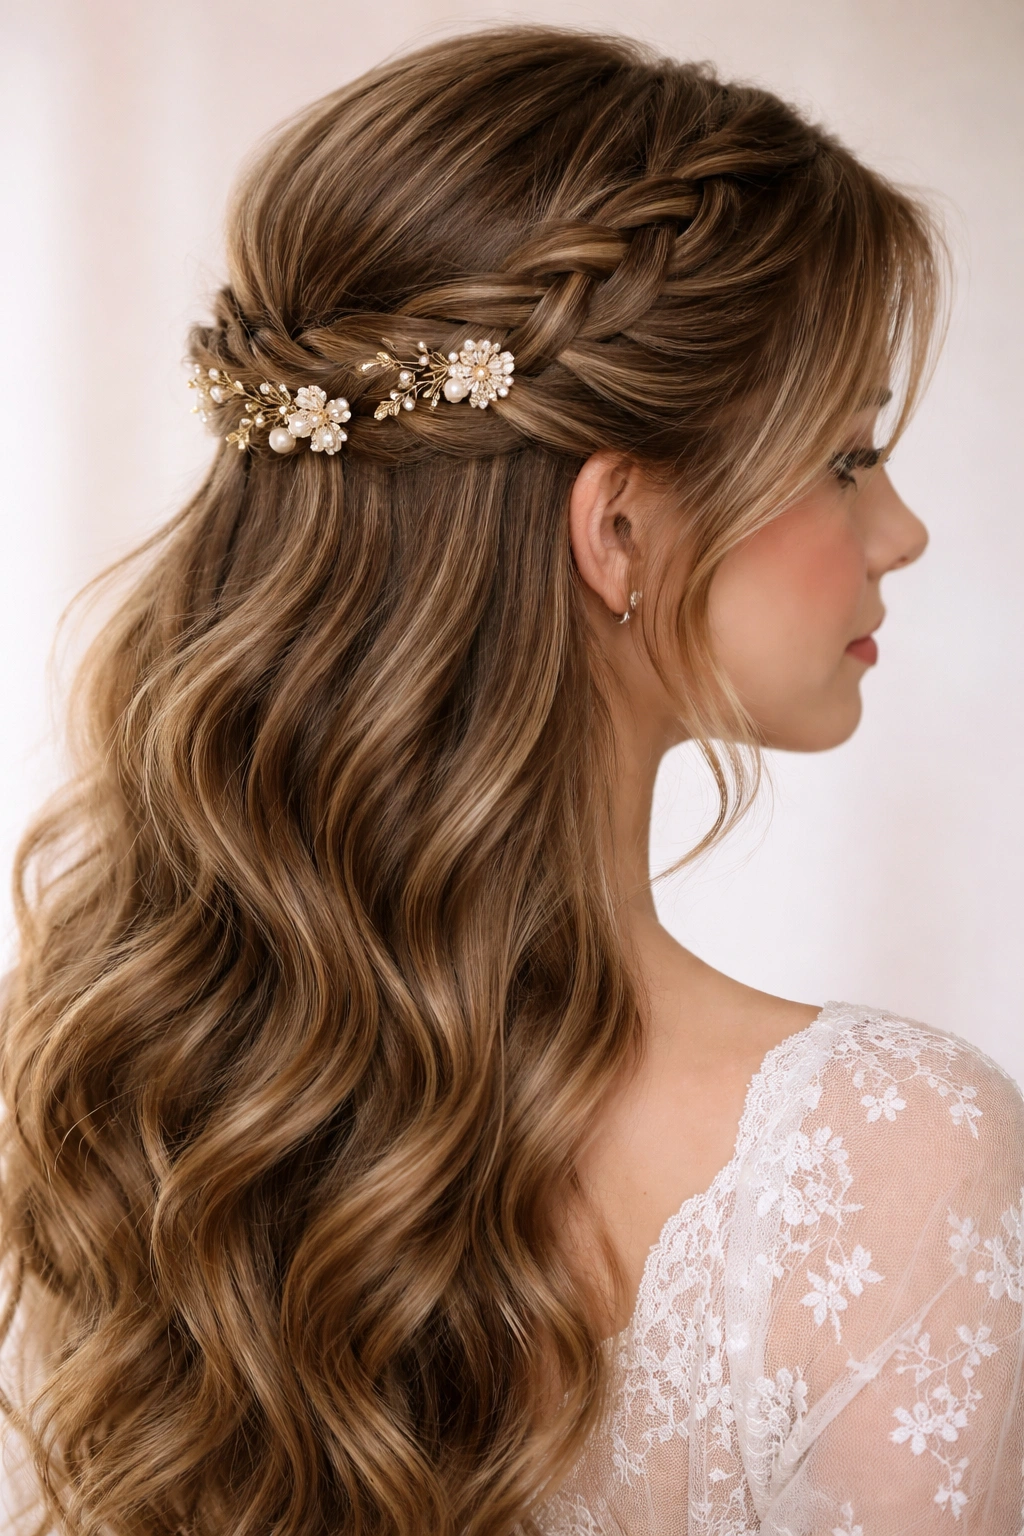
If you’re the type who wants a little more structure and intricacy, braided half-up styles deliver. This version combines a classic Dutch braid with the ease of half-down hair, giving you sophistication without excessive styling time. Start by making a deep side part on whichever side makes your face feel most balanced—everyone has a better side, and homecoming photos will prove it.
Mastering the Dutch Braid
A Dutch braid is basically a regular three-strand braid, but you cross the side strands under the center strand instead of over it. This creates that gorgeous raised, architectural look that really stands out in photos. Start the braid near your temple and bring it diagonally across the back of your head toward your opposite ear, incorporating small sections of hair as you go down the braid.
Adding Texture and Dimension
Before you start braiding, spray your hair with a light texturizing spray or sea salt spray. This gives your braid something to grip and makes the final result look less polished and more interesting. As you braid, gently pull the edges of each loop outward once you’ve completed the braid—this makes it appear thicker and more romantic.
The Finishing Details
Secure the braid at the back of your head with bobby pins that match your hair color, then tuck a few small baby’s breath or eucalyptus sprigs into the braid if you’re going for a garden-romance vibe. Alternatively, use tiny floral hair clips in your homecoming colors for a more coordinated look. Let the remaining half-down hair fall in waves or curls to balance the structure of the braid.
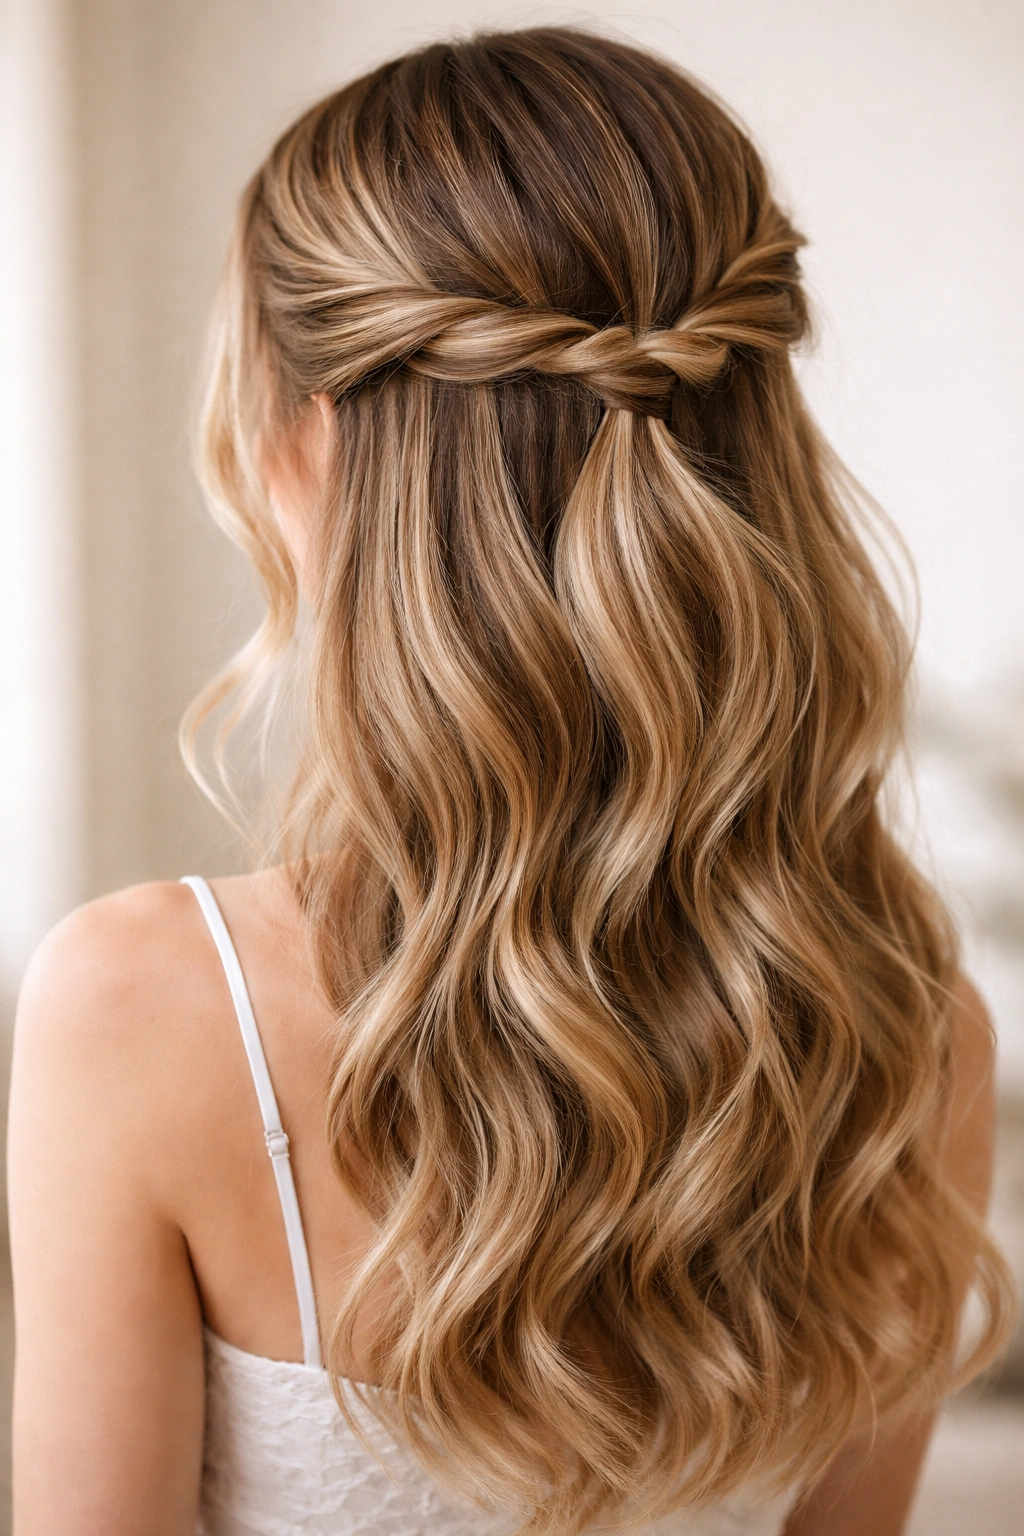
3. Twisted Half Updo with Face-Framing Layers
This style is pure elegance with minimal effort—two sections of your hair twisted together and pinned at the back. It works beautifully on every hair type because the twists add visual interest without requiring complicated braiding skills. Start by applying a smoothing serum to damp hair, then blow-dry it straight or with a slight wave depending on your preference.
Creating the Twisted Sections
Take a small section of hair from your right temple (about the width of a dollar bill) and divide it into two thin strands. Twist these strands around each other loosely, keeping the twist close to your scalp as you work toward the back of your head. Repeat on the left side with another section of hair. These two twists should meet at the back of your head, roughly where your crown is.
The Strategic Pinning
Secure both twisted sections together with bobby pins at the center back, but don’t worry about making it perfectly hidden—a little texture and visible pins actually look intentional and modern. You can even use decorative bobby pins in gold or silver that coordinate with your dress. The key is that the pins look like a design choice, not a desperate hiding spot.
Frame Your Face
Before you finish, pull out a few delicate face-framing pieces from near your temples and let them fall naturally around your cheeks and ears. This softens the style and adds a touch of romanticism. If you have layers or shorter pieces, this happens naturally, but if you have all one length, you can gently tease out a few strands to create that effect.
Worth knowing: This style works best on hair that’s been styled with some texture. Completely straight hair can look a bit flat, so even if you don’t do full waves, adding some volume with a texturizing spray or light waves helps the style shine.
4. Sleek High Half Ponytail
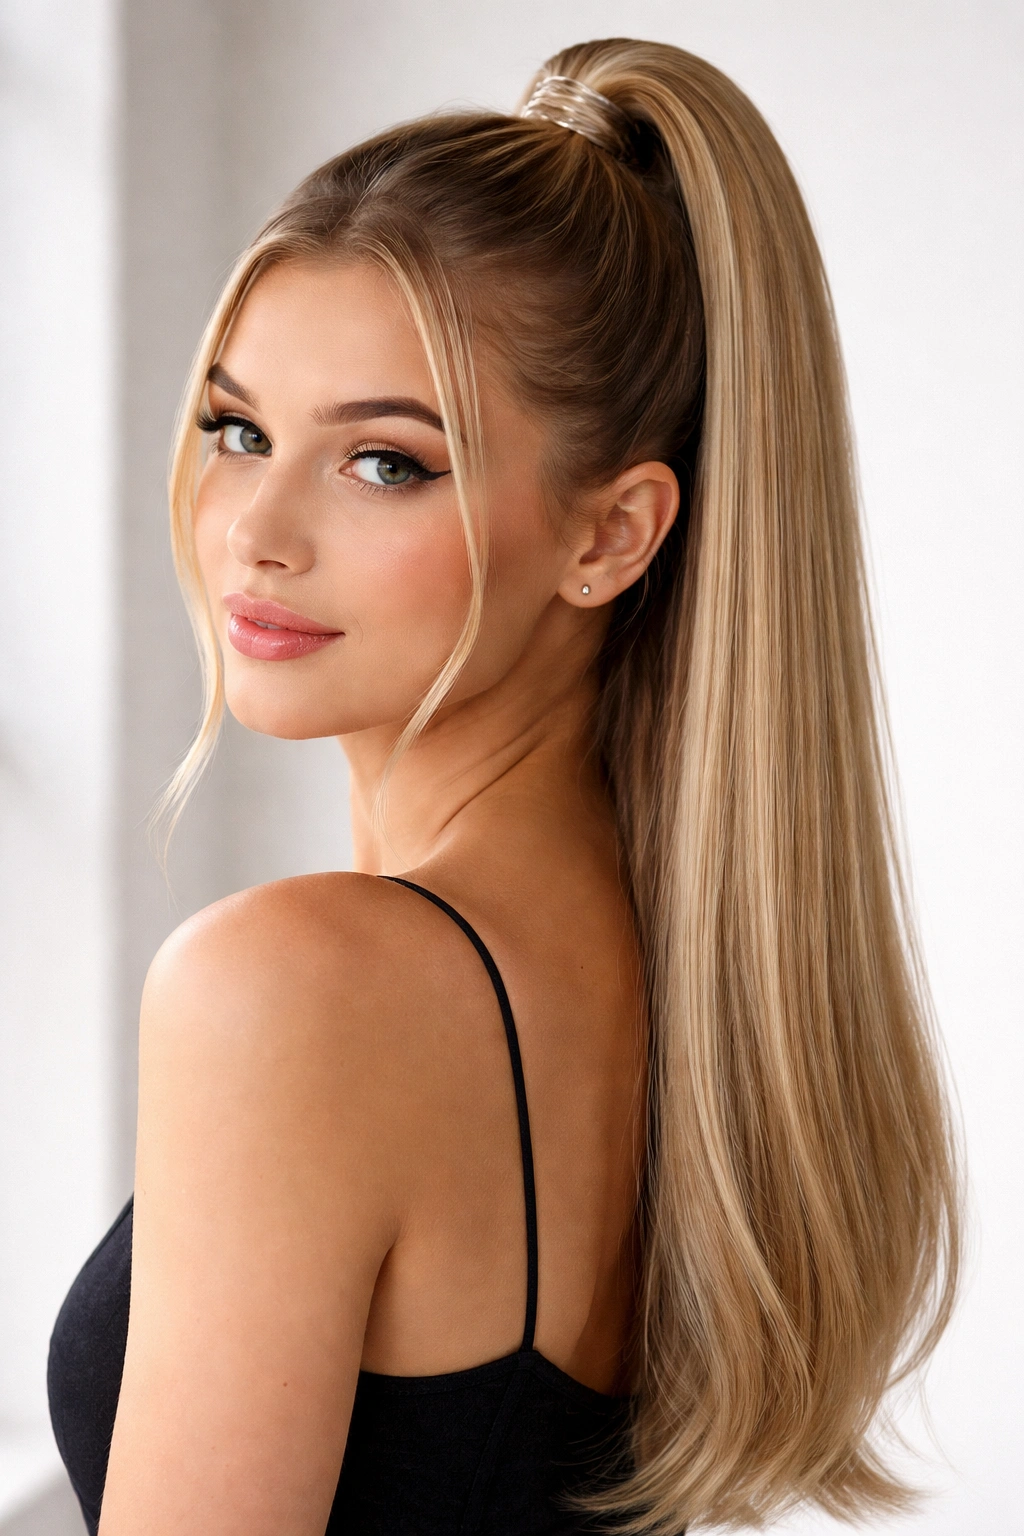
When your homecoming dress is already romantic or detailed, sometimes you need hair that’s clean and modern rather than all waves and curls. A sleek high half ponytail gives you that put-together, almost athletic elegance that balances busy outfit choices. This look requires a smoothing serum and hairspray with serious staying power—you want zero flyaways.
Achieving the Sleek Look
Apply a smoothing serum to damp hair and blow-dry it completely straight using a paddle brush and concentrator nozzle on your blow dryer. Once dry, use a flat iron to polish any sections that aren’t perfectly straight. The sleekness is what makes this style special, so don’t skip this step even if you normally skip heat styling.
Creating the Ponytail
Take a section of hair from temple to temple across the top of your head, making sure it’s thick enough to look intentional but not so much that you’re taking half your hair up. Gather this section at the crown and secure it with a clear elastic or a thin elastic in your hair color. The placement should be high but not so high that it pulls uncomfortably—think of it as sitting right where a baseball cap sits.
The Polished Finish
Smooth any bumps around the ponytail base with a fine-tooth comb and a tiny dab of smoothing serum. Wrap a thin piece of hair around the base of the ponytail to hide the elastic, securing it with a bobby pin. You can add a sleek gold cuff or hair ring if you want a touch of shine, or keep it completely minimal for maximum modern elegance.
5. Romantic Curls with Ribbon
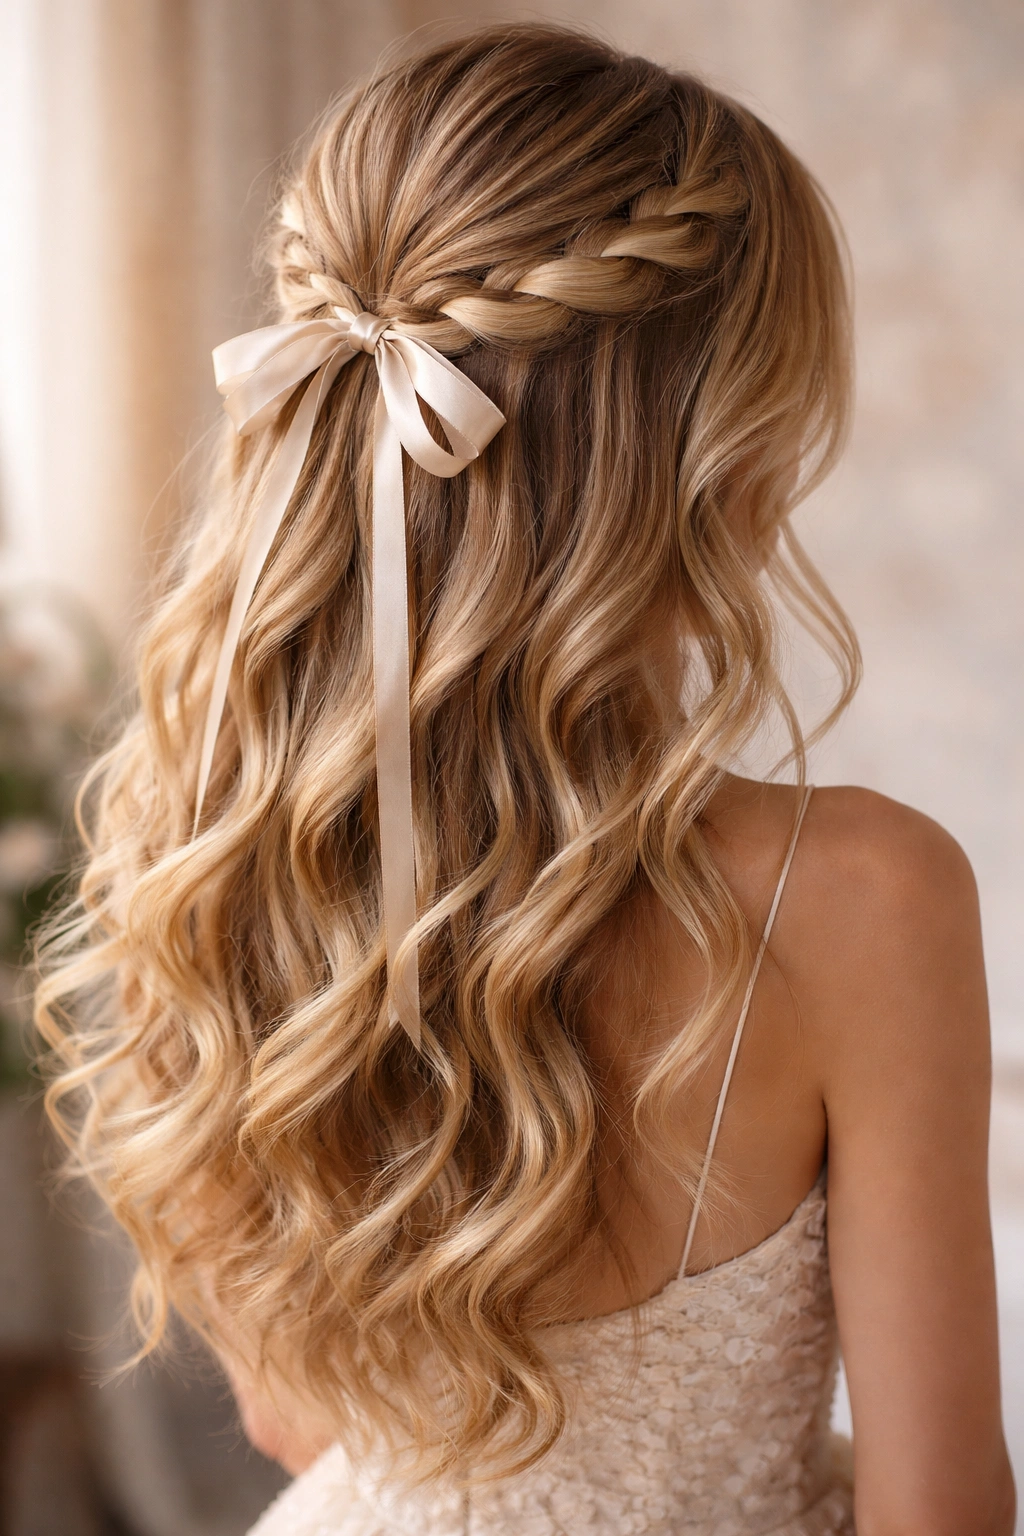
This style takes the classic half-up look and elevates it with the unexpected addition of a beautiful ribbon woven through the top section. It’s surprisingly easy to achieve and photographs like a dream. Start with damp hair and apply a curl cream or mousse before blow-drying, which helps create lasting waves and curls.
Building the Curls
Using a 1.5-inch curling iron, curl your entire head in sections, wrapping each section around the barrel and holding for about five seconds. Let each curl cool slightly before releasing it—this sets the shape and makes your curls last significantly longer through dancing and photos. Curl everything, including the section you plan to pin up, so the whole effect looks cohesive and intentional.
Incorporating the Ribbon
This is the fun part. After you’ve created your half-up section and secured it with bobby pins, thread a satin ribbon (about half an inch wide) through the base of your ponytail where it meets your secured hair. The ribbon should weave in and out slightly, creating visual interest. Use ribbon in a color that complements your dress—blush pink, ivory, gold, or even your school colors work beautifully.
The Loose, Romantic Vibe
Gently brush through the curls with a paddle brush or your fingers to break them up into soft waves. You’re going for romantic waves rather than tight ringlets. Let some pieces fall around your face and shoulders for that effortlessly elegant vibe. Finish with a light hairspray that keeps everything in place without making it feel crunchy.
Pro tip: Curl your hair the night before if you’re getting ready in the morning, then refresh the curls with a curling iron or a curling wand just before the event. Your curls will be bouncier and last longer.
6. Messy Bun Half Up
Sometimes the most beautiful styles are the ones that look like you threw them together in five minutes. A messy bun half-up sits right at that intersection of effortless and elevated—it looks undone enough to be charming but polished enough for homecoming. This works on all hair types, including fine hair, because the messiness camouflages any lack of volume.
Creating the Base
Blow-dry your hair with a light texturizing spray or sea salt spray applied to damp roots. You’re going for texture and movement, not sleekness, so don’t worry about perfecting every strand. If your hair is naturally straight, you can skip this step, but adding some texture really makes the style sing.
Building the Half-Up Bun
Gather your top section of hair (from temple to temple) and bring it to the back of your head, but instead of securing it with a tight elastic, use a flexible hair tie that allows some movement. Take the gathered section and twist it loosely, then wrap it around itself to form a bun shape. Secure the bun with bobby pins, but don’t tuck everything in neatly—let some pieces escape and fall around the base of the bun.
Adding Intentional Messiness
Pull gently at the sides and top of the bun to loosen it slightly and create volume. You want it to look full and relaxed, not tight and perfect. Let a few longer pieces fall down around your shoulders and frame your face. If you have bangs or shorter pieces, let those fall naturally too—they add to the undone-glam aesthetic.
Worth knowing: The messier this bun looks, the better it usually photographs. That contradicts everything our brains tell us about neatness, but trust it. The imperfect, lived-in quality is what makes it charming rather than sloppy.
7. Dutch Braid Half Up Style
A Dutch braid is the more interesting cousin of a regular French braid—it sits raised on top of your head and looks more architectural and modern. When incorporated into a half-up style, it creates a focal point that’s sophisticated without being overly formal. This works especially well on medium to long hair and looks stunning in homecoming photos.
The Dutch Braid Technique
Part your hair slightly to one side, then take a small section from your temple and divide it into three strands. Cross the right strand under the center (not over, like a regular braid—this creates the raised look), then cross the left strand under the center. As you continue braiding, add small sections of hair to the outer strands before crossing them under, just like you would with a French braid.
Bringing the Braid Across
Angle your braid diagonally across the back of your head, incorporating hair as you go. You’re essentially creating a thick, raised line across your head that looks like a crown. The braid should end somewhere near your opposite ear or the back of your head, depending on how thick you want it to be.
Finishing Touches
Secure the end of the braid with a bobby pin that matches your hair color, then gently pull the sides of each loop in the braid outward to make it appear thicker and more textured. This loosening process is crucial—a tight, perfect braid can look harsh, while a slightly loose braid looks intentional and pretty. Leave the bottom half of your hair completely down and wavy or curly for contrast.
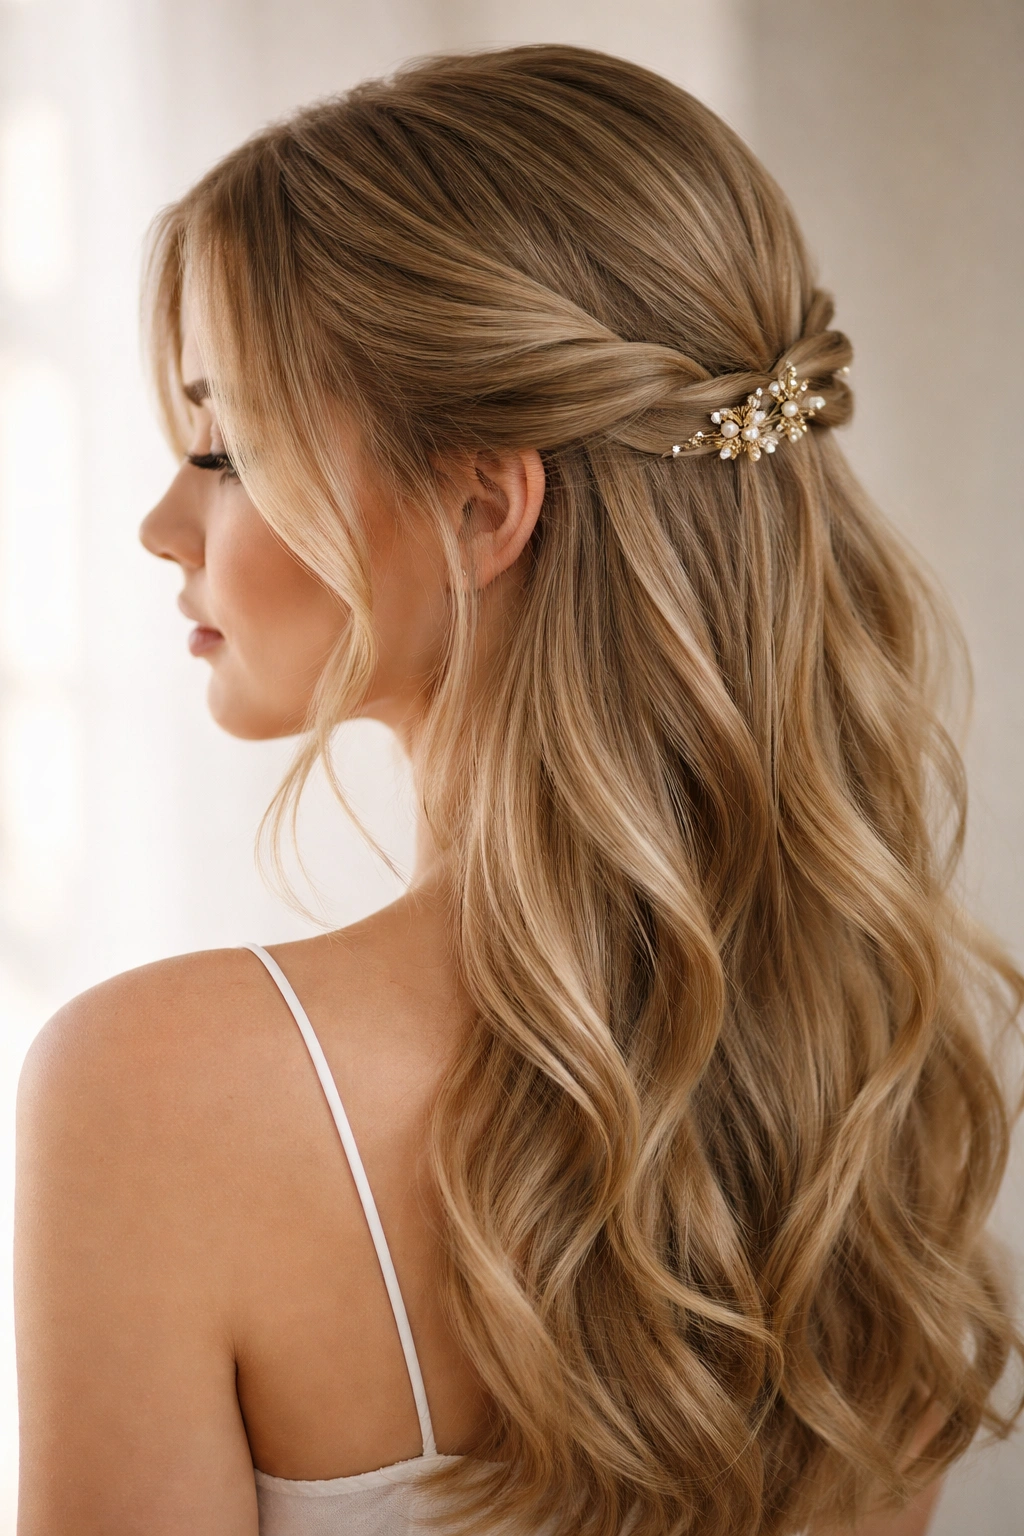
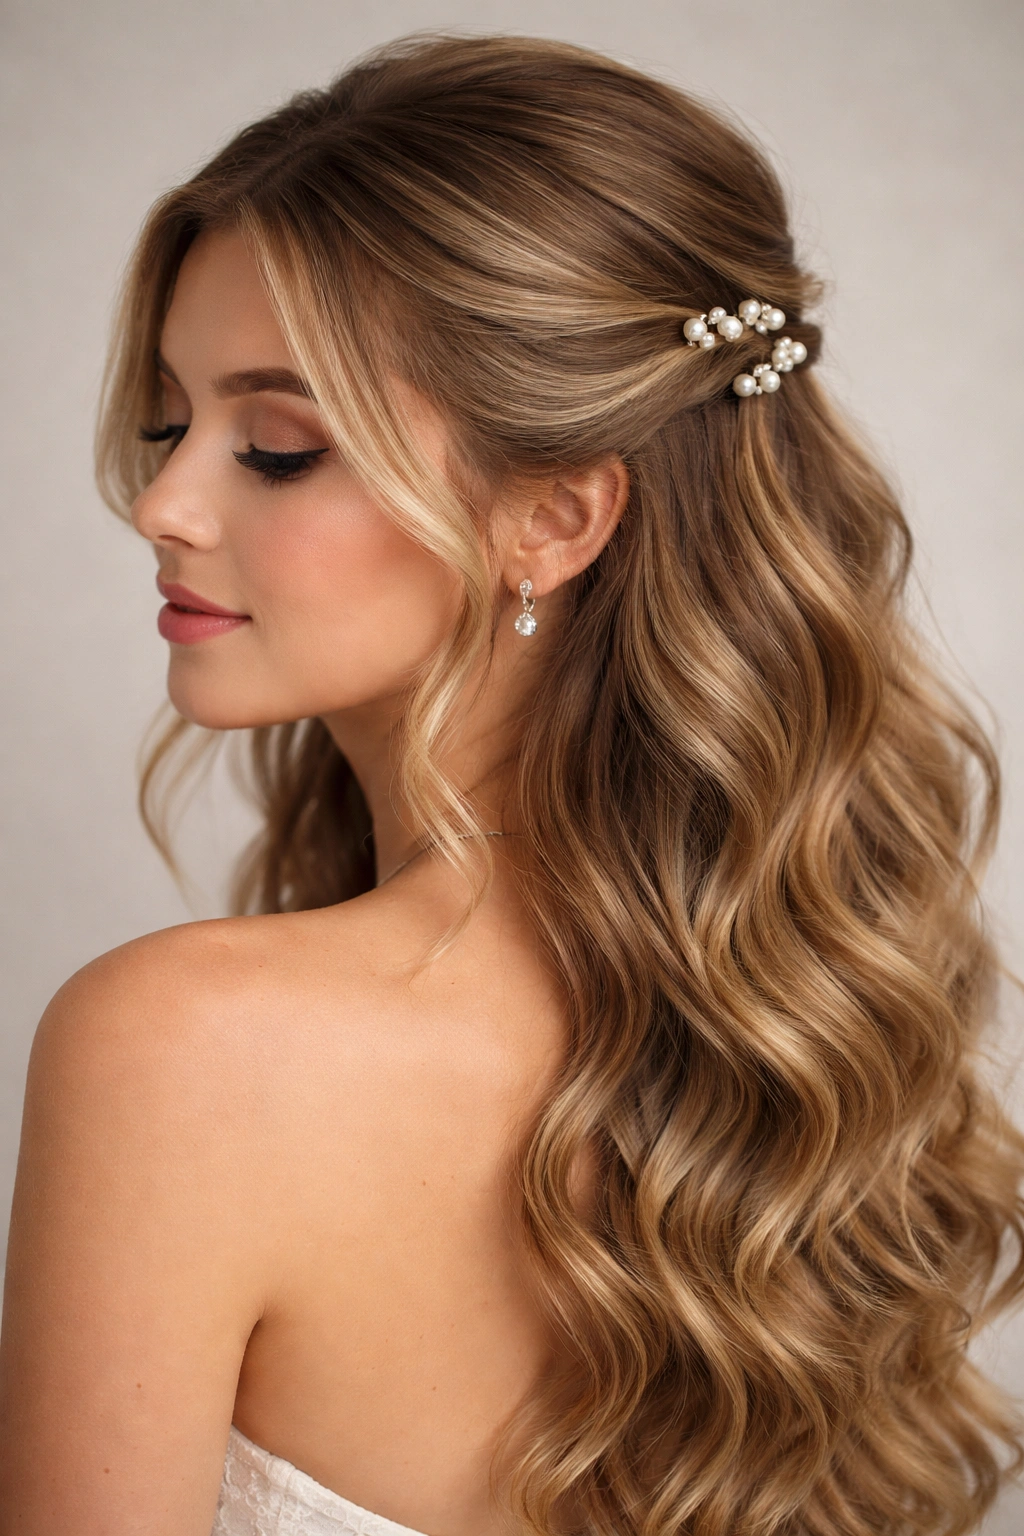
8. Half Up Half Down with Hair Accessories
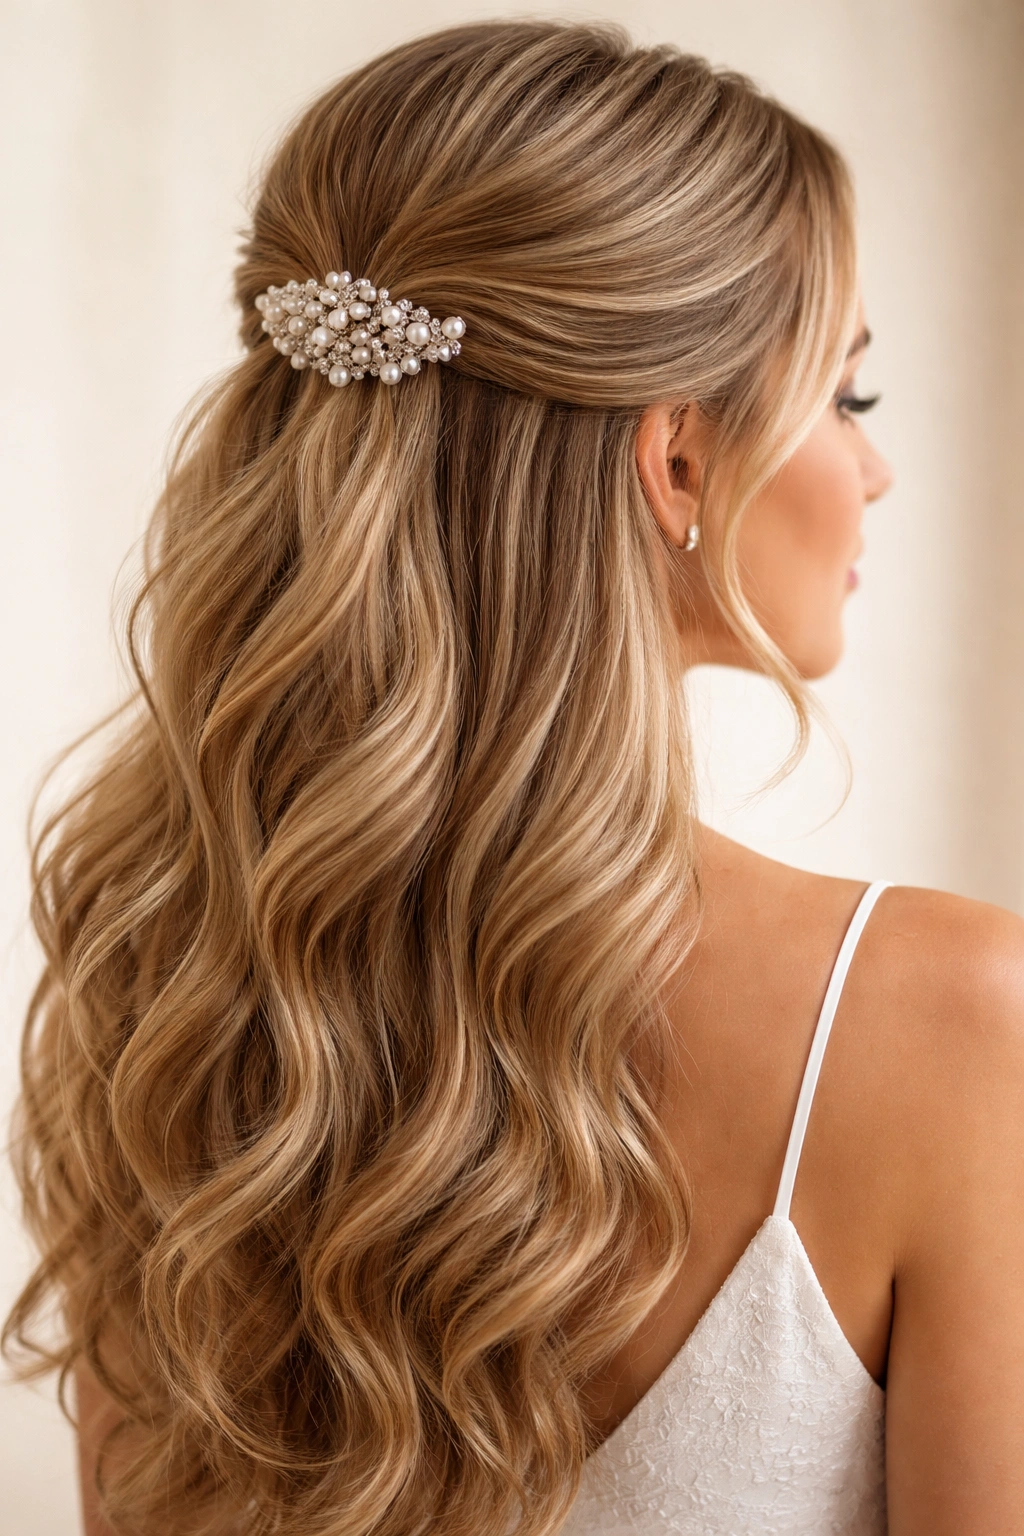
Sometimes it’s not about the style itself but the accessories you use to secure it. This version keeps the hair placement simple—just a clean gathered section at the top—but elevates it with eye-catching accessories like a claw clip, a decorative hair slide, or a jeweled clip. The accessories do the styling work for you.
Choosing Your Accessories
The key is selecting something that coordinates with your homecoming dress without matching it exactly. If your dress is rose gold, go with gold hair accessories. If your dress is navy, try a tortoiseshell or gold clip. Jeweled clips, pearls, and delicate hair slides all work beautifully. Some people even use small hair scarves or thin bandanas as their securing accessory for a fun, fashion-forward vibe.
The Simple Half-Up Base
Gather the top section of your hair from temple to temple, making sure it’s thick enough to look substantial but not so much that your style looks too formal for a school event. Secure it loosely with an elastic, then cover the elastic with your chosen accessory. The accessory becomes the star of the show, so make sure it’s something you love looking at from every angle.
Adding Movement Below
The bottom half of your hair should have some movement and texture to balance the graphic nature of a bold accessory. Loose waves or soft curls work beautifully. If your hair is very straight, apply a light texturizing spray and run through it with your fingers to create movement without looking like you’ve styled it heavily.
Pro tip: If you’re using a decorative clip or slide, place it slightly off-center rather than directly in the middle of your half-up section. It looks more modern and interesting, and it’s easier to secure without the elastic showing.
9. Textured Half Up with Volume
This style is for anyone who wants to maximize the volume and drama of their hair. It combines strategic teasing at the roots with waves and curls throughout, creating a half-up style that looks big, bouncy, and absolutely stunning in motion. This works beautifully on medium to long hair and photographs like a dream.
Creating Root Volume
Before you style anything, blow-dry your hair in sections, lifting your roots with the brush as you go. Once your hair is dry, take a fine-tooth comb and gently backcomb (or tease) the roots of the section you plan to pin up. You’re not going for a rat’s-nest look—just subtle texture at the roots that gives height and fullness. Smooth the top layer down so it looks polished, but keep the teased layer underneath for support.
Building Waves and Curls
Using a 1.5-inch curling iron, create waves throughout your entire head, curling larger sections for loose waves rather than tight curls. Curl everything, including the section you plan to pin up, so the overall effect looks unified. Let the curls cool before you release them—this sets the shape and makes your waves last much longer.
The Half-Up Assembly
Take your teased, curled top section and gather it at the crown, securing it with bobby pins hidden underneath the curls. You can also add a small decorative clip if you want an accent. The key is letting plenty of curls and waves frame your face and cascade down, creating that full, voluminous look that makes you feel like a homecoming queen.
10. Elegant Low Half Updo
If you prefer a more understated, classic elegance, a low half updo might be exactly your style. This version gathers hair at the base of your neck rather than at the crown, creating a style that’s sophisticated and mature-looking without being overly formal. It works beautifully with dressier homecoming looks and photographs like absolute perfection.
Setting Up the Style
Start with soft waves throughout your hair—use a 1.5-inch curling iron or a curling wand to create loose, romantic waves. Let these waves cool before you move on to creating the half-up section. The waves are your foundation and they make the low placement look intentional and pretty rather than unfinished.
Creating the Low Half-Up
Take a section of hair from temple to temple, but gather it lower than you would for a traditional half-up—think of it sitting where the bottom of your skull curves. Gently twist this section as you bring it to the back of your head, creating a soft, romantic element. Secure it with bobby pins and add a delicate clip or ribbon if you want a finishing touch.
Balancing the Proportions
With a low half-up placement, the bulk of your hair remains down and wavy around your shoulders, creating a look that’s romantic and dramatic. Make sure the waves are really visible and beautiful in the front and sides—this is your statement. You can pull a few tendrils down around your face from the half-up section if you want even more softness.
Worth knowing: This style works especially well if you have layers or shoulder-length hair, but it’s beautiful on longer hair too. The key is having enough wave or texture to make it look intentional rather than like you just forgot to style the top section.
11. Twisted Crown Half Style
A twisted crown is basically two twists that meet at the back of your head and encircle your head like a crown—it’s incredibly romantic and looks way more complicated than it actually is. When styled as a half-up, with the twists meeting at your crown rather than being fully twisted around, it becomes an elegant half-up variation that’s perfect for homecoming.
Creating the First Twist
Take a section of hair from your right temple and divide it into two thin sections. Twist these sections around each other loosely as you move toward the back of your head, keeping the twist close to your scalp. You’re not trying to do a tight, geometric twist—a loose, romantic twist looks much better for homecoming. Incorporate tiny sections of hair as you go if you want the twist to feel more substantial.
Creating the Second Twist
Repeat this process on the left side of your head with another section of hair, twisting it toward the back of your head to meet the first twist. Both twists should end up at the back of your head, roughly at your crown, where they’ll meet and be secured together.
Securing Your Crown
Use bobby pins to secure both twists together at the meeting point. The pins don’t need to be hidden—in fact, visible gold or silver bobby pins look intentional and pretty. You could also use a decorative clip to secure the twists together, making it an even more obvious design element.
Adding Final Details
Gently pull at the twisted sections to loosen them and add volume. You want them to look relaxed and romantic, not tight and severe. Let the rest of your hair fall in waves or curls down your back and around your shoulders, framing the twisted crown beautifully.
12. Bubble Braid Half Up
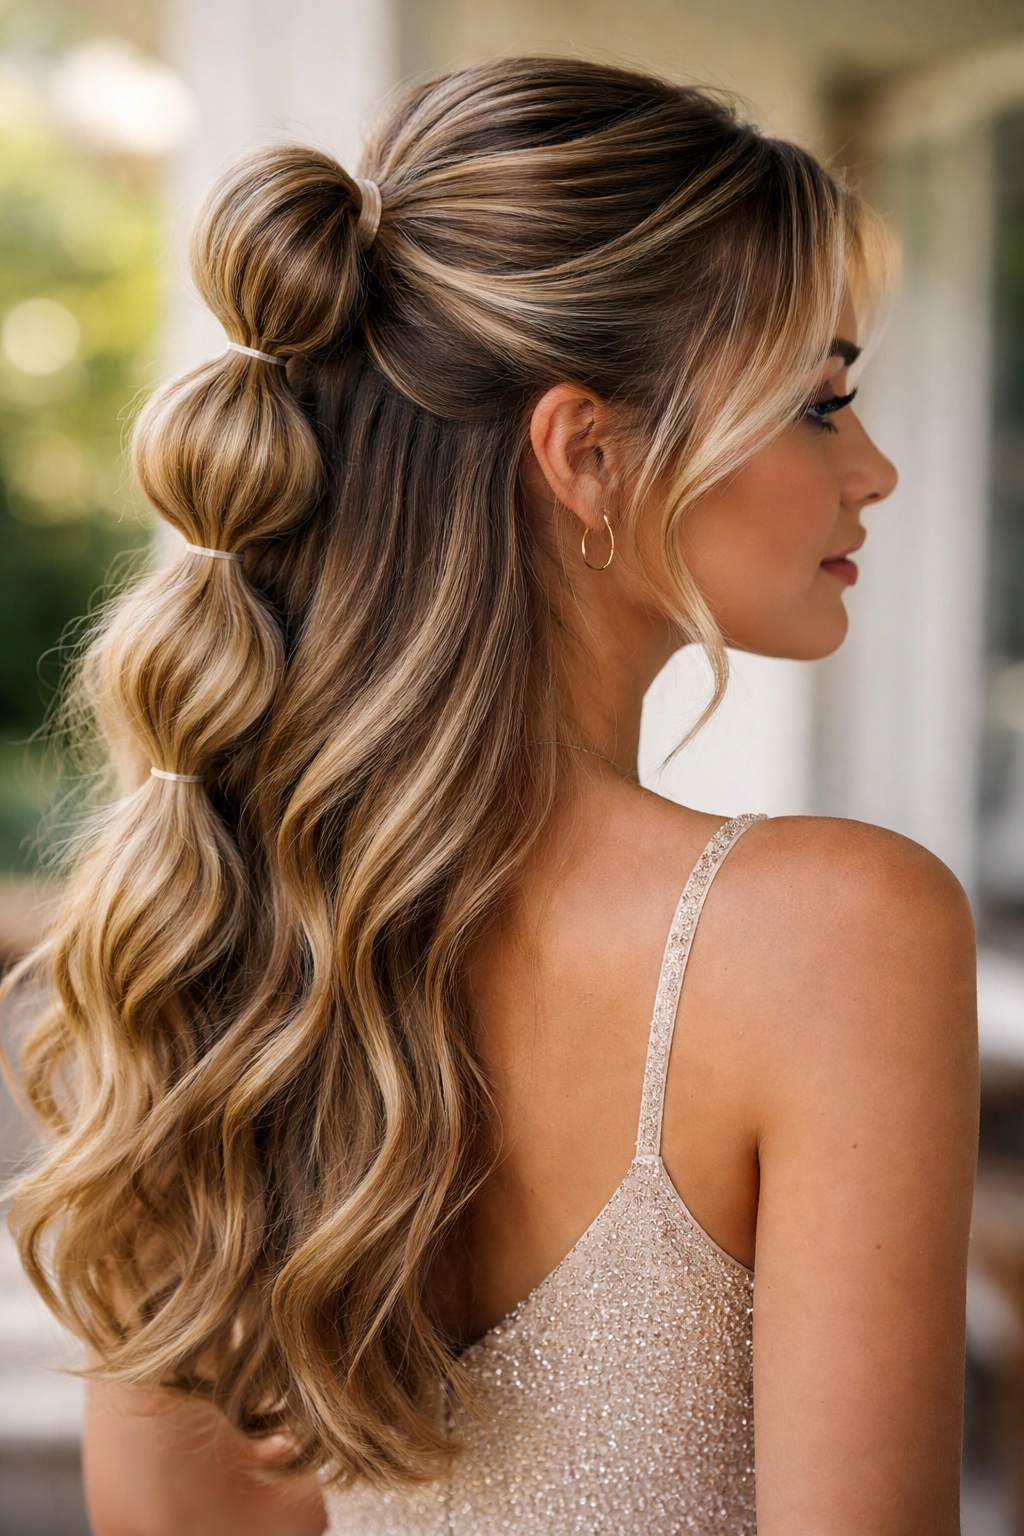
A bubble braid is a playful, modern twist on a traditional braid—instead of continuously braiding, you create sections (bubbles) by gathering hair and securing it with elastics, then puffing out each section for a dimensional look. As a half-up style, it’s fun, youthful, and photographs beautifully because it has so much texture and movement.
Creating the Base Sections
Take your half-up section of hair and secure it in a small, high ponytail. Below that elastic, add another elastic about an inch down, creating the first “bubble.” Repeat this process, adding elastics every inch down the length of your gathered hair, creating three to four bubbles depending on how long your gathered section is.
Puffing Out Each Bubble
This is where the magic happens. Take the hair between the first and second elastic and gently pull it outward and upward, creating a puffy, textured bubble shape. Do this for each bubble, pulling gently to create volume without pulling the elastics out. The bubbles should look full and dimensional, not perfectly smooth.
The Final Effect
Once you’ve puffed out all your bubbles, let the bottom section of your hair fall in waves or curls. The bubble braid becomes a focal point at the top while the waves below create movement and softness. You can hide the elastics by wrapping tiny pieces of hair around them, or leave them visible for a more modern, intentional look.
Pro tip: Add a small decorative clip at the base of your bubble braid or at the bottom where it meets your loose hair. It adds visual interest and looks intentional.
13. Half Up with Statement Bow
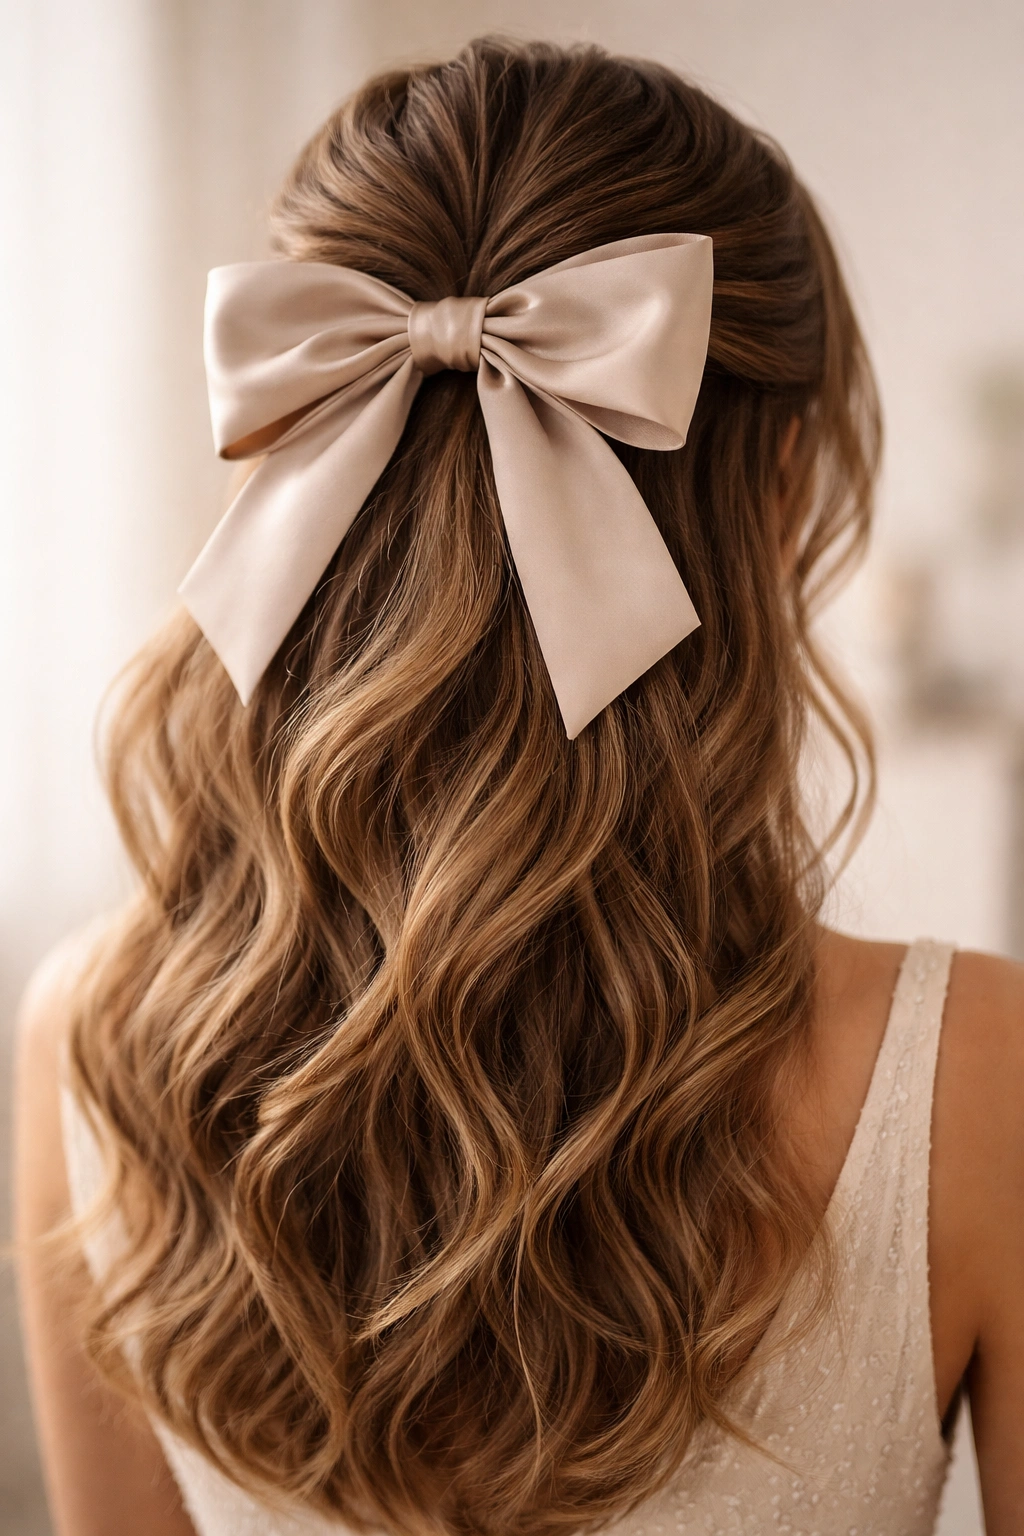
If you want your half-up style to make a real fashion statement, style it with a bold, oversized bow. This works beautifully on straight, wavy, or curly hair and creates an instantly put-together, almost vintage-inspired look that’s perfect for homecoming. The bow becomes the hero of your hairstyle.
Styling Your Hair
Create waves or curls throughout your entire head using a curling iron or wand. You want texture and movement, not smooth, straight hair, because the texture balances the graphic nature of a statement bow. Let the waves or curls set before you move on to securing your half-up section.
Choosing Your Bow
Statement bows come in endless variations: satin, velvet, oversized, delicate, solid colors, patterned. Choose something that coordinates with your homecoming dress without necessarily matching it exactly. If your dress is emerald green, a gold or emerald bow works beautifully. If your dress is blush pink, try ivory, gold, or blush.
Securing the Bow
Gather your top half section and secure it with a clear elastic or an elastic in your hair color. Then slip your statement bow over the elastic, adjusting it so it sits perfectly centered or slightly off-center depending on your preference. Make sure the bow is secure and won’t slip during the night—no one wants to spend homecoming fixing their hair.
Finishing Touches
Let plenty of your curled or waved hair fall down around the bow and frame your face. The contrast between the statement bow and the soft waves creates visual interest and balance. Pull out a few face-framing pieces to add softness around your cheeks and temples.
14. Loose Waves Half Pinned Back
Sometimes the most beautiful styles are the simplest ones. This version keeps your hair mostly down with just the top section loosely pinned back, creating an effortless, “I woke up like this but somehow it’s perfect” vibe. It’s ideal for anyone with naturally wavy hair or anyone who’s great at creating waves.
Creating Beautiful Waves
Use a 1.5-inch curling iron to create loose waves throughout your entire head. The waves should feel soft and romantic, not tight and sculpted. Curl away from your face on the front sections and alternate direction as you move toward the back for a natural, undone quality. Let each wave cool before releasing it.
The Loose Pin Back
Take just a small section from each temple—not your entire top section, just tiny pieces from near your face—and bring them to the back of your head. Pin them loosely together with a bobby pin or secure them with a small clip. The placement should look accidental, like you just gathered a bit of hair so it wouldn’t fall in your face.
Keeping It Effortless
Resist the urge to make this look neat and perfect. Some flyaways are good. Some pieces not quite secured are good. Some bumps and texture are good. The whole point is that this looks like you rolled out of bed with perfect waves and casually pinned back a couple of pieces. It’s intentionally undone.
Worth knowing: This style works best on hair that’s at least shoulder-length and has some natural texture or wave to it. If your hair is very straight or very short, you might need more styling and structure to make it work.
15. Half Up Fishtail Braid
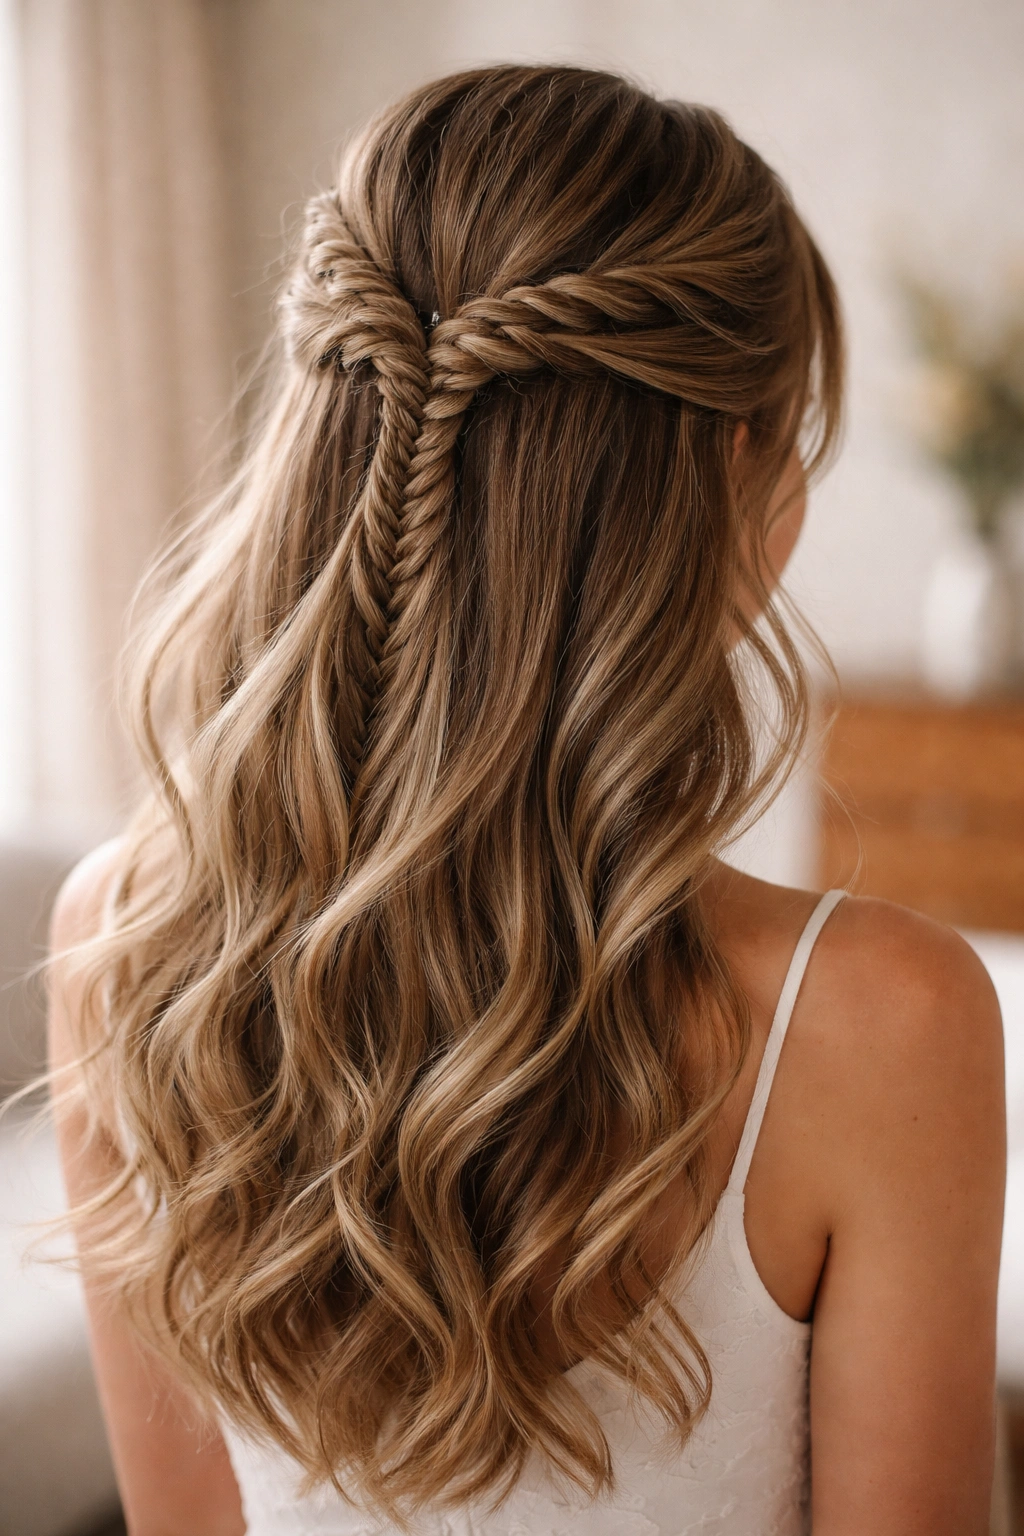
A fishtail braid is an elegant alternative to a traditional braid—it uses just two sections of hair instead of three, which creates a finer, more delicate-looking braid that photographs beautifully. When incorporated into a half-up style, it becomes a sophisticated focal point that’s perfect for a formal homecoming look.
Mastering the Fishtail Braid
Take a section of hair from your right temple and divide it into two large sections. Take a thin piece of hair from the outside of the right section and cross it over to the left section. Then take a thin piece from the outside of the left section and cross it over to the right section. Continue this alternating pattern as you work toward the back of your head, creating a braid that looks intricate and delicate.
Incorporating the Half-Up Placement
As you create your fishtail braid, angle it across the back of your head toward the opposite ear or toward the center back, depending on your preference. You’re essentially creating a line of detail that frames the top of your head. The braid should start near your temple and end somewhere you can secure it with a bobby pin.
Creating Dimension
Once your braid is complete, gently pull the outer edges of each section outward to make the braid appear wider, thicker, and more textured. This softening process takes what could look tight and perfect and makes it look romantic and dimensional. It’s the difference between a braid that looks like you’re heading to the gym and a braid that looks like you’re attending an elegant event.
Finishing the Look
Secure the end of your braid with a bobby pin, then let the bottom half of your hair fall in soft waves or curls. The delicate fishtail braid creates the structure and interest at the top, while the waves below add movement and romance.
16. Sleek Half Up with Side Part
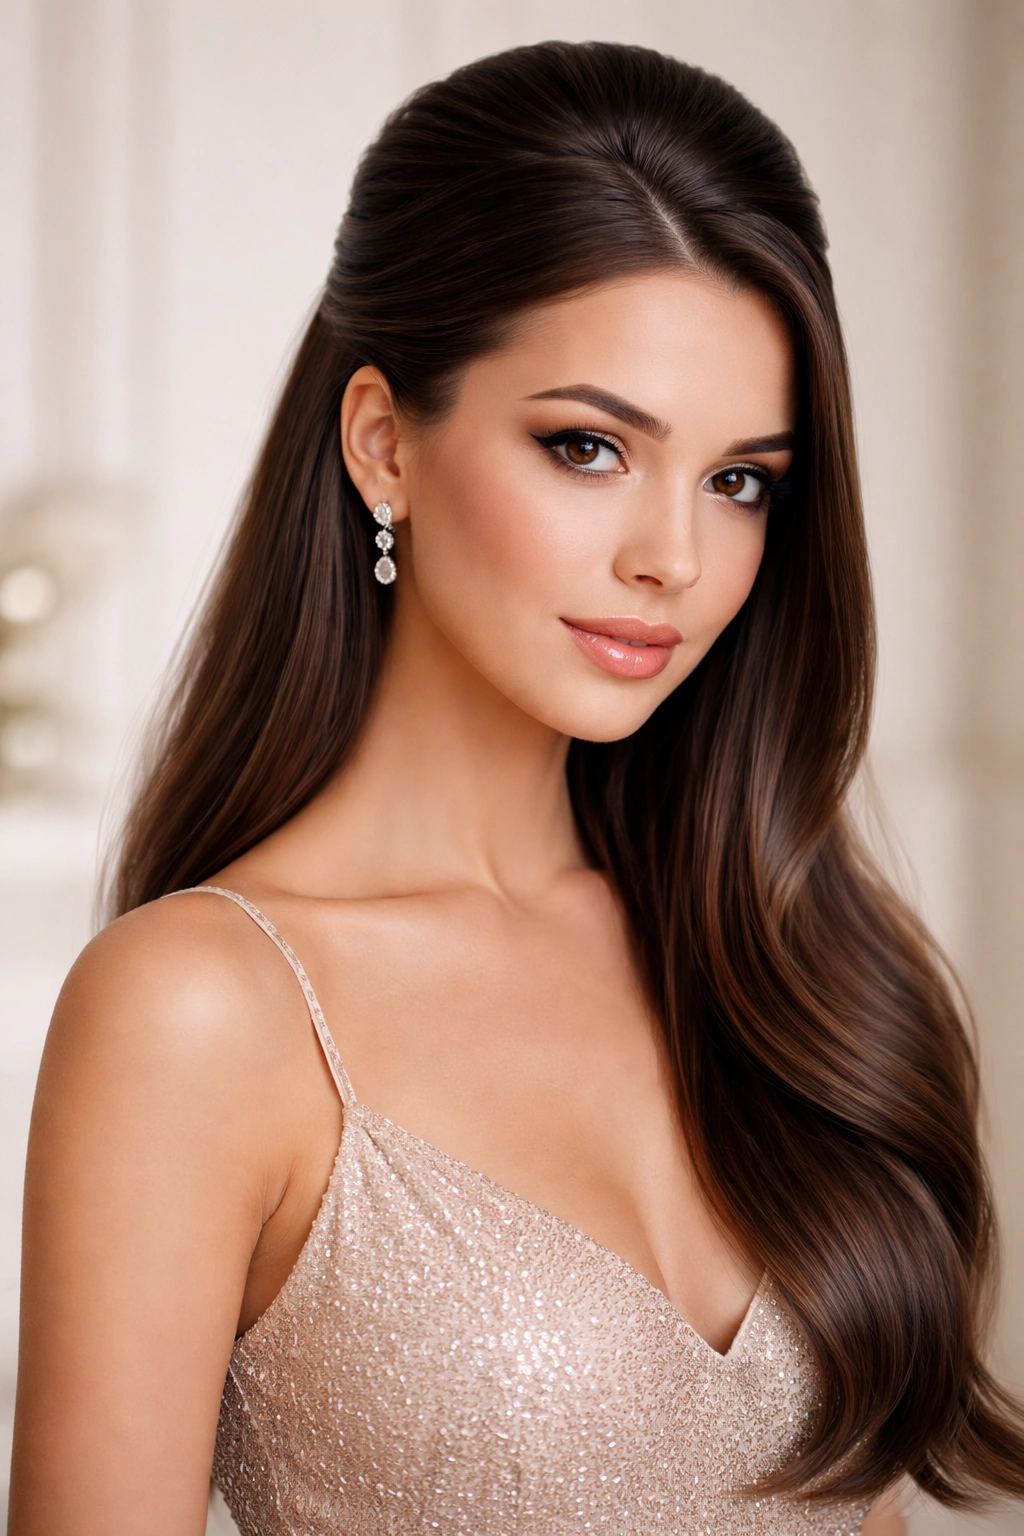
When your homecoming dress is already dramatic or ornate, sometimes you need hair that’s clean, modern, and lets your dress be the star. A sleek half-up with a deep side part delivers exactly that—it’s sophisticated, contemporary, and works beautifully with both classic and trendy homecoming looks.
Creating the Sleek Base
Apply a smoothing serum to damp hair and blow-dry it completely straight using a paddle brush and concentrator nozzle. Once dry, use a flat iron to polish the hair and create a glass-like smoothness. You want this to look sleek and intentional, not flat and boring, so make sure the strands have shine and movement even though they’re straight.
Making Your Side Part
Create a deep side part—this means parting your hair much further to one side than you normally would, almost to your temple on one side. This creates an asymmetrical, modern look that photographs beautifully and frames your face in an interesting way.
The Sleek Half-Up Section
From the side with less hair (the side where most of your hair is swept), gather the top section and bring it to the back of your head, securing it with a sleek elastic or a decorative clip. The gathering should look smooth and polished, not textured. Wrap a thin piece of hair around the base of your half-up section to hide the elastic for a more finished appearance.
Modern Finishing Touches
Add a single gold cuff or hair ring to the base of your half-up section for a touch of modern luxury. Keep everything else minimal and clean. The deep side part and sleek texture are your design elements—you don’t need additional fussiness.
17. Voluminous Half Up with Curls

For anyone who wants maximum drama and bounce, this style delivers. It combines strategic teasing with full, bouncy curls throughout, creating a half-up look that’s absolutely show-stopping. This works beautifully on medium to very long hair and makes you feel like a superstar at homecoming.
Building the Foundation
Blow-dry your hair in sections, lifting your roots with the blow dryer and brush to create height. Once dry, use a fine-tooth comb to gently backcomb the roots of the section you’ll pin up, creating subtle texture and volume at the base. Smooth the top layer so it looks polished while keeping the teased layer underneath for support and fullness.
Creating Dramatic Curls
Using a 1.25-inch curling iron, create curls throughout your entire head. Wrap larger sections around the barrel for looser curls rather than tight ringlets. Work methodically through your hair, curling everything including the section you’ll pin up. Let each curl cool before releasing—this sets the shape and creates longer-lasting curls.
The Voluminous Half-Up
Gather your teased, curled top section at the crown and secure it with bobby pins. Don’t worry about making it look super neat—some volume and texture visible at the base actually adds to the glamorous effect. You can add a delicate clip or keep the bobby pins as an accent with decorative options.
Maximum Movement
Make sure plenty of curls cascade down your back and frame your face. This isn’t the place for subtlety—you want drama, bounce, and movement. Every step and every dance move should make your hair move and catch the light beautifully.
Pro tip: Curl your hair the night before if you can, then refresh the curls with a curling iron about 30 minutes before you leave. Your curls will be bouncier and last longer throughout the event.
18. Half Up with Claw Clip Accent

A tortoiseshell or metallic claw clip has become a modern homecoming staple, and it’s the perfect accessory to elevate a simple half-up style into something fashion-forward and intentional. This works on all hair types and all textures, from straight to curly, making it incredibly versatile.
Creating Your Base
Depending on your hair type and preference, you can either keep your hair straight and sleek or create waves and curls. If you’re going for modern elegance with a metallic clip, sleek works beautifully. If you want romantic softness with a tortoiseshell clip, waves or curls are perfect. Blow-dry your hair according to your texture preference.
Gathering Your Half-Up Section
Take a section of hair from temple to temple, making it thick enough to look substantial but not so much that you’re taking up half your head. Gather this section at the crown and secure it loosely with a clear elastic that won’t show. The whole point is for the claw clip to be the visible element holding your hair, not the elastic.
Placing Your Claw Clip
Once your hair is loosely gathered with the elastic, slip your claw clip over the gathered hair and elastic, positioning it so the clip is visible and becomes a design element. You can place it centered or slightly off-center, depending on your preference. Make sure it’s tight enough to hold everything securely all night without being so tight that it causes a headache.
Styling the Lower Half
Leave the bottom half of your hair down in whatever texture you’ve chosen—waves, curls, or completely straight. The claw clip becomes the focal point, so the rest of your hair should complement it without competing with it. Pull out a few face-framing pieces to soften your look and add dimension.
Worth knowing: Claw clips come in endless colors and finishes. Choose one that coordinates with your homecoming dress and your overall look. A gold metallic clip has a different vibe than a tortoiseshell clip, and a jeweled clip creates yet another aesthetic entirely—pick the one that matches your personal style.
Final Thoughts
The half up half down hairstyle is your secret weapon for looking effortlessly polished at homecoming without spending three hours getting ready. Whether you go for intricate braids and twists, romantic waves and ribbons, or modern sleekness and bold clips, the foundation is always the same: gather, secure, and style with confidence. The best homecoming hair is the hair that makes you feel beautiful and confident, so choose a style that matches your personality and your dress.
Remember that no half-up style needs to be perfect. The slightly undone waves, the loose braid, the hair that escapes from your pins—these imperfections are what make the style charming rather than stiff. Take a few test runs before homecoming if you’re trying something new, but don’t stress about making it look magazine-perfect. Your friends won’t be examining your hair under a magnifying glass; they’ll just notice that you look absolutely gorgeous.
Have fun with your homecoming hair, take tons of photos, and enjoy every moment of the night. You’re going to look amazing.