Knotless braids have become a game-changer for people with curly hair, and when you combine them with the effortless elegance of a half up half down style, you get something that’s both protective and absolutely stunning. Unlike traditional box braids that start with a bulky knot at the roots, knotless braids use a feed-in technique that distributes tension more evenly across your scalp — which means healthier hair and less breakage over time. The half up half down format is pure brilliance for curly-haired folks because it lets you showcase your natural curl pattern while keeping hair off your face and neck, and it works whether you’re heading to work, the gym, or a special occasion.
The beauty of knotless braid half up half down styles is their versatility. You can wear them sleek and refined, textured and wild, adorned with beads and accessories, or completely bare. They work on all curl types — from loose waves to tight coils — and they can last anywhere from two to six weeks with proper care. These styles are genuinely protective, meaning they give your hair a break from daily styling and manipulation while still letting you express yourself. Whether you’re looking for something intricate and eye-catching or simple and wearable-every-day, there’s a knotless braid half up half down style that’ll feel like it was made just for your hair.
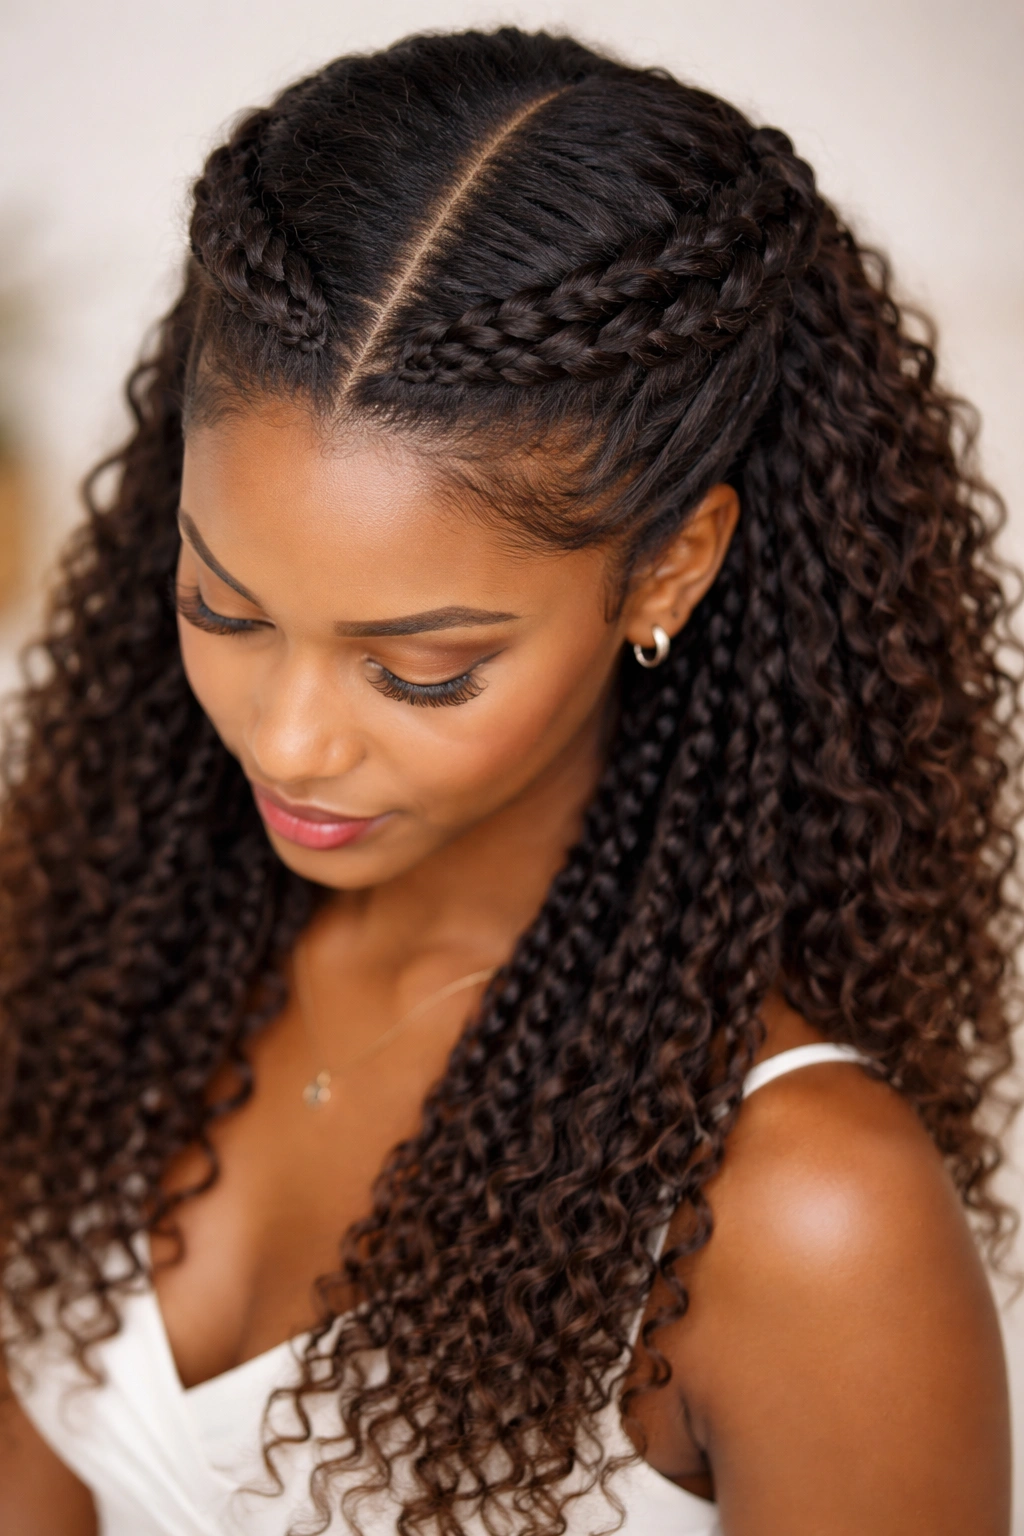
1. The Sleek Center Knotless Braids with Curved Sections
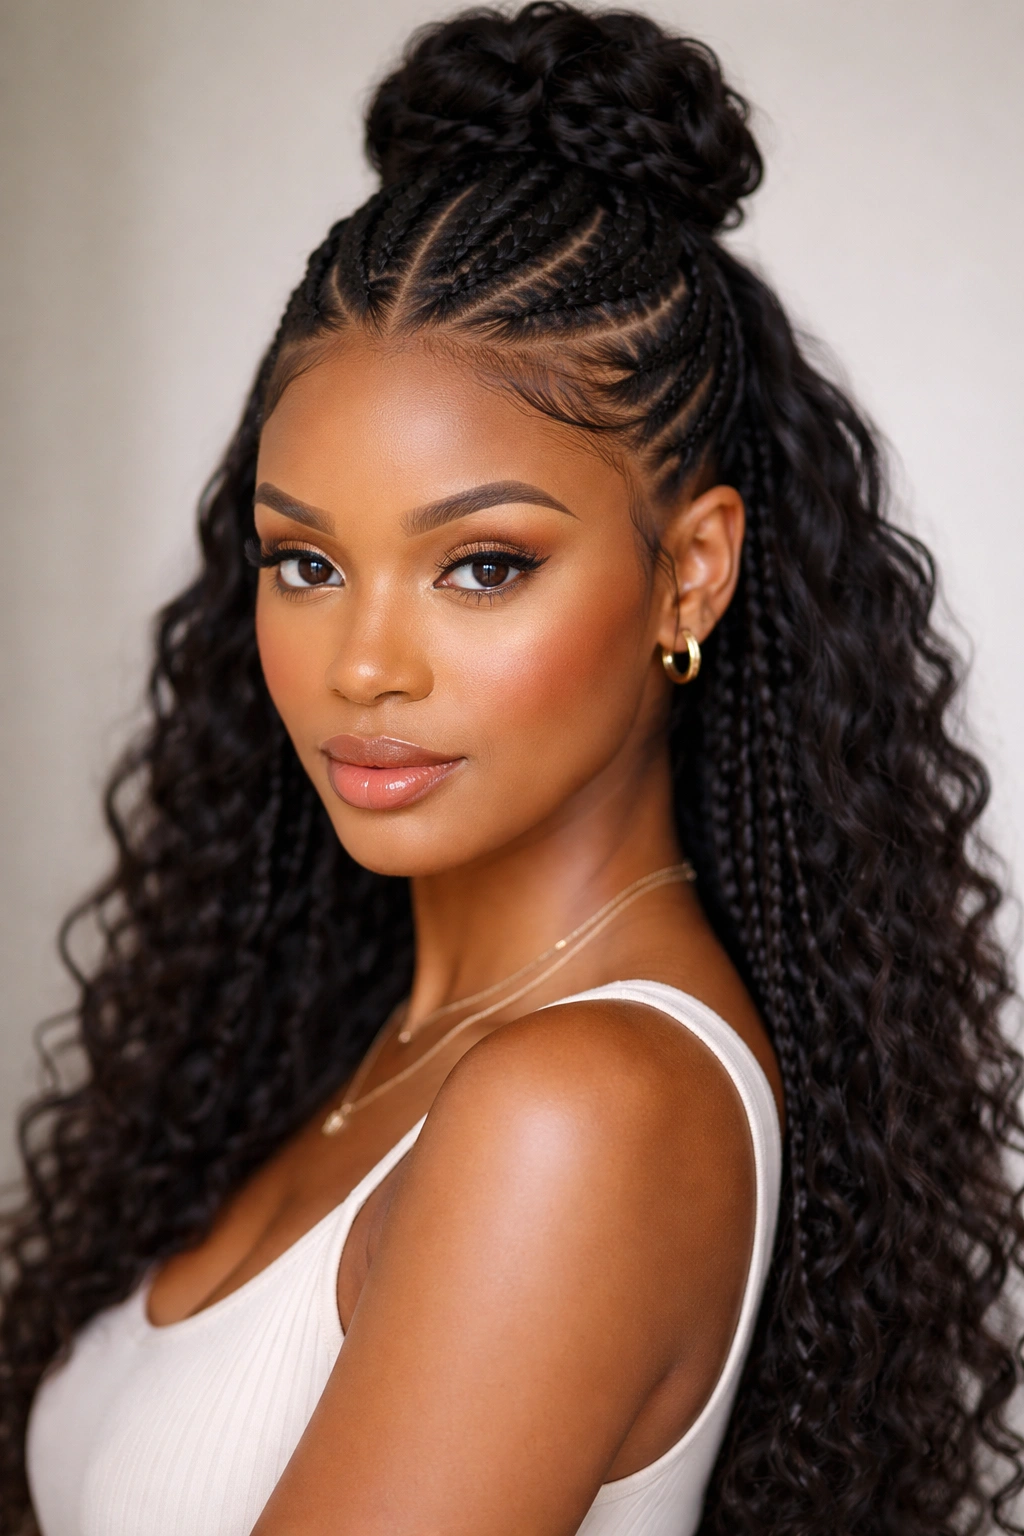
This style features two knotless braids running down the center of your head from the crown, with the top portions pulled up into a bun or secured at the back while the bottom halves flow freely. The magic lies in how the curved sections frame your face — the slight angle as they move from front to back creates dimension and flatters most face shapes beautifully. You start by parting your hair down the middle, then creating two neat, thin knotless braids that begin at the crown and travel straight back, pulling the upper portions up and securing them while allowing the lower braids to drape naturally down your back.
Why This Works for Curly Hair
Curly hair tends to have width and volume already, so a sleek center-parted style balances that perfectly without adding bulk at the crown where tension can be problematic. The feed-in technique of knotless braids means you’re not creating a tight knot that pulls on your edges — instead, the tension is distributed throughout the braid itself. This style also showcases the curl definition in your loose bottom sections while keeping the top neat and controlled.
How to Create It
- Start with moisturized, detangled hair and a clear center part from forehead to nape
- Section out a triangular area at the crown on each side, about 2-3 inches wide
- Begin your first knotless braid at the crown, adding hair gradually as you move down toward the nape
- Braid only to about the center of your head, then secure with a small elastic
- Repeat on the other side, ensuring both braids are the same thickness and tension
- Pull both braid sections up and secure them together at the back with bobby pins, creating a half-up look
- Leave the remaining bottom section of hair out, allowing your natural curls to flow freely
- For extra sleekness, use a light hold edge control on the parted sections
Pro tip: Apply a leave-in conditioner to your loose bottom section before installing the braids — this helps your curls pop and look moisturized throughout the style’s lifespan.
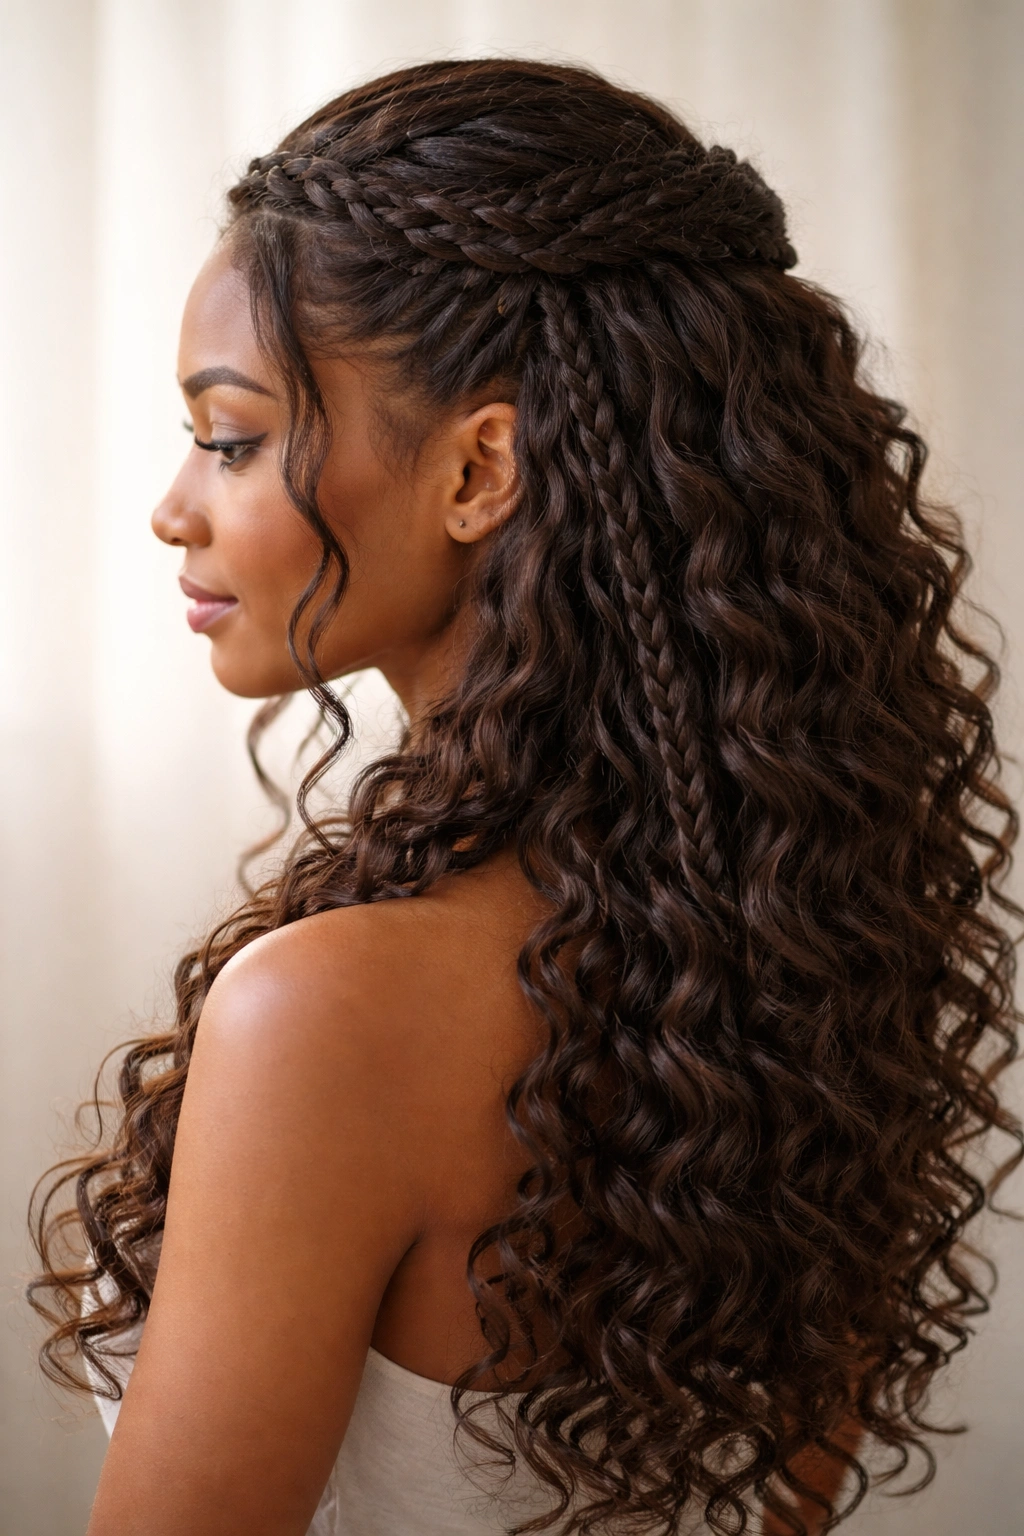
2. Goddess Knotless Braids with Front Swoops
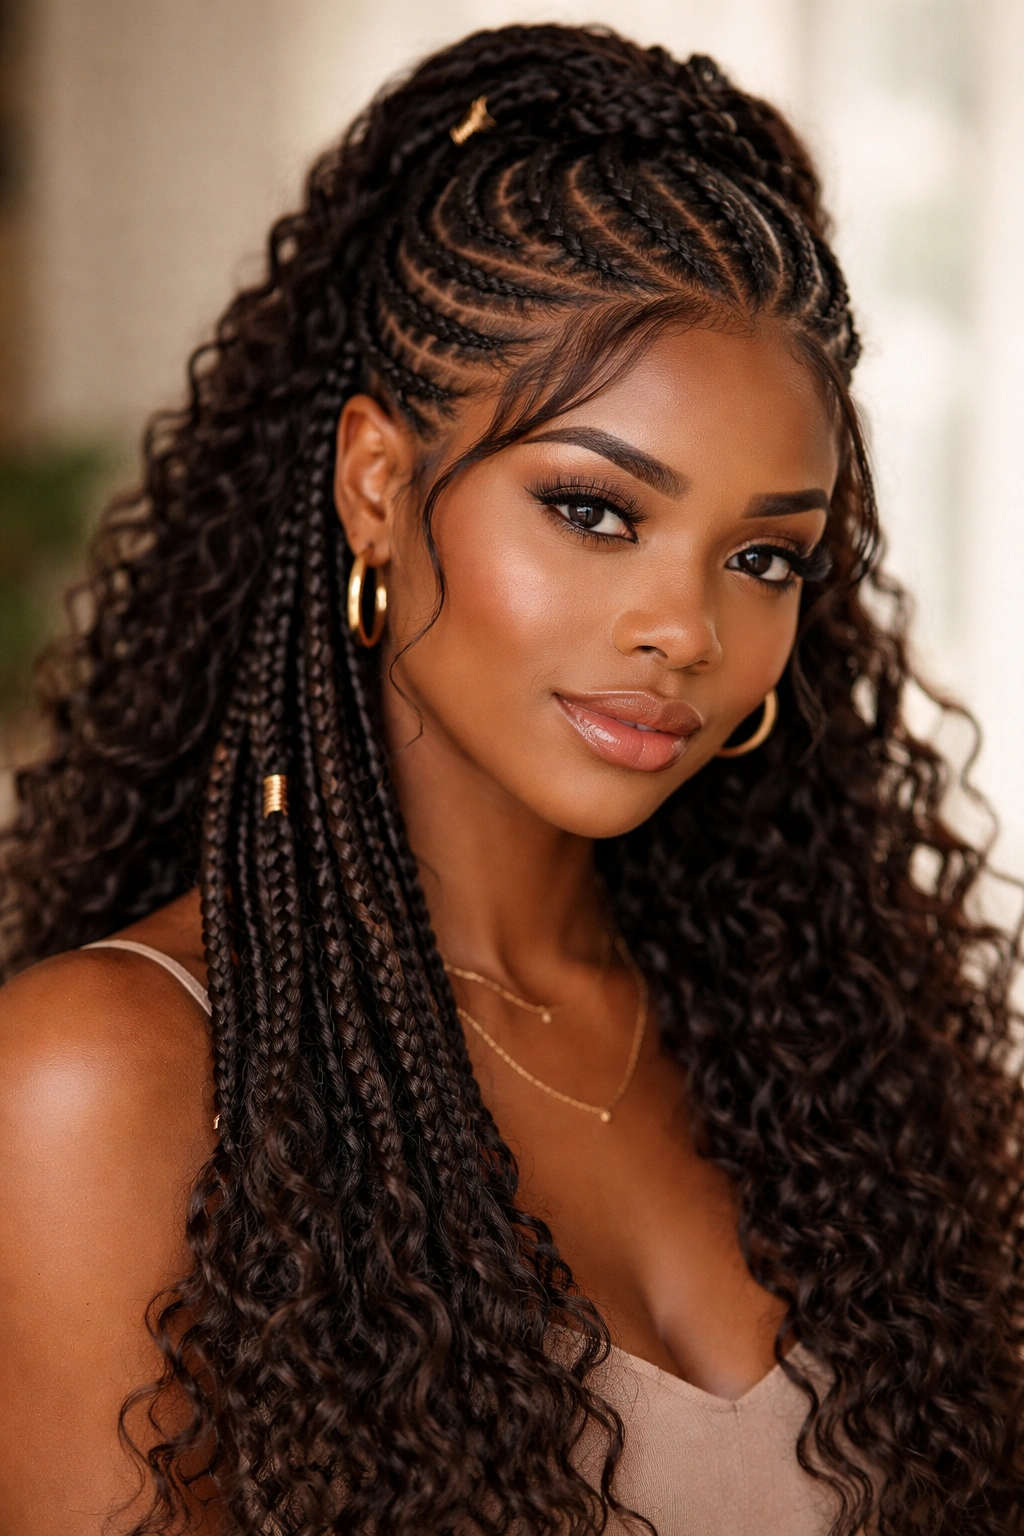
This is the style that makes people stop and stare. It features multiple thicker knotless braids that sweep across the front and sides of your head in a swooping motion, with the back left down in your natural curls. The braids start at one temple, curve across the front hairline, and curve back around the other temple, creating an absolutely regal, goddess-like frame that works for both everyday wear and special events. The thickness and number of braids (typically 2-3) make a bold statement while the front swoops draw attention to your face.
Why This Works for Curly Hair
Curly hair already has that romantic, flowing quality that makes goddess braids look effortless and natural rather than too styled. The swooping motion follows the natural movement and shape of curly hair, so it doesn’t fight against your texture. You’re also protecting the most delicate parts of your hairline — the temples and edges — by incorporating them into the braids rather than leaving them exposed to daily manipulation.
How to Create It
- Begin with your hair parted however feels natural to you (no specific part required)
- Start your first knotless braid at your left temple, feeding hair in as you move across the front of your head
- Curve the braid toward the right, swooping it across your forehead in an elegant arc
- Let it continue to the right temple, then curve it back toward the nape
- Secure the end of this first braid at the back with an elastic
- Create a second swooping braid below the first, following the same curved path
- Leave your hair down in the back, allowing curls to flow freely
- Consider adding gold cuffs or beads to the braids for extra drama and elegance
Worth knowing: This style looks even more impressive if you gently curl or wave the loose hair in the back using a curling iron on low heat, creating unified texture throughout.
3. Zig-Zag Knotless Half-Up with Side Shave Detail
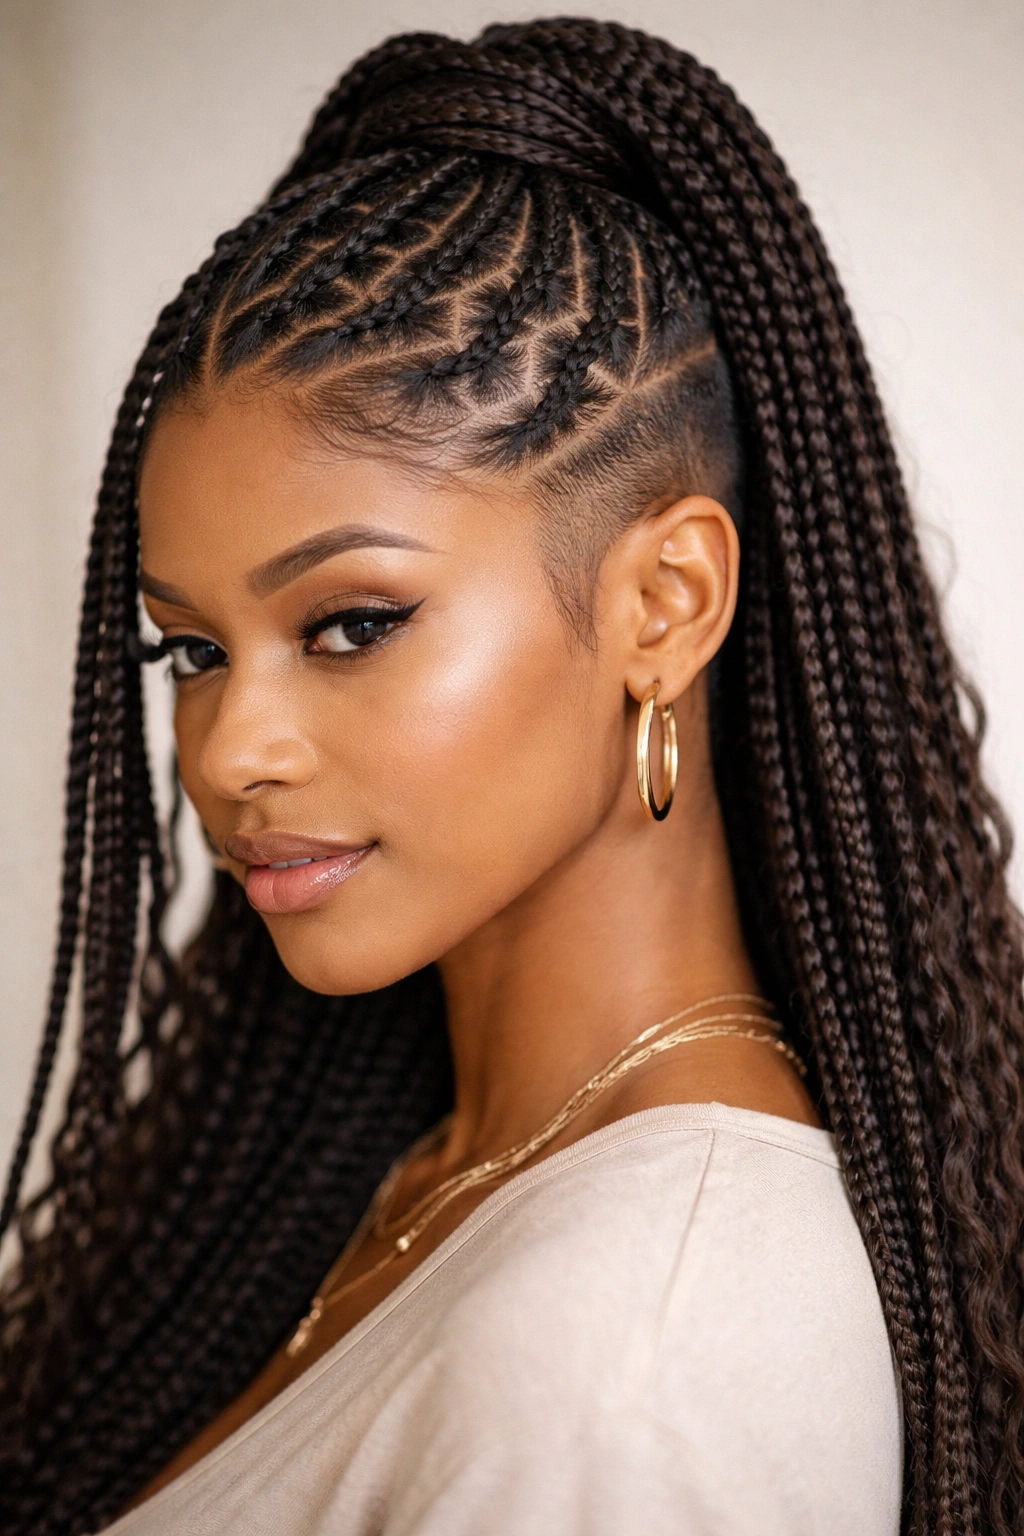
The zig-zag pattern here isn’t created by the braids themselves — rather, it’s the path they take across your head, creating a dynamic, almost playful vibe. You create multiple thin knotless braids that follow a zig-zag pattern from one side to the other, securing the braids at the back while leaving your hair loose. This style pairs beautifully with a geometric undercut or fade on one side, which becomes a stunning detail when your hair is half-up. Even without a fade, the zig-zag pattern itself adds visual interest and movement.
Why It’s Perfect for Textured Hair
The zig-zag path creates visual lines that complement the natural texture and movement of curly hair. You’re creating structure without sacrificing the softness and curl definition that makes curly hair beautiful. The multiple braids distribute weight evenly, reducing tension on any single point of your scalp. The style also works across all curl types because the pattern and depth of the braids make any curl pattern look intentional and styled.
Key Styling Elements
- Divide your hair into 4-6 thin horizontal sections using clips
- Create your first knotless braid starting at the left side, moving at a slight angle
- Create your second braid starting below and to the right of the first, angling in the opposite direction
- Continue this zig-zag pattern across your head until you reach the right side
- Secure all braids together at the nape with bobby pins and small elastics
- Leave the bottom portion of hair down in your natural curls
- Use a mousse or lightweight curl cream on the loose sections to enhance definition
- Flip your head upside down gently to help the braids sit naturally and avoid a flat appearance
Inside tip: Slightly loosening each braid by gently pulling on the edges (called “blousing”) makes them look fuller, more textured, and less severe — perfect for a softer, more approachable everyday look.
4. Double Knot Bun with Knotless Braids
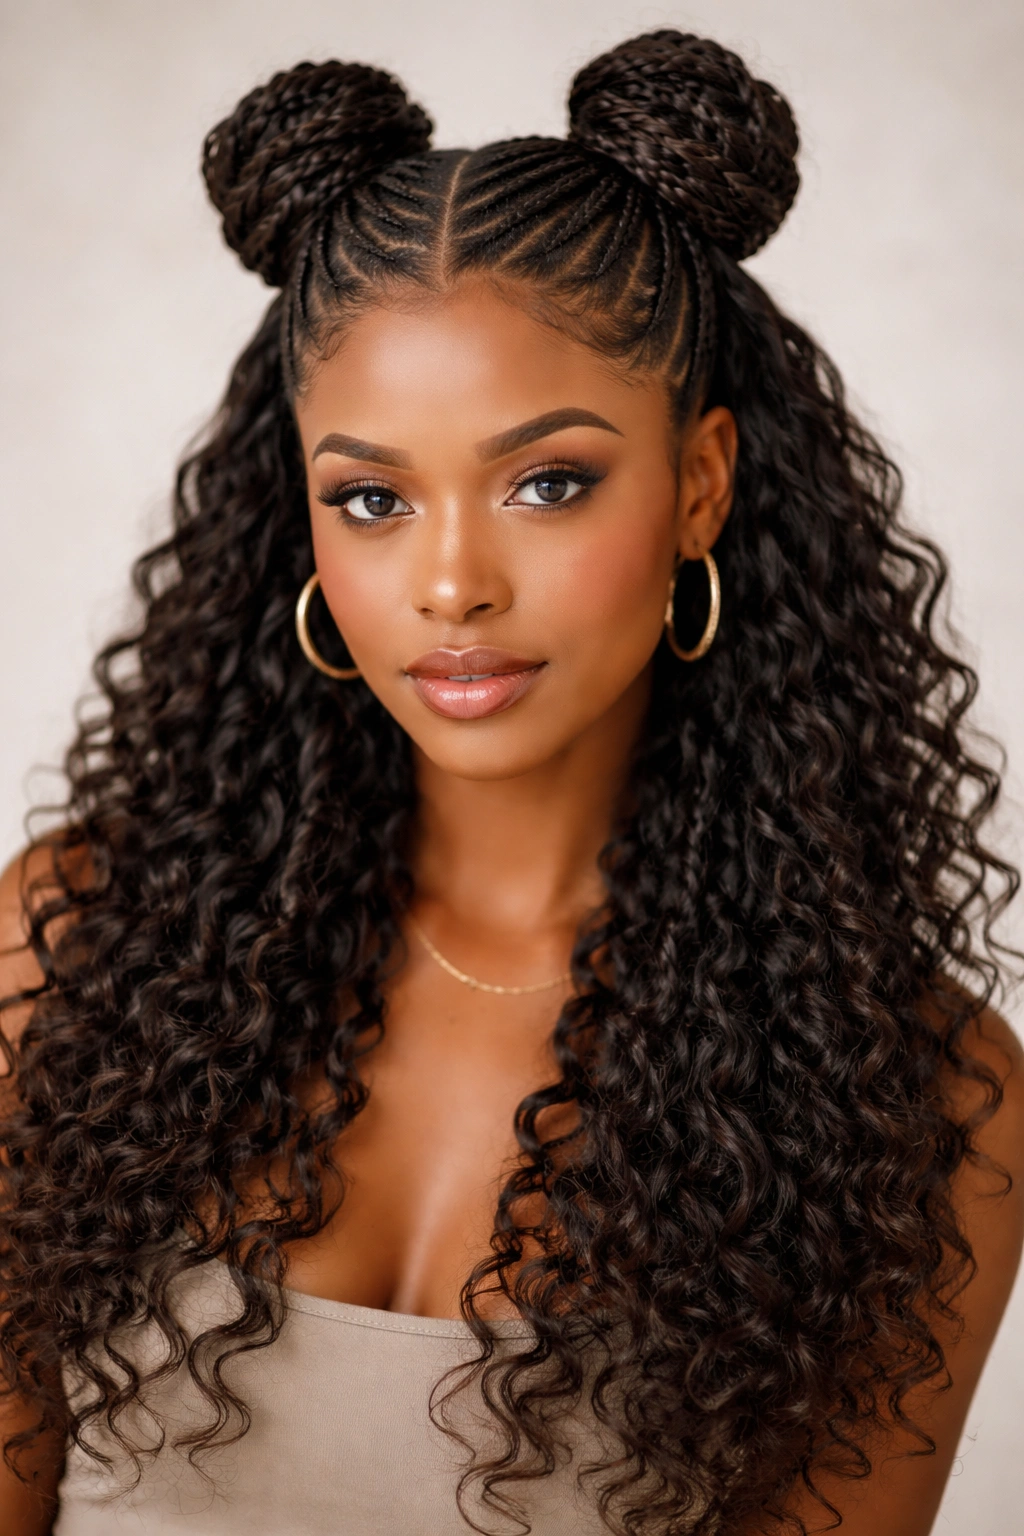
This playful hybrid style features two knotless braids that start at the temples, travel back toward the center, and wrap around to form two small buns at the crown — with the rest of your hair flowing down in waves. It’s giving Ariana Grande meets curly-haired sophistication. The two buns sit side-by-side at the top of your head, held in place by the braids themselves and bobby pins, while your curls cascade down from underneath. This works beautifully for casual dates, brunches, or any situation where you want to feel put-together without looking overly formal.
What Makes This Style Unique
The double knot bun instantly elevates a casual look into something more intentional and styled. Because you’re using knotless braids to wrap and secure the buns rather than rubber bands, you avoid the tight, sharp look that traditional buns can create on textured hair. The braids act as both a styling element and a structural support system, meaning your buns will hold for hours without becoming loose or messy.
Installation Steps
- Start with hair that has some texture or wave — slightly damp hair is ideal
- Create a part down the center of your head from forehead to nape
- Section out a triangular piece at the right temple and begin a knotless braid
- Braid this section toward the back-right area, then wrap it into a small bun shape
- Secure the bun with bobby pins pushed through the braid itself
- Repeat on the left side, mirroring the size and placement
- Leave all hair below the buns down and loose
- Gently scrunch your loose curls with a curl-enhancing cream to define them
- Consider adding small metal bangles or hair clips to the base of each bun for detail
Real talk: This style works best when your loose bottom section has some length — at least shoulder-length — so that the proportion between the small buns and the flowing hair below feels balanced and intentional.
5. The Infinity Loop Knotless Braid Crown
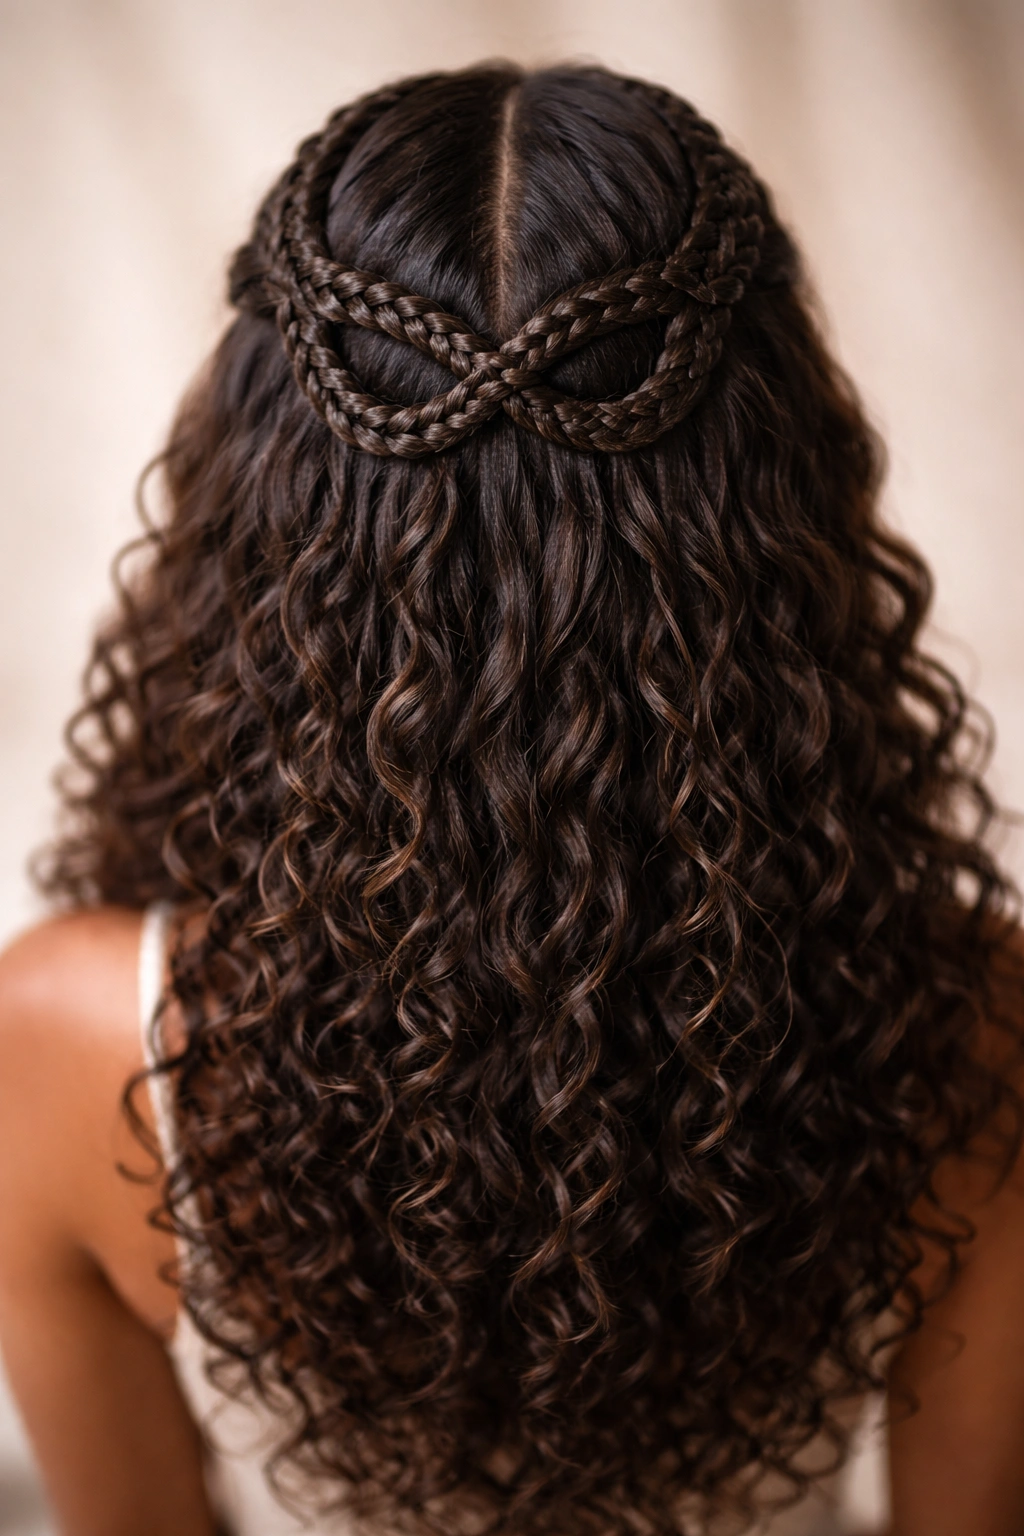
Imagine a knotless braid that starts at one temple, travels across the crown of your head, and loops back around — creating an infinity-symbol shape when viewed from above. Your hair stays half-down, with the crown dramatically framed by this looping braid and the rest flowing freely. This style is intricate enough to turn heads but simple enough to wear regularly. It’s the kind of style that looks like it took hours but actually comes together in about thirty minutes once you understand the technique.
Why This Works
The looping motion of the braid follows the natural shape of your head and the way curly hair falls, so it looks harmonious rather than fighting your texture. Because the braid forms a complete shape, it holds everything in place without needing multiple elastics or clips — the style stays secure through movement, exercise, and daily wear. The infinity symbol is inherently flattering and creates a focal point at the crown, drawing the eye up and making you look taller.
How to Achieve It
- Begin with detangled, lightly moisturized hair
- Start a knotless braid at your right temple, feeding hair in as you move
- Travel the braid across the top-back of your head, creating a gentle arc
- Continue the braid around to your left temple
- At the left temple, instead of securing it, continue the braid back across the crown
- Loop it back to the right side, creating that infinity shape
- Secure both ends together at the back with bobby pins
- Leave all hair below the crown down in natural curls
- Use a light finishing spray to hold the braid shape without making it look stiff
Something most people miss: Creating this style on slightly textured, not-fully-dry hair actually makes it easier to braid and gives the final result a softer, more blended appearance with your curls.
6. Box Braid Style Knotless Braids with Wrapped Top
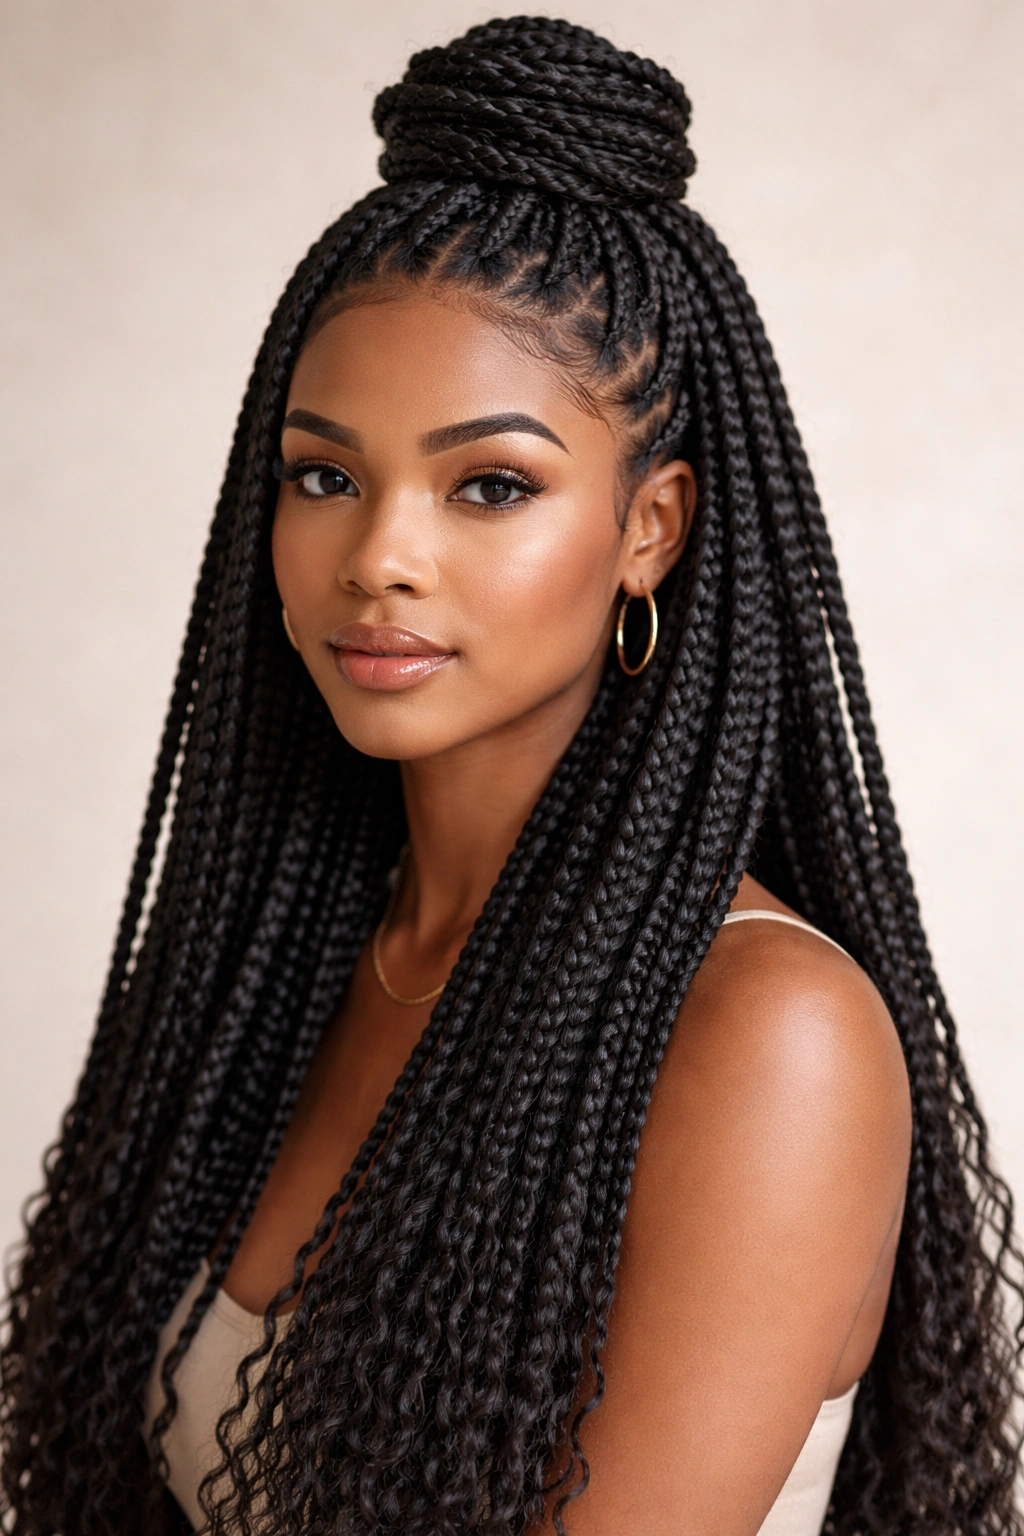
This modern take on a classic style uses thicker knotless braids — usually 6-10 of them, depending on your hair density — arranged with about half secured at the top and the other half flowing freely. The top braids are pulled up and secured into a half-up style using a claw clip or by wrapping them with a coordinating hair wrap or thread, while the bottom braids drape down your back. This gives you the protective, bold look of box braids with the practical half-up versatility.
Why This Hybrid Works
You get all the protective benefits of full braids — your natural hair is tucked away, minimal manipulation, length-protective — but with the flexibility of a half-up style that prevents all your hair from being tied back tightly for weeks. The multiple braids distribute weight across your entire scalp rather than concentrating tension in one spot. Because they’re knotless, each braid starts relatively thin at the root, meaning less stress on your edges and hairline.
Creation Guide
- Divide your hair into 8-12 sections depending on thickness and desired final look
- Create a knotless braid in each section, starting at the roots with the feed-in technique
- Make these braids slightly thicker than you would for a fully-braided style
- Gather the top half of the braids and pull them up to the crown
- Secure them using a medium-to-large claw clip or by wrapping with a hair wrap
- Alternatively, create a small high ponytail and wrap it with thread in a contrasting color
- Let the bottom half of the braids fall freely down your back and shoulders
- Add gold cuffs or cowrie shells sporadically throughout the braids for visual interest
- Finish with a light spray to smooth any flyaways
Pro tip: When wrapping your half-up section with thread or yarn, use the same color as your braids for a cohesive look, or go bold with a contrasting metallic or jewel tone for maximum impact.
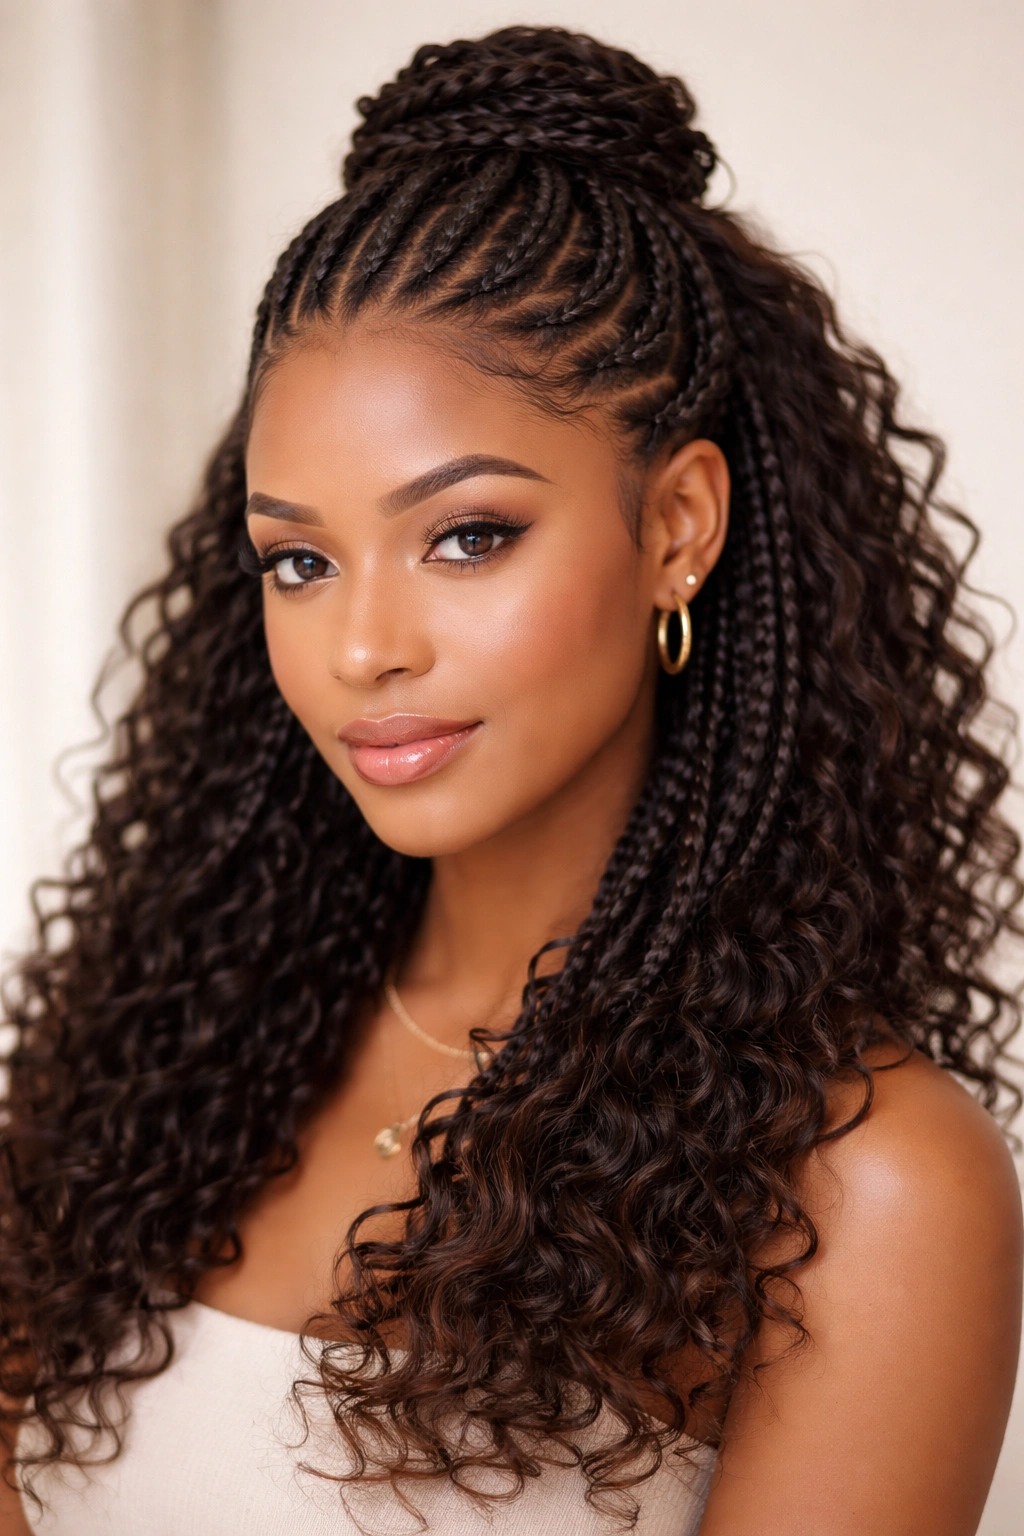
7. Cornrow-Inspired Knotless Half-Up Crown
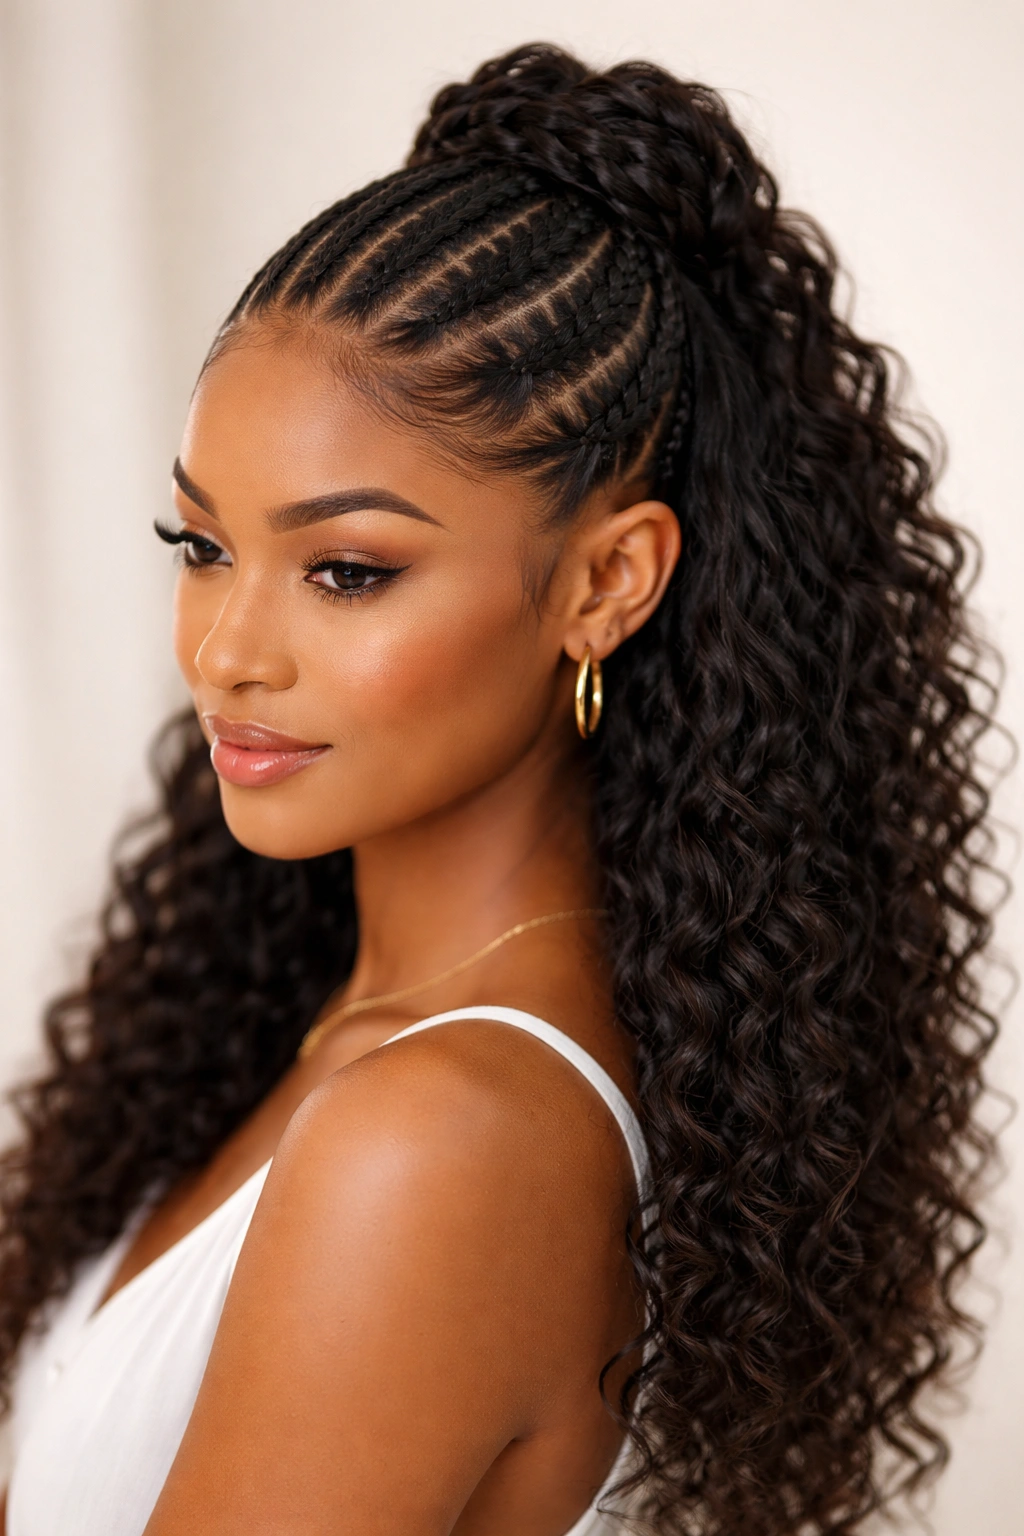
This style takes the sleekness and control of cornrows and reimagines it with knotless braiding and a half-up silhouette. You create 3-5 knotless braids that follow the natural contours of your scalp, starting from your hairline and traveling toward the crown, where they’re secured and anchored while the back section remains down. The result looks neat, defined, and polished — perfect for work, workouts, or anytime you want to look put-together. Unlike traditional cornrows, knotless braids don’t pull as tightly, which means you can wear this style comfortably for extended periods.
The Protective Benefit
Cornrow-style braids are inherently protective because they start from your most delicate areas — your edges and hairline — and gently guide hair back. The knotless feed-in method distributes the tension that would typically concentrate at the base, making this one of the gentlest half-up styles you can wear. Your edges get a break from constant styling and manipulation, which over time means healthier, stronger hairline.
Execution Method
- Section your hair into 3-5 parts depending on desired thickness and coverage
- Create a knotless braid in each section, starting from the front (hairline area) and traveling back toward the crown
- Angle each braid slightly inward as you move back, following your scalp’s natural contours
- Secure all braids together at the crown using bobby pins and a small elastic
- Smooth down any baby hairs along your hairline using edge control
- Leave the back section of hair down in your natural curl pattern
- Apply a curl-defining cream or mousse to the loose section to enhance texture
- Finish with a flexible hold hairspray for all-day security
Worth knowing: This style is particularly great before bed — you can wrap the loose section gently and wake up with defined curls that haven’t been flattened overnight.
8. Asymmetrical Side Sweep Knotless Braid

Want something dramatic and directional? This asymmetrical style features knotless braids that all sweep dramatically to one side, starting from the opposite temple and traveling across the top and back of your head before being secured. Everything stays on one side of your head, creating an edgy, fashion-forward silhouette that looks intentional and bold. Your hair stays half-up and half-down, but the asymmetry is the statement maker here. This works beautifully if you have shorter hair on one side or prefer to show off an undercut.
Why Asymmetry Flatters Curly Hair
Asymmetrical styles add visual interest and movement, which complements the natural texture and volume of curly hair. Rather than trying to create perfect symmetry (which can look overly formal on textured hair), you’re leaning into natural flow and movement. The one-sided sweep also creates the illusion of shape and face-framing without actually cutting your hair — it’s a styling trick that makes you look intentional.
Styling Instructions
- Create a deep side part, with more hair on one side than the other
- Section the smaller side into 2-3 thin knotless braids
- Braid each section, starting from near your part and traveling toward the back
- Angle all the braids in the same direction — toward the larger side of your head
- Secure all braids together on the heavier side using bobby pins
- Ensure the braids are positioned behind your ear and don’t cover your face
- Leave the larger bottom section of hair down and curly
- Add texture to your loose section with a curling iron or curl cream for dimension
- Consider a bold eyeliner or statement earring on the exposed side to complete the look
Something cool: This style actually looks better slightly imperfect — gently pulling and loosening the braids creates movement and makes them blend beautifully with your curls rather than looking too rigid.
9. Wrap-Around Braid with Loose Top Knot
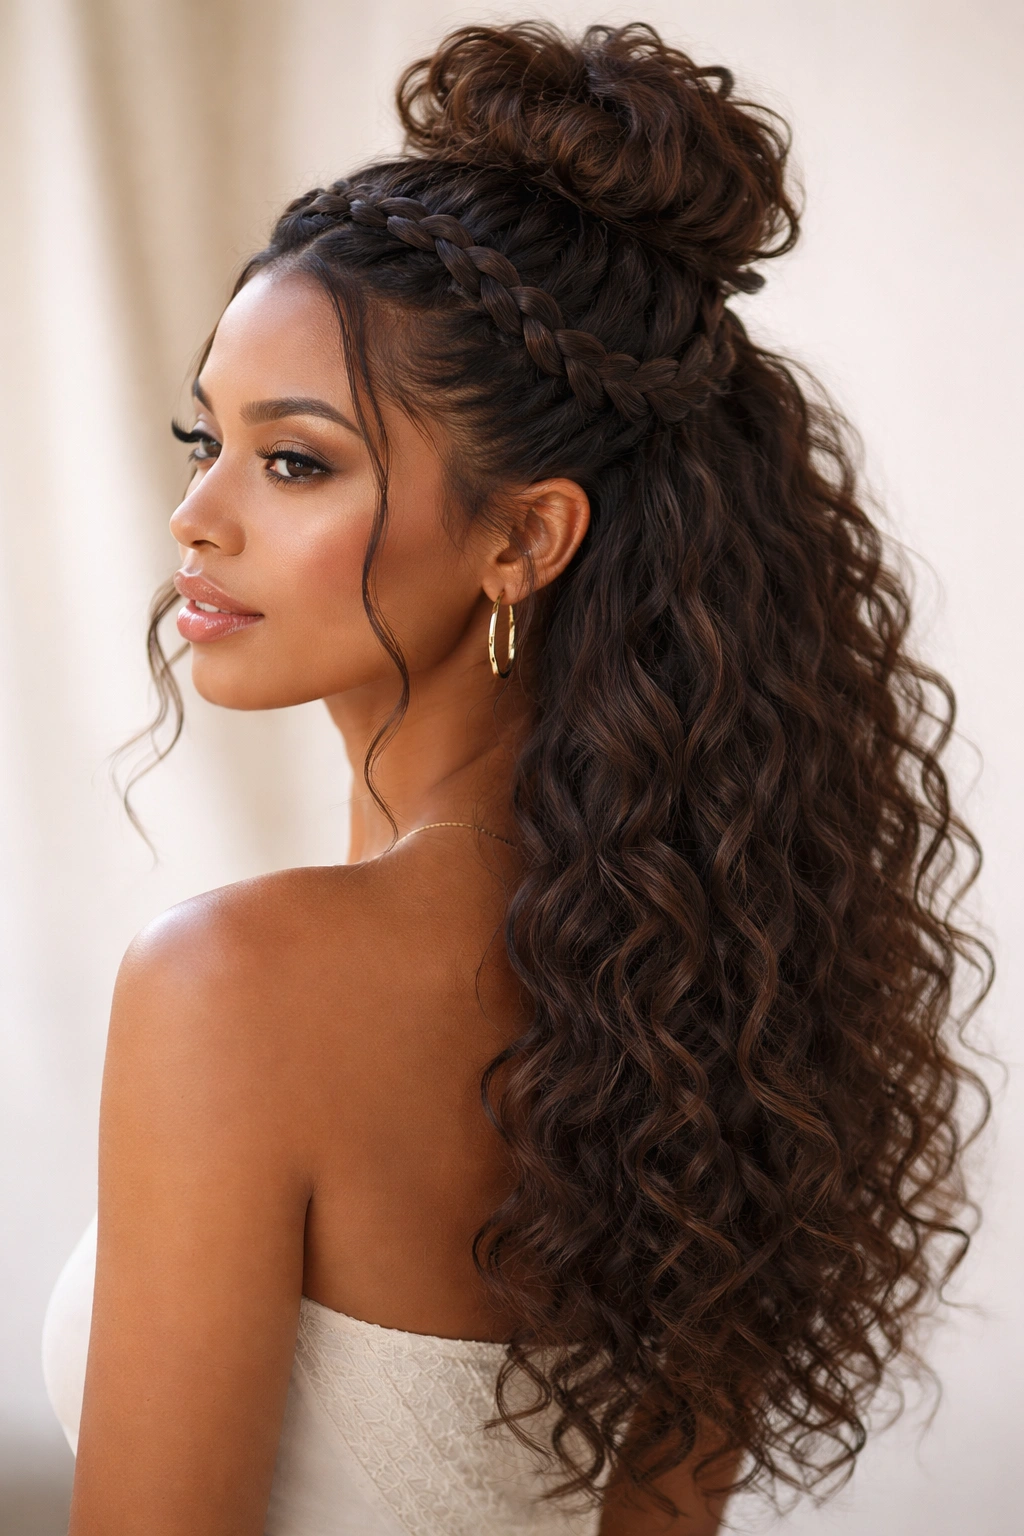
This romantic, ethereal style features a single thick knotless braid that wraps around the back of your head like a crown, holding up a loose, voluminous top knot while the rest of your hair flows down. It’s half-up in the technical sense, but it feels soft and romantic rather than structured. The braid itself becomes a design element, and it actually does the work of supporting the knot while looking like pure decoration. This is perfect for date night, celebrations, or anytime you want to feel feminine and effortless.
Perfect for Curly Hair Romanticism
Curly hair has an inherent romantic quality, and this style enhances that. The combination of the structured braid and the soft, voluminous knot creates contrast and visual interest. Because you’re using a single braid instead of multiple tight sections, there’s less tension on your scalp while still having enough support to hold your style. Your curls can be as wild and textured as you want in that loose top knot — the braid actually looks better when it contrasts with softness.
How to Install
- Apply a mousse or cream to damp hair and allow curls to air-dry to about 60% moisture
- Gather the top section of your hair (roughly the top third) into a loose, high ponytail at the crown
- Tease this ponytail gently with a brush to create volume and texture
- Twist or loosely braid this teased section to create a soft knot shape
- Pin the knot in place using bobby pins inserted throughout
- Leave the bottom two-thirds of your hair down
- Create a thick knotless braid starting from one side of your head
- Braid it across the back of your head, underneath the knot, ending at the other side
- Secure both ends of the braid with bobby pins, anchoring them to the knot
- Gently pull and fluff both the knot and the braid to create softness and dimension
- Finish with a light hairspray
Pro tip: Using a hair ribbon or silk thread woven through the wrap-around braid elevates the look instantly and adds color coordination to match your outfit.
10. Feed-In Braid Crown with Twisted Sides
Imagine a thicker knotless braid that travels from one ear, across the top of your head like a crown, and ends at the other ear — while the rest of your hair stays completely down and textured. To make it even more dimensional, you create a twisted section on each side that feeds into the main crown braid, adding complexity and visual depth. This style is elegant enough for upscale events but comfortable enough for everyday wear, and it works across all curl types because the crown frame is so flattering.
Why This Elevation Works
The crown braid is inherently flattering because it frames your face and adds height. Adding the twisted sides creates a more complex, intentional look that reads as “I put effort into this” without actually being overly complicated. The combination of twisted and braided textures creates visual interest, making the style feel more dynamic and less monotonous. Because everything is feed-in style knotless braid, the entire crown sits gently on your head with minimal tension.
Detailed Steps
- Part your hair from temple to temple across the top, clipping the back section out of the way
- Take a small section from the right temple and begin a two-strand twist
- Add hair gradually as you twist toward the back-right area (twisting, not braiding)
- When you reach about the back-right area, incorporate this twisted section into your main crown braid
- Starting at the front-right, begin a thick knotless braid that feeds in the twisted section
- Braid this toward the back of your head, maintaining even thickness
- As you approach the left side, incorporate a left-side twisted section that you’ve created to mirror the right
- Braid all the way to the left temple and secure with a small elastic
- Leave all hair below the temple-to-temple parting down in natural curls
- Apply curl cream to the loose section and allow curls to set
Worth knowing: This style stays secure longer if you gently bobby pin the crown braid to the hair underneath in 2-3 spots — it prevents any shifting or loosening as you move throughout your day.
11. Chunky Knotless Braids Half-Up with Bead Details
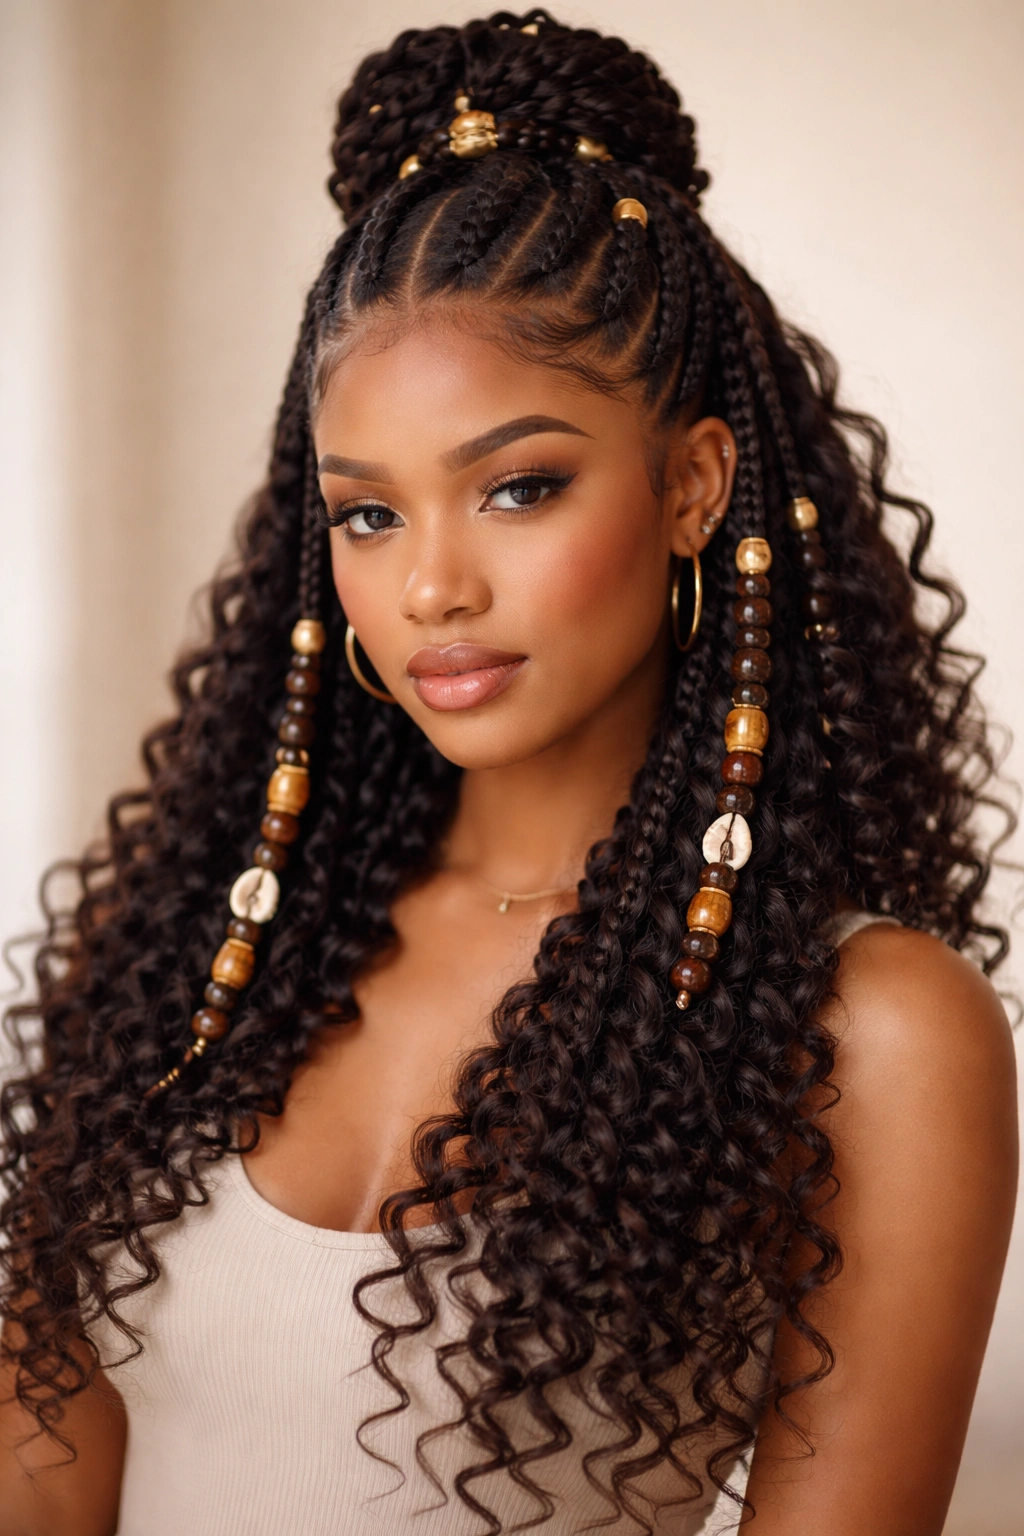
For a bold, statement-making look, use fewer but much thicker knotless braids — typically just 3-4 of them. You create these substantial braids, pull the top portions up and secure them into a half-up style, and embellish them with beads, cuffs, and wraps. The thickness of the braids makes a visual impact, and the beads add cultural significance, personal expression, and extra visual interest. This is the style for people who want their hair to be impossible to ignore.
The Impact of Chunky Braids
Thicker braids cover more area with fewer sections, which means less installation time and less overall tension distributed across more points on your scalp. They also make a statement visually — they’re bold, they’re beautiful, and they demand to be seen. When you add beads and cuffs, you’re creating a personalized work of art that reflects your style and personality. This style works wonderfully on all curl types because the braids themselves provide enough visual structure that any curl pattern looks intentional.
Installation Breakdown
- Divide your hair into 3-4 large sections depending on your hair density and desired final look
- Create a thick knotless braid in each section, ensuring even thickness throughout
- These braids should be noticeably thick — about ¾ to 1 inch in diameter
- Gather the top portions of all braids and pull them up to the crown
- Secure using a large claw clip or by wrapping with coordinating thread
- Space the beads intentionally — cluster them in some areas, space them out in others
- Slide beads onto each braid at various heights using curved bead threaders
- Consider mixing metal tones, colors, and bead shapes for visual complexity
- Leave the bottom portions of the braids (below the half-up line) down and flowing
- Finish with a flexible hold spray to smooth flyaways
Real talk: The weight of chunky braids with beads means this style is beautiful for 3-4 weeks but does create more tension over time, so if you have sensitive scalp or edges, you might rotate this with lighter styles.
12. Waterfall Knotless Braid Half-Up Hybrid
This intricate style combines the elegance of waterfall braids with the protective benefits of knotless braiding. You create a braid that starts at one temple, travels back toward the crown, and releases sections of hair as it goes — creating that “waterfall” effect where strands flow freely while the main braid continues. The released sections create a cascade of curls that frame your face and flow down your back, while the main braid is secured at the back in a half-up style. This is the most romantic and ethereal of all the options, perfect for when you want to feel like the main character.
The Romantic Technical Details
The waterfall effect works beautifully with curly hair because the released sections curl and coil naturally, creating dimension and movement that wouldn’t exist with straight hair. Unlike traditional waterfall braids that can look flat on textured hair, using the knotless feed-in technique makes the main braid visible and dimensional even while other sections flow freely. You’re creating multiple visual layers — the braid, the cascading curls, and the loose bottom section.
How to Master This
- Start with curls that have texture and definition — apply a curl cream before styling
- Begin a knotless braid at your right temple, feeding in hair as you braid toward the back
- After incorporating 3-4 strands, release one section and allow it to flow freely
- Continue braiding with new hair, release another section, and repeat this pattern
- Each time you release a section, the hair falls in a cascade down the side of your head
- Continue this pattern all the way to the back-center of your head
- Secure the main braid at the back with a small elastic
- If desired, create a matching braid on the left side following the same waterfall pattern
- Leave all remaining hair down in your natural curls
- Use a curl-enhancing gel on the loose sections to make them pop
- Gently scrunch curls to encourage definition and volume
Pro tip: Practice this on a friend or mannequin head first — the release-and-continue pattern takes a few tries to get the spacing right, but once you understand the rhythm, it becomes meditative and enjoyable.
Final Thoughts
Knotless braid half-up half-down styles are genuinely one of the most versatile, beautiful, and protective styling options available for curly hair. Whether you choose something sleek and simple like the center braids or go full glam with the waterfall cascade, you’re making a style choice that respects your hair’s health while celebrating its natural texture. The variety available means you can change it up based on your mood, the occasion, or simply because you feel like trying something new — and each style will last weeks, giving you protection and convenience alongside beauty.
The real power of these styles is in how they work with curly hair rather than against it. You’re not trying to tame your curls or hide them — you’re framing them, protecting them, and letting them shine. Because knotless braids distribute tension more evenly than traditional braids, you can wear them with confidence, knowing you’re making a healthy choice for your hair. Start with the style that speaks to you most, give yourself permission to mess up a few times while you’re learning (that’s completely normal), and then experiment. Your curly hair deserves to be styled in ways that feel good, look beautiful, and keep it strong.